Among folk craftsmen, one of the most common homemade products is a belt grinder, which is commonly called a grinder, sander.
Making the necessary parts and assembling a grinder with your own hands is generally not difficult, especially for those who have certain design skills and have the necessary tools and equipment. Depending on the goals of the home craftsman, as well as the volume and duration of grinding work, the sizes, design and materials from which a homemade grinder is made can be very diverse.
Some create machines that are practically no different from factory ones, using milled parts or a complex metal profile. Others use wood and plywood to make the frame and rollers.
In addition, on the Internet you can find many video clips in which the authors demonstrate their grinder made from scrap metal and the remains of various materials stored in the yard or workshop. In fact, what the grinder frame is made of does not matter very much.
The main thing is that it is strong enough, and the rollers are located in the same plane, have free rotation and are securely fixed. The maximum number of revolutions of the grinder drive is also very important, since its main technological parameter—the linear speed of the grinding belt—depends on this.
The parts and components necessary for this device can be made with your own hands or purchased ready-made.
Schematic diagram of the grinder design
The Internet contains many images of 3D models, drawings, sketches and even assembly drawings of grinders of various designs. Each of them has its own characteristics, but in principle they all consist of several main components (see figure below):
- Drive with electric motor.
- The bed is on a stable base.
- Drive pulley.
- Tension roller with tension adjustment mechanism.
- Guide rollers (usually one or two).
- Device for moving and tilting guide rollers.
- Support table.
Grinder diagram
Before you start designing your grinder, you need to decide on the range of lengths of sanding belts that you plan to use. Both the overall size and layout of the future machine, as well as the characteristics of the tension mechanism and the device for moving the guide rollers, depend on this parameter.
The length of the tape used is equal to the sum of the center distances, adjusted for the dimensions of the pulley and rollers, and must take into account the strokes of the adjustment and tension mechanisms.
One of the key points when designing a grinder is calculating the linear speed of the grinding belt, which directly depends on the engine speed and the diameter of the drive pulley.
When grinding various materials, it is necessary to take into account that each of them has its own physical characteristics and therefore must be processed at a certain speed. The maximum grinding speeds for the most common materials are approximately equal (or close), but the lower limits vary significantly (indicators in m/s):
- hardwood and plywood - 15÷30;
- varnish coatings - 5÷15;
- soft and coniferous wood - 12÷20;
- carbon steel products - 25÷30;
- plastics - 10÷20.
When making a grinder with your own hands, as a rule, old electric motors from household appliances are used (most often from sewing and washing machines), or hand-held power tools (drills and grinders) are used as a drive.
That is, the home master is limited in advance in choosing the engine rotation speed, so for him the main design parameter in the design of his machine is the diameter of the drive pulley, on which the linear speed of the sanding belt directly depends.
VIEW Grinder pulleys on AliExpress → The diameter of the drive pulley (in mm) is calculated using the following formula:
Here V is the required speed of the abrasive belt in m/s, and N is the rotation speed of the drive pulley in rpm. Below is a table of the dependence of linear speed on this diameter.
When using your own electric motor to reduce or increase the rotation speed, you can make a drive with a belt drive and pulleys of appropriate diameters.
For range control, a stepped pulley is usually used or several replaceable pulleys are made. But the best choice for these purposes is a frequency regulator, the description and diagrams of which can be easily found on the Internet.
If the drive is a power tool, then perhaps the most suitable option would be a simple electronic controller. Such a device is inexpensive - 500–800 rubles, but along with the speed it significantly reduces power.
Design Features
Before you begin selecting materials and components, it is important to understand the operating principle of the device.
Important! Some grinder parts will have to be purchased ready-made. Perhaps turn to the services of a turner.
There is nothing complicated in the design of the grinder from the mechanical side. It is important to determine the power of the unit and find components. In fact, the main element of the design is the motor and drive, which supplies torque to the rollers that rotate the belt. All elements can be made from metal, plywood, or even plastic. The photo shows a drawing of the grinder with dimensions.
Grinder device in the drawing
Let's look at the principle of operation of the grinder. With the help of a motor, a group of rollers is driven, one of which is the main one, or leading, the others are secondary. After turning on the device, the sanding belt begins to move. Using the regulators, you can shift the position of the rollers, which allows you to adjust the depth of tension and grinding and also its angle.
So, the main elements of the grinder are:
- Base.
- Electric motor.
- Straight roller with pulley.
- Tension rollers.
- Abrasive tape.
- Rack.
In addition, the design includes a rotating clamping mechanism.
Main components of the grinder
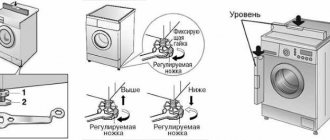
The unit, as we have already said, can be either manual or stationary. The design of a stationary device includes elements such as a rotary table with clamps, which is usually mounted on a workbench or stationary frame. The table can change the angle of inclination, rotate along its axis, and in some models – perpendicularly.
The motor is driven either by a foot drive or by a drive motor that is attached directly to the tool on the frame. An old drill, grinder, or washing machine engine can serve as the “heart” of the grinder. The main thing is to ensure the necessary speed, which will allow you to process exactly those surfaces that you need.
Interesting fact! The power of the machine depends on the design of the belt mechanism and the volume of workpieces that you plan to process. The longer the sanding belt, the stronger the motor needs to be installed.
It is clear that over time the tension force of the tape may weaken; for this, options are provided for adjusting the tension system. This may be a spring clamp, and in some cases a regular bolt will help to adjust the height and angle of the rollers relative to each other.
Important! The rollers in the grinder must be installed strictly vertically relative to each other. Any change in the position of the rollers may cause the belt to break.
When thinking through the design, determine in advance how the work area will be cleaned of dust and eye protection. Typically, a folding acrylic glass or a stationary vacuum cleaner is used. You can see the design of this piece of equipment in industrial grinders.
Advice! Before deciding on the size of the belt and the width of the rollers, figure out for yourself what surfaces you plan to process, their dimensions and volume of work.
An example of the correct placement of rollers on a grinder
As we have already noted above, the issue of choosing a belt for a grinder is one of the most important. The speed and quality of surface treatment will depend on this. It is well known that sanding belts for grinders vary in length, width and degree of hardness (grain). Most often, the following tape sizes are used in machines of this type: 610, 915, 1230, 1600, 1830 mm in length, in width there are only two options -50 and 100 mm, however, experienced craftsmen can cut a tape of any width.
Important rules for choosing a belt for a grinder:
- The bottom fabric must be elastic in its structure. The fabric base better withstands surface tension.
- must withstand maximum angular speeds - at least 1500 rpm;
- the abrasive coating must be of high quality. Selected according to the material;
- the tensile strength must be at least 15%;
- the tape must be resistant to possible heating, which often occurs during long-term operation.
To make a homemade grinder, the master will use the soleplate of an old belt sander. This is convenient because you can buy ready-made sanding belts instead of gluing them yourself.
The transmission mechanism will be the belts and rollers of the vehicle's auxiliary drive system. Please note that the timing belt is toothed, but in this case the technician will use the smooth side of the belt rather than the toothed one.
First of all, the author makes the drive pulley. And for this he uses 20 mm thick plywood. We make markings and cut out a circle of the required diameter with a jigsaw. Then you need to drill a hole in it.
READ MORE: TOP 15: Best wireless headphones
The pulley will need to be mounted on the electric motor shaft; the author uses glue to fix it. Then you will need to connect the speed controller.
The diameter of the plywood pulley turned out to be a little large, and therefore the author grinds off the excess using a carpenter's cutter. As a result, the diameter was reduced to 70 mm, and runout was reduced to a minimum.
A homemade grinder is characterized by a special design in which the soleplate from an old belt sander will be used. This solution makes further operation of the machine convenient and low-cost. This is explained by the possibility of using ready-made sanding belts and the absence of the need to apply them yourself.
The desktop is used as a basis. Its design can be changed at the request of the user, who will focus on the goals and the desired result. Grinders can be screwed to the floor, which makes the machine more stable, although it deprives it of such an important quality as mobility. But in this case, the grinder will not move or vibrate during operation. You can also add wheels to the table, making it easy to move around the workshop.
The beauty of a homemade grinder is the ability to change the design at your own discretion, add structural elements or remove what is not useful in further work. In any case, before starting work on creating a grinder, it is necessary to think through the drawings of the future machine. It will be much easier to make adjustments on paper than during the process of creating the installation.
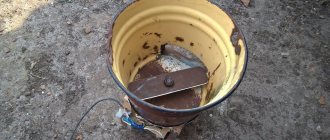
Homemade grinder with a washing machine engine
With a drive pulley size of 70÷100 mm, the motor for the grinder must spin up to at least 3000 rpm.
According to their characteristics, asynchronous electric motors from old automatic washing machines with a power of at least 300 W meet this requirement (albeit not fully). These are quite simple, reliable and unpretentious devices, which are one of the most common used electric motors. Their output shaft has a threaded connection onto which a pulley to drive the grinder can be easily attached.
When using commutator motors from next-generation washing machines, you cannot do without a separate speed controller, since their rotation speed usually lies in the range from 11 to 18 thousand revolutions per minute.
These compact and powerful devices have their drawback: with constant use under load, their brushes quickly wear out.
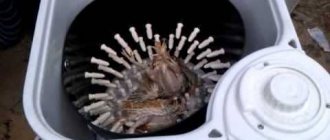
In the video (see below), a folk craftsman demonstrates a self-made grinder with a motor from a washing machine, a convenient tensioning device, an electronic speed controller and rollers on bearings with a diameter of 65 mm (a tension roller from a Gazelle).
The result is a completely workable option with a high-quality and functional support table, which rotates ninety degrees and moves along guides.
Rollers for grinder
This is probably the most difficult part of the job. As a rule, four rollers are made for a conventional draw frame. With sizes from 60 to 160 millimeters. The rollers are made of metal, steel or titanium are best. The size of the rollers depends on the size of the abrasive belt. The structure itself is made of metal or wood. The main thing is to ensure good fastening of the rollers to the working base. The rollers themselves should have a “barrel” shape, so they hold the tape better. In this case, it is advisable to create a drawing. It is possible that you will turn to turners for help. To achieve reliable and high-quality operation of the grinder, do not skimp on the production of rollers.
We looked at how to make a grinder yourself using different types of drives. Many drawings are designed for a specific task, but it is not a fact that they will suit you. You can purchase components at hardware stores or make them yourself. When working with a grinder, follow safety precautions. When manufacturing some parts, such as rollers, you should not skimp on them. Sometimes it is better to order them from professionals.
How to make a grinder from a drill
The need for polishing wood and metal products does not arise very rarely.
But buying a factory grinder, as a rule, is not economically viable, and making a stationary installation for small volumes of occasional work seems impractical. Therefore, craftsmen quite often use simple in design versions of grinders driven by hand-held power tools. They are usually made from scrap materials, which often include wood, plastic and plywood.
Making a grinder from a drill
This grinder is easy to make with your own hands, even at home. Moreover, when grinding small products made of wood or plastic, such a device is in no way inferior in its characteristics to a stationary grinder.
There should also be no problems with selecting the grinding speed, since most modern drills have a built-in regulator (in extreme cases, you can use an external dimmer).
In addition, such a grinder is very simple in its design, so it can be assembled and disassembled as needed.
Grinder designed for drill
This installation is a special attachment.
We will need the following tools and materials:
- Metal sheet.
- Bearings.
- Shaft with gears.
- Abrasive tape.
We cut out two plates measuring 110×250 millimeters from a metal sheet. We drill several holes in the plates. On the studs we cut a thread of 120 millimeters. We attach the rollers to the studs and secure them with bolts.
We stretch the abrasive tape between the metal plates. We install the homemade product on the frame, and secure the drill with clamps.
Using this grinder you can sharpen knives or other flat products.
Do-it-yourself grinder from an angle grinder
VIEW Manual belt grinder on AliExpress →
A stationary grinder made from an angle grinder is used in the same cases as belt grinders made from a drill, i.e. when it is necessary to perform small occasional work that does not require special quality. But at the same time, the grinder has its own characteristic features, which include a very high drive rotation speed.
Therefore, when using it, a speed controller may be required. Very often, this power tool is used as part of “electric files”: narrow and long belt-grinding attachments for an angle grinder, which are used to process hard-to-reach places, as well as small holes and openings (see photo below).
Grinder from grinder
The main design difference between an angle grinder and other types of power tools is that its output shaft is turned at an angle of 90º to the axis of the electric motor and, accordingly, to the housing.
For this reason, it is called an angle grinder. This feature is perfect for longitudinal fastening of the drive roller and the “electric file” blade.
The result is a tool that is elongated in a line and very comfortable to use. The same attachment for a drill is located at a right angle to the body, which is quite inconvenient for work.
Making a grinder from Chapai
Grinders “By Chapay” (trademark ByChapay©) enjoy absolute authority among specialists for their thoughtful design, functional versatility and high quality workmanship.
The family of these machines was developed by Andrey Chapai, an engineer and entrepreneur from Kovrov, who died at the beginning of 2021. Today his wife continues to produce and sell them.
Grinder from Chapai
From a technological point of view, the “Ot Chapaya” grinders are an example of a mechanism thought out in every detail. These devices have a rotating frame, the ability to tilt the belt, adjust the working height, and are also equipped with various devices: a pressure table, contouring rollers, a grinding wheel, etc.
It is impossible to make such a machine with your own hands without the use of special equipment. As a rule, craftsmen who make grinders of this class borrow design solutions from Chapai, and also copy the general layout and individual elements.
But they have to order most of the parts from factories with equipment for cutting thick metal, milling and turning.
VIEW Stationary grinder on AliExpress →