Installation of toilet installation.
The installation for wall-hung plumbing aesthetically hides all water communications behind a false wall, leaving only the toilet bowl and a panel of buttons outside. The design saves the size of the room; the external decoration of the device can decorate its design. Installation of the toilet installation has features depending on the type of device. The most common installation models are up to 50 centimeters wide, 15 to 30 centimeters deep, the average height of the structure is 80 centimeters, which is suitable for a person of average height. You can find installations one and a half meters high.
What is installation
The installation is a structure for attaching suspended plumbing fixtures in a bathroom.
The design serves for:
- support the entrance to the sewer.
- to support the water pipe inlet.
- for attaching the tank.
The installation not only visually increases the space, but also facilitates the process of cleaning under the toilet. Before installation, it is necessary to take into account that the wall to which the installation is attached will increase in volume to 25 centimeters. The tank for this system is made of high quality plastic, because the design requires strength and long service life. After installing the installation, access to the plumbing will be limited by a false wall; repairs and control of the pipes and cistern will be carried out through the flush panel.
Important! Repairing and replacing plumbing structures will involve complex work. Such as cleaning the tiles, dismantling the tank, then installing it again. Therefore, for this system it is worth immediately choosing devices with high reliability and durability.
Installation for a toilet from which company to choose?
This market is divided by various companies that compete for buyers with unique design models and practical adaptations in plumbing products.
The most famous representatives of the segment are:
1. Cersanit
2.Grohe
3. Geberit
4. Vidima
5. AlcaPlast
The company with the dolphin logo on all its products belongs to the Polish brand, which is the Cersanit Joint Stock Company. Its activities began in 1998, and the main specification is ceramic products and components for their installation.
Grohe is a more well-known corporation headquartered in Düsseldorf, which first appeared on the plumbing market back in 1936. German quality is manifested in high precision and reliable operation of shut-off valves, mixers and other accessories. Products are developed not only for the private needs of retail customers, but also for commercial use for large construction companies. In the global plumbing market, this company represents 8% of all available products.
Geberit has its roots in Switzerland and has been introducing new technologies into cleaning systems for over 100 years. Today the company has 17 production facilities located in Germany, Italy, Switzerland, Austria, USA, China and Slovenia.
Vidima and AlcaPlast are Bulgarian and Czech companies that are popular due to their affordable prices and interesting range of sanitary products.
Available width and height of the structure
Before purchasing an installation, you need to select the correct size of the structure for the room. Depth is considered the most important value when choosing plumbing fixtures.
The depth is affected by the type of construction:
- for a block system the parameter reaches 10-15 centimeters.
- for a frame structure the parameter is 15-30 centimeters.
The distance from the toilet to the opposite wall or door must be at least 60 centimeters. If there is a solid wall, it is better to install a block installation, which will save up to fifteen centimeters of space in front of the bathroom.
Attention! The block design will actually increase the free meters of the toilet room. It also costs less than a frame one.
The design of small thickness has a flat tank, which is no more than 90 centimeters thick. Most often you can find a tank width of 50 centimeters, which means that the entire system has a width of no more than 60 centimeters.
Common design sizes:
- The block type has a height of 80 centimeters to 1 meter, the frame type reaches from a meter to 1.4 meters.
- The pipe connecting the sewer outlet to the plumbing should be located twenty centimeters from the floor covering.
- Fasteners where pins are installed for hanging the device are usually mounted at a distance of 32 centimeters from the floor. These parameters can be adjusted by twisting the legs.
- The fastening axes should be located at a distance of 23 or 18 centimeters from each other.
Having this height and width of the installation, the toilet is installed 30 centimeters from the floor, which is convenient for all family members.
The toilet itself has the usual dimensions:
- width from 30 to 40 centimeters.
- height from 30 to 40 centimeters.
- The mini model has a length of 54 centimeters, the standard model has a length of 55-60 centimeters, the model reaches a maximum of 70 centimeters.
Installation height of wall-hung toilet
At what height should I install a wall-hung toilet? Of course, this question is of great interest to the owners, since if everything is more or less clear with the floor structure, then how to choose this size in a hanging model? If there are young children in the family, then this fact must be taken into account when selecting the height.
The maximum height from the bowl to the floor, which is also standard, is from 40 to 43 cm. This parameter is recommended by SNiP as optimal for an adult and the most comfortable, including for families with children. Reducing or increasing height is only advisable if the majority of family members are below or above average height. In this case, during installation, you can select the required level, but you should remember that it will be possible to change it only by disassembling the entire structure, that is, by starting the repair again.
Types of installation devices
Different types of installations have different designs and parameters (height, depth).
Three types of installation:
- block
- frame
- corner
There are installations that are suitable only for specific plumbing fixtures, along with them there are universal models. There is a corner type of installation, which is less common than other types, but the design is indispensable for rooms with small dimensions.
- Block type. The device has a toilet and a built-in module. The device is attached to the wall or floor, and the module is hidden behind a false wall. The drain tank is suspended or walled up with bricks, cement, or hidden behind a partition made of plastic or plasterboard. Distinctive features of the model:
- a flat-shaped tank whose thickness is less than its width and height.
non-standard fasteners.
- Frame type. The frame for the frame system is a frame consisting of a durable steel material, coated on top with a special anti-corrosion solution. Sometimes structural elements are welded together to increase strength. The frame can withstand the weight loads placed on the toilet. Attention! The frame structure can be installed anywhere in the room if it is possible to connect sewer and water pipes. Frame-type installations come in two types. Some are designed for one type of plumbing fixture, for example, a toilet or bidet. Others are mounted with various plumbing fixtures. Frame-shaped structures are installed free-standing on fixed legs. Such systems are suitable even for walls made of plasterboard material. Types of fastening system:
- The frame is mounted on the wall using 4 fastening elements.
- the frame is attached to the floor covering, this system is equipped with additional supports.
- the structure is attached at 4 points: two to the floor, two in the wall.
- Angular type. For ease of placement in small spaces, we created a system that is mounted in the corner of the bathroom. This design is mounted on the wall; installation will be more expensive than other types of installation.
The block type is cheaper than the frame type, has a shallow depth, and can only be mounted to a load-bearing wall. It differs from the standard toilet model (not wall-hung) in that the tank is hidden from others. For the structure, it is best to prepare a niche in the wall. This type is suitable for low-budget installation or, if necessary, to leave access to communications.
Attention! Only a solid wall is suitable for installing a block system. If this is not possible, then it is better to choose another type of installation.
The advantages include:
- economical small design size.
- enlargement of the room, because the central place of the bathroom remains free.
- The installation height varies at will within 40 millimeters.
- The toilet can be mounted simultaneously with a bidet or sink.
- The material of the toilet bowl is made of very durable material, they do not break under extreme loads, the structure can withstand about 500 kilograms of weight.
Reference! The corner type is suitable for installation in joint rooms for a bath and toilet. If you install such a structure in a regular bathroom, then the model, on the contrary, will reduce the perception of a large space.
Useful tips
Let us allow ourselves to give the reader some advice on the selection and installation of the plumbing fixtures that interest us.
Like floor-mounted, wall-hung toilets can be made from different materials. Let's try to evaluate them.
Polished stainless steel is virtually stain-free due to its exceptionally smooth surface. If deposits still remain on it, they can be easily removed using any household chemical.
Why does stainless steel occupy a much smaller market share than competing solutions?
- Somewhat official-looking steel plumbing fixtures. It has become familiar as anti-vandal equipment for public toilets and evokes corresponding associations among most potential buyers.
- In addition, the price of stainless steel toilets is much higher than that of ceramic analogues, and starts from about 20,000 rubles.
Glass is not much inferior to stainless steel in practicality; however, looking through the translucent walls at what remains on the walls of the bowl below the water level is a rather dubious pleasure.
Sediment and dirt will be too visible in a glass toilet.
The main problem of polymer concrete is its limited resistance to aggressive cleaning agents and scratches. Removing urinary stone and lime deposits from it without disturbing the appearance of the surface is a non-trivial task.
The main value of sanitary ware is its low cost. That is why it is the undoubted leader in the plumbing market. The disadvantage is that its large-porous surface actively collects dirt and often needs cleaning.
Glazed faience, thanks to its glassy coating, is much more resistant to stains and is easier to find, practically no different in cost from material without glaze.
A set of necessary tools
A block or frame installation is installed before finishing work in the bathroom. Installation work is not complicated and does not require extensive knowledge in the field of plumbing. To get started, you need to disassemble the existing instructions and study installation master classes. The tools needed for installation are usually found in every home.
For the installation process you must have:
- tape measure to take measurements.
- pencil or pen.
- building level.
- hammer drill with a set of drills for concrete.
- silicone sealant.
- FUM tape.
- open-end wrenches of different sizes.
Step-by-step instructions for installing a toilet
After choosing the appropriate type of installation and marking the height, width and other parameters, you can begin installation. Preliminary work includes leveling the floor. If you plan to install a block installation, you will also need to level the walls. As mentioned above, when installing this type, it is necessary to have a solid wall, because a regular partition will not support the entire weight of the product.
The next step is to choose the location of the toilet installation; it should be suitable taking into account the height and depth of the installation. After this, it is necessary to install communications: sewerage and water supply. The pipes must be positioned so that they are close to the installation site.
Required tools:
- drill with drill bits for concrete;
- FUM tape;
- adjustable wrench;
- hammer;
- screwdriver;
- core;
- corrugated pipe for sewerage;
- building level;
- double plasterboard, but it must be of increased water resistance.
Let's look at the installation procedure using the example of a frame installation.
Attaching the frame to the floor
Algorithm of actions:
- Pre-installation of the frame, checking the height and horizontal placement by the building level.
- Using a marker or pencil, mark the points where the frame will be attached. You should focus on ready-made holes in the installation.
- Move the steel frame aside and make holes for fastening at the points marked in the previous step. If installation is carried out in a concrete wall, in most cases dowels with a hex key are used.
- The frame is installed in place, and fasteners are screwed into the created holes.
As a rule, the installation has a height that can be adjusted. It is necessary to calculate the height from the level of the finished floor, i.e. from the level of the floor covering. If at the time of installation the coating has not yet been laid, then its approximate height is taken into account and added to the installation height of the toilet.
Watch the video
If the value needs to be adjusted, the bolts are loosened. At the stage of changing the height, you should definitely check the even horizontal position of the product using a level.
We attach it to the wall
To secure it to the wall, adjustable bolts are used, which are usually included in the kit. One end of the bolts is fixed to the upper frame corners, and the other is fixed to the wall using specialized dowels.
After this, you need to make sure that the installation is located in a strictly vertical position. The building level must be applied to the racks on the sides, then by rotating the nut on the fastening element, the position of the frame relative to the wall changes.
This alignment procedure is not particularly difficult, but its implementation is of great importance. It is important to align the structure as accurately as possible, checking in several planes.
When the technician carrying out the procedure has made sure that the installation of the toilet installation is carried out smoothly, it is necessary to press the moving element on the fastener. This will fix the screw and securely fasten the product in one position.
We invite you to familiarize yourself with the toilet with the old-style platform
[/sociallocker]
Then you need to connect the pipe, which is fixed on the frame with the sewer outlet. Sometimes the kit includes an elbow for connecting to the sewer pipeline; if it is missing, you must use a corrugated pipe designed for sewer work.
There is another connection option. To do this, a plastic clamp must be placed on the steel frame. It is into this that you need to connect the pipe, which is the outlet of the sewer pipeline. However, in this case it is necessary to know exactly the suitable pipe diameter.
The cold water supply is connected to the cistern through the appropriate pipe. The connection can be made with almost any pipe; the most important thing is to ensure the reliability of the connection. This is required to minimize the risk of joint depressurization and liquid leakage.
It is advisable not to use pipes made of metal-plastic with a press fitting. Such fittings require regular tightening for reliable operation, and due to hidden communications this is quite difficult to do. It is recommended to use copper, polypropylene or polyethylene pipes, the components of which are firmly connected by soldering.
The entrance to the tank and the adapter are connected by a flexible hose. It is recommended to use a branded product, but if this is not possible, any stainless steel plumbing hose will do.
After completing the main part of the toilet installation, finishing work should begin. Once the steel frame is installed, it should be covered with drywall. Typically 2 sheets are required.
First of all, marks of height and other dimensions are applied to the wall, then the profile is mounted at the created points. After this, the plasterboard sheets are installed to the profile.
Before finishing, it is recommended to install a box for the button to prevent the entry of construction debris and dirt. Holes are cut out on the drywall for the flush button, sewer outlet and water supply pipes, for 2 studs on which the toilet bowl is installed. After installing the plasterboard sheets, the tiles are laid.
When the finishing is finished, you need to cut the box for the drain button; its borders should be located approximately at the same level as the tiles. The button will be installed on 2 fasteners. Then you need to connect a cable (for the mechanical version) or a hose (for pneumatics) to the mechanism. Then the button should be installed in place and secured with bolts.
Attaching the toilet to the installation:
- A gasket is mounted, which is pressed onto the studs.
- The holes where the sewerage and water supply are connected are sealed with a silicone product intended for plumbing.
- The structure is installed on studs, then rubber gaskets are installed on them, and the fastenings are tightened.
- Excess parts of the gasket are cut off with a sharp knife.
During the purchasing process, it is advisable to choose only high-quality plumbing fixtures. However, even this will not always prevent breakdown. The main disadvantage of hidden communications is that there is always the possibility of depressurization of the pipe connection, which implies the need for repairs.
Watch the video
If this happens, the apartment owner will not immediately notice the breakdown, and by the time the leak is discovered, water will be able to flood the neighbor’s apartment. If there is no free access to the internal contents, it will be very difficult to repair the system without dismantling the elements.
To minimize the likelihood of such a problem, it is recommended to purchase plumbing fixtures and fasteners only from trusted manufacturers. However, you will have to pay for quality; the cost of models from world-famous manufacturers is quite high.
Professionals also recommend using a pipeline without detachable joints, which can become depressurized. The best choice is polypropylene pipes, the parts of which are heated and connected into a single, non-dismountable structure.
This approach will minimize the risk of leakage. If you still need to use metal-plastic water supply, it is advisable to install press fittings. They are considered the most reliable of all types of fittings.
It is also recommended to take time to select a drain button. There are numerous options on the market to suit any interior design. If you search, you can find a piece that perfectly matches the style of the room. In addition to ordinary mechanical buttons, models with a pneumatic mechanism are sold.
Their difference from mechanical ones is that the action on the drain valve is carried out not with the help of a metal rod, but by changing the air pressure. The advantage of the pneumatic mechanism is that such a button can be installed in any place.
There are also flush buttons that allow you to save water when flushing. They come in these types:
- Dicotyledons - consist of two components. When you press one half, only half of the water is washed off, and when you press the second half, all the water in the tank is drained;
- start/stop mechanism. When you click on the “start” button, the draining begins, and when you click on “stop”, it stops. This approach helps the toilet user decide how much water to flush.
Thus, installation of the installation can be done with your own hands. The procedure is not too complicated; even a beginner in construction can perform it. However, it is important to carefully follow the instructions and recommendations.
Before starting installation, it is advisable to know the height and other dimensions of the wall-hung toilet with installation in order to choose the right place for installation.
Watch the video
Installation of a wall-mounted toilet is carried out with the following tools:
- a set of keys;
- drills for concrete according to the size of the fastener;
- hammer drill;
- building level;
- marker.
How to determine the location for installation
Before purchasing the installation, you need to determine the installation location of the structure. If there is not much space in the room, then it is better to choose a corner type to increase free movement in the room. As a rule, they are installed where the toilet previously stood, because there is no need to reconnect the sewerage system and water supply. This will slow down the installation process.
How to mark for installation
To mark, you need a marker, pen or pencil, and a level with a tape measure. Measurements are carried out taking into account the parameters of the installation structure. To begin with, draw a straight line, which determines the location of the main axis of the structure. Using a tape measure, measure from the wall to the future edge of the system; the distance should be more than 13.5 millimeters. The space for the tank is marked with dashed lines on the wall, and points for attaching the device are marked on the walls and flooring.
Features of height selection
When purchasing a toilet, it is important to consider its height for comfortable use. Even your health can depend on the correct length of plumbing fixtures. Therefore, there are clearly defined height standards for wall-hung and floor-mounted toilets - 40 cm. This is the interval from the floor to the bowl that is suitable for a person of average height.
If we talk about wall-mounted toilets, they can be installed at any height in the range of 20 cm
The dimensions of the equipment are regulated by the relevant SNiP. It controls all plumbing, heating, sewerage in both industrial and residential buildings. When installing a new toilet, you must rely on these standards.
Wall-hung models are those that are installed in the wall rather than on the floor. You can hang them at any level you want. This way, you won't have to rely on the standard plumbing heights chosen by the manufacturers. Hanging plumbing fixtures are located only in the wall and not on the floor. This will save space in the toilet or bathroom.
Height refers to the value that is measured from the floor of the bathroom or toilet to the top of the toilet bowl without the seat. And although most models are of standard height and not everyone will find them comfortable, there are still standards for the level at which toilets are installed.
Models with a bowl height of 35 to 38 cm are considered useful for maintaining a healthy intestine. Since your body is more willing to expel waste when your hips are slightly below your knees, a slightly lower setting may be a better option.
The comfort level is modeled by the average height of the chair, that is, the top of the bowl above the floor should be 40-43 cm. When you add a seat, the size actually increases to 45-48 cm. This distance will make life much easier for taller and older members of your family.
The cistern of a wall-hung toilet is different from a regular one because it is wide and flat. It is attached to a steel frame. The formation of condensation is eliminated by insulating the tank.
The button for draining the water is mounted on the front, in a special cutout. Installing a toilet provides access to repair the tank through this hole, which will allow you to get to the drain fittings without dismantling the casing.
The volume of the tank is no less than usual. Some water drainage devices provide the ability to drain water in portions of different volumes - 3 and 6 liters.
The bowl is the main part of the entire structure: it is in plain sight. It can take different forms:
- square;
- rectangular;
- oval;
- round;
- drop-shaped;
- triangular.
Fixation for installation is carried out using a special set of fasteners. A lid is installed on the bowl.
In order not to spend extra money on a new lid with a microlift, it is advisable to buy a toilet that already includes it. In total, everything will cost less.
The drain tank is mounted in the place intended for it using fasteners. If the frame design is homemade, it is installed at a height of 0.5 m from the bowl.
Then the pipes are laid. Installation must be done as efficiently as possible to avoid leaks.
The toilet outlet is connected to the sewer outlet using corrugation, the connections are sealed, and then the bowl is screwed onto the pins.
After installation work, the toilet is checked for functionality and for leaks. Any deficiencies found should be corrected immediately. If necessary, the installation height of the installation toilet is adjusted.
Installing a wall-hung toilet without installation in Moscow and the Moscow region costs from 1,700 to 3,000 rubles. Installation of a panel with drain buttons from 200 to 600 rubles. Similar work in St. Petersburg will cost from 1,200 to 2,700 rubles; installation of flush buttons in St. Petersburg starts from 180 rubles. Prices vary greatly across regions. For a more accurate cost estimate, use our repair cost estimate form.
How to install a block installation
The block type is attached only to a load-bearing wall, so you need to correctly determine the location for the structure in the room. Next, draw an axis in the center of the system location.
Then perform the following installation work:
- The height parameter for the entire structure is determined and measured; most often, the height of the system is no more than a meter. Make markings for the holes for the dowels to install the devices. Keep alignment on the central axis of the structure. Using a hammer drill, drill the required holes and hammer in the dowels.
- Anchor bolts are screwed into the dowels, and the main elements of the system are screwed onto screws and nuts. Level the structure in the vertical and horizontal direction using a level, plugs, and clamps.
- Hang the tank onto the frame using the fasteners included in the kit.
- Conduct communications. A water supply pipe is connected to the tank, and the outlet to the sewer is attached to the structure using a plastic clamp. All joints are lubricated with sealant.
- The pins are screwed into the prepared holes, couplings are placed on the studs, and the system pipes must match in size. To ensure shock absorption, seal with gaskets, then install the toilet itself, treating all connections with sealant. If necessary, use clamps to secure the drain hose. They conduct a test for the hermetic operation of the system and finish the wall, which hides the pipes of the structure and the tank behind it.
Frame
The installation scheme for a wall-hung toilet provides for a separate and hidden placement of the tank and fixation of the bowl on a steel frame (installation), which, in turn, is attached to the floor and main wall. The installation is installed after the water pipes have been laid and brought out. High-quality installation of a wall-hung toilet primarily depends on the correct installation of the frame.
- The installation is leveled.
- The height of the wall-hung toilet from the floor may be greater if family members are tall. The remaining parameters are selected according to the instructions.
- The frame is attached to the floor and wall with anchor bolts so that the structure is stationary. If necessary, additional fastening is made, which the instructions may not provide for.
- After assembling the structure, the tank with communications is sealed with plasterboard or decorative panels. The material should be moisture resistant.
- The bowl is attached to special pins at the last stage of installation.
How to install a frame installation
Determine the location for the frame and carry out markings. The system can be installed on hollow walls, thin partitions, and is used for installation under window frames, in the corners of the room.
Installation diagram:
Make markings for the installation location of the frame, mark points for fastening elements: two on the wall and two on the floor. Level the structure using a level.- Drill holes at the fastening points, insert dowels, mount the frame on them, strengthening them with anchor bolts. Attention! To adjust the height of the frame, tighten the legs, only then they are screwed with clamping bolts.
- Place a plastic water supply to the outlet of the tank.
Attention! Flexible hoses are not installed in this system, since the service life is shorter than that of plastic or copper elements; their connections are firmly soldered. If the pipes are replaced, you will have to dismantle the false wall, which is not easy, and then reinstall everything.
- Using a corrugated pipe or using a pipe, connect the sewer system, loosely tighten the nuts on the toilet, and test the system for leaks. Check the functionality of the flush button.
- If there is no leakage, tighten the nuts and screws tightly and begin finishing the wall.
Reference! To finish a false wall, a metal profile is mounted along the edges of the entire structure, and any type of cladding is attached to it, for example, plasterboard or fiberboard tiles.
Design features of wall-hung toilets
The hanging system has some features, knowledge of which is necessary both during installation and during operation:
- The connection between the installations and the sewage system is carried out using nozzles with diameters of 110 and 90 millimeters, which are supplied to all installation systems. In addition, the kit always comes with a coupling that allows you to connect the structure with the toilet itself.
- The use of a 90 mm pipe in the installation is not accidental: this diameter allows you to reduce the bending radius.
- The control element can be mounted in the middle of the top or front surface of the tank. If a malfunction occurs, the control button is removed and gives access to the internal cavity of the tank. Often the cost of the button is not included by default in the equipment package.
- If a malfunction of the float mechanism occurs, the excess water will drain through a special drainage, the outlet of which is directed to the toilet.
- Most of the tanks that can be purchased on the market have a built-in function that allows you to save water. This system has two variations:
- double flush button, which makes it possible to empty the tank completely or partially; - a system with full control, in which the drain is carried out as long as the key is held in the clamped position. - In order for the tiles to “lay” well on top of the entire structure, you need to correctly position the installation in relation to the facing seams. For example, the flush button is usually placed in the middle of the tile or in the center of the seam running between the tiles so that this element looks symmetrical. In addition, to achieve a good look, the installation is initially installed with a 2 mm allowance, and the tiles are laid only when the exact location of the button is known.
- If a mechanical drive for the drain button is used, then the wall covering the device should be no thicker than 6-7 centimeters.
Recommendations for different consumer groups
Are you scared by the criticism of the decision we are discussing? Well, let's move on to the next stage.
The size of a wall-hung toilet and its installation varies depending on the manufacturer and model within a fairly wide range.
| Dimensions | Value, mm |
| Length (from wall) | 500 – 600 |
| Width | 300 – 400 |
| Bowl height | 300 – 400 |
| Installation depth | 150 – 300 |
| Installation height | 800 – 1400 |
| Installation width | 500 – 600 |
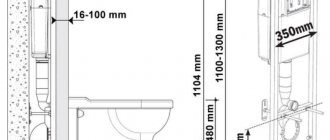
At what height should a wall-hung toilet be attached to the wall? Optimal values lie in the range of 400 – 450 millimeters.
Dimensions and installation recommendations from one of the plumbing manufacturers.
As always, there are a number of nuances.
- Don't forget about the thickness of the seat. Having set the edge of the toilet to a height of 450 mm and installed the seat, you may find that the height has become uncomfortably high.
- The height is selected based on the level of the finished floor covering. If you position the toilet so that its edge is 400 mm from the floor, and then fill the screed and lay the tiles, you will have hearing problems when visiting the toilet. Your ears will be covered with your knees.
- Finally, if the height of your family members differs significantly from the average in one direction or another, the height of the wall-hung toilet can be adjusted accordingly.
Do not forget about the location of the plumbing item in the room.
- Distance from the edge of the bowl to the wall, bidet, washing machine, etc. ideally should not be less than 20 centimeters. The distance to these objects from the longitudinal axis of the bowl should not be less than 40 cm.
- A reasonable minimum distance from the front edge of the seat to the door is 60 cm. No, a closer door won’t hurt to sit down, but adjusting your clothes will do the trick.
Placing the toilet in the toilet room.
- The optimal height of the drain button is about a meter from the floor.
Below we provide general guidelines for choosing the appropriate height for people of different heights and needs.
For tall people, for example, a toilet with a standard height of 38-40 cm will be uncomfortably low. If you are tall, a floor-mounted toilet labeled “comfortable height” would be a good solution. Comfort Height toilets, for example, have a higher than average seat height of 43-48 cm. This value is measured from the floor to the top of the seat.
Short people (160 cm and below) usually prefer standard height toilets, where the seat height will be around 40 cm or less. But taller toilets with a seat height of 43 cm or more may be uncomfortable, since a short person simply will not be able to put his feet on the floor. And when your legs hang above the floor, this can cause unpleasant sensations - pain in the joints, for example.
Provided that a person is disabled and is forced to use a wheelchair with a side sliding mechanism to move between the wheelchair seat and the toilet seat, then in this case it is better to choose plumbing fixtures with a seat height equal to the height of the stroller seat.
In this case, it can be quite difficult to choose a suitable floor-standing toilet, so you should pay attention to wall-mounted models. That is, the wall-mounted toilet can always be installed at the height you need. It should be noted that there are established restrictions on the absolute minimum and maximum height to which a wall-mounted toilet can be installed; these indicators will depend on the capabilities of the supporting system (support system) that is installed inside the wall of the toilet or bathroom. Therefore, make sure before purchasing that the stud wall mount model and the corresponding supporting system chosen will actually support the required height range.