How to install a surface pump in a well
The instructions indicate that surface pumps can be installed in a well if its depth is up to 20 meters. In this case, water flows to the distribution points directly from the well. The connection diagram for a surface pump to a well includes the following equipment:
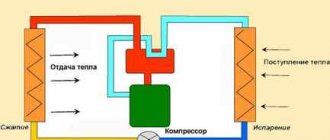
- A centrifugal pump that lifts water and supplies it to the house.
- The hydraulic accumulator softens the hydraulic shock. It consists of two parts separated by a membrane.
- The electric motor is connected to the pump and pressure switch.
- The pressure switch controls its level in the system. If there is a strong drop in pressure, the relay starts the motor, and if there is too much pressure, it turns it off.
- The pressure gauge is used to determine the value and regulate pressure.
- Water intake system with check valve.
- The main connects the pump and the water intake.
Installation diagram of a surface pump for a well
When installing a surface pump or station, you need to adhere to some rules that will ensure proper operation of the equipment:
- Stable water suction is ensured by close proximity to the well.
- The room must be ventilated, warm and dry.
- The location should not be cramped. During operation, preventive and repair work will be required.
- The room must absorb noise emitted by pumping equipment.
Suitable installation locations may include:
- The room is inside the house, but with poor sound insulation this will be a big disadvantage of the installation.
- Basement. In the absence of heating and insulation of floors and walls, additional funds must be spent on their preparation.
- Special well. But here it is difficult to maintain the required level of pressure and repair work is difficult.
- Caisson. The basic rule is the correct depth of the special installation site.
Tip: To install a pumping station for a well, it is best to arrange a separate room.
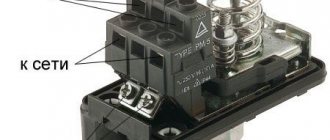
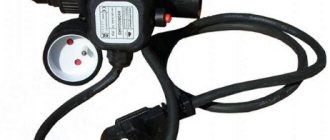
Mixed connection diagram of the automation unit and pressure switch
When simultaneously connecting the control unit and the pressure switch, the cabinet with the automation is installed first.
Safety requirements that must be observed when connecting actuator equipment :
- Before installing the box, you need to make sure that the mains voltage and motor power comply with the recommended ROM (start-up protection device) limiting characteristics.
- When installing the housing, use the holes provided by the manufacturer. When connecting parts to the unit, be careful when working with the tool so as not to damage the boards and sensors located inside.
- When assembling electrical structures, use the diagrams located on the housing stickers or in the unit passport. Avoid getting plastic or metal objects (shavings, insulation, washers, etc.) into the installation area.
- If it is necessary to replace any parts, you must use components from the same manufacturer and with the same technical characteristics.
After a visual inspection of the cabinet, checking the completeness and correct connection of the automation components, they begin installing the pressure switch.
Connection diagram of the pressure switch and automation unit.
Features of installing a well pump
Advice: The device should be installed below the water level in the well, but more than one meter from the “well supply” hole. In this case, the pump will be safe from the penetration of soil or sand particles into it and the possibility of overheating.
To install the pump in a well you will need:
- Plastic pipe. The element is lowered into the well along with the device, and during operation water will rise through it.
- Cable for insurance.
- Cable for connecting the motor.
Tip: Before installing a well pump, you need to thoroughly clean the installation site: pump out water from the well until the sand and silt completely disappear. To protect the pump from water hammer, it is necessary to install a check valve on the equipment.
You can install a well pump only after checking and adjusting the pressure that has established in the pressure tank. Its value should be 0.9 part of the switching pressure. Constantly pumped water cools the engine, which provides it with protection from overheating, and therefore premature failure. Regardless of the type of equipment selected, during installation of a well pump, it is necessary to check the operating point under different modes. To do this you need:
- Measure the design value of the water supply flow by measuring the filling rate of the volume.
- Take the pressure reading.
- Determine what current consumption is.
Moreover, if even one indicator is higher than the factory data, it will be necessary to close the valve, this will create additional resistance and will contribute to the correct establishment of the operating point.
Electrical diagram for connecting a pump for a well
Mechanical pressure regulator for well
The easiest and most cost-effective way to automate a well is to install a mechanical pressure regulator on it. It works quite simply, the water creates pressure in the capsule, and if it is not enough, the contacts close and the pump turns on; as soon as the tap closes, the pressure increases and the contacts open.
It happens that such pressure switches are equipped with a pressure gauge, but the most inexpensive models lack this. Such a relay can be installed at any point in the pipeline; the pressure in the pipe is the same everywhere. The most significant drawback of this device is the lack of protection against “dry running” and if for some reason the water in the well runs out and the pressure in the system drops, the pressure switch will supply electricity to the pump, and the pump will work until it runs out. building.
The second point is the presence of a hydraulic accumulator in the system. It performs at least two functions:
- Prevents frequent pump starts.
- It absorbs water shocks that occur when the tap is suddenly closed.
How does a hydraulic accumulator work?
A hydraulic accumulator is a tank made of ferrous metal or stainless steel. As a rule, they are painted blue and have a capacity of 5 to 500 liters. The number of pump starts directly depends on the volume of the tank. With low water consumption in systems equipped with small-volume hydraulic accumulators (up to 50 liters), frequent pressure drops in water pressure can easily be observed. The hydraulic accumulator has a built-in membrane and is inflated to a pressure of about 2 atm. The pressure in the system must always be higher than the pressure in the membrane, otherwise the membrane simply will not work.
When the pump is turned on, water begins to fill the expansion tank and compresses the membrane in volume, since it has a lower pressure. After the pump is turned off, the pressure in the membrane and in the tank is equalized. When the tap opens, water pours out of the tank, and the volume of water poured out of the tank fills the air in the membrane. At the moment when the pressure in the system drops to the one set in the relay to turn on, the pump turns on and the process repeats.
So, let's summarize. Inexpensive pressure switches must be equipped with a dry-running sensor and a hydraulic accumulator.
Relay selection
When choosing a hydraulic relay, you are guided by its range in the water supply; the standard value is 1.5 - 3 bar. When connecting using a pressure gauge, adjust it using the adjusting screws. Do the same with the dry-running relay, setting it to turn off the power when the pressure in the line is less than 1.5 bar. If a private house has a high number of floors, then to supply water with the required pressure to the upper floors, the relay is additionally adjusted, increasing the upper and lower response thresholds.
For example, if the height of the rise to the upper floors is 5 meters (1 bar corresponds to 10 meters of vertical water column), then 0.5 bar is added to the upper and lower response limits and the resulting response range is from 2 to 3.5 bar . The brand chosen for water supply at home must have the appropriate pressure range according to the passport.
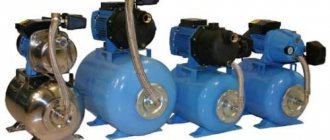
Rice. 8 Pumping units with floats and electrolytic sensors
We explain how to connect a water pump
Connecting a water pump is an important step in creating an uninterrupted water supply system and obtaining water for your own needs. The speed of pumping water from the source to you depends on the correct connection.
To connect the water pump, it is better to follow the sequential instructions so as not to miss an important connection step. This will help you not get confused and calmly connect all the necessary parts of the water device.
How to connect a stationary pump:
- Install the adapter onto the pipe. This will ensure differences for different threaded connections;
- Take a powerful power cable. It must meet all the requirements since we are placing it in water. In this case, the wire insulation must fully cope with being in water for a long time;
- We use couplings for connection. These are heat-shrinkable tubes that create waterproofing;
- We duplicate the internal check valve with an additional metal valve;
- Next, we hang the pump along the axis of the well or borehole;
- We fix the pump with an eyelet for stability.
By following these simple steps, you'll have your water pump connected in no time. The main thing is to remember safety and use only those wires that are well insulated from moisture.
As you can see, connecting the pump is a simple process. It only requires attentiveness and a little time. Connect the pump correctly, follow the safety rules, and then the treasured water will flow from the other end of the hose.
Types and depths of wells
The depth of immersion of the pump into the well largely depends on its parameters; when drilling, three main types are distinguished: Abyssinian, on sand, and artesian.
Abyssinian well
Abyssinian is the most affordable option from a financial point of view; its depth rarely exceeds 10 meters; the intake is carried out from the first aquifer (upper water). Drilling the Abyssinian is often done with your own hands using homemade drills; usually its channel pipe has a small diameter of 1.5 - 3 inches and is designed for water intake with a surface electric or manual mechanical pump.
The pipes lowered into the Abyssinian are equipped with a needle-shaped filter at the end; due to its light weight, it is located directly in the aquifer without sinking to the sandy muddy bottom - thanks to this, the water in the Abyssinian does not have sand and clay impurities. Although the Abyssinian spring has fairly clean water, the well is rarely used to provide a constant water supply to a residential building - its flow rate is too small.
Well in the sand
If water-bearing strata are not found at a shallow depth in the area, a sand well is drilled until water is found, the depth of which lies in the range from 15 to 60 m with an average of about 30 meters. This type is most common in individual water supply; when drilling, a column of plastic or steel pipes with a diameter of 100–160 mm is lowered into the shaft, which, due to its high weight, rests on the bottom of the water-bearing formation.
A perforated water filter is installed at the end of the column to purify water from sand and clay particles, but in many cases this is not enough and additional elements are installed in the pipeline that filter the water (sand, coarse and fine filters).
The use of pumping equipment for intake must take this factor into account (a large number of sand particles), so modifications are usually chosen for working with contaminated water. A well on sand, unlike an Abyssinian, has a higher flow rate and, most importantly, is suitable for water supply to an individual residential building, although its service life is short (depending on the size of the sand fractions) and averages about 5 years.
Rice. 2 Types of wells for installing a submersible pump
Artesian well
When searching for sources of artesian water, drilling is carried out to an aquifer with a calcareous bottom, while the depth of the borehole channel during domestic drilling can reach up to 200 m, and in industrial sources a threshold of about 300 m or more is considered normal. During installation, the casing with a special filter for large particles rests on a solid limestone bottom, which is free of clay and sand. Thanks to this, water from great depths is crystal clear and the only drawback is its high iron content. The deeper the aquifer is, the greater the pressure exerted on it by the higher layers of the earth - as a result, artesian springs have the highest flow rate and a constant static level.
Scope and design of surface pumps
Example of use - watering a vegetable garden with water from a nearby body of water
Surface pumps, unlike submersible pumps, are located near a water source. Their body does not come into contact with the liquid; it flows to the points of consumption through the inlet pipe.
The devices are used to deliver water to the house, to drain the basement after a spring flood, and to pump out liquid from the pool. It can be used for irrigating a plot of land - in this case, the pump is placed near a reservoir and the hose is lowered into the water. Almost all devices run on electricity, so you need a long power cable.
An important point is that the depth of the well should not exceed 10 meters, since all surface pumps have low power. Most often, groundwater lies at this depth, which accumulates harmful substances from neighboring septic tanks. Mineral fertilizers are also washed out by rain into these reservoirs, so additional filters are installed before entering the house.
A surface pump will not be suitable if the site has an artesian well, the depth of which can exceed 30 meters. In such a situation, you need to buy submersible equipment that has more power and is capable of pumping liquid from such a depth.
WINTER OPTION WITH INSTALLATION OF METAL CAISSON
A caisson is an underground metal structure (chamber) located directly above the well, welded hermetically to the casing, and performs several functions:
- Protects the wellhead from flooding and pollution by flood waters.
- Protects the system from freezing and makes it possible to operate the well all year round, and not just in the warm season.
- Makes it possible to place equipment (battery tank, control unit and cable and pipe distribution) directly above the well, in the absence of a special room in the house.
- Provides convenient access to equipment for inspection, repair or maintenance.
| When constructing a turnkey well, the caisson neck cover is at least 5 centimeters above the ground. | When constructing a well in winter, the caisson neck is additionally insulated. | When constructing a turnkey well, all water-lifting equipment is installed in the caisson. |
WINTER OPTION WITH INSTALLATION OF WELL ADAPTER
The cost of installing a water well according to the “winter option” can be reduced by refusing to install a caisson, “replacing” it with a well adapter, which is installed on the casing and allows you to bring the water pipe below the freezing level.
However, the downhole adapter has many disadvantages (complexity of installation on a two-pipe well, difficulties with lifting a pump located at a depth of 60 m, extreme difficulty in installing a pumping unit at a depth of over 60 m, etc.).
Another inconvenience is the need to place a hydraulic storage tank and automatic control in the house. Having weighed all the pros and cons, the conclusion does not allow us to talk about the advantage of the downhole adapter (except for the price) over the caisson.
| The downhole adapter is installed at a depth of 1.8 meters, and the well cover covers the casing. | To construct a well without a caisson, a well adapter and a well cap are used. | To set up a turnkey well, you need a high-quality well adapter and cap. |
SUMMER OPTION FOR WATERING AN AREA WITH INSTALLATION OF A WELL CAP
If you are going to use the well exclusively for summer irrigation, then the option for its arrangement will be the least labor-intensive and, accordingly, the cheapest.
After all, you only need to install a pump with a water-lifting pipe and a well head.
If desired, you can install compact automation that allows you to control the well pump depending on the water intake, without using bulky hydraulic storage tanks.
| Summer arrangement of a well for irrigation. | Summer construction of a water well. | Summer well construction. |
| Summer well construction without a caisson. | Summer well construction price. | Summer well construction on a turnkey basis. |
Hydraulic accumulator for water supply
Metal tank with a rubber membrane (bulb). Air with P=1.5 atm is pumped into the tank through the nipple. When the tap is closed, the pressure in the system increases, water fills the bulb and compresses the air in the tank. Water is an incompressible liquid, and the more water in the tank, the higher the pressure in it. When the taps are opened, the pressure drops and air pushes water out of the membrane into the pipe.
The hydraulic accumulator has two main functions:
- Water hammer protection. When closing the taps, the water flow encounters an obstacle and water hammer is possible. A very strong blow can damage the pipes and even disrupt the well pump. The hydraulic tank temporarily removes excess water, and a shock wave does not occur.
- Protection of the well pump from rapid wear. Water accumulates in the tank, which enters the system when the tap is opened. The relay does not “feel” that the pressure has dropped and does not turn on the pump. This saves its working resource.
Selection of hydraulic accumulator by volume
To calculate the volume of the hydraulic tank, the formula is derived:
Where:
16.5 – coefficient;
Q – total water consumption by household plumbing, l/min;
A – limit of pump starts per hour;
Pmin – P in the system when the well pump is turned on (on average 1.4 atm);
Pmax – P in the system when the well pump is turned off (on average 2.8 atm);
P0 – P air in an empty hydraulic accumulator (Pmin minus 10%).
Approximate calculation of the volume of a hydraulic accumulator:
- A – up to 20 starts per hour;
- Q – 35 l/min;
- P0 – 1.26 atm.
We substitute the numbers into the formula and get:
Many people ask whether a hydraulic tank with “smart automation” is needed. It turns the well pump on and off when the pressure changes and ideally a hydraulic tank is not needed. We believe that a hydraulic accumulator must be installed. There is always a chance that the automation will fail. It’s better to protect yourself in advance and install a hydraulic tank than to spend money on repairs later.
Prices for installation of pumping equipment
Below are typical estimates for the installation of pumping equipment (installation of a caisson or well adapter, well pump and automation) at various pump installation depths: from 20 meters to 100 meters in increments of 10 meters.
The cost of installing a well pump, caisson and automation includes transportation costs up to 30 kilometers from the Moscow Ring Road.
Price table for well construction
| Pump installation depth | Construction of an artesian well | |||||
| With caisson | With borehole adapter | |||||
| rub. | rub. | rub. | rub. | rub. | rub. | |
| 20 meters | 83180 | 87975 | 117240 | 57800 | 62595 | 100560 |
| 30 meters | 88180 | 93125 | 120240 | 62800 | 67745 | 103560 |
| 40 meters | 91080 | 96025 | 127713 | 65700 | 70645 | 111033 |
| 50 meters | 96230 | 100725 | 140919 | 70850 | 75345 | 124239 |
| 60 meters | 102530 | 107025 | 150609 | 77150 | 81645 | 133929 |
| 70 meters | 107230 | 115425 | 153859 | — | — | — |
| 80 meters | 110130 | 118325 | 158873 | — | — | — |
| 90 meters | — | 121225 | 162123 | — | — | — |
| 100 meters | — | 124125 | 165373 | — | — | — |
Drain valve
If you leave water in the system over the winter, it can freeze and damage the pipes. A drain valve is used to discharge water. It is placed behind the well pump and works automatically.
The ball with the spring is pressed and water does not pour out if the pressure is higher than 0.9 atmospheres. If it falls below 0.6 atmospheres, the spring is released and water flows out of the pipe. The valve can only be installed in a system with a submersible well pump. Pumping stations do not create pressure and the valve simply will not close.
The Zagorod company installs Debe drain valves (Sweden). The valve has a width of 95 mm and is suitable for casing pipes of even small diameters. Other high-quality drain valves are Unipump, Belamos, Isk.
The most important automation for well water supply is a hydraulic accumulator and a check valve.
Installation of a submersible electric pump for installation in a well
To install a submersible electric pump in a well, work is performed in the following order:
- Screws a plastic adapter coupling into the outlet of the unit to connect the pressure pipeline. If there is no built-in check valve, install your own, mounting it first at the outlet of the electric pump, then screw on the fitting for connecting HDPE pipes.
- They attach a pipe to the pump and fix it with a plastic cuff, thread a cable through the ears of the housing and connect its ends at the outlet using two special clamps, the free end is screwed to the main cable with electrical tape.
- Connect the power cable, cable and pressure hose together using electrical tape or zip ties in 1 meter increments, making sure that the power cord is secured without tension.
- The electric pump is lowered into the well to a predetermined depth. To do this, measure and cut the pressure pipe to the required length, insert it into the head, to which the cable is tied.
- After a dive, you can immediately check the operation of the electric pump without connecting to the pipeline, if the liquid supply corresponds to the passport data, connect the entire water line and then monitor and regulate the operation of the equipment with automatic devices.
Rice. 8 Preparing the downhole electric pump for immersion
To connect a well pump to a water supply system, devices are used that automate its operation, prevent frequent startup and reduce the load on the line. They can be independently assembled in one module, installed in a living space, or left in a caisson pit with a borehole head.
Connection types
There are several ways to tie a wellhead well. Before making a decision, the costs of equipment and work, well parameters, climatic conditions and pump type are taken into account.
The open option is the cheapest way to connect a well pump. It is suitable in cases where the water point will be used only during the warm period. During the construction the following work is carried out:
- The upper part of the casing is cut so that only a small section remains above the ground.
- A head is attached to the mouth. It is on this that the electric pump, pressure pipe and power cable will be suspended.
- Using special adapters, the water supply is connected, and the power cable is also supplied. Pipes and wire are placed on the surface.
This type of connection has a large number of disadvantages, including poor protection from freezing, the risk of equipment theft, and laying the pipeline on the surface of the ground. When using a deep-well pump, most of the equipment will have to be placed in a separate building or in the house, and this is an additional inconvenience.
With the help of a pit, you can achieve higher protection and also provide better tying compared to the summer version. The arrangement includes the following stages:
- Digging a hole of the required depth, which will protect the system from winter freezing.
- Construction of walls made of brick, gas silicate, expanded clay or concrete (using formwork).
- Installation of external waterproofing made of gravel.
- Installing a concrete slab or sheet metal cover. It's better to use the first option.
It is also advisable to make the floor from a layer of sand or crushed stone. In some cases, the screed is poured. When constructing a pit, the groundwater level should be taken into account. If the waterproofing is poorly done or completely absent, then if the aquifer is high, the well will always be flooded. Because of this, it is not advisable to install an electric pump in a pit.
The pumping equipment is connected using a conventional well head. The pipeline in this arrangement option runs underground.
Connecting a deep-well pump to a water supply system
When installing an individual water supply system, even at the stage of drilling operations, you should know the diameter and material of the pipeline, the depth of the water line, the operating pressure in the system for which the equipment is designed. When installing and turning on the water supply, follow the following recommendations:
When using a plumbing system in winter, you will have to take measures to protect it from the cold. Typically, pipes are laid underground and they must exit from the well head, so a caisson pit will be needed to install and maintain the equipment. To make it more convenient and reduce the depth, the water line is insulated and heated with an electric cable.
Rice. 6 Assembling a pumping station with your own hands - main steps
- When determining the immersion depth of the electric pump, set the dynamic level with the equipment turned on and suspend the unit 2 meters below the set mark; the minimum distance to the bottom for deep models is 1 meter.
- When using sand wells, it is necessary to install sand filters or rough cleaning filters in the water line in front of the equipment.
- Electric pumps change their pumping efficiency when the supply voltage changes, so for stable operation it is better to purchase a voltage stabilizer and connect the equipment to it.
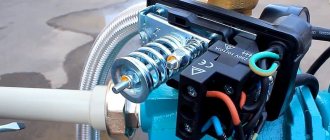
- For ease of operation and maintenance, the pumping station is often assembled with your own hands. A pressure gauge and pressure switch are mounted on the hydraulic accumulator using a standard five-inlet fitting, but since there is no pipe for attaching the dry-running relay, it will have to be installed on an additional tee.
- Often electric pumps have a short power cable, not long enough to connect to the mains. It is extended by soldering a similar one with further insulation of the connection point with a heat-shrink sleeve.
- The presence of coarse and fine filters in the water supply system is mandatory. They must be placed before the automatic control system, otherwise the ingress of sand and dirt will lead to their incorrect operation and breakdown.
Rice. 7 Placement of automatic equipment in a caisson pit
Connection diagram for a well pump for autonomous water supply to a private house No. 9 (complete)
How to connect a submersible well pump?
So, you have purchased or are planning to buy a submersible well pump and want to connect it yourself. Or, you have already connected a well pump for irrigation and now you want to automatically supply water to your home. This article is for those who want to independently connect a well pump to organize automatic water supply for a private home or cottage.
Well pump connection diagram
Submersible well pumps in our catalog
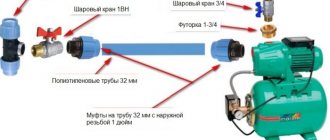
Fittings and pipes for pumping station:
- Nipple 1” 01034024, 2 pcs.
- Check valve 1” 01049035, 1 piece + mesh filter, 1 piece
- Pipe 32 HDPE 1” 01014138 footage on request
- Borehole head OGS 113-127/32 03013282, 1 piece
- Bend 32/90 HDPE 01014042, 1 pc.
- HDPE coupling with external thread 01014022, 3 pcs
- Ball valve 1″ female-female thread EUROS 01035023, 1 piece, 3 pieces
- Adapter (fitting) 5 outputs 1″ 03013007, 1 pc.
- Adapter (fitting) 3 outputs 1″ 03013156, 1 pc.
- Ball valve with outlet 1″ EUROS 01035019, 2 pcs
- Flask 10ВВ 10″ 1″ for cold water 01006032, 1 pc.
- Internal-external eyeliner 1″ 80 cm 01051042, 1 piece
- Hydraulic accumulator (expansion tank) 50 l 01061020, 1 pc.
- Pressure gauge D63 0-4 bar 1/4″ 01048025, 1 pc.
- Dry running sensor LP/3 03013144, 1 pc.
- Pressure sensor PM5 03013125, 1 pc.
Above is a typical connection diagram for a well pump for organizing automatic water supply for a private house.
Let's look at the purpose of the connection nodes and the process of starting the pump.
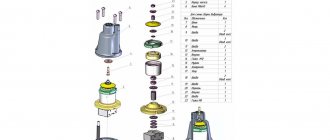
2. The 1” check valve prevents water from flowing back into the well when the pump is turned off. Cuts off large fractions of sand and silicates, thereby preventing premature wear of the pump.
3. You will need a pipe. The absolute choice would be HDPE polyethylene pipe. It is easy to use and inexpensive compared to pipes made from other materials. HDPE stands for low-density polyethylene. Very often, many people think that this pipe is designed for low pressure and cannot be used in household networks. Actually this is not true. The standard version of the pipe is designed for 10 atmospheres. And the abbreviation HDPE speaks only about the method of manufacturing the pipe. Pipes made using the HDPE method have a rigid structure, while pipes made from high-density polyethylene LDPE are soft. As a rule, you will need 32 diameter pipe. The diameter of the pipe can be determined more accurately after calculations.
4. Borehole head. Today, heads are produced in plastic, cast iron and steel formats. For example, a steel or cast iron unit has sufficient strength and can withstand about 500 kg of well equipment. Plastic heads are designed for a load of no more than 250 kg. Said heads vary in diameter. The most popular are from 110 mm to 160 mm. How to understand the head designation? For example, OS 110-32P. OS - well head. 110 - diameter of the cover and flange, in mm. It is suitable for a casing pipe 2-3 mm smaller in diameter. 32 is the diameter of the hole in the flange and the crimp connection for installing the HDPE pipe, in mm. P - indicates that the head is plastic. The absence of a letter indicates that it is made of metal. Thanks to the head, several issues are resolved at once:
- The pump, cable, and pipeline are securely fixed
- The well is protected from debris, precipitation and dust
- Reduces the risk of well freezing
When drilling a well, installation of the head is usually included in the cost of the work.
However, you can save on this if you install the head yourself. Installation of the well head
:
- Cut the casing pipe so that it protrudes 10-15 cm from the ground. Carefully coat the top of the pipe with grease.
- Slide the first metal flange onto the pipe, pressing it into the ground.
- Slide the rubber ring onto the flange.
- Thread the cable, pipe and cable into the second flange.
- Secure the cable to the carabiner and carefully lower the pump, holding it on the cable.
- When the pump has reached the bottom, lift the pump approximately 0.5-1 m and secure the head cover to the casing pipe with standard bolts.
5, 6. To connect the pipe with the fittings of the pipeline, you will need crimp connections for the pipe.
They can be either bronze or plastic. We recommend sticking with plastic connections. Why? They are almost 10 times cheaper than bronze connections. And from a functionality point of view, they are in no way inferior to them. For a typical connection scheme, you will need three HDPE couplings 32*1” external thread and one HDPE angle 32. A stainless steel cable for pulling the pump out of the well in case of its breakdown or maintenance. Usually a cable with a diameter of 3 mm is used. For the cable, you must purchase two clamps.
7. Ball Valves
.
The taps are used to cut off the pressure from the flask when replacing the cartridge and during repairs in the household network. 8. Big Blue filter flask
and 10 micron mechanical cleaning cartridge protect plumbing equipment from foreign particles. 9, 10. Adapter for 5 and 3 outputs for connecting a pressure gauge, dry-running relay and pressure switch.
12, 13. Sensors for automatic pump on/off. The dry-running sensor will protect your pump from running dry and prevent pump breakdown. The dry-running relay turns off the pump if the well runs out of water. Is a required element. If it is missing, there is a possibility of the pump overheating and failure. If water is drained from the system for any reason, the system must be refilled. The pressure sensor ensures that the pump turns on, if the pressure in the system drops, water consumption begins.
14. Eyeliner 1” Giant. Serves to connect the expansion tank. It is not possible to install a liner with a smaller diameter.
15. Hydraulic accumulator (expansion tank). This is a storage container with a rubber membrane inside. Using an expansion tank makes it possible, with low water consumption, not to turn on the pump, and to cover water needs using the liquid stored in the tank. This allows you to increase the service life of the pump. The expansion tank also avoids water hammer.
How to choose the correct accumulator tank capacity?
If the number of consumers does not exceed 3 people, and the installed pump has a capacity of up to 2 cubic meters per hour, it is recommended to take a tank with a volume of 20 to 24 liters or more. If the number of consumers is from 4 to 8 people and the pump capacity is up to 3.5 cubic meters per hour, a tank with a volume of 50 liters or higher is installed. If the number of consumers is more than 10 people and the productivity of the pumping equipment is more than 5 cubic meters per hour, choose a tank of 100 liters or higher. In any case, the larger the tank capacity, the fewer pump on/off times. Moreover, it will serve for a longer period of time. Depending on the available space, you can choose either a horizontal or vertical tank.
Starting the well pump
1. Before starting work, take a car pressure gauge and check the pressure in the hydraulic tank. Under normal living conditions, factory settings of -1.5 atmospheres (bar) will be quite sufficient.
2. Open any of the household faucets at the highest point of consumption and turn on the pump. Let the pump run until a continuous stream of water without air begins to flow from the mixer. The system is completely filled with water.
4. Close the tap. Let the pump run for some time until the set water pressure in the system is reached and the pump stops on its own.
Well pump startup completed
. This is an automatic water supply system for a home based on a submersible well pump.
Installing a pump in a well
An important point when carrying out water supply work for a country house is the proper installation of the pump in the well. If the equipment is installed correctly, this is a guarantee of its long and uninterrupted operation.
Despite the fact that there is nothing complicated in installing a pump in a well, there are also some nuances that should be taken into account before starting work.
Important criteria when selecting water supply equipment
If the water supply equipment was selected incorrectly, installing a well pump can be a rather difficult task. The parameters that must be taken into account when choosing pumping equipment include the following:
- Dynamic and static level of a water artesian well. You can find this information in the installation passport. If you do not have such data, for example, due to the loss of documents, do not panic - this information is restored experimentally;
- To calculate the required volume of water that must be provided by the installed equipment, count the number of water consumption points. These include a sink, bathtub, shower, toilet, washing machine, dishwasher, etc.;
- Distance between the house and the water trunk.
What are the dangers of unqualified installation of a pump in a well?
If errors were made during the installation of downhole equipment or low-quality materials were used, this can cause a number of negative consequences. There are often cases when work performed by non-professionals leads to breaks in water-lifting products, the impossibility of dismantling when replacement is necessary, as well as premature breakdowns of pumps.
The first two scenarios, when the old equipment cannot be removed from the well, jeopardize the possibility of its subsequent use. Because of this, all the work has to be done anew: they drill another well, install a new caisson, since using the old one is impractical, and install new equipment.
Do-it-yourself automation for a well or with the help of professionals
General operating principle of automation ↑
Despite the difference in price and functionality, modern automatic units work according to the same scheme - various sensors monitor the pressure level and adjust it as necessary.
A good example is the operating principle of a simple pressure switch:
- The device is installed in two positions - maximum and minimum pressure in the system - and connected to the hydraulic accumulator.
- The accumulator membrane reacts to the amount of water, that is, to the pressure level.
- When the minimum permissible level is reached, a relay is turned on, which starts the pump.
- The pump stops working when the upper sensor is triggered.
More advanced systems that operate without a hydraulic accumulator can be equipped with additional options, but the main principle of operation of the automation for a well pump remains unchanged.
Types of automation for well pumps ↑
First generation ↑
The first (simplest) generation of automation includes the following devices:
- Pressure switch;
- Hydraulic accumulator;
- Dry running blocking sensors;
- Float switches.
The pressure switch was mentioned above. Float switches react to a critical drop in liquid level by turning off the pump. Dry running sensors prevent the pump from overheating - if there is no water in the chamber, the system stops functioning. As a rule, a similar scheme is used in surface models.
The simplest automation for a well pump can be easily installed with your own hands. The system is also suitable for drainage equipment.
Second generation ↑
The second generation automatic blocks are more serious mechanisms. It uses an electronic control unit and several sensitive sensors attached to different places in the pipeline and pumping station. Signals from the sensors are sent to a microcircuit that fully monitors the operation of the water supply system.
The electronic “watchman” reacts in real time to any deviations from the norm. In addition, it can be equipped with additional functions:
- Temperature control;
- Emergency system shutdown;
- Checking the fluid level;
- Dry running blocker.
Important! The big disadvantage of this automation scheme for well pumps is the need for fine tuning, the tendency to break down and the rather high price
Third generation ↑
Important! If you do not have experience in water supply, you will not be able to install automation for a well yourself. Only a specialist can determine which algorithm is best to program the system with
Automatic block with your own hands ↑
Do-it-yourself automation for a well pump is often cheaper than a factory set of equipment. When purchasing components separately, you can always choose the best option for the purchased pump model without overpaying for unnecessary additional options.
Important! Such amateur activities require a certain level of knowledge. If you cannot call yourself a specialist, it is better to purchase pumping equipment with pre-installed automation
Basic assembly diagrams ↑
Among the automation circuits for well pumps, the following types have proven themselves well:
All automation units are collected in one place. In this case, the hydraulic accumulator can be located on the surface, and water is supplied to it through a pipe or flexible connection. The circuit is suitable for both surface and deep-well pumps.
Control unit on the hydraulic accumulator
With this placement, it is recommended to connect the system manifold to the pump supply pipe. It turns out to be a distributed station - the unit is located in the well, and the control unit with a hydraulic accumulator is installed in the house or utility room.
Distributed pumping station
The automation unit is located near the cold water collector, maintaining a constant pressure level in it. The pressure line extends from the pump itself. With this scheme, it is better to use surface models.
Installation tips ↑
In order for automatic equipment to serve you faithfully, you need to take care in advance about the correct location for its installation:
- The room must be heated year-round.
- The closer the remote block is to the well, the better. The ideal option is to equip a small boiler room near the caisson.
- To avoid pressure losses, install the pumping station in close proximity to the collector.
- If the equipment will be located in the house, ensure high-quality sound insulation of the room.
Types of pumps for wells and their functions
Pumps for supplying water from a well can be immersed in narrow wells to great depths or mounted on the surface. The operating principle of the device and its installation is as follows:
- Its main elements are impellers mounted on one shaft.
- Their rotation occurs in diffusers, which ensures the movement of liquid.
- After the fluid passes through all the wheels, it exits the device through a special discharge valve.
- Fluid movement occurs due to pressure differences, which are summed up across all impellers.
There are several types of such equipment:
- Centrifugal. Such a pump allows the supply of clean water without large contaminants.
- Auger. This is the most common device, capable of pumping liquid with an admixture of particles per cubic meter of no more than 300 grams.
- Vortex. Transfers only water purified from contaminants.
Despite the differences, all types of pumps serve to perform similar functions:
- Supply groundwater to private houses and cottages.
- Participate in the organization of irrigation systems.
- Pump liquid into tanks and containers.
- Provide comprehensive water supply in automatic mode.
When choosing a pump for a site, the following criteria are taken into account:
- Initial equipment dimensions. They need to be taken into account to ensure certain technological tolerances when placing the pump in the well.
- Power of the electricity source. Borehole pumps are manufactured single- and three-phase.
- Device power. This parameter must be determined in advance based on the calculated pressure and water consumption.
- Pump cost. In this case, it is necessary to choose the right price-quality ratio of equipment.
Types of household pumps
Pumps for wells are divided into submersible and surface. Such units have some advantages over others:
- Large water intake depth, which is inaccessible to any other type of pump.
- Ease of installation.
- No rubbing parts.
- Low noise level.
- Long service life.
The photo shows the types of submersible borehole pumps.
Submersible Well Pumps
Advice: It is very important to ensure that the equipment is properly and correctly arranged and to use only high-quality materials. Violation of installation technology or the use of poor materials can lead to:
Violation of installation technology or the use of poor materials can lead to:
- Pump breakage.
- Its premature failure.
- When dismantling, it is impossible to lift the pump.
What is a surface pump
There are two types of pumps – submersible and surface pumps. You can guess their differences from the name, but to better understand the difference between these devices, you need to know their important characteristics. We will not understand the design, but will only discuss the most important differences.
A surface pump is a device that belongs to the category of self-priming equipment. The maximum height to which it is capable of lifting water from the bottom of the well is 10.3 meters - this is a calculated value derived as the maximum possible at normal atmospheric pressure. In fact, this value is at an even lower level - about 8 meters, since the operation of the equipment is influenced by various factors that cause power losses.
8 meters is, of course, not enough to extract high-quality water suitable for drinking, so this equipment is supplemented with remote ejectors - devices that help increase the lifting depth to 40 meters.
The average productivity of a surface pump is not at a very high level - from 1 to 4 cubic meters per hour, but this is absolutely enough to meet all the household needs of even a large family.
The operating pressure that the equipment creates also varies greatly from model to model. Simple devices have a reading of about 2 Bar, while more powerful ones can reach up to 5, which is equal to 20 and 50 meters of water column, respectively.
Submersible pumps are lowered directly to the bottom of the well and controlled by a remote unit. They do not draw in water, but push it into the pipeline system, which makes it possible to use such equipment even in very deep wells. 200 meters is not the limit for them, but this applies to industrial equipment. For domestic use, you simply select a model of the required power for the depth of your well.
Such equipment can provide very high water consumption - an average productivity of about 10-15 cubic meters.
What types of submersible pumps for wells are there, their technical characteristics, prices and, of course, the main criteria for choosing such equipment. We will try to fully answer these important questions in a special article.
Recommendations for choosing a pump for a well
Among the various types of pumping equipment used for pumping water from a well or well, submersible devices are the most popular. This popularity is explained by a number of advantages of submersible pumps, which include:
- no noise during operation;
- the ability to ensure uninterrupted water supply from a serviced well;
- ease of installation;
- the ability to provide water supply from wells of considerable depth;
- compact dimensions;
- no need for additional cooling of the drive motor;
- anti-corrosion properties of the materials from which the body is made.
When choosing such a device, you should pay attention to such parameters as:
- the total demand of water intake points for water, which the selected pump must provide;
- characteristics of the well from which water is to be pumped (diameter and depth);
- geological data of the area where the well was drilled (depth at which groundwater is located, soil type, etc.);
- the presence of a power source at the site where it is planned to install pumping equipment.
The main technical characteristics by which pumping equipment is selected are:
- the performance of the device, which characterizes how much liquid it is capable of pumping per unit of time;
- pressure (this parameter, measured in meters of water column, indicates to what height and distance the pump is capable of transporting liquid through the pipeline system).
This approach when choosing pumping equipment will give you the opportunity to further modernize your pumping station if the need arises.
Installing deep-well pumps, as a rule, does not cause any particular difficulties; it can be done even without experience in carrying out such procedures. When operating submersible pumps, as well as any other type of pumping equipment, one should not forget about their regular maintenance, which will significantly extend the life of their trouble-free use.
Dismantling the deep-well pump
The need for dismantling due to pump failure may arise for a number of reasons, the most common of which are:
- incorrect installation of a submersible pump in a well;
- incorrectly selected elements of automatic control of pumping equipment;
- incorrect choice of the hydraulic machine itself based on its power.
So, if a pump, initially designed to service wells with a depth of no more than 50 m, is used to lift water to a height of about 80 m, then repairs to such equipment may be required after just a few months of its operation. The automation of this pump, configured for a certain pressure of the pumped liquid medium, simply will not periodically turn off the device, as a result of which it will work with constant overloads and, accordingly, will quickly fail.
Deep pump removed from a well
When a broken deep-well pump requires dismantling, it is better to invite qualified specialists to carry out this procedure. If you have studied theoretical material on this topic and watched videos shared on the Internet by users of submersible pumping devices, you can dismantle it yourself.
Advantages of contacting qualified specialists
The main and most important advantage of hiring qualified specialists for maintenance and dismantling of a submersible pump is that they have the necessary knowledge, skills and experience in working with hydraulic machines. This will allow such specialists to quickly diagnose faulty equipment, determine the cause of its failure or incorrect operation, quickly eliminate it and perform commissioning work.
In addition, serious companies involved in the installation and repair of pumping equipment servicing a well or a well provide guarantees for all the work they perform.
How to Determine the Required Source Depth
The borehole pump must be installed at a certain depth of the water source. When using a well as a source of water supply, the static and dynamic levels of the location of the pumped liquid medium in it are taken into account. The static level is understood as the distance at which the surface of water, in a calm state, is located from the surface of the earth. At the dynamic level, water is in the well after it begins to be pumped out.
Dynamics of a water column in a well
In order for submersible pumping equipment to function effectively and be cooled efficiently by the liquid medium it pumps, it should be located in the well at a level at least 30 cm below the dynamic level. If the thickness of the water layer allows, then it will be better if the deep pump is installed at a level located 2–3 m below the dynamic level. It should be taken into account that the pump installed in the well should be located at a distance of at least 1–2 m from its bottom.
Types of surface pumps
There are three types of surface pumps - centrifugal, ejector and vortex. They differ from each other in design features and performance characteristics.
Table. Types of surface pumps.
| Vortex | Inside the body of such a pump there is a special axis, on which the so-called impeller is fixed, on which the blades are located. It is they who will transfer the energy of movement to the water during the rotation of the main axis. These are small-sized installations and are inexpensive. Their suction depth is small, so more often they are used not for pumping water into a hydraulic accumulator, but for adjusting pressure levels in the water supply system, irrigation, and pumping water from the basement during floods in the spring. Efficiency is only about 45%. Not recommended for use as a pump for filling hydraulic accumulators. |
| Centrifugal | Such a pump is also called self-priming and has special wheels inside, which create the necessary pressure during operation of the device. They rotate due to the working shaft resting on bearings. The power is higher than that of a vortex pump, and therefore it can pump water from a greater depth and can be used to organize a water supply system for a residential building. This is a more expensive, but at the same time reliable and durable type of device with an efficiency of up to 92%. Can be used to create a pumping station in the house. |
| Ejector | Such a pump consists of two circulation circuits: in one of them, liquid is supplied to the ejector, where a pressure difference is formed due to the Bernoulli effect, and water enters from the second circuit. This design allows the pump to be lowered to a depth, which will solve the problem of low suction height. But recently such installations have not been in demand, since there are more efficient submersible pumps. |
Operating principle of self-priming pumps
Based on what was written above, it can be noted that it is best to purchase a centrifugal pump. This is the best option. Let's take a closer look at its structure: a pair of disks are installed on the gear shaft inside the mechanism. A small hole is made in one of them, connected to the free space between these parts. In this gap there are plates inclined at a certain angle - they create special channels from the center of the free space to the edge. These “passes” are connected to a diffuser, which in turn is connected to a supply conduit. And the suction hose is connected to the disk hole.
Horizontal surface centrifugal pump
The inter-disk free space and the suction hose are filled with water, then the gearbox starts up, and the vane plates begin to rotate and push out the water. This process occurs due to centrifugal force. As a result, a discharged space is created in the center, and at the edges and in the diffuser, on the contrary, the pressure increases. To even out this “skew”, the system will strive to equalize the indicators and begin to pump water. This is how this setup works.
Attention! Such pumps are usually not used independently - they are part of the design of the pumping station. This system includes a control unit and a hydraulic accumulator.
The electric pump will automatically supply water to the house, which is very convenient and practical.
What is well automation?
Automatic control systems include electronics (pressure switch, idle speed, flow), pressure gauge, accumulator or modules in which these elements are combined - all of them are responsible for the optimal functioning of the water main.
In the water supply line, automation performs the following role:
- Controls the electric pump, turning it off as the line fills. In high-tech systems, instead of turning it off, it is used to adjust the rotation speed of the electric motor.
- Protects the water main from water hammer and helps create some water reserves in the event of equipment breakdown or power outage.
- Includes protective devices for the pump that interrupt the flow of electrical current to it in the event of a lack of water at the source.
Rice. 2 Example of a borehole water intake source
Recommendations for pump placement and positioning
When calculating to what depth to immerse the pump in the well and the location of the pump in the well, it is useful to follow the following recommendations:
- The electric pump should not come into contact with the walls of the column, so it is hung strictly in the center of the head.
- When the electric pump is lowered into a well in sand below the dynamic level, it is better to make the distance from the surface of the water a little more than recommended, for example, 5 meters. This will help to avoid the unpleasant consequences of a situation when, during operation, the source silts up, its flow rate and, accordingly, the dynamic threshold decreases. In order to lower the electric pump deeper in the future, you will have to lengthen or change the water pipe and cable cut to fit the head - this will lead to unjustified financial expenses.
- If, according to the parameters of the well, the electric pump must be located in the bottom area, it is better to use screw types - they cope better with pumping contaminated water, and replacing their simple parts is cheaper.
Rice. 9 Lowering the pump into the well
When placing an electric pump in a well, it is advisable to use such characteristics as dynamic and static level. Lowering the pumping equipment slightly below the dynamic mark contributes to less load on the body and working mechanism of the unit, the intake of cleaner water from the source, saves materials and simplifies maintenance.
Why do you need a pumping station?
The source of water for drinking and household needs is often a well or borehole. The second option is considered more reliable. High-quality drinking water can only be obtained from great depths.
The liquid rises to the surface and is directed into the water supply system using a submersible pump equipped with additional devices. It is possible to use surface pumping equipment. The installation can be used if there is a shallow well. This is due to the limited suction lift.
The introduction of a pump has a positive effect on the functioning of the water supply system. Compact equipment is designed to solve the following problems:
- extraction of water from a source and its supply to the water supply system of the house;
- equalizing pressure in pipes, preventing damage to the water supply system from water hammer that occurs during system startup;
- protection of equipment from spontaneous activation;
- storage of water reserves used during power outages.
The supply of liquid to the water supply system from the well does not occur every time the tap is opened. The protective relay and hydraulic accumulator monitor the required response value. Reducing the frequency of switching on extends the service life of the engine of the motor unit.