Here you will learn:
- Determining the location of drilling a well in the country
- Types of wells for summer cottages
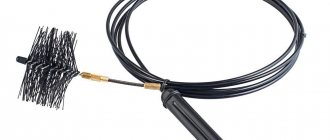
- Abyssinian well
- DIY sand well in the country
- Artesian well
- Dimensions of the well protection structure
- Ensuring the tightness of the casing pipe
- Using a Downhole Adapter
- Selection and installation of equipment for water supply
- Well care and operation
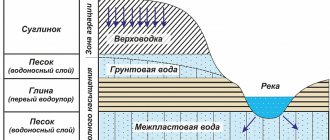
A well in the country is a convenient source of water so as not to depend on centralized water supply. You can organize an Abyssinian well, an artesian well or a sand well.
Determining the location of drilling a well in the country
First of all, you should get to know your neighbors and find out how they solved the water supply issue. If they already have wells on the property, look at their locations. It is possible that the neighbors use imported water. In this case, you will need to study the soil layers on the site. Research results are usually incorporated into a construction project. From the documents you will learn the level of the aquifer and the flow line of surface groundwater.
The next step is to determine the location of drilling a well in the country. The simplest and most commonly used method of finding water among people is the frame method or the rod method. A man holds two curved metal wires in his outstretched hands. Trying not to change the position of his hands, he moves around the area. In the place where the underground spring flows closest to the surface, the wires will begin to twist and cross. Having determined the drilling location, you need to choose the type of water well that is suitable for you.
The correct choice of location, depth and materials of a well at the dacha is a guarantee of obtaining clean drinking water in sufficient quantities.
Well drilling technology
The procedure for constructing a well is quite simple. First you will need to find a suitable place for drilling. There must be good access to it in order to carry out timely maintenance. It is necessary to locate the well drilling point at the lowest point of the suburban area. Then the shaft is drilled, casing pipes and equipment are installed.
If you plan to drill a deep well, you should turn to professionals. They have special equipment that allows drilling to be carried out quickly and without extra costs. Particular attention should be paid to self-development of the well.
Drilling a wellbore
Before you start drilling a water well, you should first build a pit. It should have dimensions of 1.5x1.5 m. The depth of the pit should be about 2 m. It may not be equipped. However, with a pit, longer rods can be used when drilling.
The further sequence of work for drilling a well is as follows:
- It is necessary to equip a drilling rig. It can be a tripod assembled from logs and pipes. Semi-professional towers can also be used. They are often rented to perform wells on private property.
- When drilling, you will need a certain number of nozzles. Each of them is necessary to pass certain breeds. For example, to drill through soft soil, you will need a coil. When drilling through dense layers of soil, drill spoons should be used. A chisel is used to break stones. To remove arrogance and pass the quicksand, you will need a bailer.
- The main element used to drill a well is the drill string. It is a metal pipe with a diameter of 25 mm. Nozzles are put on it. The column is composite. When immersed to a certain depth, the pipe is extended with additional sections. Column elements are connected both with pins and with threads.
- One drilling stroke allows you to plunge into the ground by 0.5 m. Then the column should be pulled out and cleaned. After opening the roof of the formation, it is necessary to switch to the bailer. It has a check valve. The aquifer is quite soft. It can be passed quite easily. You should not go deeper than 0.5 m. If you do not take this point into account when drilling, you can break through the bottom and the water will begin to go down.
You can also use a simpler drilling technology - percussion. The operating principle is quite simple. This drilling method includes the following steps:
- The soft layer of soil is passed through with an auger.
- Then you need to make a projectile from the pipe. Its length should be about 0.5 m. The projectile is sharpened and hardened on the underside. You can use a ready-made drill bit.
- On the reverse side, to make the projectile heavier, you will need to weld a rod and tie a cord to it.
Drilling using this design is explained quite simply. The projectile is thrown into the barrel. It sinks under its own weight. Then it must be pulled out by the cord and cleaned. However, this method has one drawback. The walls of the trunk will not be smooth. Its diameter will be quite small. This kind of drilling is quite simple to carry out. The work is done quickly and effortlessly.
Column casing
When the drilling of the shaft is completed, it is strengthened using siege pipes. There are 3 options that should be considered in more detail:
- Steel pipes. They are used when drilling if the soil in the area is unstable, as well as at large drilling depths. Such products are very durable and reliable. Their only drawback is their susceptibility to rust.
- Asbestos cement pipes. They are used to strengthen columns quite often. However, only pressure pipes, which are expensive, are suitable for such tasks. They are connected by a coupling, which reduces the diameter of the column.
- Plastic pipes are also widely used when drilling wells. Their cost is quite low, this material does not rust, is environmentally neutral and durable. If the soil is stable and drilling is carried out to a depth of up to 50 m, plastic pipes can be used without fear.
Important! When encountering quicksand along the drilling path, only steel pipes should be used. If you choose plastic ones, they will be crushed, but asbestos-cement ones will be broken.
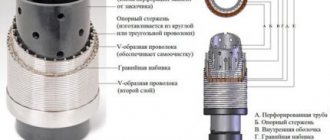
Filtration column
The well cannot be operated without a filter complex. The design must include a column containing a mesh for rough water purification and perforation. The perforated sector is complemented by a filter layer. The design of the filter system includes a settling tank in which the sludge settles. The filter in the column can be slotted or perforated.
Hole filters are quite simple to make. They can be made by drilling a number of holes of the required diameter. The holes need to be made in a checkerboard pattern.
Slotted columns are more efficient. The slots in them are cut into certain sectors. The filtration mesh located around the column is selected depending on the depth of the well drilling.
Important! When calculating the number and diameter of holes, it must be remembered that all holes must have an area of at least 25% of the total area of the column.
You can install the filter yourself. To do this, you need to follow a series of simple steps. First, slurry is removed from the column and its bottom is plugged. To solve this problem, you need to make a small bag (the size of the column) and fill it with cement mixture. The composition should contain 1 kg of sand and the same amount of cement powder. The bag is lowered to the bottom of the column. After three days, the cork will set securely.
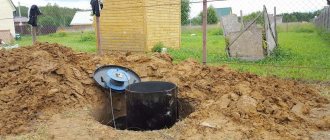
Adapter or caisson
A caisson is a well installed at the top of a structure. It is necessary to be able to service the well year-round. One of its main functions is insulation. In addition, it also performs a protective function. Special devices are placed in the caisson that allow the well to function normally. One of the advantages of installing a caisson is the absence of noise from operating equipment.
Caissons are made from various materials. They can be plastic or reinforced concrete. The most common are metal and plastic products. This is due to their durability and tightness. For stable soil, it is better to use plastic pipes. This will save on the construction of a well. If there is quicksand or groundwater, a metal column is installed.
The adapter is a special adapter that allows you to make the exit of the column from the casing pipe absolutely sealed. It is installed below the freezing level of the soil. Its cost is lower than that of a caisson. However, after every 2-3 years it is necessary to change the gaskets. For this reason, many choose to install a caisson.
Related equipment
The principle of operation of a water well is quite simple. The water in it rises from underground lakes due to high pressure. It is supplied to the house by a pump. The pump plays a major role in the operation of the autonomous water supply system. Domestic pumps should not be used when installing a water well. They are not suitable for long-term use. As a result of constant vibration, silt rising from the bottom clogs the filtration system.
Before choosing a specific pump, you should determine the level of the water surface. If it is located at a depth of 8 m, self-priming units should be used. At a mirror level of 15 m, the same devices are used, but with an upper ejector. For diving to depths of more than 20 m, deep-well pumps are chosen.
The list of related equipment includes:
- Head for casing pipe. Thanks to this design element, debris does not get into the barrel. It is also made of plastic or metal. The plastic head can withstand a load of up to 200 kg. When using a metal product, the maximum load weight can be 500 kg. The connection is made by flange. It is completely sealed. A rubber gasket is used for this.
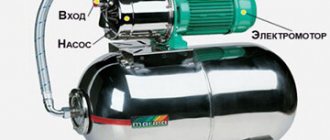
- The hydraulic accumulator is designed to compensate for hydraulic shock. Due to its use, the pump is operated less intensively. It is often called a membrane tank. The capacity of the hydraulic accumulator is selected based on the power of the installed structure. Install the hydraulic accumulator in the caisson.
Other well equipment is a pressure switch. It controls the activation of the pump. In addition, it turns on the pressure gauge and the valve for removing air from the system.
Types of wells for summer cottages
At dachas, three types of wells are mainly used.
Abyssinian
The Abyssinian water well is a small source that can be made in the territory of a private house, garage or other indoor space. The liquid is extracted from a depth of about 15 meters. Mostly the water is potable and clean. It has a favorable mineral composition.
Operating principle. It is based on an inch pipe. At its lower end there is a special filter and a drilling element – a needle. The pipe is driven into the ground, and a pump is installed on top to create a vacuum.
Pros:
- Made by hand.
- Does not interfere with landscape design.
- There is no need to rent special equipment.
- The pump is remote or located in a caisson above the source itself.
- The work will take about 1 day.
- Silting is excluded.
- Capacity up to 3 cubic meters/hour.
- If necessary, it can be easily dismantled and moved to another location.
Minuses:
- Depth limitation.
- Must be used constantly. Otherwise, you will have to pump, which is a labor-intensive process.
On the sand
The depth is determined by the level of the aquifer. The water well for sand is located in the second interlayer layer. Liquid accumulates in sandy deposits. Its depth can be a minimum of 15 m and a maximum of 30 m. It is produced mainly by the auger drilling method.
Operating principle. The source diameter is 100 mm. A special filter tube is placed at the bottom. Subsequently, it may become clogged and will have to be drilled again. The liquid is supplied to the top using pumping equipment.
Good to know: with constant use it will last up to 20 years - this is at best.
Pros:
- Minimum investment.
- The simple design allows you to do it yourself.
- Possibility of using small drilling rigs.
- Possibility to drill in any convenient place.
- There is no need to build a complex filtration system.
Minuses:
- Operational life.
- The performance is affected by the water level.
Artesian
Made for large houses. The depth can reach 100 meters or more. The dacha is equipped with a casing and service pipe. The first has a diameter of 159 or 133 mm. The second is 133 or 117 mm. The diameter of the well is determined based on needs.
Principle. First, the casing becomes clogged. It houses an operational and deep-well pump.
Pros:
- High performance.
- Long service life.
- Stable level.
Minuses:
- High price.
- Long production time, up to 7 days.
- Use of an expensive treatment system due to high mineralization.
- Use of large equipment.
- A package of permits is required.
Types of water wells
- Sand well.
This type has become more widespread due to the low cost of work and the ability to perform work manually. From a design point of view, a sand well is a single column with a bottom filter (see diagram). The well flow ranges from 5 to 100 cubic meters. per day. The drilling depth is limited to 10 meters (with machine drilling 30 m). To pump out water, a hand pump (a hand pump for a well) or a pumping apparatus is used. The service life is 10-15 years.
- Limestone well or artesian well.
It is much less common. The reason for this may be: the high cost of the work and the need to coordinate the drilling project with local permitting organizations (such as KP Vodokanal). The design of the well is more complex. It consists of two columns - casing and working. The first is installed before the limestone, the second - directly in the limestone. An artesian well has a higher flow rate from 7 to 40 cubic meters. per hour (depending on the diameter of the pipe) and lasts up to 50 years. Drilling takes place using machinery, and the depth can reach 320 meters.
Since we plan to drill with our own hands, we will consider in more detail the construction of sand wells, as they are the most accessible in terms of independent implementation.
Abyssinian well
Abyssinian well on the site
Despite their name, "Abyssinians" are actually boreholes, often called "needles." Due to the shallow depth, the daily productivity of such structures is low - no more than 25 cubic meters. The well is characterized by simplicity of design and consists of the following elements:
- cone-shaped filter;
- surface device for supplying water (pumping station or manual “rocker”);
- pipes ø25 cm.
Plugging the “Abyssinian well”
First you need to understand a number of nuances associated with the installation.
- Drilling near toilets, VOCs, garbage heaps, etc. is prohibited.
- Installation of the “Abyssinian” is possible only if the aquifer is located no deeper than 8 m from the surface.
- The surface pump used for such wells is not capable of handling hard rock.
- A hand pump will be an excellent complement to an electric one. Moreover, it will make the water supply of the site independent of electricity.
Pros and cons of the design
The advantages of “Abyssinian” include:
- ease of installation (the entire installation procedure takes no more than ten hours);
- low installation price;
- conditional mobility - if necessary, the well can be dismantled and installed in another location;
- no need to obtain a special drilling permit;
- low hardness of the resulting water, minimal concentration of inorganic iron;
- Possibility of installation inside the building.
But there are also disadvantages:
- infiltration of contaminants due to shallow depth;
- the well is not suitable for all soil types.
Well drilling with portable units
Manufacturing of the structure
First you need to prepare all the elements of the well.
Step one. A pipe ø25 cm, 1-1.1 m long, is used as a filter. Slots of 2.5 cm are made in the walls of the pipe in increments of 2 cm (not the entire length, but only 80 cm).
Making a filter
Important! All dimensions must be strictly observed, otherwise the strength of the pipe will be significantly reduced.
Step two. Then the future filter is wrapped with steel wire and covered with a stainless steel mesh measuring 16x100 cm. Clamps are used to secure the mesh - they need to be installed in 10 cm increments.
Step three. Another filter element is a 10 cm long steel tip. It can be pre-ordered from a turner.
Hammer with cone
Hammer with cone
Step four. The mesh with the tip is fixed using tin solder.
Important! All elements must be made of the same material - this will prevent corrosion.
Step five. The remaining pipes are cut into sections of 1-1.5 m. At the ends of the sections you need to cut a small thread.
Installation
Below is the simplest installation option that does not require the use of special equipment.
Step one. First, a hole measuring 1x1x0.5 m is dug in the required location.
Step two. This is followed by preliminary drilling using a simple garden auger. After about half a meter, the drill is extended with a ø12 cm pipe (bolts and couplings from a pipe of slightly smaller diameter are used for connection).
Step three. After the appearance of wet sand, drilling stops and the actual driving begins. The previously prepared structure is installed in the well and driven in with a headstock and an ordinary sledgehammer. To do this, the upper section of the pipe is wrapped with flax, and a headstock is put on it. The blows are applied to the headstock until the pipe is completely hidden - after that the next section is attached and the procedure is repeated.
Important! The headstock must weigh at least 30 kg, and therefore you need to be extremely careful so that it does not fall on your feet while working.
Drilling an Abyssinian well diagram
Periodically, water is poured into the pipe and listening is performed. Every half a meter the pipe turns clockwise, while you need to monitor the sound:
- in coarse sand there will be a grinding sound;
- in fine fraction - rustling;
- There will be no sounds in clay soil.
When noise occurs, the well is filled with water. If the water disappears slowly, then you need to walk another half a meter, and if it disappears quickly enough, then only 30 cm.
Important! During driving, the gap between the pipe and the walls of the shaft is filled with earth and carefully compacted.
Hand pump
Hand pump
Step four. All that remains is to install the pump. The design of a hand pump is extremely simple - a piston installed in a hollow metal cylinder. Once installation is complete, the well is pumped until clean water appears. The base is filled with cement mortar. If desired, the “Abyssinian” can also be connected to a pumping station.
Abyssinian well
Important! After a test run of the well, it is necessary to submit the water for examination. To do this, you will need sterile containers - they will be given to you in the selected laboratory along with instructions for collecting water.
“Abyssinian wells” do not require any special care. Probably, in ten years the water supply will decrease, but this can be easily corrected by cleaning the filter or flushing the shaft with strong water pressure.
Well pumping
Preparatory stage - construction of a pit
The top layer of soil is prone to crumbling, so the well is protected with a special structure - a pit, in other words, a hole one and a half by one and a half meters, the depth of which is no more than 2 meters. Boards are used to strengthen the walls, and they also line the floor. The strength of the floor depends on the thickness of the boards, so products no thinner than 5 cm are used. The pit is covered with a second flooring on top.
The holes for sand wells are small in size and are located at shallow depths, while the holes for artesian wells go several meters into the ground
Then prepare the holes in the following order:
Recent Entries
5 working ways to use tar in the garden 7 indoor plants that help you get married even in adulthood Indoor plants that can bloom in trouble
- erecting a drilling rig;
- remove the top flooring;
- find the center point on the lower flooring;
- make a hole whose diameter coincides with the shoe and couplings;
- cut out a second hole - in the upper flooring.
The vertical precision created by the two guide holes guarantees high-quality drilling.
When and where is it better to drill a well on the site:
DIY sand well in the country
When getting down to work, you need to start by drawing up plans and diagrams. First of all, think about where the well will be located in your yard. Take into account all the buildings on the site to understand how convenient the location you have chosen is. Don’t forget about what you planned to build at your dacha in the future. Remember that a well is built once, and moving it to another location will not be easy.
Work order
Having settled all the location issues and created work plans, it is necessary to begin their implementation:
- Carefully mark for future work. Make sure your accuracy is as high as possible.
- Prepare a hole for the drilling tool to enter.
- Install the drilling equipment to the required position.
- Start drilling.
- Assemble a filter column from a pipe, a sump, and a filter, and lower it into the pit.
- Look closely and find the space between the soil and the outside walls of the casing. It must be covered with crushed stone or sand, your choice. If you choose crushed stone, be extremely careful not to damage the outside of the casing.
- Rinse the filter by pumping water into the pipe. This way you can seal the top part.
- Using a screw pump and a bailer, pump out water from the well.
- Make sure that the water from the well is clean.
- Carefully and slowly lower the submersible pump into the well. This procedure is performed using a safety cable.
- Connect the water pipe or hose to the pump.
- In order for the water supply to be adjustable, install a special valve on the pipe.
- The casing, which protrudes above the surface, should not allow water to pass through in undesirable places. For this purpose, perform waterproofing.
- Equip the wellhead with a caisson, and then carefully secure it to the head using a welding machine.
- If you planned to supply pipes to the house, at this stage it is time to lay them in trenches.
- Cover the caisson with soil, and also make a concrete blind area.
This is how, in less than 20 steps, a well can be made in the country. Of course, everything is not so simple, but by doing the work as accurately as possible, you will succeed.
Drilling a shallow well with your own hands
You can also drill a well manually, but for this, of course, you will need special equipment. We list it below:
- Boer;
- drilling rig;
- winch;
- casing;
- rods.
By the way, it is not necessary to take a drilling rig, but only if the well is not deep. For shallow holes, you can remove the drill string by hand.
As for drill rods, they are made from ordinary pipes and are connected using threads or keys. The lower rod should not be forgotten, because it must be equipped with a special drill.
To make cutting attachments you will need sheet steel 3 millimeters wide. And another very important point concerns sharpening the edges of the nozzles. They need to be sharpened in such a way that they end up going into the soil underground in a clockwise direction.
Now you should install a derrick on the site where you will be drilling. Make sure that the height of the derrick exceeds the dimensions of the drilling rod so that lifting and retrieving the rod occurs completely unimpeded.
To create a well, you will probably need an assistant. You can start rotating yourself, but after some time, when the drill goes underground, the efforts of one person will not be enough to continue drilling work.
If you and your assistant run into problems or simply get stuck, try pouring water into the soil, as it will soften it somewhat.
While drilling, pull the drill out approximately every half meter to remove excess soil from the well.
When the drill reaches ground level, an additional frame is attached to it. Continue drilling until you notice on the ground that you have finally reached the aquifer. After this, you need to clear the hole of the earth and sink the drill even deeper, trying to reach a layer called waterproof. Having reached this layer, an abundant flow of water will begin into the well.
Pump out the dirty water using a pump and soon you will find clean water. If suddenly you notice that the water is not getting cleaner, you need to deepen the drill a few more meters.
Mechanisms for self-construction of wells
Usually, special drilling equipment is used to construct a well, so a completely logical question arises: how to drill a well in a country house without using it? It turns out that there is a simple manual mechanism consisting of a drilling rig and a column suspended from it. Let's take a closer look at the individual pieces of equipment.
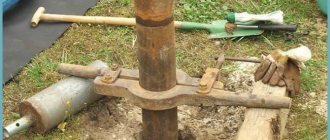
The base is a tower resembling a tripod. The material for the supports is either metal pipes or logs connected at the top with a pin. The drill column lifting block is also located there. The two legs of the tower are connected by a winch (gate).
The design of drilling equipment may vary. In some cases, if the impermeable layer lies close to the surface of the earth, a hand drill is sufficient
The drilling column is the main functional element. It consists of several three-meter rods connected by couplings. Sometimes a length of one and a half meters is enough. It is the column that is immersed in the ground, and its length is adjusted using rods. Replacement of special equipment are water pipes equipped with steel couplings.
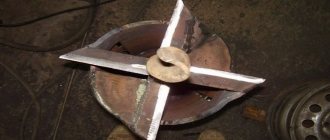
Drilling heads must be selected depending on the nature of the soil. Here are the most commonly used: 1 - “spoon”, 2 - “coil”, 3 - “chisel”, 4 - “bailer”
The impact or soil-cutting element is the drill head. It is screwed onto the column using a threaded adapter. As the head is lowered into the soil, soil fills the drill cavities. For different types of rocks, different attachments are used: a “spoon” is suitable for soft soil, a “coil” for dense soil, and a “chisel” for hard rocks. Use a bailer to lift the loosened soil up.
To prevent the walls of the well from crumbling, casing pipes are used - as a rule, these are ordinary plastic plumbing products, lightweight and easy to install. The bottom of the pipe is a kind of shoe, with a smooth or jagged edge at the bottom.
There are two main types of casing shoes: a – toothed (mill), b – smooth. Cutting area: 1 – teeth, 2 – smooth edge
Thus, the construction of a well takes place using special equipment, some of which can be purchased at the store, some of which you can make yourself.
You can find out how to find water for a well here:
Artesian well
An artesian well is significantly deeper in depth than the previously described wells, since water is extracted from the aquifer of deep rocks. The flow rate of such a source is very high and can provide water consumption for several houses. Since to install an artesian well it is necessary to turn to specialists, we will not dwell in detail on drilling and installation of equipment.
Drilling an artesian well
When choosing a company engaged in the construction of artesian wells, you should not trust companies that offer plastic pipes for casing the well, because such casing will not withstand the pressure of deep rocks. The company must have several serious drilling rigs and a hydrologist on staff.
Therefore, drilling an artesian well cannot be cheap. Another disadvantage is the high probability of increased water hardness, as well as the presence of divalent iron and manganese compounds in the composition. But at the same time, artesian water, when installed correctly, does not change its chemical and bacteriological characteristics, regardless of external conditions.
Another difficulty in developing such a water source is obtaining permission to drill and operate an artesian well. This is also quite difficult to do because it is necessary to comply with three zones of the well’s sanitary protection zone. For example, within a radius of 200 m there should be no garbage heaps, toilets with an open cesspool, etc.
There is only one way out: collective installation of a well for several houses.
Geological exploration
Before you start drilling, you need to decide how deep the water is in your dacha. That is, it is worth carrying out a geological check and finding a suitable area on the ground.
There are several possibilities for this:
- Set of hydrological maps.
- Exploration drilling procedure.
- Survey of neighbors.
In search of maps, as well as to obtain advice from a hydrological engineer, you can contact the relevant departments. Exploration drilling work is an expensive pleasure, and therefore it makes sense to use this service in case of emergency. In most cases, country property owners try to conduct surveys among their neighbors who already have their own well water. Perhaps they will be able to tell you how to clean a well at your dacha with your own hands if necessary. It is worth noting that this is an inevitable component of almost any drilling to access a water resource. And it is usually carried out after the procedure of introducing it into the ground.
In addition, it is worth paying attention to several important criteria - nature itself has prudently placed all the identification marks:
- The presence of a large amount of moisture-loving vegetation on the site.
- Various natural phenomena, be it evening fog or heavy dew.
- Characteristic behavior of insects and animals, in particular too large a concentration of flies, mosquitoes, midges.
As experts note, cats most prefer to sleep in places under which groundwater flows.
Dimensions of the well protection structure
The dimensions of the protective structure must be such that the installer can easily carry out his work.
Dimensions depend on the installation location of the equipment. If it is not located above the wellhead, 0.8 x 0.8 m is enough for a person to lower the pump. If a pressure accumulator or station is supposed to be installed in the caisson, add at least 0.5 m in front and behind.
If reinforced concrete rings are used to construct a protective structure, the minimum acceptable size is 90 cm, provided that the equipment will be located in the house. Inside the ring with a diameter of 150 cm, medium-sized equipment is placed, leaving space for the installer to work. A circle with a diameter of 200 cm allows you to place a tank with a volume of 200 liters inside.
Auger drilling rig
Such penetration into the soil is carried out using a special tool - an auger. It is a pipe with a diameter of 100 mm, to the bottom of which several turns of steel tape are welded. Their diameter is already larger - 200 mm. As a result, the design resembles a classic drill.
As the tool enters the ground, it is expanded with additional elements using a threaded connection, keys, hexagon or using couplings. A tripod tower is also required here, with the help of which the “drill” is secured. It can be made of wood or metal. The working pipe itself is quite heavy, and therefore it is worth using a winch with an electric motor to facilitate the process.
The essence of this procedure is as follows: the “drill” rotates, thereby destroying the soil layer by layer. Due to the spiral auger, excess soil rises upward. The end result is a well.
Only this method for creating a water well in a dacha with your own hands is applicable in cases where the soil is soft and loose and the depth of the well will not exceed 30-50 meters.
Ensuring the tightness of the casing pipe
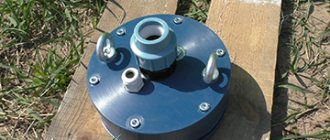
The casing pipe must be protected from the penetration of dust and melt water, which are sources of microorganisms. For sealing, a special device is used - a head made of cast iron or plastic, capable of withstanding a load of 200 kg. The device consists of:
- flange;
- covers;
- carbine;
- cuff;
- fasteners.
The head is selected according to the diameter of the casing pipe and, after being mounted on it, is fixed with a flange. The entrance cover has holes for entering the power cable and water pipe. All connections to pipes and cables are reliably sealed with rubber seals. A gasket is installed under the cover before fixing it with bolts.
How to install a water well at your dacha
Submersible screw pump for pumping wells
Having reached the required level, it is necessary to begin arranging the source. The first step is to install a deep cleaning filter. You can make it yourself. To do this, you will need a filtration mesh with a suitable hole diameter, perforation and casing pipe. It is enough to assemble a filter column from a pipe, a filter and a settling tank, fix the structure and lower it into the well shaft.
The next stage is preparing a mixture of coarse sand and fine crushed stone. The components are mixed and poured into the cavity between the source wall and the pipe. It is important to pump water at the same time in order to thoroughly rinse the cleaning structure.
The first pumping is done using a screw centrifugal pump. The water is pumped out until the well shaft is filled with clean and clear water. The equipment is tied to a safety rope (deep pumps have special holes for fastening) and lowered into the pipe. Next, you need to connect the pipeline to all water intake points, for example, a house, summer kitchen, bathhouse, etc.
The power and modification of pumping equipment depends on several factors: the depth of the source and its distance from buildings, the diameter of the casing pipe. If the source is shallow, you can use a surface pump.
The caisson, which will protect the well from blockages and freezing, can be built in the form of a canopy, decorative well, or house. The inside needs to be sealed and insulated.
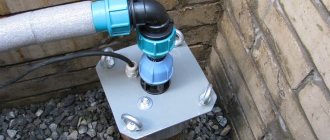
Using a Downhole Adapter
An alternative to an expensive caisson or house is a well adapter. The design allows you to bring the water pipe into the house directly from the well. The device has the form of a collapsible fitting and consists of external and internal parts. The water main is connected to the outer one, and the hose from the pump is connected to the inner one. Both parts are fixed to the wellbore, repeating its shape. Tightness is ensured by double sealing.
Using a downhole adapter.
When choosing an adapter, you should consider the following:
- The structure is located below the soil freezing level, and in the event of a breakdown, excavation work will be required.
- The casing pipe comes to the surface and is closed with a lid. An electrical cable is inserted through it.
- In winter, the well may freeze through the casing, so it is wrapped in heat-insulating material.
- Installation of equipment is possible only in the house.
- Installation of the adapter requires a special key.
Drilling process: sequence of actions
If you prepare the necessary equipment and follow the sequence of steps, there will be no questions about how to properly make a well. The finished drilling rig is equipped with a head and a mechanism in the form of a winch. The bar is passed down through both holes, if necessary, it is extended and the collar is secured. Usually two people rotate the gate, and a third person is needed to correct the position of the bar.
If the well is shallow, then only a drill column is used, directing it down strictly vertically. A tripod with a lift is necessary for deep wells
A mark is placed on the column, retreating 60-70 cm from the top flooring. Having lowered the column to the designated distance, it is removed back, removing the rock raised along with the drill. The cleaned column is immersed in the same way several times. Greater depth requires extension of the bar. To do this, another pipe is connected using a coupling.
Depending on the stability of the soil, the drilling method is chosen - with or without casing pipes. With stable, dense soil, you can drill the entire well without using casing pipes. Crumbling rocks indicate that after 2-3 meters a pipe equipped with a shoe should be installed. The diameter of the pipe is wider than the diameter of the couplings, so the pipe enters the shaft with difficulty. Sometimes, to place it there, they use a screw or a sledgehammer.
Products for laying water pipelines are used as casing pipes - metal or polypropylene pipes of the required diameter for external work.
If rocks are crumbling, collapse should be avoided. For this purpose, the drill is not lowered too low - below the end of the casing by a certain distance. Usually it is equal to half the length of the drill. Thus, the process consists of alternating drilling and installation of casing pipes, which are built up as they go deeper.
Selection and installation of equipment for water supply
Equipment for individual water supply consists of the following elements:
- The pump can be submersible or located on the surface.
- Automation that controls the operation of the pump and protects it from overload.
- Hydraulic accumulator, open or closed (membrane tank). The latter is preferable, it ensures stable pressure in the water supply.
An open water storage tank must be installed at the highest point of the water supply system, in the attic or under the ceiling of the upper floor. A closed container has no restrictions on the installation location.
The nature of the well arrangement is largely determined by the type and location of installation of the water supply equipment. Let's consider the main options for equipping the source with equipment.
Surface pump for shallow well
A surface pump is significantly cheaper, easier to install and maintain than a submersible pump. The most rational and economically viable option is a three-in-one complete pumping station, which includes a surface pump, a relatively small (20-60 l) membrane tank and all the necessary automation.
Two pipes are connected to the surface pump: one of them goes into the well, the second goes from the pump to the water supply system.
A hose or rigid pipe immersed in the water intake is equipped with a mesh filter that prevents abrasive mineral particles from entering the pump.
Before turning on, the surface pump needs to be filled with water necessary for cooling and normal operation of the engine.
Before the water leaves the pump into the water supply network, there is a fine filter designed to protect subsequent equipment and to prepare the water for use.
Only the suction hose is lowered into the well. Thus, the construction of the well and pump maintenance are simplified. In addition, the hose has a small diameter, which allows it to be used in so-called “Norton wells” (Abyssinian wells), where a submersible pump simply does not fit.
Pumping stations have only one, but very significant drawback. A surface pump is not able to lift water from great depths; for most models the limit is 8-10 m. This limits the scope of application of pumping stations to wells and shallow wells.
Due to the low lifting height, pumping stations with an overhead pump often have to be installed as close as possible to the wellhead. Otherwise, you will have to additionally overcome hydraulic resistance from the water source to the place in the house where the pump is installed.
Submersible pump for deep well
To lift water from wells more than 10 m deep, submersible pumps must be used. Choosing the right pump and determining its suspension height in the casing is a separate and rather difficult issue.
Within the scope of the article, we only need to understand what additional equipment the pump is equipped with, how it is mounted and connected.
- If water will be pumped from a depth of more than 10 m, a submersible pump is required.
- Before installation, the submersible pump is connected to the water supply hose. A rope is used to hold the unit.
- The processes of connecting and servicing deep-well pumps are simplified as much as possible so as not to cause difficulties even for an inexperienced owner.
- You can easily prepare a deep-well pump for installation in a well by strictly following the instructions.
As we have already mentioned, the mandatory elements of the water supply equipment of an individual house are a hydraulic accumulator and automatic control systems. In the case of a submersible pump, the lift height of which is several times greater than that of a surface pump, there are no restrictions on the installation location of the closed hydraulic accumulator.
The membrane tank and control can be placed quite far from the wellhead; the distance to the source has little effect on the operation of the system. An excellent place to place equipment is a dry and clean technical room in the house, in the basement or first floor.
Scheme of autonomous water supply based on a submersible pump. The membrane tank can be located at a fairly large distance from the well
Preparing the structure for operation
The end of drilling is the moment when the drill reaches the waterproof layer. The well is thoroughly cleaned with a bailer attachment, and a filter is installed at the bottom, which will serve as a barrier to retain mechanical impurities. The filter grid can be a metal mesh with a fine mesh or a perforated pipe with a small gap.
The well filter consists of the following parts: 1 – perforated pipe, 2 – holes of the required diameter, 3 – wire winding, 4 – metal mesh
Having equipped the inside of the well, its above-ground part is equipped and decorated. To do this, remove the boards of both floorings, dismantle the lining of the pit walls and backfill. To pump water out of the well, a pump (submersible or surface) is installed. The upper part of the structure is decorated with decor. A variety of design ideas will work, from a simple head canopy to a gazebo or fake well. One option is to install a crane.
You can learn how to make a well head with your own hands from the material:
Here are two examples of how you can equip a well in your country house:
Beautiful and original design of the well - a small decorative well made of wood, very reminiscent of the real one. Decor design may vary
To camouflage mines, wells, boreholes, decor is made from artificial stone. In appearance it resembles a natural element - a stone or a large stump
Well care and operation
The fact that you equipped the well yourself does not mean that it will serve you for a long time, because it needs to be operated correctly and also requires careful maintenance.
If you notice that water has stopped flowing with its usual pressure, or it has begun to come out in small jerks, mixed with air, this may only mean the need to clean the well. This issue cannot be put off until later, because the problem will not disappear on its own and will grow like a snowball.
To clean the well you will need a water or air compressor. This way you can quickly and reliably get rid of sand and silt.
If the condition of your well is more neglected, we recommend that you use a short circuit, and maybe even acid. But it is better to trust these techniques exclusively to professionals who earn their living from this type of work.
Correct operation
Water supply pumps
The service life of a water supply from a well in a dacha will depend on the operating characteristics of the source. To ensure that it lasts for more than one year, you should pay attention to the following rules:
- Choose the right pumping equipment. Too powerful will quickly dry up the source. Therefore, before purchasing installations, you need to compare the well flow rate with the characteristics of the engine.
- Additionally, the well is equipped with a lid that prevents foreign objects, such as debris, birds, insects, dust, etc. from getting inside.
It is necessary to regularly disinfect the source and monitor the quality of well water. Due to continuous changes in the composition of soil and groundwater, the quality may change for the worse.
Rotary Drilling Tool
This method involves certain difficulties, but at the same time the technique itself is the most reliable for forming a well. In this case, the drill is driven into rotation by the rotor. You can only build the frame on your own, but the remaining elements must be purchased from a reliable manufacturer:
- drill rod;
- swivel;
- paddle drill;
- motor pump;
- gear motor.
Using this installation, you can perform drilling with flushing, as well as perform rotational, percussive and other work. In addition, it is possible to supply a solution that will erode the soil in order to facilitate its excavation. In addition, the process itself is much faster.
Sand wells: what you need to know and how to get clean water ↑
Sand wells are an advantageous combination of low cost and long service life of the water intake. This is the best solution for a summer house. The yield is sufficient to provide a small cottage and maintenance of the site. Sand sources are less susceptible to changes in performance and are easy to maintain.
Choosing a location and determining the depth ↑
The well is constructed to a depth of up to 40 m. The minimum depth depends on the depth of 2–3 sandy water carriers and ranges from 20 m. It is almost impossible to determine the depth of the layers without exploration work and the availability of special maps.
Design and depth of sand water intake arrangement
The period of use of the source and stability of performance is at least 10 - 15 years. The quality and quantity of water depends on the composition of the aquifer and water saturation. If the water lens is located in coarse sand, or a gravel-sand mixture, such a well is less susceptible to silting and has good productivity. Average flow rates are up to 1.5 - 2 m3 per hour.
The location of the installation is chosen depending on the drilling technique. A flat area is required at a distance of 5 m from the house or other buildings. To maintain the absolute verticality of the trunk, choose flat areas without slopes or elevations.
Advantages:
- Simplicity and speed of arrangement - the standard turnaround time is 1-2 days.
- Low cost.
- Ability to carry out work in hard-to-reach places.
- Stable performance, ease of maintenance, possibility of seasonal preservation.
Drilling technique and source arrangement ↑
Depending on the landscape conditions, soil composition and the depth to which they plan to drill the well, the work technique is chosen:
- Auger drilling using a mobile unit or a small-sized collapsible unit.
The unit can drill to a depth of up to 40 m in 8 hours
- The shock-rope method is applicable in soft soils.
- Rotary drilling with water pressure supply for washing the mine.
MDR is used when passing to a depth of up to 40 m. The structure is assembled in a limited area - an area of 2x3 m is sufficient. For the entire complex of work, 1 day is enough. The casing is formed from thick-walled steel pipes or special reinforced plastic ones. At the bottom of the casing there should be a perforated section - a filter that protects the bottom from the penetration of clay and sand.
Wells are equipped with pumping stations. It is preferable to use submersible pumps selected in accordance with the productivity of the source and the intensity of well operation.
Installation of caisson and installation of equipment
An underground water supply is laid from the drilling site to the cottage, digging an insulated pipe below the freezing point. The automation and hydraulic accumulator are installed in a caisson or basement.
A little about the types of water wells
Based on the results of assessing the depth of the aquifer, dacha owners will have to choose from three options:
- the water lies close, at a depth of up to 12 meters - an Abyssinian well;
- an aquifer no deeper than 50 meters - a well “for sand”;
- The water is very deep, up to 200 meters - a well “for limestone”.
An aquifer lying close to the surface is rare. The lucky owners of such a site can make a needle well, which will take only one day or even a few hours to create. The technology for creating an Abyssinian well is that the soil is pierced with a rather thin pipe: only 1-1.5 inches. A cone-shaped filter is installed at the end of the pipe, which facilitates penetration through the soil thickness. A suction pump is mounted on top. However, little water comes from the Abyssinian well, so it may be necessary to construct another water source of this type. The compact shape of the Abyssinian well allows you to drill such a well even in the basement of a house.
A “limestone” well, i.e. an artesian one, is also not common. This option is good because it allows you to get a large amount of very clean water. But it is almost impossible to successfully drill such a well on your own; you will need to attract a team with professional drilling equipment. In addition, artesian water sources must be licensed by the relevant authorities. Please note that if there is a layer of artesian water under the dacha plot, it makes sense to discuss with your neighbors a joint payment for the brigade’s services, since such a well can easily provide water consumption for several households at the same time.
To create an Abyssinian well, a thin one and a half inch pipe with a filter tip is driven into the ground. Compact dimensions and simple technology make it possible to install such a well in the basement of a house or make an additional source of water in a summer cottage
Most often, water lies on the horizon within a depth of fifty meters. Such a well can be completed even by novice drillers using one of the methods developed for such situations. Which ones? Read on.
Which drilling method should I choose?
For such large-scale drilling work, you will need a special installation that you can make yourself. The type of installation depends on the selected drilling method:
- shock-rope;
- screw;
- rotary.
To make a unit capable of creating a narrow well several tens of meters deep, in addition to conventional tools, you will need a drill, an angle grinder and a welding machine. Inexperienced craftsmen are advised to acquire skills in working with these complex devices. Although creating a homemade drilling rig will require a lot of time and effort, the device can be used effectively in the future, for example, when installing a pile foundation. Some craftsmen with such an installation started their own business installing water wells in neighboring dachas.
Option #1 - shock-rope installation
A working tool of this design is a rather heavy cartridge and a bailer mounted on a cable. The cable with the load is suspended vertically on a special frame. The soil is broken up using a chuck and removed with a bailer until the depth of the pit reaches the aquifer. The weight of the cartridge must be at least 80 kg. Such devices are now practically not used manually; operations are performed using a rotary motor, which raises and lowers the rope with a load.
To create a cable-percussion drilling rig, you will need a bailer and a chuck with sharpened edges, as well as a cable, a frame on which the load will be attached, and a motor to control the cable
It is recommended to sharpen the lower edge of the chuck and also attach several sharp triangular elements to it to increase efficiency. First, a hole of a suitable diameter is made in the ground using a regular garden drill, and then work begins with a chuck and bailer. Impact-rope drilling is quite effective on both light and clay soils.
An interesting version of this installation is presented in the video:
Option #2 - auger drilling rig
When this device operates, the soil is removed using a special drill, which is made from a 100 mm steel pipe. A couple of turns of a screw with a diameter of approximately 200 mm are welded to its lower end. Two inclined steel knives are installed along the edges of the auger. A removable handle, also made from a piece of steel pipe, is mounted on top.
To make a drill, several turns of metal with sharpened edges are welded to a metal pipe. As the wellbore deepens, the pipe is extended to the required length
As the structure deepens into the ground, the main pipe is extended using a threaded connection or coupling. The device is secured using a tripod tower made of wood or metal. To remove a fairly heavy pipe from a pit, it is recommended to use a winch with an electric motor.
Here is an example of auger drilling work with simultaneous casing:
Option #3 - rotary drilling rig
This is the most complex, but also the most reliable installation option for drilling wells. You can make only the frame for such a device yourself, and it is recommended to purchase other elements, such as a drill rod, swivel, blade drill, motor pump and gear motor, from a reliable manufacturer. Using such a setup, you can carry out flushing drilling, impact drilling, rotary drilling, etc. The ability to supply a solution that erodes the soil and facilitates its excavation increases the speed of drilling work several times.
Example of work:
Please note that if one of your neighbors already has experience in drilling a well on their own, it makes sense to inquire about the possibility of borrowing ready-made drilling equipment.
Drilling methods and tools
How to drill a water well yourself? The following types of drilling are available for amateur performance:
- shock;
- rotary and shock-rotational;
- shock-rope.
Shock
Used to create a needle well, also called an Abyssinian well. In fact, the soil is literally pierced by a pipe with a pointed tip, having a diameter of 25 to 120 mm. A series of blows are carried out on its end with a special heavy instrument - a headstock.
Rotary (rotary) and impact-rotary
With this method, the drill bit is attached to the end of a so-called drill string or rod, consisting of several pipes connected in series.
As the well deepens, the drill string is expanded by attaching more and more bends to it.
When manual drilling, only bayonet couplings can be used to connect individual links.
The column is rotated using a lever embedded in the upper elbow, thus forcing the drill to sink into the ground. During rotary impact drilling, the drill rod is periodically lifted and dropped, loosening the soil, or it is hit with a sledgehammer.
Tools:
- Screw. A two-lead version is used, since one entry will go to the side and quickly get stuck. When rotary drilling with an auger, cohesive soils of uniform density pass through - soil, soft clay, loam, wet sandy loam.
- Spoon drill. It is used for rotary or rotary impact drilling to develop loose and loose soils that cannot be held between the auger blades.
After drilling a well, work should be carried out to improve it. It is very important to build a reliable well cap to protect the well from flood waters. Do-it-yourself well head: manufacturing progress, varieties and markings.
Shock-rope
The easiest way. A heavy drilling rig is suspended on a rope, the end of which is thrown over a block. The projectile is lifted manually or using a winch and then dropped, loosening or removing the soil (depending on the tool used).
Types of drills:
- Chisel: the lower part is equipped with sharp teeth. Used to destroy boulders and loosen dense soils.
- Bailer: looks like an inverted glass with a valve. It is used for sampling loose and semi-liquid soils: when the bailer is dropped, its cavity is filled with rock. The instrument is pulled to the surface and emptied.
- Hammer cup (Schitz drill): the principle of operation is the same as that of a bailer, only without a valve. It is used for sampling viscous, sticky soils that are held in the cavity of the glass due to friction.
Which well is better to drill: selection criteria ↑
To decide which well to choose, you need to know the answers to a few simple questions:
- For what needs will the water be used? If the source is equipped only for the purpose of seasonal irrigation, or for construction that will not be completed within the next 12 months, there is no point in investing in the construction of deep water intakes. If a well is not used for several months, its filter becomes silted and clay plugs form in the wellbore. After downtime, the well will have to be cleaned, but it is not always possible to restore the flow rate. If you need drinking water for constant maintenance of your home, then it is advisable to drill a filter or artesian well.
- How much water is needed per day? Sources, depending on the type, have different performance. In small surface water intakes, the amount of water decreases during drought, and the flow rate is not enough for intensive withdrawal from several taps.
Range of occurrence of aquifers
- At what depth are the aquifers located? In dry soil, you may not be able to reach the water-saturated layer with shallow drilling depth. Analysis of maps of the occurrence of sandy and limestone rocks makes it possible to calculate the cost of slaughter and determine which well is better to drill: for sand or for limestone. A mistake with the choice of location and depth of the well may result in the need to develop another source.
Arrangement of casing in sandy water intake
- Is it possible to deliver drilling equipment to the site? In difficult conditions, when there are no access roads, or the site is on a steep slope, it is impossible for a mobile drilling rig to reach the work site. In this case, the choice of well type is determined by the ability to install small-sized equipment. If the slaughter has to be done manually, then a sandy water intake is arranged up to 1 sand aquifer.
Deep drilling for limestone is carried out using a professional installation