Purpose of the drainage system around the house
Drainage around the house and blind area (a waterproof covering around the perimeter of the building, located at an angle to the wall for easy drainage of water) are necessary to protect the foundation and base of the walls from the effects of groundwater and precipitation. The blind area performs an important function, but without a drainage system it is not able to effectively protect the house from moisture.
Heavy rains and melting snow raise the groundwater level. In the absence of a water drainage system, the following processes occur.
- Water stagnates in the upper layers of the soil. The soil becomes swampy and heaving. When it freezes, it expands, putting uneven pressure on the foundation. As a result, the house settles unevenly.
- At the same time, water seeps into the microcavities of the foundation and the base of the walls. When it freezes, it expands, increasing the size of the cavities. Over time, the foundation cracks, which sharply reduces the life of the structure.
- Water seeps into the basement through cracks. This causes mold growth and damage to supplies and equipment placed in underground areas.
- Further, dampness and mold spores rise to residential floors, affect walls, furniture and cause diseases in households. In cold weather, moisture in the underground causes the formation of frost on baseboards and walls.
Drainage around the garden plot is used to create optimal soil moisture on flooded lands. This gets rid of puddles and stagnant water. Allows you to grow the desired crops and get a good harvest.
Drainage materials
When designing a drainage mechanism, it is of utmost importance to calculate the degree of load on the drainage elements. Under heavy loads, plastic materials may not withstand, so a concrete version will be more reliable. Constructing wells, gutters, and channels from concrete can withstand 90 tons of pressure.
The use of cast iron protective gratings on gutters for drainage extends their service life. The material for rainwater inlets located around the circumference of the building is selected based on the degree of operational load.
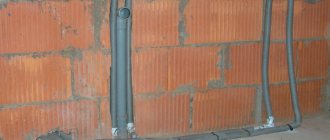
The pipeline is laid around the perimeter of the building in trenches with a drainage layer.
Drainage pipes may have a corrugated or smooth surface. A smooth coating helps ensure good throughput for enhanced drainage, and a corrugated pipe gives rigidity, and therefore strength, to the pipeline.
What does a drainage system consist of for removing rainwater from a house? Source tl.decoratex.biz
Types of drainage, their features and purpose
There are 2 types of drainage around a low-rise building: surface and underground; let’s look at both types:
Surface
Surface drainage and point storm drains around the house are built to collect excess moisture that falls in the form of precipitation. According to the layout of drainage pipes (drains), this type of system is divided into ring, layer, and wall.
For each specific case, a separate project is created, which takes into account the landscape, soil type, location of buildings on the site (existing or future), type of foundation of permanent buildings, level of soil freezing and many other points.
Type 1. Wall
The drainage around the winding is of the linear variety. Be built simultaneously with the foundation. Construction of the system after completion of construction is possible, but it is much more difficult and expensive.
Necessary for removing moisture from the external surfaces of the foundation. It consists of trenches encircling the foundation along the perimeter at the maximum permissible distance, in which drains are laid. The depth of the trench is 0.3-0.5 m below the foundation level.
The trenches have a slope, usually 1 cm -2 cm per 1 m, so that water flows under the influence of gravity to one lower point.
At the lowest point, the drains are connected to the inspection well. An outlet pipe is also connected to it.
Type 2. Layered
A complex, expensive and at the same time very effective way to prevent the destructive effects of water on the foundation. It is used to drain the soil under the foundation and communications when:
— a permanent structure is planned to be built directly above the groundwater lens;
— the site is located on an aquifer;
— groundwater comes to the surface under pressure;
— other methods of protection are not effective.
The plot of land is not drained in this way due to economic infeasibility.
Reservoir drainage is constructed under the foundation and connected to a wall or ring drainage system. This bond effectively removes moisture.
It is a sand cushion with a thickness of 0.3 m with prisms made of gravel or crushed stone, which are placed at a certain pitch. Also, the sand cushion can be covered with a continuous layer of gravel/crushed stone. The latter option is used when enhanced water drainage is required. The perimeter of the sand layer is made larger than the perimeter of the foundation.
The top of the drying pad is covered with perlite. Perlite prevents concrete from leaking into the gravel or crushed stone layer when pouring the foundation, maintaining its drainage properties.
Type 3. Circular
To be built to lower the groundwater level. Unlike stratum, it is used to protect the foundation from water and drain the land.
To protect the house, a ring system is laid around it at a set distance. The distance to the drains is maintained at least 5 m to prevent soil shrinkage. If necessary, strengthen the soil. The drainage depth around the house is 50 cm ± 20 cm.
To drain the site, a project is being developed that matches the topography and location of the buildings.
The principle of this drainage device around the house is similar to the construction of a wall system.
The advantage of the ring type is that it can be erected when the construction of the house is completed. Also, the ring system can be combined with wall and layer ones.
Underground (deep)
They build deep drainage around the house on clay soils when the construction of a surface system is impossible or impractical. It is a complex, sometimes multi-level system. They are built on watery lands, in lowlands and in areas located in floodplains and near floodplains.
For private houses, 3 types of underground drainage systems are relevant: horizontal, vertical, combined.
View 4. Horizontal
Consists of drains, inspection wells, and catch basins. You also need a pump to pump out water.
The principle of laying drains for an underground horizontal system is similar to laying surface linear drainage. At corner joints and at the lowest point, drains are connected to inspection wells. This is necessary in order to notice and clean up dirt in time.
Water flows through drains into reservoirs. From there it partially goes into the underlying layers of soil. The water that remains in the reservoir is pumped out with a pump for irrigation or other household needs.
Similar to surface drainage, horizontal deep drainage can be implemented in the form of a ring, wall and layer structure. The latter differs from the layered surface one in that instead of a drainage cushion under the foundation, an artificial reservoir is created, filled with gravel or crushed stone with a depth of 0.3 m. The water from it goes into the soil or into another part of the drainage system.
View 5. Vertical
It consists of water intake wells and reduction wells, with a depth of 20 to 50 meters and a pump. From the wells, a certain amount of water goes into the soil, the excess is pumped out with a pump.
Type 6. Combined
Combines the design of vertical and horizontal drainage.
On topic: Site drainage in 5 steps: how to do it yourself
Drainage of rainwater from the house: deep drainage
The simplest option for deep drainage is an open ditch dug with a slope towards the final water intake (ravine, swamp, pond, lake).
To ensure that ditches do not interfere with movement around the site, they are filled with broken brick, stone, crushed stone or similar materials.
Drainage ditches are dug along the perimeter of the site. Their width is 0.5 m, and their depth is 0.6-0.7 m. The walls of the ditch are beveled at an angle of 20-30°.
Water is discharged into a drainage ditch common to several areas. Such drainage is cheap, but not without its drawbacks. It is short-lived and difficult to install without affecting the landscape of the site. The filler quickly silts up and system performance deteriorates. Open drainage is not used near roads due to possible soil subsidence.
Closed drainage
It does not disturb the appearance of the site and allows the soil to be used for creating lawns, planting plants and erecting light, foundationless buildings. For closed drainage, a trench is laid with a depth of 0.7-1.5 m and a width of 0.5 m.
It is dug with a slight slope towards a natural watercourse or drainage well. The bottom of the trench is lined with sand and small crushed stone to a height of 10 cm. The backfill layer is leveled in accordance with the recommended slope angle (5 mm/m) and compacted. Drainage pipes are laid on the prepared cushion.
The trench is half filled with crushed stone so that a water-permeable layer of crushed stone surrounds the pipeline on all sides. Gravel and soil removed when digging a trench are poured on top, and a layer of turf is laid on top of it.
To reduce the labor intensity of the work, drainage pipes and storm sewer pipes are often laid parallel in the same trench.
Usually several side pipes are laid to the central drainage pipe. The central pipe collects water from those adjacent to it and carries it outside the site or into a drainage well. Drainage wells are installed when there is not enough slope and space for water drainage.
Do-it-yourself drainage installation around the house
It is quite possible to install drainage around the house yourself. For this, basic drawing knowledge and the ability to perform simple construction and installation work are sufficient.
Before starting work you must:
- conduct geodetic and geological surveys of the site;
- determine the type of future drainage system;
- draw up a project.
This work must be performed by specialists. Without the appropriate skills and equipment, drawing up a project yourself can lead to serious mistakes. As a result, all the work will have to be redone.
If drainage is built incorrectly under the foundation, this will lead to premature destruction of the building and the need to demolish and rebuild the house.
On topic: Site drainage, step-by-step instructions on how to do it yourself in 5 steps.
Selection of materials and their estimated cost
The selection and purchase of materials is carried out when the project is ready.
For a DIY drainage system around the house you will need:
- geotextiles with a density of 100 -150 g/m2; price from 17 rub./m;
- drains; price from 50 rubles per meter of plastic pipe;
- crushed stone or gravel larger than the size of the holes in the drains; from 200 rub/m3;
- sand; from 100 rub/m3;
- plastic inspection well; from 950 rub.;
- plastic collector well; from 10,000 rub.;
- drainage sediment; submersible type from 3000 rub.;
- fitting.
Drains are made of plastic, asbestos-cement and ceramic. Preference should be given to pipes made of high-strength plastic that can withstand significant loads.
There are plastic drains on sale, wrapped in geotextile or coconut copra.
Asbestos-cement pipes are heavy and require special equipment for careful and correct installation. Ceramic ones have a high drainage capacity, however, they are fragile, difficult to install, and may not withstand the pressure of frozen soils.
What tools will you need?
Before you begin, you need to prepare your tools. You will need:
- bayonet and shovel shovels;
- garden wheelbarrow;
- level;
- roulette;
- manual rammer.
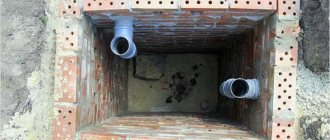
A cesspool for a toilet is a simple sewage system with high groundwater
Low-cost local treatment facilities for dachas are represented by cesspools. When constructing a structure, the rules of SanPiN and SNiP must be observed:
- The storage pit is designed to collect domestic wastewater. It is located on a plot next to a country house;
- This treatment facility must be 10 m away from the water supply and 20 m from the drinking water well;
- The cesspool is located at a distance of 10–12 m from structures in neighboring areas. Violation of this rule will lead to the destruction of the foundations of houses or other buildings in the event of emergency situations;
- It is allowed to make a drainage hole at a distance of 1 m from the fence;
- The depth of the structure does not exceed 3 m.
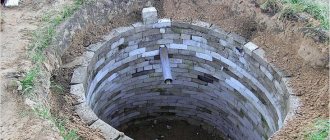
This is a cheap sewer for a summer residence. The design does not provide for the use of a bottom. You can use such a structure when the daily volume of wastewater does not exceed 1 m3. When performing excavation work, it is necessary to ensure that the depth of the hole is no more than 2.5 m. If the groundwater layer is disturbed, then sewage will begin to pollute the environment. When there is a lot of waste, it is better to use a septic tank.
The temporary structure of the cesspool is constructed from cheap scrap materials. It will last at least 10 years. Such a do-it-yourself sewer system at the dacha can be made from tires, boards or beams. A sewage container is installed in the pits.
How to properly make drainage around the house. Step-by-step instruction
After completing the design work and purchasing everything you need, you can begin work.
- Clearing the area. Remove debris and anything that might interfere with work.
- Preparing the trench . Dig trenches while maintaining the slope. The minimum width is equal to the pipe diameter plus 30 cm. The slope is checked by level. Its size is 1-2 cm per 1 meter.
- Backfill. Fill the trenches with sand in a layer of at least 10 cm.
- The foundation is prepared for the wells . Make a platform of suitable size, filled with sand. If the groundwater level is high, the site for the well is concreted with a 10-centimeter layer on which the well is fixed.
- Cover the trenches with geotextiles . Its edges should extend beyond the top edges of the trenches.
- Laying drains . Crushed stone is poured onto the geotextile in a layer of 10-20 cm, leveled so that the thickness is the same and the angle of inclination does not change. Drains are laid, connecting them with fittings or sockets. Connect the pipes to the “inputs” of the well. For tightness, rubber O-rings are used.
- Backfilling of pipes . An even 20-centimeter layer of crushed stone is poured over the pipes and wrapped in geotextiles.
- Backfilling with sand . 20 cm of sand is poured on top of the geotextile, compacted, and covered with soil.
- Digging a well . The wells are buried and covered with lids.
If there is a large amount of precipitation in the region, especially in summer, storm drainage trays (storm drains) are located directly above the drains. They are laid on a sand cushion.
You can see an example of laying drainage around a house in this video.
Rules for drawing up a sewerage diagram in a house
The sewerage diagram in a private house is tied to the house plan. It must contain the key elements of the system - a riser (if the building has more than one floor), pipe markings (internal wiring, corners and turns), water drainage points.
When designing, it is important to remember that an overly complicated circuit will cause problems in the future during operation and repair.
Internal wiring is laid during the construction of the house. Its installation begins when the roof of the house and ceilings are installed, but the finishing work of the premises has not yet been carried out. External sewerage is installed after the internal system is fully equipped. Below is a sewerage diagram for a private two-story house:
General diagram of internal sewerage in a two-story house Source strojdvor.ru
The procedure for drawing up a diagram:
- All drawings are drawn to scale; the installation location of the riser, pipe laying lines, and the number of drain points (connection of plumbing and household appliances) are indicated on the plan.
- The size of the riser is determined, the total length of the pipeline is calculated (taking into account the outlet), and the exit point from the main riser structure.
- In places where blockages may form, cleaning and inspection are provided.
- A separate drawing is constructed for each floor.
- The size and installation location of the sewer pipe are calculated (in large sewer systems it prevents the occurrence of vacuum in the sewer pipe)
- The external communications scheme is based on the same principle.
See also: Catalog of companies that specialize in the design and installation of sewerage and water supply
Purpose of storm drain
A storm drain is installed to drain rain and melt water. It belongs to the point type. It is used as an independent structure and in combination with a drainage system.
Installing a storm drain is not difficult, but it is important to design the future system well.
Selection and calculation of materials for storm drains
When the project is ready, it is necessary to purchase building materials. You will need:
- sand;
- crushed stone;
- cement;
- sealant;
- storm drains;
- water collection tanks (storm water inlets);
- pipes;
- gutters;
- sand traps;
- gratings;
- observation wells for monitoring water levels;
- adapters for turns;
- plugs;
- brackets.
Drainage trays are made from asbestos cement, cast iron, stainless steel, and plastic. For self-installation, it is better to choose plastic. It is lightweight, pliable, and does not require complex equipment for installation.
The profile of the trays comes in the form of U, U and slotted. U-shaped is the most convenient for a private home. It is quite capacious and has no corners where dirt accumulates.
The calculation of materials for a stormwater system depends on the amount of precipitation, the design of the house, the area and characteristics of the land plot.
The diameter of the drains is chosen:
85 mm – for 10 l/s
100 mm – 20 l/s
150 mm – 50 l/s
200 mm – 80 l/s
The length of the gutters depends on the height of the house.
Drainage trays and gratings are calculated based on the linear footage of the storm drain using design calculations or tape measurements.
The volume of bulk materials can be approximately calculated using the formula:
V=abc
where a, b are the width and length of the trench, respectively,
c – layer height.
For sand, it is worth taking an amendment for compaction of about 20%. For crushed stone - about 5-10%.
Wells are selected based on the amount of precipitation. They are calculated using the formula:
M = (20A)Sk,
where M is the mass of precipitation;
20 – time, in minutes;
A – precipitation intensity over a period of 20 minutes;
S is the area from which water is collected;
k is the moisture absorption coefficient of the material.
The amount of sediment mass must also be known in order to correctly select the depth of drainage trays and their number on the site.
Do-it-yourself storm drain installation
Installation of storm drains is carried out after preparing the site (collecting garbage, eliminating all unnecessary things).
- Dig trenches up to 30-50 cm deep. The trenches must be clearly aligned with the projection of the location of the drains.
- Pits are dug under the drains. They are equipped with water intakes with a capacity of 5000-10,000 ml with special containers for collecting waste.
- Plastic rotary and inspection wells are installed.
- The trenches are filled with sand. Drainage trays are laid on the sand and grates are installed.
- Every 10 meters of a straight line, at all turns and at the exit from the tray system, sand traps are placed.
- The collected water is either discharged into a ditch/storm sewer outside the site, or collected in a container and watered with it in the garden. Draining rain and melt water into sewers for disposal of household wastewater is prohibited by SNiP.
If water is discharged outside the site, permission is required from the Department of Natural Surveillance, the Central State Hydrometeorological Service, the UPN, the Fisheries Department, and the Basin and Water Management Department. It is necessary to provide the stormwater drainage design to these services. Construction should begin only after its approval.
Where to drain the water
There are several options for recycling water flowing through a linear drainage system. If the house is located in a green area and it is possible to lay a drainage system to a lake or ravine, this is worth taking advantage of, but this option is rare.
Another convenient method - draining water into a storm sewer - is only possible if the site is connected to it.
Water cannot be drained into a house station or septic tank.
Another common option is an absorbent well, the depth of which should reach the permeable layer.
Read also
Turnkey installation of drainage around a private house
If you are not sure that you will be able to carry out proper drainage and storm drainage around the house with your own hands, you can order turnkey work. To do this, you need to choose a reliable contractor and find out the cost of the service in advance. You can buy all materials and components for installing a drainage system from a warehouse in Irkutsk.
How to choose a contractor
When choosing a contractor, you need to consider the following points.
- Famous name. The organization or team must have a certain reputation in a given locality/region.
- Positive feedback . It is necessary to find as many reviews and information about this contractor as possible.
- Official registration with tax and other authorities. Serious contractors have the status of individual entrepreneurs or legal entities. All information about them is transparent.
- Portfolio. The customer has the right to demand examples of work.
- Agreement. It is necessary to conclude an agreement. Before signing, the document is read carefully. All unclear points must be clarified immediately. If the conditions are not satisfactory, the customer must demand that they be changed, or refuse the services of this organization.
- Acceptance. Acceptance is made after inspection.
How much does high-quality turnkey drainage cost?
The cost of turnkey drainage depends on many factors. Before drawing up the project, no one will tell you the exact cost. The approximate price of a surface linear system is from 900 rubles/linear meter. Deep - from 1500 rubles/linear meter. Deep ring-shaped drainage costs from 3,000 rubles per linear meter. Storm drains – from 1200 rubles/linear meter.
From cesspool to VOC
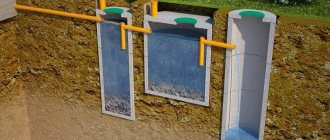
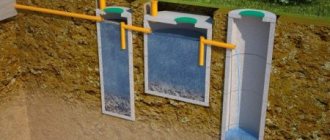
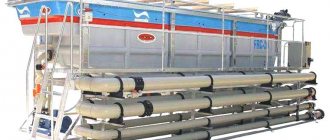
Modern technologies in the field of engineering equipment are advancing by leaps and bounds, and today many types of installations for the treatment of household wastewater have been developed. Let us remember how the history of private sewerage developed.
First - a cesspool, then its modernized version - a septic tank, and finally installations in which a full cycle of wastewater treatment is carried out. The latter are called differently: deep biological treatment stations (systems), wastewater treatment plants (WTP), local treatment plants (WTP), etc.
In order not to get confused in these names, which essentially mean the same thing, we will use the abbreviation VOC.
But we’ll talk about VOCs a little later, and now let’s discuss the question: are septic tanks already a thing of the past or not yet?
Since a consumer who is inexperienced in the problems of private sewerage sometimes misinterprets the meaning of this term, it is not amiss to recall that an industrial septic tank is a large container (most often made of plastic) located in the ground and connected by a supply pipe to the sewer outlet from the house.
The simplest septic tank is essentially a large barrel; more complex models are divided into two or three sections or consist of two or three separate containers. The septic tank not only accumulates wastewater, it is where it first decomposes into heavy waste, which gradually settles down, and light, which floats to the surface. Thanks to this treatment method, which is called mechanical, the wastewater is purified by 60%, which is a very low degree of purification, and therefore it is prohibited to discharge it onto the terrain.
Technologies ten years ago assumed the construction of filtration fields adjacent to the house - drainage systems through which the soil was purified of wastewater from the septic tank. Today this is an outdated method. However, the septic tank itself cannot be discounted. Sometimes it helps solve certain problems. For example, if we are not talking about a country house for year-round use, but about a dacha where the family visits seasonally or periodically. Since the septic tank is suitable for processing a relatively small volume (1-3 m 3 /dg.) of household wastewater and fecal matter, you will have to call a sewer truck from time to time. To reduce the rate of filling the container, wastewater can be divided into “gray” (water after washing dishes, bathing, washing) and “black” (flow from the toilet) and only “black” ones can be sent to the septic tank.
In any case, for a periodic home, a septic tank will be the most economical solution. Sometimes it has to be installed for other reasons. For example, in water protection zones, where the use of even VOCs is prohibited, wastewater is purified by 94-98%. Actually, this is all the information a private developer needs to know about a septic tank in order to make a choice in favor of a septic tank or VOC.
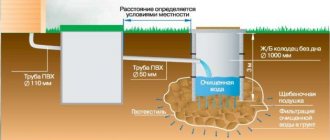
Wastewater disposal options
a) Discharge of purified water by gravity into the existing drainage network b) Discharge of wastewater into an intermediate well in which a drainage pump is installed c) Pressure discharge of wastewater into a road ditch d) Gravity discharge of wastewater into a filter (drainage) well