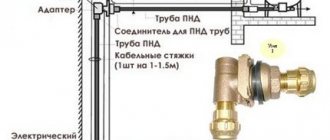
You can make a drill for a well with your own hands, but in terms of strength it may be inferior to special equipment. For this reason, before starting work, it is necessary to study the properties of the soil on the site. A tool will last longer if it is made according to the load placed on it.
Drilling a well is the optimal way to provide water to a suburban area in the absence of a central water supply line due to the low cost of the work compared to well water supply and technological accessibility.
Features of drilling with homemade devices
Drilling with homemade projectiles is possible under the following conditions:
- the aquifer lies at a depth not exceeding 20 m;
- the soil is sandy or clayey, but not rocky.
They make attachments for percussion-rope or rotary drilling - only these methods are suitable for constructing a well yourself. The first method does not require the creation of complex equipment. They build a simple drilling rig from materials that are available on the farm. The method is also attractive because you can work without assistants.
When rotary drilling, a tool is used that, going deep into the soil, lifts it up. 2 people stand on the sides of the bar and rotate it, applying force to the transverse handle. Spiral or spoon type drill bits are used.
Types of drill material
There are several types of drills used to solve repair and construction problems. Concrete drills with a steel cutting part are the most common type of drill. These concrete drills are made of steel with tungsten carbide inserts. Polycrystalline diamond burs use synthetic diamonds combined with carbide inserts. Diamond drills are 40-50 times stronger than steel ones. For their production, industrial diamonds are used, which are intended specifically for drilling heavy-duty surfaces.
Different drilling technologies and supporting parts are also used to achieve different results. For example, if you need to increase the diameter of the hole, you can use special nozzles.
Several types of drill can be used for one hole. This is because each type is designed for specific purposes. With one drill you can make a hole, with another you can give it the desired shape or increase the diameter. The drills must be replaced upon expiration of their service life. They are not restored or repaired, so it is important to monitor the level of sharpening and change consumables for the hammer drill on time.
Since drilling involves working with hard materials, the efficiency and result of drilling depends on the material of the drill.
Carbide is considered the best material among professionals for the production of drills. There is a risk of breakage if you do not hold the hammer drill at a right angle to the surface of the structure. The quality and productivity of drilling operations is affected by the consumable material. The coating plays an important role in maintaining the ideal sharpness of the drill bit. The coating also prevents corrosion and rust formation.
On the market you can find several options for drill coating:
- black oxide. Together with the lubricating composition, it will ensure the drill’s resistance to overheating and anti-corrosion protection. Thanks to this coating, the hammer drill will last longer;
- titanium nitride for drill. Found in tool models on high-speed rotary drills. This is another great option for added strength to the drill. Even after sharpening the drill, the properties of the protective coating are retained;
- titanium aluminum nitride for drill. This is the best option in terms of product durability. It is this coating that provides reliable protection against abrasion and corrosion, increasing the service life of the drill;
- diamond powder coating for drill. This type of coating is used for drills that are designed to perform serious industrial tasks. Diamond coating simplifies the process of working with hard materials. Such drills do an excellent job and save you from additional time. Used to create holes in stone or tiles. Once this coating is applied, the borers become very hard and abrasive.
Types of drills for self-drilling
A drill is used to dig vertical holes of small diameter. When drilling, the soil is destroyed in the horizontal and vertical directions.
Any drilling device consists of the following parts:
- lower support pipe;
- nozzles;
- handles.
The main role is played by the nozzles located at the end of the drill rod.
According to the accepted classification, they are divided into types:
- rotational;
- drums;
- chisels.
The tool is used depending on the soil type and drilling method.
Screw
The basis of the design is plates welded to the pipe at an angle of 30-70°. The projectile resembles a large drill that enters the soil with a cutter sharpened to a cone. Above it there is a spiral, the size of which determines the diameter of the wellbore. The cutting edges enter the soil and cut it. The soil accumulates in the cavity between the screw turns and is retained. When removing the projectile, it is manually cleared of rock.
Coronal
The design consists of a pipe and a crown at the bottom. The projectile is made of durable steel with sharpened cutters. The working process is reminiscent of screwing an upside down glass into the ground. A hollow tube with a crown at the end is screwed into the rock in a spiral. Then the glass is pulled up and freed from the ground. Often, a chisel is used in conjunction with a crown, which is used to first pass through the trunk.
Shock-rope
Scheme of the operating principle of the shock-rope type.
This is a large tool consisting of a drill string and a bailer. To use it, build a tripod 2-3 m high, and install a block for the rope at the top.
The technology is simple:
- the projectile is lifted on a rope and dropped from a height;
- he punches a hole in the ground with his own weight;
- the soil enters the instrument and remains there;
- the drill is lifted and cleared of rock;
- Continue the process until they reach water.
Spoon
Plastic rocks are easier to penetrate with a spoon drill. This is a semi-cylindrical projectile with 2 edges. There is a gap between them, the size of which depends on the type of soil - narrower for looser rocks. The cutting edge is bent, the lower part is in the form of a bucket-shaped cutter. In another version, there is a cutter on one side and a transverse protrusion on the other. A drill is welded between them.
The peculiarity of the tool is that the cutter is located along the axis, and the spoon is shifted to the side by 10-15 mm. When drilling, a projectile with its cutting edge produces a hole with a larger diameter than itself. This is necessary because during the work process a casing pipe is immediately installed. An eccentric spoon enters the casing pipe, producing a barrel along its diameter.
Spiral type drill, or coil
The projectile is used in dense clays and loams. Outwardly, it looks like a carpenter's drill. The lower part of the coil resembles a dovetail. When rotating, the tool, like a corkscrew, cuts into the ground, which rises up and lingers on the blades. After making no more than 2 revolutions, the drill is lifted to tear it away from the main mass of the rock. If this is not done, lifting the projectile upward will be so difficult that you can break the rods.
Chisel bit
Chisel bits for drilling wells.
A chisel is used to crush clay, dry rocks, and small stones. To make the well wider, the bits are made eccentric. Made from hardenable steel. The pointed part of the bit has a different angle depending on the properties of the rock.
Relatively soft soils are passed with a tool sharpened at an angle of 70-80°. For boulders and pebbles - 110-130°. The chisel is hardened to a height of 25 mm.
The shape of the tool also depends on the hardness of the rock:
- for relatively soft ones - a flat chisel;
- for more durable ones - a Z-shaped blade;
- for the hardest ones - a cross chisel.
Self-production is difficult, welding does not last long. The production uses stamping, which can be replaced by milling.
Rod
Drilling a well using a rotary or percussive method can be carried out using a rod drill. Made from gas pipes 1-3 m long. Used if a strictly vertical position of the barrel is required. Instead of a rope, as in cable percussion drilling, rods made of gas pipes are used. They are connected to each other by threaded couplings. In some cases, rotation is combined with hits on the barbell.
Diamond
For penetration of particularly strong rocks, diamond drills with an electric or pneumatic drive are used. Strong rocks pass at high speed, 2 times faster than with a chisel.
Drilling with well flushing
Drilling with this method allows you to travel up to 12 m in 1 hour. During drilling, the channel is flushed.
This can happen in 2 ways:
- Straight. The flushing liquid is supplied through a hose to the bottom of the well. After the soil is washed away, the loosened mixture is thrown out.
- Reverse. The channel is filled with solution, and then the mixture of soil and solution is removed from the well.
The washing solution performs several functions:
- cools the working parts of the tool;
- washes away the soil;
- strengthens the casing.
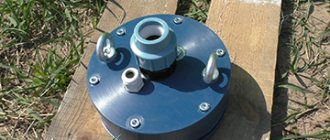
Special pumps are used to supply the flushing solution into the well.
The installation consists of 2 frames and a swivel located between them and transmitting torque from the engine to the drill. A pipe is attached to its body. Particular attention is paid to the tightness of the soft element, because the washing liquid is supplied through it.
The life of a drilling rig largely depends on the reliability of the swivel, so high-quality steel is used for its manufacture. The gap between the moving parts mating to it is kept to a minimum so that beating does not occur during drilling.
How to make a drill with your own hands
The nearest aquifer lies at a depth of up to 20 m. You can drill a well with your own hands, using self-made equipment. They can pass through rocks of varying densities, except rocky ones. For manufacturing you will need pipes, sheet metal, a grinder and a welding machine.
Making a simple underwater drill
The simplest drill without a spiral element is made from a steel strip and pipe. Iron 10 mm thick, 50-100 mm wide, 1.5 m long. It will be needed to make a drill sheet. A handle is made from a pipe with a diameter of no more than 32 mm.
The simplest underwater drill.
Algorithm of actions:
- 80 mm are retreated from the end of the steel strip, and a slot of 150 × 2 mm is cut out.
- From the very bottom, the strip is cut in the form of a sharp tip, and a loop for the handle is made at the opposite end.
- The metal in the area of the gap is bent in opposite directions to form an oval.
- It is sharpened, the sides are bent in opposite directions.
- A handle is inserted into the loop to rotate the drill.
The tool can go through sand, loam, even gravel. The rock is packed into the working cavity and is removed when the projectile is lifted. If it is necessary to drill a hole of greater depth, the drilling device is expanded. Add the same strips of iron or weld a piece of pipe to connect the rod.
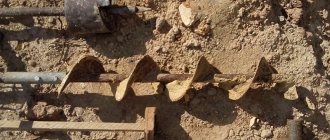
Making an auger drill
To make such a drill, you will need a thick-walled pipe with a diameter of 25-32 mm and a steel disk 6 mm thick. You can take it from a circular saw - it is thinner, but the metal is harder. Disk size based on borehole diameter. A pointed tip is welded onto the end of the pipe. The disc is cut into 2 halves, the edges are sharpened, and the teeth can be cut.
They retreat 10-15 cm from the tip, weld parts of the disk to the pipe with an inclination in opposite directions. The angle relative to the axis is 70°. There should be an angle of 40° between the screw halves. If you do more, the soil doesn’t stay well and crumbles when you lift it. On top of the rod there is a fastening for extending the length.
A more productive option is when spiral turns are made along a thick-walled pipe. Hardened steel strips are used. Pieces of screw augers from agricultural machinery with 3-4 turns are often used. A drill or pin is welded at the bottom to center the tool during operation. Periodically pull it to the surface and clear it of soil.
Spoon drill assembly
Spoon drill diagram.
This type of digging tool is used on soft soils. The soil layer is developed simultaneously in depth and width.
Made from pipes with walls of at least 5 mm. A through cut is made along it with a grinder. Its width depends on the properties of the soil. The looser the rock, the narrower the slot required.
They take a hammer, a crowbar, and widen the gap. A profile is formed, giving the projectile the shape of a spoon. The side and bottom edges are sharpened. A drill with a diameter of 10-30 mm is welded to the bottom. Place a bar on top, moving it away from the axis by 1-1.5 cm.
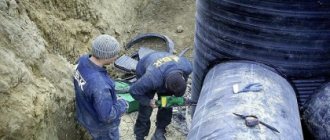
Manufacturing of impact-rope drill
The equipment works using a different method - not rotational, but impact. In addition to the projectile itself, you will need a tripod. It is installed at the site of the future well. Made from pipes or wood, the upper parts are fastened together. A block wheel is also installed there, through which the rope is thrown.
To activate the equipment, the projectile must be lifted and released into free fall. Muscular strength is used, but the work is facilitated by the use of a winch - electric or manual.
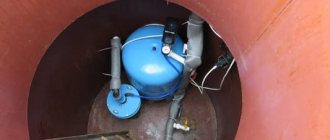
The tools for such a drill are a bailer, a glass or a bell. The most advanced drilling tool is the bailer. It has a valve at the bottom that lets soil particles in and holds them back so they don’t fall back into the well. Used if the rocks are loose or wet. Dense soil does not pass through the valve well, so use a glass. It traps solid earth without a valve.
To clear the projectile cavity of rock particles, it is lifted upward. The soil is removed from the bailer through a window made in the upper part. For convenient work, they make not a small window, but a slot along the projectile almost ⅔ of the upper half of the bailer.
The tool itself is made from a pipe with thick walls, the diameter of which is equal to the wellbore.
Impact-rope drill.
Sequence of work:
- A strip of iron is welded to the top center of the pipe wall. A hole is drilled in it opposite the axis. A rope is inserted into it and fixed.
- Process the lower part. The end of the pipe is sharpened or cut with teeth.
- A slot is made to remove the rock.
- Install the valve. This is the most important and difficult part of the bailer to make.
There are several valve options. Simple and short-lived - petal. This is a pipe-shaped plate that is fixed in the center. Sometimes it is equipped with a spring.
The ball valve is superior, but the main part is difficult to find in the right size. The ball should cover 75% of the bailer diameter. There is an easy way to make it yourself. They buy a children's rubber ball and make an incision. Fill with shot or bearing balls and seal. The glue used is waterproof.
For the ball, a funnel-shaped seat is made from 2 washers - on top and bottom. The valve should close the hole in it under the weight of the soil and let it in when the bailer is lowered into the well.
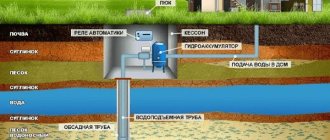
What types of wells are there?
Before considering the issue of equipment intended for drilling wells, it is advisable to become familiar with the technologies for extracting water from a summer cottage. To do this, you can use one of the main types of wells:
- Construction of a well with quick filling from a good spring. It can be an excellent storage tank for water, containing approximately two cubic meters of liquid.
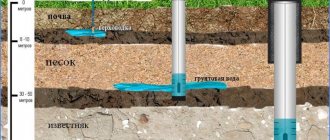
- A sand well, which is a pipe with a diameter of one hundred millimeters, which is immersed to a depth of up to 30 meters using an auger. At its recessed end of the pipe, a stainless mesh is attached, which acts as a filter when immersed in sand with a coarse fraction. The depth of such a device is from 10 to 50 meters, the operating period is at least five years.
- An artesian filterless well is used to extract water located between layers consisting of porous limestone. The depth of such wells is from 20 to 100 meters, they can be operated for up to 50 years.
A water well is a kind of narrow well, as can be seen in the photo.
Water well design
The duration of well operation depends on the frequency of its use. With increasing intensity, its service life increases. You can determine the depth of drilling a well by first focusing on similar devices in neighboring areas, and purchase the number of casing pipes with some reserve for adjusting the depth of groundwater.
Tips and tricks
To drill the well to the required depth, the rods are extended. Each section is 1 m long or slightly longer. Add gradually as you move deeper. To fix the rods, threaded couplings or bolts are used, which are threaded through through holes in the pipes.
Sometimes it is difficult to pull the shell up. If there is no winch, a lever lift is built from a long pipe and a support next to the well.
The heavier the bailer, the more it travels in 1 ascent and descent. If a winch is used, the projectile is made heavier by placing a removable weight on top.
Making a spoon drill
For constructing a water-bearing well in soft or loose soil, another version of a rotary drilling device - a spoon drill - is perfect. It allows you to quickly select the soil, because the soil is loosened not only by its lower end, but also by its sides. To make such a device yourself, you will need a thick-walled steel pipe about half a meter long.
A vertical cut is made in the pipe, from one end to the other. The lower end of the pipe is slightly bent inward with a sledgehammer to form a scooping spoon - one side of the end is bent more strongly than the other. Then we tap the pipe with a sledgehammer along the longitudinal cut so that one edge of the cut protrudes outward. All protruding, or cutting, parts of the workpiece are sharpened with a grinder. A rod is attached to the upper end of the drill, causing it to rotate.
An important nuance is that the rod is attached not along the central axis, but with an offset of 1-2 cm.
This is necessary to allow the side edge to grip the soil. The cut soil accumulates inside the drill and is removed when removed from the hole. A thick drill is usually welded to the bottom of the drill - it serves to center the direction of penetration into the ground.
Advice from experts on drill selection
When choosing the necessary tool for drilling, you should adhere to the following recommendations from experts, which will help you not make a mistake when purchasing and not spend extra money. The most important ones are listed below:
- When choosing a coil drill, pay special attention to its spiral, the steepness of which determines the speed of work when drilling wells.
- For shallow holes, you can purchase a drill that has a flat spiral, which is subject to the least wear.
- It is best to select drills from a well-known brand, which is associated with high costs, but also the purchase of a higher quality tool at the same time.
- The speed of the drill must be suitable for the work. If it is exceeded, the tool may become unusable, since it will already be worn out.
The resulting well during drilling will have the greatest depth if the spiral is steeper. This parameter determines how optimal the sludge removal process will be. Choosing a drill with a flat spiral will help achieve optimal drilling results. However, it can be used for quite a long time.
When performing drilling work, you should be more careful and maintain the axis, otherwise the tool may break. It should be purchased for an existing hammer drill, and not for an adapter. The adapter is suitable for universal types of drills, which manufacturers have always strived to produce. In practice, the adapter is only the cause of tool failure during drilling.