Drilling a well is only the first step towards creating an autonomous water supply in the house.
After completion of the main work, the time comes to install pumping equipment, conduct power supply and install a ground structure that will protect the well from the external environment.
An important stage in the final work is to install the well head with your own hands. What is it and is it needed at all? What does the marking on the head mean, how to install it and what is the price of the issue.
Why is the title important?
City dwellers often fail to understand how important it is to keep the water source clean. We are accustomed to the fact that clean water appears with the turn of the tap in the kitchen or bathroom.
And if there is no water, this is a reason for indignation. If you install your own water supply, you will not have to be indignant at the clogging of the well and the decrease in flow rate, that is, the amount of water available for pumping.
What accidental pollution can threaten a private water intake point?
The diameter of the well is only 11-18 cm. It would seem that what could get into such a small hole? Unfortunately, a lot. And the small diameter plays a rather negative role. Small objects are enough to clog. Birds, small animals, sponges, tools, lumps of dirt, all these objects can completely block access to water and can be quite difficult to remove.
In practice, I have encountered cases where the cause of clogging was simply a large stone that somehow got into the casing well. The cost of extracting the stone cost the well owner tens of thousands of rubles. The cost of the lid can be from 500 rubles if made independently, to one and a half to two thousand when purchased in a specialized store.
Well cleaning work is very labor-intensive and takes a lot of time or costs serious money. Therefore, it is better not to skimp on the device or purchasing the correct closing cover.
Design and installation procedure of the structure
The well head is used to protect the reservoir from sewage, insects and debris.
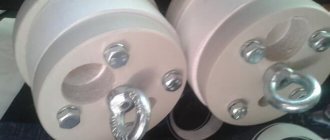
Before using this product, you should familiarize yourself with its structure. The head includes a cover, a carabiner, fasteners, a flange structure and a sealing ring. The cover is equipped with special bolts.
Installation is carried out without welding. The structure is mounted using bolts. When they are tightened, all elements are compressed: flange, ring and cover. This ensures tightness.
The head is designed to solve many problems:
- The well is equipped with a protection system and tightness.
- The debit of the well increases.
- The occurrence of ice and freezing during cold periods is reduced.
- Wires and a pump are easily attached to this device.
- Used to protect against damage or theft.
- Helps to switch to a smaller pipe diameter.
- Helps increase the productivity of small wells.
- Prevents source contamination.
- Performs a decorative function.
The heads are made of plastic or plastic. Equipment that weighs no more than 200 kg is suspended from plastic products. Steel devices can withstand weights of up to 500 kg.
Design diagram of a typical head
For installation, materials and special tools are purchased:
- head;
- construction grinder;
- paints with anti-corrosion effect;
- keys;
- solid oil
Installation consists of correctly clamping the sealing element between the flange part and the cover. The fasteners are tightly tightened. Before work, the casing pipe is cut. Then its edges are cleaned.
How to choose the right well head
To make the right choice, you need to know what the digital and letter markings on the products for sale mean; their decoding in order looks like this:
- OS – alphabetic symbols indicate the borehole head;
- A – anti-vandal design;
- P – made of plastic; if the symbol is missing, it means metal;
- B – symbol in the marking for composite heads of Gilex, in which the central part with attached pumping equipment (electrical cable, cable and hose) can be freely removed and installed back into the well without removing the head from the casing pipe;
- 90-110 – numbers indicating the range of external dimensions of the casing pipes the cap assembly is designed for;
- 25,32,40 – these symbols follow the slash and indicate the outer diameter of the HDPE pipe for which the central collet is designed.
It should be noted that not all manufacturers support this marking and its sequence; there are designations AOC, OGS, OD, which do not play a special role in determining the purpose of the product.
Rice. 7 Installation diagram of the Gilex OSPB head in the well
When choosing a head, here are some tips to keep in mind:
The most convenient, practical and inexpensive are plastic devices; they are best used for shallow immersion depths of low- and medium-power electric pumps. If the immersion depth is large (large mass of water in the pressure pipe) or the electric pump is large and heavy for pumping significant volumes, it is better to use more durable steel or cast iron heads
Although the terminal box makes it much easier to connect and disconnect the electric pump from the power source, its use must be approached with caution when operating high-power equipment. The fact is that the design proposed by the manufacturer and the terminal strips themselves are too unreliable methods of connecting wires, and with the high current that powerful electric pumps consume, overheating of the contacts, melting of the plastic head or cable insulation is possible
Also, high humidity in the tip area, even with reliable insulation of the terminal box (from the point of view of the domestic manufacturer), can lead to corrosion of the contacts, overheating or short circuit.
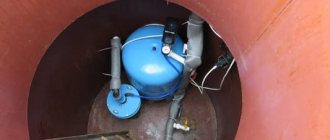
Well heads
To protect against
dust, dirt, sand, foreign objects, amphibians and dirty water from getting into the well when flooded by spring waters, the upper end of the casing pipe is equipped with a cap - a plug that hermetically closes its neck.
The head mounted on the pipe provides reliable hanging of the electric pump, wires and water hose.
In winter, sealing saves the well from freezing, and if there is a locking device, it will protect against unauthorized entry.
The most popular on the market are domestically produced heads “Dzhileks” and “Aquarius”
, combining low price and desired quality.
The downhole head "Dzhileks" is intended for equipping wells with casing pipes with a diameter of 90 to 160 millimeters and pumps with polyvinyl chloride pipes with a diameter of 25, 32 and 40 mm. They are made of cast iron or plastic.
The Aquarius head is made of plastic and is intended for shallow wells with a casing pipe diameter of 113-127 mm and a pressure pipe diameter of 32 mm.
Another one releases headlines
made of plastic and cast iron for wells with an outer pipe diameter of 107-159 mm and a pump pipe diameter of 32 and 40 mm.
Well protection from frost
Installing a cap will help prevent the well from freezing in winter, but it does not provide a complete guarantee against freezing in severe frosts or when the well is used year-round for water supply in private homes.
One way to protect against frost is to install boxes with thermal insulation over the well. This option is suitable for summer cottages.
The box can be made from available materials: boards, plywood, timber and similar materials. The inside of the box is lined with heat-insulating material: felt, foam plastic, etc. It can also be filled with dry grass, leaves or foam granules.
As a stationary option, you can use a brick box with insulated walls. For insulation of year-round wells, the installation of a caisson is best suited.
A caisson is a heat-insulating device made of plastic or metal in the form of a round inverted container or cube. The caissons are used to install water supply pipes to the house, to the bathhouse, and for watering the garden, as well as the necessary monitoring and automatic control equipment. If necessary, equipment for warming up is installed.
In conclusion, it should be noted that the well cover is an important element of your drinking water source and its installation should not be neglected.
How to make a header yourself
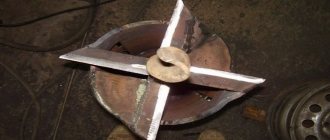
So, the most important thing is the construction of a homemade head. For convenience and clarity, you need to divide this process into 2 stages: the construction of its main parts and the installation of the resulting structure at the wellhead.
Stage 1: preparation of parts
Plastic covers are characterized by good performance characteristics and light weight.
Start by actually creating the main parts of the structure. The first thing you need to decide on is the material. Heads are available in metal (steel, cast iron or aluminum) and plastic. For self-creation, only metal is suitable. The most popular options are stainless steel and aluminum.
You will need:
- one sheet of selected metal with a thickness of 1 cm;
- 6 or 8 bolts;
- 3 eye bolts;
- 1 carabiner (to the lower eyebolt);
- strong metal cable;
- inlet fittings;
- plastic pipe for water supply.
Now you need to understand the design:
- Make a flange from a sheet of metal. The internal diameter of the flange is measured by the outer diameter of the casing pipe: it should be 1-2 mm larger than the diameter of the pipe.
- Once the flange is cut, cut out a plug for it; The size of the plug must match the size of the flange. Its thickness should be 8-10 mm. Make holes in the cover: for the power cable of the pump and water pipes, 6-8 holes for bolts (respectively, the same as on the flange), 3 holes for eye bolts.
- Install the cable and pipe entries into the holes made.
- Install 3 eye bolts into the previously made holes: 1 from below - the cover, 2 from above - it. The lower eye bolt will serve to secure the pump, and the upper eye bolts will make lifting the pump easier.
- The last task at this stage is the rubber gasket that will be placed between the cover and the flange. Naturally, it must correspond in size to both parts, more precisely, to their internal diameter.
Stage 2: assembly of prepared parts and installation of the structure
Finally, when you understand the structure of the head and the main parts for it are ready, you can proceed to the stage of installing the device on the well with your own hands.
Therefore, the entire installation begins with its preparation:
- The casing pipe should be cut perpendicularly. This step is necessary so that the pipe fits the dimensions of the lid. Grind the edges of the pipe, completely remove all irregularities and cover the edges with anti-corrosion agent.
- The second step is to immerse the pump in the well. The first step is to measure the required length of the cable and cut the required piece. Prepare the pump for immersion in accordance with the rules specified in the instructions supplied with the pump. Now take the plastic pipe and the pump power cable. Fasten the plastic pipe, cable and cable together: this is done with clamps.
- The pipe with the rope and cable must be threaded through the head cover. Attach a carabiner to the eye bolt, which is attached to the cover from below. Attach one end of the cable to this carabiner.
- It's time to weld the flange to the casing. Once the flange is secured to the pipe, place a gasket on it and release the pump. Place the cover that covers the top of the casing on top.
- All that remains is to press the gasket more tightly between the cover and the flange and bolt them together.
https://youtube.com/watch?v=evCaLRk3_tE
Ready! The work can be considered completed. You have made your own header, all that remains is to enjoy the fruits of your labors. If you followed the recommendations described here, rest assured that a homemade head will increase the service life of your well no less than a purchased one could.
The main design element of the upper part of the well
Why is this detail needed?
When the aquifer is deep, the main source for autonomous water supply becomes a well. And in order for this source to ensure a stable supply of water (and of the required quality), it should be properly equipped.
This is what an unformed pipe looks like: anything can get into it
One of the most important parts that influences the performance of the entire system is the well head. This is a durable sealed cover that is fixed to the upper section of the casing pipe.
Well heads perform a number of functions:
- Source sealing. Installing a cap allows you to block the wellhead, protecting the aquifer from both pollution and moisture. This is especially true during the period of autumn rains and spring melting of snow.
- Formation of an optimal microclimate. By sealing the pipe, we reduce heat loss during the cold season. Thanks to this, even areas of the cable, hose and cable close to the surface do not freeze, which significantly increases their reliability and service life.
The protective structure ensures the functionality of the entire system, isolating the aquifer from the external environment
- Improving the efficiency of the pump. Sealing the mouth creates tension inside the casing, due to which water is literally “sucked” from the horizon. For wells with a small flow rate during dry seasons, this literally becomes a salvation!
- Increasing the reliability of equipment fixation. By installing the head on the well, we are able to secure the pump to a cable attached to an eye bolt in the device cover. Such a mount will be much more durable than fixing the pump with improvised means.
The pump is securely secured against theft thanks to the multi-bolt mounting system.
- Theft protection. The head is fixed to the pipe neck using bolts, which are not so easy to unscrew even with a special tool. Yes, when dismantling the head you will have to tinker, especially with old fasteners - but an attacker is almost guaranteed not to be able to get to the well pump.
This method of sealing a pipe, as in the photo, is cheaper, but its effectiveness is questionable
In general, installing a well head is a completely justified decision. Of course, you can seal the top edge of the casing at a lower cost (for example, by wrapping it with polyethylene). But this approach will not provide us with the necessary protection from ground and surface water, not to mention other factors.
Types and design of heads
Plastic models (pictured) are suitable for most domestic wells
Installation of the head begins with the selection of a suitable model. Today they produce products for the most common diameters of casing pipes, and they can be made from the following materials:
| Material | Advantages | Flaws |
| Plastic |
|
|
| Steel |
|
|
| Cast iron |
|
|
Steel models combine low weight with a sufficient margin of safety
If you need maximum strength, choose a cast iron model
By and large, you can choose any well head - if the manufacturing technology is followed, the role of the material will be secondary.
Design diagram of a typical head
The design of the well head is also not too complicated
When selecting a model, you should pay attention to the following elements:
- Flange - A ring-shaped piece that fits over the top of the casing and is used to secure the cap. The most common diameters are from 60 to 160 mm.
When installing the pump on a cable with a hose, pass it through a flange with an o-ring
- Sealing ring. Located between the cover and the flange, it is used to seal the connection.
The seal ensures sealing of the joint between the flange and the cover
- Lid. The upper part of the structure, during installation, is pressed against the flange through an elastic seal. The holes in the cover are designed to accommodate the power cable and water supply pipe/hose. At the bottom there is a carabiner with a bolt fastening - a pump is suspended from it on a cable.
Cover with fastening ring on the bottom surface
- Fastening bolts (4 or more) - connect the cover to the flange and provide the required clamping force.
Pros and cons of a homemade head
The simplest homemade well cover is a piece of polyethylene that covers the well from above and is tied with wire or rope to the casing pipe. Summer residents wrap the head with polyethylene at the end of the summer season, after the pumps and hoses have been removed. Such a primitive device does not protect well even from bad weather and, with a high degree of probability, the well will have to be flushed before use.
The advantages of this method include its extremely low cost. This is the only plus.
The disadvantages of an improvised lid include its non-tightness. The correct cover should ensure reliable and tight closure of the head of the caisson pipe, completely eliminating the ingress of groundwater, sand and debris.
Metal heads are welded or firmly drilled to the casing, so accidental pranks and clogging of wells are excluded from mischief.
A sealed lid is even more necessary when carrying out work on insulating the water intake for the winter. Construction of a pit, backfilling of insulation, installation of underground water communications - all this is impossible to imagine without well-organized protection of the cleanliness of the well.
What is a well head and why is it needed?
The cap is a design element of the upper part of the well, made as a plug for the end of the casing pipe emerging from the ground. If we draw an analogy with a household well, well heads perform the same functions as a well superstructure and a gate for lifting water, namely:
- Source protection. The cap provides protection against dirt, debris and external precipitation entering the borehole channel; in winter, the cap prevents freezing of surface water.
- Fixation of equipment. Sufficient strength of the head guarantees reliable fastening of the cable, except to its carabiners in the lower part of the cover, on which the submersible electric pump is suspended. In addition, the head provides a convenient place for placing the power cable of the electric pump.
- Sealing the channel. In cold weather, to protect water from freezing, a heating electric cable is often used, which is placed in the deep shafts of the source. A tight-fitting lid prevents heat loss and, accordingly, saves energy for heating; it also simplifies additional insulation with soft materials, protecting the well from insulation particles getting inside.
- Protection against theft. The price of submersible pumps installed in a well can reach up to 2000 USD. (Grundfos SP9), therefore, when using expensive equipment, it is necessary to take measures to protect it from theft. The special design of the heads and the technology for their fastening make it much more difficult or almost impossible to remove an expensive electric pump from the well.
Rice. 2 Sectional view of the head on the casing pipe
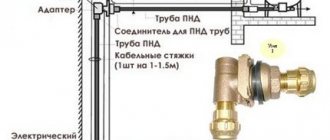
- Pipe connection. The head provides a convenient connection of the pressure pipe from the electric pump to the water supply system - for this purpose, in its central part there is a hole through which the pipeline coming from the electric pump is removed and secured. After the standpipe is cut using an elbow or straight compression fitting, it is connected to the water main going into the house.
- Increase in flow rate. By using a sealed well cap, you can artificially maintain a stable level. This is due to the fact that in shallow wells, a decrease in the height of the water surface creates an area of rarefaction that prevents this process.
- Simplification of dismantling. In traditional head models, when removing the electric pump from the well for repairs and maintenance, it was necessary to unscrew the bolts and completely remove the device, disconnect the power cable from the home network and pull it out through the cover. Modern models allow you to remove and install the pump in the well without unscrewing the mounting bolts due to the removable central part of the top cover. Another advantage of such devices is the presence of a terminal box in the side of the case, which allows you to disconnect and connect the power cable of the electric pump to the electrical network without pulling it to the house.
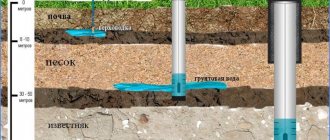
Types of casing pipes and rules for their use
The determining criteria for choosing casing pipes are the length of the wellbore and the calculated soil pressure. Based on this, you can install plastic, metal or asbestos-cement structures. Each type has its own advantages, disadvantages and requirements for installation and operation.
Plastic pipes for wells
Made from polypropylene, PVC or HDPE. Must comply with GOST 2248-001-84300500-2009. They are not destroyed by moisture, but the plastic case is less resistant to mechanical damage than the metal one. It is possible to form a wellbore entirely from a polymer water pipeline, but only with the right choice of model.
How to choose a good plastic pipe for a well:
- The design pressure in the lower part of the barrel should not exceed 16 atm. An alternative is to install check valves every 10-15 meters of the well to normalize the pressure.
- For HDPE, diameters from 90 cm, wall thickness from 7 cm.
- Polypropylene is rarely used due to its high cost. For structural rigidity, PN25 or higher models must be used.
- Connection method: threaded coupling (couplingless) or welded. The latter is rarely used for wells.
At low temperatures, the polymer loses its plasticity, which can lead to its damage due to external pressure. This also complicates system maintenance at subzero temperatures. Installation in regions with an average winter temperature of -10°C is not recommended.
Structural device
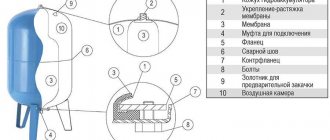
The design of a standard type well head is not very complex and consists of the following components:
Lid. The base part of the product, on which the main parts are placed, is made in the form of a disk, its edges protrude beyond the inner ring and rest on the ends of the casing pipe. In the center of the disk there is a hole for fixing a HDPE plastic pipe with a standard diameter of 25, 32, 40 mm, which corresponds to 1, 1 1/4 and 1 1/2 inches.
The outer diameter of the disk plate has different sizes; in the standard version it overlaps two adjacent standard sizes of casing pipe in the range from 90 to 160 mm. There are also holes in the cover for mounting bolts and the electrical cable coming from the pump.
Flange. A ring part with holes for fastener bolts, placed over the casing pipe, when connected to the cover, forms a single structure tightly fixed to the pipe surface.
Seal. It is a rubber ring of circular cross-section, placed between the head cover and the flange when they are connected, seals the joint and helps to tightly hold the head on the pipe.
Carbine. The device serves to secure the cable on which the well pump is suspended.
Rice. 6 Well head - main structural elements
Eye bolts. They are bolts with a ring head located in the upper part of the cover; sometimes one of them is turned down and serves to secure the cable. Eye bolts are designed for lifting or installing massive well pumping equipment using a winch or special equipment together with the head - this greatly facilitates the work.
Cable entry. To protect the power cable from contact with the walls of the hole in the cover through which it passes, a sealed lead is used that is screwed into the cover and insulating the power cord from its surface.
Collet clamp. The compression fitting is located in the central part of the head and reliably fixes the pipe coming out of it in a stationary state.
Mounting bolts. The elements connect the flange and the sealing ring with a removable cover; some models have a more complex anti-vandal design - in it the bolts are recessed into the cover and can only be unscrewed using a special key.
Terminal box. Some manufacturers equip their models with this type of addition; in the block, the electric pump wiring is secured and connected to the network cable coming from the house.
Kinds
Today it is easy to find several categories of well heads on the market.
Their device is almost the same and consists of a flange, a cap, and a rubber ring. The difference lies in the material that was used to create the head, as well as in the additional operating properties of this part. First of all, the difference between metal types and plastic lies, at a minimum, in the weight of the equipment that is suspended. A plastic head can withstand a weight of up to 200 kilograms, and a steel one - up to half a ton. When choosing a head material, you should take into account the depth of the well, as well as the weight of the equipment that will be attached to it.
For example, for wells whose depth does not exceed 50 meters, the weight of the equipment will not exceed 50–100 kilograms. At the same time, for deep wells, in which it makes sense to use a powerful pumping unit, as well as several tens of meters of steel cable and wires, and the total weight of the equipment can exceed a quarter of a ton.
The well head also has a number of options, because manufacturers are trying to maximally satisfy the requirements of all their clients. For this reason, well heads are equipped with the following parts:
- eye bolts;
- cable entry, which is necessary for the electric drive;
- a fitting for the pipe from which water will fall;
- a set of carbines;
- bolts for fastening.
Now some elements are worth talking about in detail.
- An eye bolt is a regular bolt, the upper part of which is made in the form of a ring. These elements are usually used for hanging equipment, attaching cables, and so on. As a rule, they are placed on the head so that the lid can be lifted easier and from below so that the pump can be suspended.
- A cable gland is an excellent thing, the presence of which virtually eliminates the possibility of accidental damage to the electrical cable. As a rule, such an input has a special spring, which provides reliable fastening and allows us to say that the head is sealed.
Plastic
Plastic well head.
The advantages of this type of plug include the presence of a removable area in the top cover. It allows you to move the pump into a water-bearing well without removing the fastening elements. In addition, plastic products are equipped with a terminal box through which electrical wiring is connected.
Metal
This type of device is resistant to temperature changes, has high strength, and has a long service life. At the same time, these elements are susceptible to corrosion. Before use in a humid environment, products are coated with anti-corrosion agents.
Metal head for a well.
The following metal plugs are available on the market:
- cast iron;
- steel.
Steel models have a simple and reliable design, but if the protective coating is damaged, they quickly rust. Their cost exceeds the price of polymer analogues.
Cast iron devices are characterized by their large mass. The anti-corrosion properties of the material are imparted by a zinc or galvanic protective layer. The disadvantage of the products is considered to be low resistance to impact. In terms of price, cast iron products are comparable to steel samples.
Both types of plugs are used when constructing deep wells. The maximum weight of the equipment can be 500 kg.
The procedure for making a headband yourself
The well cover is made of fasteners and thick metal. The sheet thickness must be more than 10 mm.
For better sealing of the structure, a caisson is used, which is a waterproof container. This device is effective in cold weather. It protects the mine from icing and promotes regular operation of pumping equipment.
The caisson houses filtration structures and automatic control and monitoring elements.
The casing pipe is pre-prepared. It is trimmed and irregularities are removed from its surface. The edges are primed and paint with an anti-corrosion effect is applied to them.
Self-construction work consists of the following stages:
- A fixing flange and a cover are cut out of metal. Both parts are made the same size.
- Fittings are attached to the cover for fastening pressure water pipes and cables. A bolt is mounted to the bottom surface to secure the cable holding the pump. Bolts are attached to the upper part, using which the lid is lifted.
- A ring is made of rubber, which is used as a gasket between the main parts.
- A flange and a sealing ring are installed on the column. The last part is put on with some effort. In this case, machine oil or grease is used. In this case, there should be no gaps between the product and the pipe. The rubber ring is designed to increase the level of sealing of the system.
- Under the lower part of the head there is a carabiner to which the pump is attached. One end of the hose is also attached to it. Parts for fixation are selected from stainless steel.
- Then the cable is laid. The pump is attached to the cable and released into the shaft. The cable is selected from stainless material. A steel product will deteriorate when exposed to moisture.
- When the cable is stretched, a cover is installed on the casing pipe. The bolt holes are installed opposite each other on the flange and cover.
- The bolts are then inserted and tightened securely with the nuts.
- A flange is installed on the pipe.
High-quality sealing increases the efficiency of the well. When the pressure in the pipe decreases during operation of the pumping equipment, the flow rate of the source increases.
WATCH THE VIDEO
During operation, the cable, water pipe and cable are fastened with plastic clamps. This prevents sagging.
If you use fasteners with secret heads during installation, this will serve as additional protection for the installation.
Having selected high-quality materials and studied all stages of installation work, this device is made with one’s own hands.
Features of installation of caisson structures during well construction
In most cases, if the well is located in open space, a caisson will be required. Inside the caisson box there is all kinds of service equipment, filters, automation, etc.
A caisson is a reservoir that isolates the well head from groundwater.
As already noted, it can be made of different materials:
- Plastic. It has good performance in terms of thermal insulation, and is also completely not susceptible to corrosion and fungal infections. In addition, plastic caissons are lightweight, so they can be installed even without the need to resort to special equipment. Plastic is a relatively inexpensive option. But the obvious disadvantages of this option include the low rigidity of the plastic structure. In order to increase this indicator, during the installation process the plastic caisson is filled with concrete along the entire perimeter;
- Metal. The advantage of metal caissons is that you can weld a structure of any size and any shape with your own hands. Such a caisson will be very durable. But at the same time it will be necessary to carry out additional protection from moisture - treatment with an anti-corrosion coating. In addition, metal caissons have a large mass. You can either purchase a metal caisson in finished form, or weld it to order or yourself. The design is extremely durable and will last as long as possible. But it will also be necessary to carry out thermal insulation measures;
- Concrete, reinforced concrete. Another one of the most common options. Today, however, they are used less frequently due to the complexity of arrangement. The concrete caisson is very durable and will reliably protect the well from the most aggressive environmental influences. At the same time, it has a huge mass and over time can sink in the soil if it is not installed correctly. This, in turn, will cause the pipes in the water supply to be damaged.
As a rule, all stages of caisson installation are similar to each other - regardless of which option was chosen.
Caisson installation diagram.
First, the pit is prepared. It is a hole with a diameter of 30 centimeters larger than the diameter of the caisson itself. The depth of the pit should be calculated in such a way that the upper part of the caisson rises above the ground by about 20 cm. This will avoid flooding of the well during periods of heavy rainfall or flood. Then it is necessary to install the casing sleeve. To do this, a hole is made in the bottom of the caisson, usually in the center. Now a piece of pipe 15 cm long and with a diameter slightly larger than the diameter of the casing is welded to this hole so that it can be threaded into the sleeve without any problems. At the next stage, the installation of nipples for water pipes is carried out. They are welded into the caisson wall in the places where the pipes are supposed to be installed. Then the caisson tank is directly installed in the pit. You first need to provide a cushion of crushed stone about 20 cm thick at the bottom of the pit. The casing pipe is cut to soil level. Now the caisson is installed on the pre-prepared beams in such a way that the sleeve can be easily put on the casing pipe. The beams are removed and the caisson is sealed. All that remains is to insert the pipes into the nipples - and you can begin backfilling the entire structure. The space between the walls of the sleeve and the pipe, as well as nipples and pipes, can be filled with polyurethane foam.
Operating principle of the protective cap
The design of the protective head is quite simple. Various materials are also used for manufacturing. Steel heads are considered the most reliable, but for plastic casing, a plastic head can be used. The disadvantages of plastic are obvious. This is poor resistance to temperature fluctuations, insufficient strength in the cold; cracks will quickly appear on the plastic head and it will cease to perform its function.
The composition of the cover is as follows. This is the cover itself, a brass or plastic clamp, eye bolts, plastic or steel inputs, a rubber ring, a carabiner, a fastening device, a flange.
The structure is installed using bolts.
The pump hose is inserted through the cover using eye bolts.
To install the head, it is necessary to make an accurate and even cut of the casing pipe. Connect the pump on the cable with the cable and the outlet pipe using clamps. Once you lower the pump into the well, you can put the seal cap on.
It should be noted that most large companies that install wells include capping in their services. Perhaps, when ordering well drilling, you should clarify whether this necessary service is provided.
It is best to use factory-made heads.
Setting up your own well on your personal plot will allow you not to depend on the vagaries of the central water supply. But it is worth knowing that any extraction of water from aquifers following the first near-surface one requires a mandatory license. And in order to obtain such a license, it is necessary to collect a lot of preliminary permitting documents for. And your home will always have enough water for domestic use and watering the garden.
Drainage arrangement
First of all, a site plan is made with the approximate location of drainage points. After this, you need to calculate the amount of materials needed. To construct a well you need:
- crushed stone or expanded clay with which the hole will be filled;
- casing plastic or asbestos pipes or polypropylene fabric with wooden slats.
The walls of the well must be protected from silting. Therefore, you need to decide in advance on the arrangement method. Because The cost and timing of the work depends on this.
Options:
- use of casing pipes;
- hand-made protective bag made of polypropylene fabric.
Both options have their place and do their job well. The principle of operation is the same. A well is drilled to the required depth, its walls are protected with water-conducting material, and crushed stone or expanded clay is poured inside. In this case, the diameter of the point does not matter much.
Arrangement sequence:
Using a hand drill or bailer, a hole of the required depth is made. Usually it is no more than 10 meters. As drilling progresses, you need to control the composition of the soil reached by the drill. After the first waterproof layer has been passed, you need to go down another 1-2 meters
It is important not to miss the moment and not reach the aquifer. When the hole is made, you need to arrange the walls. If the option with a pipe is chosen, it is simply lowered into the well 15-20 cm below ground level. First, holes are drilled in it along the entire plane. If you choose the fabric option, it will be a little more difficult
You will need wooden slats along the length of the well. Fabric is nailed to them so as to form an improvised pipe. To make your work easier, you can make several rings from thick wire to use as guides. The resulting structure is lowered into the ground and covered with crushed stone. It performs two functions. Firstly, it prevents the walls from collapsing, and secondly, it filters all the water passing through it. After this, the well is covered with any waterproof material. You can use a piece of polyethylene or something else - it makes no difference. It is important that the top is sealed. The structure is covered with earth.
First, holes are drilled in it along the entire plane. If you choose the fabric option, it will be a little more complicated. You will need wooden slats along the length of the well. Fabric is nailed to them so as to form an improvised pipe. To make your work easier, you can make several rings from thick wire to use as guides. The resulting structure is lowered into the ground and covered with crushed stone. It performs two functions. Firstly, it prevents the walls from collapsing, and secondly, it filters all the water passing through it. After this, the well is covered with any waterproof material. You can use a piece of polyethylene or something else - it makes no difference
It is important that the top is sealed. The structure is covered with earth.
This completes the construction of the drainage well. Depending on the depth and complexity of the soil, all work takes 1-2 days.
DIY well head
How to make a well head with your own hands?
If you are limited in funds, but have metalworking skills and prefer to do everything yourself, then making a header will not be difficult
.
There are many options for homemade heads; here is a description of one of them. The head made in this way is suitable for any type of well, because it is made of durable material - sheet metal and pipe trim.
Let's start with making the head cover
. We cut out a square blank from sheet metal, on which we measure and mark holes for the adapter flange of the water pipe, for the cable entry and for the eye bolts. Using a drill or drill bits, we cut the intended holes and clear them of burrs with a file.
We process the seams with a sanding machine, and sand the entire structure and cover it with a primer and then paint to protect it from corrosion.
At the final stage, we begin assembly:
- install the adapter for connecting the water pipe, filling the cracks with silicone sealant to ensure tightness;
- we install eye-bolts; four covers on top for raising and lowering the pump and one on the bottom for the safety rope;
- install the cable entry device.
Installation of the mounted structure in the well is similar to that described above. The cover with a welded flange is placed on the casing without any additional fastening. Bottom sealing can be achieved using insulating tape.
Product installation
Fitting a well head onto a casing pipe with your own hands is a simple operation, but requires care and attention
It is important that the bolts are tightened evenly and without distortion. Main stages of installation:
- Preparing the casing consists of cutting it to the required height or to align the edge, cleaning the edges. After fitting the flange, the structure is coated with an anti-corrosion compound.
- Attaching structural elements to the head parts: pump cable to the eye bolt under the cover, hose or plastic pipe from the pump to the fitting. The fastening clamps must be made of anti-corrosion materials, and the cable must be protected with a polymer film.
- Passing the cable through the hole in the head. During this operation, the input clamp is loosened to allow free movement of the electrical wire. This is the moment the cover is ready to be installed on the flange.
- Lower the pump into the well to the required depth, after which they begin to install the head. Insert the bolts, tighten and tighten the nuts.
The cover on the well only partially protects it from freezing; additional insulation is required to protect against severe frosts. The design of insulation structures is chosen arbitrarily: it can be a wooden box with insulating materials, or a caisson - a polymer container, a cap over the wellhead with a cap.
How to make your own header
Sometimes situations arise when, for some reason, the dimensions of the casing string have a non-standard outer diameter (180 mm), and it is impossible to find a suitable one or remake a standard head with the highest size of 160 mm. In this case, the only way out is to make a homemade metal structure using electric arc or gas welding; this will also require a household power tool (grinder, drill). The work performed consists of the following stages:
- In a hardware or hardware store you can find a sealing ring made of paronite or rubber for the outer diameter of the casing pipe; the ring must be put on the pipe with some effort.
- Made from sheet steel with a thickness of at least 5 mm. Using a grinder or jigsaw, cut out the top cover in the form of a steel circle 80 - 100 mm larger than the outer diameter of the pipe.
- A flange ring with the outer diameter of the cover and the internal size of the casing is cut out of the same steel.
- Combine both parts (it is better to use a clamp) and drill holes in them for the mounting bolts - for uniform pressing you need to make 6 or 8 equally spaced holes around the entire perimeter.
- Using special metal crowns, two holes are made in the lid - 32 mm. a threaded pipe for connecting the water main and a smaller diameter for the fitting in which the sealed lead-in will be placed, isolating the electric cable of the pump from the metal cover.
- If desired, use a metal drill to make two diametrically located holes in the lid, into which eye bolts are then screwed.
- Using a welding machine or gas torch, weld into a 32 mm threaded lid. a fitting for connecting a water line and a fitting for placing an electrical cable; a ring for hanging a carabiner is welded to the bottom of the cover.
You can easily do without a welding machine by screwing all the fittings and the carabiner ring to the lid with union nuts, if you first equip the parts to be connected with threads for fasteners.
A homemade head is placed on the pipe surface using the above method, the bolts are screwed in gradually until the compressed rubber ring secures both parts to the pipe.
Rice. 11 The main stages of work when making a head with your own hands
The head is an important element in the arrangement of a deep water intake source, ensuring the reliability of the placement of pumping equipment, ease of connection and removal of the electric pump from the well during repair and maintenance work.
The average cost of factory models is about 40 USD; this amount can be saved by making the top cover and flange from sheet steel yourself; the main difficulty in this case is finding a rubber O-ring of the appropriate size.
Buy or make your own
The well head is selected in the store. Standard models are offered, the installation of which is carried out according to the instructions. Products are made from plastic, steel or cast iron material.
The do-it-yourself well cover is made from the following materials: stainless steel or aluminum.
Each option must be airtight.
Professional and homemade designs have advantages and disadvantages:
When making it yourself, you choose available materials. When purchasing, you can choose products made of metal or plastic
The metal well cover is durable, and the plastic elements are corrosion resistant. When creating a structure on your own, it is recommended to pay attention to the tightness of the product. In professional production, the reliability of the element is tested. A do-it-yourself well head has the advantage of a low price. The disadvantage is errors during the creation and subsequent maintenance of the device.
Instructions on how to make your own well head
The cost of a purchased product is formed from several components: material, manufacturer, casing pipe size and seasonality. These products become more expensive during the summer season.
Types of houses and materials for their manufacture
When arranging a house in the country, you can choose the following forms of shelters :
- Classic gable roof with 3 corners. This is the simplest and most practical system; it is easy to make from scrap materials. There are other options - for example, a round log roof or a quadrangular structure. But even in its simplest form it protects against dust and precipitation.
- The canopy is combined with a gable roof. Such a system will be more complex, but its efficiency will be higher.
- Gazebo (open type house). In this case, the structure is installed on racks made of wood or metal. The gazebo itself at the base has any shape - square, octagonal, round.
- Log house This is a classic log house, the dimensions of which coincide with the parameters of a wellbore or a concrete ring well. Such houses come in different types - for example, with gable or asymmetrical roofs.
When choosing a type of shelter, you need to make a project. The dimensions are required so that the house protects the structure from external influences and at the same time is not too large - this will only complicate the maintenance of the system.
Wooden frame for making a house for a well.