Design features of hidden hinges
The main feature of such door hinges is their invisibility after installation. To do this, the component elements of the product are cut into the door frame and leaf.
Hidden door hinges must provide during operation of the door unit:
- Reliable connection of the canvas with the box, without the risk of disconnection;
- Free opening/closing of the door leaf;
- Maintaining its original technical characteristics throughout the entire warranty period;
- Fixation of intermediate and extreme positions of the canvas;
- Hidden-type door hinges are also required to withstand the weight of the door, possible impact loads and provide the set opening angle - 90, 120, 180 degrees.
Manufacturers use different materials to make such loops. Different models may differ in size, adjustment (some are adjustable relative to the vertical plane, others relative to the horizontal), direction of movement (right, left, double-sided).
Advantages and disadvantages of products
Before purchasing accessories, you need to consider in detail its pros and cons. Advantages:
- Safety . The hinges that are hidden inside the door structure cannot be knocked out or cut down. Of course, this factor is more useful for input, but in other cases it is also an advantage.
- Stealth . An important feature for interior doors, since ordinary hinges do not always fit into the interior of the apartment.
- Range . The buyer is presented with various accessories for both light canopies and solid massive canvases.
- Large door opening angle . The vast majority of models allow you to open it so that it becomes parallel to the adjacent wall and does not interfere with the passage.
- Durability . They are made from steel or alloys that are highly wear-resistant. Recessing the mechanism inside the box and canvas also provides additional reliability.
Of course, the products have disadvantages:
- Difficult installation . To install, you need to cut grooves of the desired shape and size inside the box and canvas. Not every craftsman has a tool (mill).
- Price . High-quality components are expensive (from 1800 rubles per piece). You can find cheaper products on the market that cost several times less, but their quality will be appropriate. Cheap parts cannot be adjusted.
- Difficult to dismantle. If you need to remove a door, sometimes you have to completely disassemble and remove the hinges.
- Increased volume . In the canvas itself there is usually enough space for fittings, but in a thin box the depth is sometimes not enough.
Advice
Hidden hinges are suitable if you want to carry out high-quality repairs that will last for many years. It is better not to use them for temporary alterations.
Pros and cons of the design
Hidden hinges, which are designed for interior doors, have both positive and negative consumer reviews.
Main advantages of the products:
- Quite attractive appearance;
- High strength. The hinges are able to withstand the weight of panels made of solid wood and iron;
- Reliability. The products are tamper-proof, i.e. attackers will not be able to cut them off;
- Long warranty period. With proper use and proper care, hinges of this type can last for several decades without replacement;
- The products are hidden after installing the door block, i.e. They are not visible, so they do not spoil the overall appearance of the structure.
The only drawback of hidden hinges is the difficulty of installation without certain skills. But, if you look at it, you can easily install them yourself without the involvement of an experienced technician.
Butterfly hinges: features
Butterfly loops - overhead, card model.
It does not require insertion due to its special design - it does not consist of two plates, but is a solid plate divided into two parts, which fit into each other when closed, without forming gaps.
Advantages of the butterfly canopy:
Disadvantages of the butterfly canopy:
- The door does not come off its hinges.
- Over time, distortions are possible.
- Used for light fabrics.
- The canvas must be perfectly smooth.
Installation Tool:
Installing butterfly door hinges with your own hands:
- Make indents from the edge of the canvas at the top and bottom by 20 cm.
- Attach the plate to the end, mark the holes for the screws.
- Drill.
- Lift and attach the door to the frame, duplicate the location
- Screw on the hinges.
- Raise and hang the canvas.
If a gap has formed between the box and the plate, you need to install a gasket under the butterfly loop with your own hands.
Required Tools
Self-installation and adjustment of hidden hinges on interior doors requires the following tools:
- A simple pencil for marking;
- Construction tape (a regular school ruler will do);
- Chisel;
- Electric drill;
- Screwdriver;
- Milling device;
- Hammer;
- Building level;
- Set of screws.
Overhead hinges for doors made of metal-plastic
If the door is equipped with an overhead hinge (one of the most common options), its adjustment can be made in both two and three planes, depending on the functional features
If the door is equipped with an overhead hinge (one of the most common options), its adjustment can be made in both two and three planes, depending on the functional features. Vertical misalignment of up to 5 mm is eliminated by adjusting the adjusting screw using a hexagon. In order to get to it, you need to remove the decorative trim from the hinges.
If there is a need to raise or, conversely, lower the door, you should find another adjusting screw at the bottom end, hidden under the detachable strip. Using the key, the door is raised up to 5 mm or lowered by 1-2 mm. The screw at the top end allows adjustment to approximately 2 mm. And when a larger adjustment is needed, up to 5 mm, you will need to completely remove the door and part of the hinge attached to the frame and adjust it.
The popularity of aluminum products is ensured by their beautiful aesthetic appearance, durability of the material, and low weight. Therefore, increased demands are placed on door hinges made from it, especially considering that, with rare exceptions, their adjustment is impossible. Of course, hot-pressed aluminum, which is used to make hinges, is a durable material with high wear resistance. It is not recommended to install products made from low quality materials on these doors.
Note! The likelihood that aluminum door hinges will need to be replaced is very high.
Even a slight impact of the door on the frame or slope can cause a crack or breakage. That’s why non-adjustable hinges are installed on such doors: if they are of high quality, they last a long time and reliably, but if they are of poor quality, they cannot be repaired, much less adjusted.
Installation of door hinges
Installation of hidden hinges requires preliminary preparation and marking. But first you need to decide how many of them will be fixed on the interior doors.
The number of hinges must be calculated based on the weight of the door leaf. For example, for medium-weight wooden doors, 2 fasteners are sufficient, and for heavy metal structures it is recommended to use at least 3.
Marking the canvas
The procedure for marking the door leaf is not difficult.
Step-by-step instruction:
- It is necessary to retreat 20-25 cm from the lower and upper edges of the canvas and draw lines with a simple pencil;
- Loops are placed in these areas and outlined with a pencil;
- When installing 3 fasteners, the third loop is placed strictly in the center.
Marking the door frame
Marking a hidden hinge on a wooden frame for interior doors is a little more difficult, but doable. To do this you need:
- Place the door leaf in the frame. Next, secure it with previously prepared wooden pegs, level it horizontally and vertically using a building level;
- On the end part of the box, mark the insertion points for hidden fastening elements (hinges). They must be located exactly opposite the contours marked on the door leaf;
- Next, you need to attach the loops to the box and also trace them along the contour. To do this, the sash can be removed;
- Once again, check that the markings are applied correctly and you can make recesses for installing fasteners.
Milling
First, the insertion into the frame and the canvas for installing hidden hinges in interior doors is done manually. Minor indentations are made using a hammer and chisel. The material is removed by lightly tapping the chisel with a hammer. To know what depth to make the notch, you need to measure the thickness of the loop.
Next, to fix the hidden fasteners, additional recesses are made using an electric drill and a special milling attachment. But before that, you need to accurately measure the height of the mount without the pad.
The drill must be worked quite carefully. The end of the box is milled with light pressing movements exactly along the previously drawn contour. After reaching the calculated hole depth, the procedure is repeated for the remaining marks.
The recesses for hidden hinges in the door leaf and frame are made according to the same pattern. To complete this work yourself may take about 1 hour.
Installation of door hinges
Installation and subsequent adjustment of hidden hinges of interior doors is carried out after preparing all the necessary recesses. At the same time, there should be no knots or shavings in them.
The procedure for installing hidden loops:
- The loop is inserted into a previously prepared recess and fits tightly into the socket;
- Next, holes are drilled to securely fix the fasteners;
- Screws are inserted and tightened into the finished holes. All fasteners must be tightened at the same time to prevent the hinge from becoming awry;
- Similar actions must be applied to all other hidden loops;
- The hinges are installed on the door frame after the leaf has been placed and firmly fixed in the opening of the frame. Wooden pegs are used for this;
- The procedure for fixing the hinges in the frame is similar to the procedure for attaching these parts to the sash;
- After completing the installation of all fasteners, they are adjusted.
Construction of houses
Hinges are accessories that just a few years ago were an unremarkable unit of one option. Now the situation has changed and this fittings may be different. Hinges are necessary to open and close doorways. There are several options for mounting door hardware, the methods directly depend on the type of door. To carry out this work, you need some skills, a suitable tool and an understanding of a certain sequence of actions. Most often, hidden loops are chosen, since they are almost invisible and thanks to this everything looks more attractive. The insertion of closed loops is available to any craftsman.
Table of contents:
Hinge options for interior doors
There are currently five options for door awnings. Each option has its own specificity and strengths. You can find and purchase the following types of canopies:
- straight or card - simple classic, with special side plates;
- corner - similar to the first, classic canopy with a slight difference in the shape of the plates, most often installed on pendulum structures;
- “invisible” - special mechanisms that are recessed into the door leaf, most often used on expensive doorways;
- eversible - there are no plates, but only pins on a special eversible axis;
- Italian - equipped with a special hinge, installed on European doors.
All interior hanging structures are divided into universal ones and those that have a specific direction: right-handed and left-handed.
As for the loop options, they are:
DIY hidden door hinges
Most often, the invisible version of the loops is a priority, as it allows you to make the object aesthetically attractive. Installation of this fittings is a little more complicated than overhead fittings and also requires more time, but if you wish and have some skill, you can install the hinges quickly and correctly with your own hands.
The advantages of this option are as follows:
- Reliability and safety - thieves will not be able to enter the premises due to the fact that they cut off the hinges, as happens with overhead options; hidden hinges are hidden from outsiders.
- High strength - the product can easily withstand the weight of the structure itself, made of metal or wood material.
- Practicality - products can last for decades with proper care.
- Visual appeal - when the doors are closed, the hinge is not visible, this allows you to maintain the aesthetics of the appearance.
- Wide variety - you can choose canopies that can withstand heavy loads or small designs for closet doors.
The disadvantage of this method is the fact that installation is not easy and requires some effort. In addition, there are a number of weaknesses of this product:
- A hidden canopy is expensive compared to other options. But even among the category of hidden interior structures, you can find those that stand higher or lower. It should be understood that the quality of the hinge directly affects the price of the product.
- Unfortunately, there are a large number of fakes on the market; as a result, you can purchase a low-quality product and lose money
- A noticeable disadvantage is the fact that not every canopy can be disassembled if necessary.
- Due to the large recessing depth, it is not always possible to install this type of canopy.
Installing hidden hinges on doors
If you do not delve into the specifics of installing the door structure, then installing the hinges of the hidden version is simple and straightforward: you need to cut a niche and insert the mechanism, then securely fasten it and start using it. But in reality, everything is a little more complicated.
Installing hidden hinges yourself is not entirely easy. It is necessary to stock up on the tools needed to carry out the work. In addition, there is an instruction that describes all the stages; following the recommendations of specialists allows you to install the mechanism efficiently and quickly. The following tools and items are required for installation:
- "invisible loops";
- fastening elements for installation;
- a simple pencil;
- yardstick;
- sharp knife;
- chisel;
- screwdriver;
- screwdriver;
- hammer.
First of all, you need to make a hidden basting. It is important to think about which direction the door will open and at what level the hidden door hinges will be located. This is not at all blindly following the requirements for show; in fact, this will affect the ease of use, durability of the canvas and consumables. To slow down the swinging of doors, experts advise installing special stoppers. In this case, the door will not hit adjacent furniture or the wall.
The number of hinges depends on the characteristics of the door: material, weight, purpose. A classic door requires the installation of two hinges, this is enough. A door made of heavy wood has a different weight, so a couple of hinges will not be enough; three elements need to be installed. Two are installed near the floor and top of the doorway. The third loop is located in the center of the side panel. All attachment points are marked with a pencil. It is necessary to calculate the depth of the excavation in advance.
How to install concealed awnings
As already mentioned, depending on the weight and size of the door, the number of hidden hinges is planned. The markup has specific stages, and they can be displayed in the following order:
- at a distance of twenty to twenty-five centimeters from the top and bottom, a mark is placed for future loops; for convenience, you need to mark with a simple pencil;
- to the future location of the canopies, it is necessary to attach loops and outline their contours;
- when installing the third loop, it is placed strictly in the center, at an equal distance between the first and second;
- two contours are immediately marked, internal for the canopy and external for the lining.
Marking a door, namely a door frame, is considered a difficult task. Like any other process, door marking has its own order and looks like this:
- the accuracy of the door leaf is measured using a building level and secured with wooden wedges;
- now you need to mark the places where the loops will be inserted;
- The loops are outlined with a pencil to indicate their attachment location.
To avoid mistakes, you need to carefully carry out the insertion process. Holes must be made after several checks of the correctness of the future location of the hinged hinges of the hidden version.
How to decide on the choice of invisible loops
The hidden mechanism is a kind of invisible mechanism, equipped with a hinge, equipped with two elements connected by a screw. To make the right choice when purchasing hidden mechanisms, you should listen to the recommendations of experts:
- before purchasing a mechanism, you should study their features; if they are not universal, then you need to decide on the sides of the attachment - right or left;
- if the hinges are inexpensive, then most likely the manufacturer saved on the control mechanism;
- When installing heavy doors, you should not prioritize the issue of savings;
- when installing a door in a new building, it is necessary to purchase a copy with adjustment so that when the house shrinks, it is possible to correct the misalignment of the door, which will happen in any case;
- when installing awnings with adjusting screws, there will be no problems with large objects drifting in - the swing angle of the sash can reach 180 degrees;
- It is necessary to select hinges based on the characteristics of the door.
Door frame: how to install hidden hinges correctly
The first step to install the mechanism is milling. This is the creation of shallow recesses for recessing hinge elements. It is possible to make such connectors yourself using a hammer and chisel. The main requirement for the notch is accuracy and correct size. The depth of the notch depends on the thickness of the loop, and if a shallow one can be widened, it will be very difficult to correct an excessively deep one.
Using a drill, make a recess along the contour outlined with a simple pencil. There is no need to rush; the result depends on the measured actions. It is necessary to make recesses in the sash and in the frame. This work takes no more than forty minutes. The hinges are installed in the cleaned recesses. This involves the following actions:
- the canopy is immersed in a specially made hole, you need to ensure that the part fits tightly and takes its place;
- Recesses are made for the screws with a special tool - a screwdriver;
- You need to insert loops into the resulting recesses and tighten them, you need to make sure that the loop does not skew.
If necessary, it is important to adjust the “invisible” hinges. In this case, you can check the functioning of the door and make sure that the “invisible” hinges are located correctly.
Hidden hinges for doors with your own hands, adjustment
The adjustment features depend on the type and version of the loop. And although there is a wide range of hidden-mount hinges on the market, they all have identical adjustment options and design. To adjust the hinges, you must follow the following steps:
- the cover is removed from the loop, this allows you to expose the adjustment mechanism;
- to change the vertical skew of the door, you should turn the bolt; this manipulation can be done using a special hex key;
- Under the mechanism panel there is a screw with which the surface of the blade is adjusted.
Expensive and complex structures have a complex adjustment mechanism in three directions at once, and this makes it possible to create ideal conditions for operation and quality of service.
It is necessary to avoid the situation when hinges are purchased immediately before installing the product. Such purchases can be made in a hurry and without taking into account many features, which will negatively affect the durability of the door. It is recommended to purchase hinges in parallel with the purchase of the door, in order to take into account its dimensions and weight, and select the color of the hinges. And although they are called hidden and are partially recessed, they are visible when the doors are open, so it is advisable to select a shade.
Also, you should not purchase a mechanism of unknown origin or go for cheapness: hinges ensure reliable opening and closing of the door.
You can make installation easier and faster using a special template. This will help avoid mistakes when basting.
How to hide door hinges, requirements for the mechanism
There are certain requirements for fittings. The main thing is that they must withstand mechanical loads. Since the door material can be different, awnings are divided into three main categories:
- for doors up to sixty kilograms of weight;
- for a one hundred and twenty kilogram door;
- for massive structures weighing up to two hundred and fifty kilograms.
If the door has even more weight, individual structures for fastening are made. There are a number of requirements for hinges:
- they must be durable, reliable, and easy to install;
- the form must be made in such a way that the fastening is as reliable as possible;
- it must be taken into account that during its service life the door can open half a million times, so the material must be appropriate;
- priority is given to the use of hinges made of aluminum, hard plastic or metal - depending on each specific situation;
- parts must be coated with anti-corrosion agents.
If you still have questions about how to make a choice and install hidden hinges with your own hands, watch the video. There you will find answers to all questions. It is possible to install hidden hinges on your own if you follow the recommendations and prepare the necessary tools. The use of such mechanisms will allow you to enjoy the quality and aesthetics of the product.
Adjusting the hinges
Hidden door hinges, which are used for interior doors, can be adjusted in three directions. To do this you will need a special hex key.
The adjusting screws, designed to adjust the position of the door leaf, are located on the hinge element, which is mounted into the end of the frame of the door structure.
Horizontal adjustment is made by a screw located directly on the surface of the hinge element. Vertical adjustment is carried out with a screw, which is placed vertically.
The design also includes an eccentric, which provides the necessary clamping force for the adjustment mechanism. To change the clamping depth, you need to tighten 2 eccentrics with a hex key.
To adjust the position of the door block leaf relative to the frame, you must simultaneously turn the screws located on all installed hinges. The available travel of these screws is left-right, up-down in 1 mm increments.
Installation of hidden canopies
Hinges can be either universal or with a specific opening side
The canopies themselves are a rather original design. The main mechanism is placed inside the frame and door. Both halves are connected by a U-shaped lever, which, when closed, is hidden inside the box. The mechanism is adjusted using screws.
Hinges can be either universal or with a specific opening side. Universal ones are more convenient in terms of selection, but less reliable. It is better to take hinges with a certain opening; an experienced store consultant will quickly determine which awnings are needed.
In addition, loops are divided into:
- adjustable
- not regulated
Recommendations for choosing a product
When purchasing hidden type hinges, it is recommended to pay attention first of all to the design of the products, because There are models designed to open doors to the right or left. You can choose a universal option that can be installed on either side of the door block.
It is also important to know that for cheap models, manufacturers do not provide for adjustment of hidden hinges of interior doors. But experts do not recommend saving on such fastening elements. During operation, any door structures are subject to deformation, especially wooden ones, and require their alignment.
It is especially recommended to give preference to adjustable hinges for those who install interior doors in new apartments purchased in new buildings. Over the next few years, any new building will sag. At the same time, not only multi-storey structures, but also private houses with 1-2 floors. The door frame may become skewed and the door leaf will begin to rub against it. And with the help of adjustable hinges, this problem can be eliminated in just a few minutes.
Criterias of choice
An “invisible” hinge is a housing in which a hinge is hidden, connected to the canvas via a lever. It consists of two elements, fixed together with a screw. When the door closes, the lever is hidden in a special recess and therefore cannot be seen from the outside.
So:
- When purchasing hinges, you should pay attention to their performance. If the products are not universal, then, naturally, you need to correlate them with the option of opening the door: left or right. Door hinges for hidden installation may or may not be adjustable - as a rule, this option is not provided in budget models.
- Of course, everyone chooses at their own discretion, but it is worth noting that this is not the case when you need to save. Those who install doors in new buildings should pay special attention to adjustable hinges.
Hidden door hinges for metal doors: opening 180 degrees
- In the first two to three years, the building shrinks: this applies to both apartment buildings and private houses. We think many have encountered a situation when a new door suddenly, for no reason at all, stops closing normally. If the elements are adjustable, this problem can be solved in a couple of minutes.
- The uniformity of the gaps on all sides of the blade is ensured using adjusting screws. Moreover, hidden-mounted door hinges provide a swing angle of up to 180 degrees, which can be fully appreciated when you have to bring large items into the house.
Note! If there are hidden hinges, metal doors installed at the entrance to the apartment do not even need to be equipped with additional anti-dismantling elements. Since the products are not visible from the outside, it is impossible to cut them off during a break-in. This fact is an undoubted advantage of this fittings, and most often it determines the buyer’s choice.
A variety of hidden elements
- Since hinges are designed for a particular load, they need to be selected depending on the dimensions and weight of the door leaf (see Parameters of interior doors - what you need to know about them). This hardware is installed not only on entrance doors, but also on interior doors, cutting it into the end of the sash and the frame. Unlike overhead models, three hidden hinges are placed on one leaf, which provides the door with additional reliability.
After hanging the canvas on the frame, its spatial position is adjusted. This is only possible if the installed hinges provide such a function. The sash is aligned horizontally, vertically and pressed, and all you need is a hex key.
Functions and Features
Door hinges perform important functions. With their help, the canvas is attached to the box. In addition, they take the weight of the door and provide an angle at which it can open. Correctly selected hidden hinges will make it possible to swing the door 180 degrees, and not 90 or 120. This is very convenient, for example, when carrying large pieces of furniture or other cargo.
Hinges can be adjustable or non-adjustable. They may also differ in weight load and the way the door opens. Depending on the direction of opening, they can be right, left or universal, which do not depend on which direction the leaf opens.
Metal door hinges can be made of different alloys such as stainless steel, cast iron or brass. Stainless or brass is preferable.
Advantages
Metal hidden hinges have a number of advantages compared to other types of hinges.
- Reliable to use. Hidden hinges, thanks to their special design, are practically unbreakable.
- They are not visible. Interior doors with hidden hinges are most often installed where the design of the room requires it. Installed at the entrance, they increase safety, since it is very difficult to get to them and cut them off, like mounted ones.
- Adjustment in three planes is possible after completion of installation and hanging of the door leaf.
stablewood.ru
Just now the workshop received an order to produce a fairly decent number of interior doors.
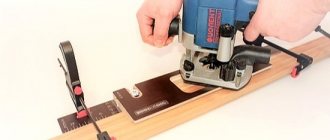
The doors are quite ordinary, if not for the large size of the door leaf - 800x2600mm. The door fittings seemed quite interesting to me - I haven’t installed hidden hinges yet. Frankly, I don’t often cut into locks and hinges, so such an experience was a novelty for me and I decided to share. So. Hinges with the funny name “Kubica K6700”, for inserting which I decided to use the most familiar method for me - make a template and mill it with a straight groove cutter. The template is made of MDF, it is fixed on the door leaf with clamps and its direct purpose is to limit the movement of a hand router along the door leaf. The bent parts of the template set the additional (internal) size of the loop and are used for repeated (deeper) milling. The template has a mark exactly in the center, which, when positioning the template, we combine with the marking of the center of the hinge on the door leaf.
For milling, I used a straight groove cutter “Globus”, from old cutters that I don’t mind. Initially it was 30mm in diameter. so I had to grind it down to 29mm using an electric sharpener. I milled the outer seat of the hinge to a depth of 6.3 mm, bent the edges of the template (limiting the route of the router along the blade), turned the turret mechanism that limits the depth of milling, and milled it again to the full depth of the hinge insertion.
If the template limits the movement of the router along the door leaf longitudinally, then the side stops of the router limit (more precisely, position) the router on the door leaf transversely. Once I adjusted these stops, I never touched them again. All door panels were milled using the same settings.
OK it's all over Now. The loop is embedded. All that remains is to simply insert it into the milled socket and secure it with screws. The hinges are not cut flush with the edge of the door leaf, but by 0.3-0.5mm. deeper and require further covering with a decorative plastic cover.
To insert the hinge into the door frame, I had to remove the protective jaws from the side stops of the router; the width of the frame (150mm) did not allow me to work comfortably, so I had to twist it out. Since the frame does not have a plane, I fixed pieces of MDF on the sole of the router, with a thickness equal to the thickness of the step on the door frame.
Please note that the pads on the sole must be wider than the intended groove, otherwise the router will sink into the groove and the workpiece will be damaged. Otherwise, the frame is milled in the same way as the door leaf, only to a slightly shallower depth, taking into account the size of the mating part of our hinge.
When marking the frame, do not forget that the gap under the door should be larger than the gap at the top. In my case it is 4mm. side gaps between the frame and the door leaf, 7mm. below and 3mm. upper gap (taking into account that the door leaf will sag a little during installation)
After installing the hinges, if the gap is not uniform or not the same on both sides, the hinge can be adjusted. This type of hinge has many adjustments and allows you to adjust the canvas in all three directions - horizontally, vertically and in depth.
On the insertion of the lock, I must admit I cheated a little - I used a Domino df-700 dowel router. I milled the external fit of the lock in a similar manner to the hinges, and then used Domino for further mortising. The lock itself is 14.5mm thick. but by setting up a dowel router, I was able to mill a similar groove and 12mm. using a milling cutter, simply turning the door leaf over and milling again. The required nest depth is up to 75mm. I had to finish it with a chisel and a drill... but Domino still made the job a lot easier.
I marked the holes for the handles and the lock with an awl and subsequently drilled them out with a feather drill.
I cut the counter part of the lock in exactly the same way as everything else, only using different sizes of cutters. Separately, I would like to note that I received great pleasure from using centering drills - a gift to me for my birthday a couple of years ago by one of my good friends, Anton, from a friendly carpentry shop. This was the first time they came in handy, but I think they will come in handy more than once. These small devices center the drill, allow you to drill accurately and all screws are screwed in without distortion.