How to choose?
When choosing an assembly and welding table, you must consider:
The welding table must have high strength and rigidity;
Have the necessary lifting capacity to work with the planned products;
To perform complex operations with products, a fastening system must be provided for installing equipment elements and fixing products. The choice of fastening system depends on the diameter of the equipment used. The larger the diameter of the equipment, the more securely the product can be secured.
Determine whether plasma nitriding is necessary. If you are planning a large amount of work, then plasma nitriding is necessary, otherwise you can buy a regular table, and use non-stick liquid or a special spray to protect its surface from welding splashes.
Additionally, the welding table can be equipped with an exhaust system. A welding table with an exhaust hood will allow you to remove polluted air from the work area through an outlet during work, thereby protecting the welder and others from harmful impurities.
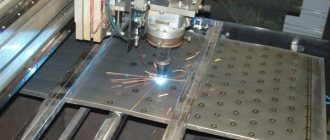
From the MOSSklad company you can order high-quality universal welding tables of different sizes based on your needs and production characteristics. We supply professional welding tables TEMPUS (Germany) and domestically produced metalworking tables RUBOV. You can order welding tables with exhaust hood from us, as well as purchase the necessary equipment with standard components (clamps, stops, clamps). For more information, you can call the number or send a request to [email protected]
Clamps
The clamp is considered a universal tool, as it can perform both installation and fixation functions. There is no single type of clamp, but this tool must be in the arsenal of any welder. Theoretically, welding without the use of clamps is quite possible, but this will come at the cost of lost time, inconvenience and, most importantly, poor quality.
The functionality of the clamp depends on whether the size of the jaw is adjustable. There are quick-clamping devices based on clamping using a cam mechanism. However, one clamp cannot fix absolutely any connection, so the welder must have several types of such tools at once. Clamps for welding work have one feature - they are made of metal. Similar carpenter's tools have plastic or wooden elements.
F-shaped
The basic design of an F-shaped clamp is quite simple, so you can often find homemade ones in a welder’s arsenal. It consists of a metal frame (tire) to which two jaws are attached. Some sponges are movable, while the other are immobile. In some cases, the fixed jaw is designed as a continuation of the bed. The movable jaw is driven by a screw with a handle.
A quick-release mechanism is available as an alternative. It replaces the movable jaw and allows you to fasten parts together more quickly. Typically, relatively large forces (up to 10,000 N) can be obtained using F-shaped clamps.
G-shaped
Such clamps are made in the form of a bracket in which both jaws remain motionless. The parts are secured by tightening the screw. This mechanism has one advantage - there is no backlash in the jaws. But in terms of the thickness of the parts being fastened, G-shaped clamps are very limited.
Corner
If necessary, fix parts at right angles using corner clamps. More complex devices allow you to adjust the angle of fixation. The components of such clamps are the body and the clamp. The clamp can be single-screw or double-screw. The pressing heels come into direct contact with the product.
End
Such devices are designed to fix the welded element to the end of the part. In appearance, they vaguely resemble G-shaped clamps, but differ in two additional clamping screws.
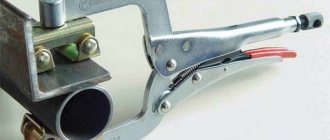
F-clamps
If G-shaped clamps have only one adjustment (clamp height), then F-shaped clamps have several adjustments . This is directly the height of the clamp and the so-called “booster”, which guarantees the most reliable fixation. An example of an F-shaped clamp is shown in the photo below.
As with G-type clamps, F-type clamps are designed to clamp workpieces either to each other or to the edge of the countertop.
F-shaped clamps regulate the clamping height by means of a guide bar along which the lower clamping jaw runs. The principle of fixation in such clamps is simple. Resting against the workpiece, the lower jaw wedges on the guide bar. To strengthen the wedge, you just need to tighten the auxiliary screw clamp.
F-clamps for welding and carpentry applications typically feature a guide bar. In welding clamps, the guide bar is usually flat, but in joinery fixtures, the guide bar most often uses a ribbed surface.
Unlike G-devices, clamps with an F-shaped profile allow you to fasten fairly high workpieces . Of course, there are also very small F-clamps. The height of the jaw opening in F-clamps can be from 100 to 300-500 (mm). The specific clamping height will depend on the clamp model. From the video below you can learn how to choose a clamp for welding.
Angle clamps
This is a series of highly specialized clamps. With their help, you can precisely join shaped steel at right angles. Such clamps are indispensable in the manufacture of frames and frames. The corner clamp allows you to weld the ends of pipes, angles, channels, etc.
There are mobile and stationary clamps. Mobile type clamps can be used locally, that is, directly on the metal structure itself. Stationary clamps are rigidly attached to the table top of a metal workbench or assembly/welding table. Stationary clamps allow you to join rolled products in one place, which has a positive effect on the accuracy of manufactured structures. Stationary type devices have proven themselves in serial and mass production of metal structures.
Classic corner-type clamps secure workpieces using clamping jaws. In more modern models, rental fixation is implemented using magnetic forces. It is enough to simply place the workpieces on the guides, the rolled product itself will “stick” to the clamp. Magnetic clamps are characterized by their simple and reliable design.
The weak point of magnetic corner clamps is the ability to work only with metal workpieces that exhibit magnetic properties. Clamps with clamping jaws can join aluminum, alloy steel, copper and all kinds of alloys that do not react to magnets.
Design
Corner clamps have a very simple design; they are driven by physical force, so at first glance there is nothing to break. But this is not always a true statement. The reliability of a clamp does not depend on the simplicity of its design, but on the materials from which it is made.
The device consists of two key elements - a moving part and a frame. The clamps and clamping screws themselves are located on the moving part. Using screws you can adjust how tightly the parts should be fixed. Clamping jaws are located on the clamps. An angle clamp for welding is often capable of fixing parts with a size of no more than 40 centimeters.
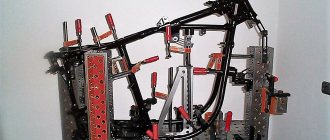
Universal fixtures for welding assembly
Universal assembly devices are usually simple and portable. They do not always provide the necessary accuracy and are designed to verify correct assembly and installation dimensions.
Portable clamps are designed to fix the relative position of the parts to be welded. Clamping fixtures can be used when welding certain parts, as well as in the manufacture of assemblies and structures. In this case, they are equipped with stands, racks and other auxiliary equipment. They are made in the form of clamps and bolt clamps, allowing you to assemble parts of any profile.
Wedges and clamping brackets are used to assemble rolled sheet products for welding. Spring clamps are used to secure thin sheets and short parts made of rolled profiles.
| wedge bracket | clip | spring clip |
Clamps are used mainly when installing large structures. Individual elements of the clamps are temporarily welded to the assembled parts, and after welding they are removed. Clamps are rigid and adjustable.
Ties are used to bring the edges of welded parts together to specified sizes. Screw ties are the most widespread.
Tie with bolt and welded angles for welding large structures made of sheet metal.
Tensioning device with welded temporary elbows for pipe assembly. It is used to a limited extent and only on carbon steel pipes.
Screw coupler for assembling structures and parts from sheet, strip and profile products.
Lever-screw coupler.
For assembling pipe joints, clamp-type clamping screw devices are most commonly used, which do not create a rigid fastening of the joined elements.
Spacers and jacks are used to fix products with a closed profile from the inside, to align the edges of cylindrical products, to remove dents, etc. When welding cylindrical products, spacers are used in combination with clamping rings. If the diameter of the shells is small, spacer rings are used, and for larger diameters, screw spacers or jacks are used. The forces in spacers and jacks are created by mechanical, hydraulic or pneumatic drives.
Centralizers are designed to secure individual pipes or similar products so that they do not shift or rotate in the directions of three coordinate axes. They allow you to combine the cylindrical surfaces of joined products (pipes, sections of pipes, etc.) to perform welding work. Depending on the position of the centralizers relative to the mounting surfaces, centralizers are divided into external (grasping) and internal (spacer). External centralizers are used when assembling pipes into sections for welding at procurement bases or in the area of construction sites. Although the design of external centralizers is different, they perform one operation to ensure alignment and alignment of the end edges of the pipes (see figure below).
| Pliers for pipes up to 40 mm in diameter | Screw clamp device for pipes up to 60 mm in diameter |
Centralizers for assembling large-diameter pipes can be equipped with a hydraulic power cylinder in the place of the clamping screw. The external hydraulic centralizer is a double-row plate chain, tightened at the ends of the joined pipes with a jack placed inside the bracket. The jack is driven by a hydraulic pump station.
External hydraulic centralizer TsNG-1220 1 - chain; 2 - thrust roller; 3 — staples; 4 - end link; 5 - jack; 6 - screw.
Internal centralizers provide the highest quality pipe assembly due to a more accurate alignment of their edges. When centering, the joint is open from the outside, which provides free access to the welding site. The use of internal centralizers makes it possible to increase the productivity and degree of assembly mechanization for welding both rotary and non-rotary pipeline joints.
Making a clamp with your own hands
You can create with your own hands:
- the required strength of the device;
- equipment for fixing metal parts;
- clamps of all sizes and varieties.
If the work ahead is simple, then the tool can be made from simple and cheap materials.
Corner clamp made of plywood
To make a tool you need:
- Prepare pieces of plywood 1.5 cm thick and 10x10 cm in size.
- Divide the squares into two parts diagonally.
- Mark holes at a distance of 2 cm from the edge and drill with a diameter of 40 mm.
- Cut the side along the holes so that excess glue under the fasteners can be conveniently removed.
The plywood tool is ready. You can’t count on its long-term use, but it is made from the simplest materials at hand.
Making and assembling a wooden corner clamp with your own hands
you should choose the right material
From the selected material you will need to prepare:
- two plates 15 cm wide, 20 cm long and 2 cm thick;
- two bars 2 cm wide and 25 cm long;
- metal bolts;
- self-tapping screws with a diameter of 5 mm (2 x 20 cm long and 2 x 12 cm).
After everything is prepared, you can begin assembling the device with your own hands:
- Place two long slats on the table. In this case, one should be laid edge down, and the second – up.
- Drill holes in the slats for connection using a drill. They must match for both parts.
- Attach one plate to the lower bar and fasten the second parallel to it. For this purpose, a self-tapping screw passing through the elements is used, which will regulate the degree of clamping of the part between them.
- Drill holes at the ends of the slats and attach solders or plates to them. The angle between the elements should be 90 degrees.
The manufacture and installation of the corner wooden clamp is completed, now you can check its operation.
DIY corner metal clamp
has good fixation rigidity
Using a metal clamp you can:
- fix structural elements at different angles;
- perform preliminary installation of products;
- align structural parts relative to each other.
In addition, metal corner clamps are widely used during welding work. Such instruments are divided into two types:
Using the device, you can fix two elements of a metal structure, and then secure them by welding. Even the simplest type of such equipment will make welding work more comfortable, ensure high quality seams, facilitate various manipulations with structural parts and significantly save time.
Making a corner clamp from metal with your own hands is quite simple. To do this you will need to prepare:
- steel sheet 10 mm thick;
- nuts – 3 pcs;
- steel sheet with external thread to fit the nuts;
- large diameter washers.
- Cut two blanks from the sheet, 50 cm long and 4 cm wide.
- Weld an auxiliary part to the main part of the part in the shape of the letter “L”.
- Weld the support element flat onto the short edge.
- Weld three nuts together, placing them with their edge towards the moving part. In this case, the screwed rod must run parallel to the base of the device.
- Weld all parts along the outer edge, inserting a strip of tool between them.
- When attaching the movable bar to the structure, weld along the inner edge.
- Weld large washers to the edge of the metal rod.
Work on the manufacture of corner metal clamps has been completed. When carrying out carpentry, plumbing or welding work, it can be used to securely fix the structure. Such a tool can replace one assistant and speed up the work time. And its moving elements will allow you to connect the parts at the required inclination and angle.
Having studied the types and options for creating corner clamps, making and assembling the tool with your own hands will not be difficult. In this case, the type of structure should be selected depending on the required fixation strength. Such a device will be useful both in the home and in professional activities.
source
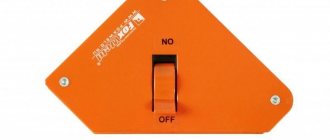
Convenient welding at an angle of 90 °
Welding magnets allow you to hold the workpiece being welded at an angle of 90°.
To ensure that welding pipes is not too troublesome and can be done without an assistant, welding magnets were invented that hold the pipes at an angle of 90°. Previously, devices for work of this kind were made without the use of magnets.
For this you will need the following materials:
- metal square with a side of 20-25 cm;
- a piece of square pipe;
- 3 small bolts and nuts for them;
- a thick bolt with a diameter of 4 cm and a nut of 35;
- drill, drill;
- a small metal cylinder with the diameter of a ballpoint pen;
- holder for the cylinder, actually its handle;
- welding machine.
Pipes 20 and 15 cm long are welded onto the square, on interchangeable sides, in the very corners, so that the ends of the pipes are on opposite sides of the square.
Make two auxiliary parts. Weld a U-shaped figure from the same pipes, approximately 10 cm long. Weld the second, using the same pipes, in the form of an isosceles trapezoid with bases of 11.5 cm and 5.4 cm.
Calculations must be performed more accurately; the angle formed when the side parts intersect should be 90 °, so the lengths of the bases will depend exactly on the width of the pipes.
On the sides of the square at the corner where the pipes are not welded, make an isosceles triangular cut. Weld a U-shaped figure to it, having previously drilled a hole for a small bolt in the center of the upper rectangle. A 4 cm wide bolt with a nut should be placed in the gap between the square and the figure.
Attach a handle to the bolt; you can use a nut with a hole in which a thin rod moves freely.
In a small cylinder the length of the smaller base of the trapezoid, make threads for the small bolts taken. The thread must be made along the tip of the large bolt, placing it in the center.
At the point of intersection of the diagonals of the trapezoid, make a hole in both similar parts. A cylindrical part will be inserted between them, in which a thread was previously made and a hole was drilled in the center. To further assemble the device, you need to prepare a 35 nut for a bolt 4 cm wide; to do this, make a through thread on one side of it, without touching the opposite edges.
corner connection
All further assembly consists of the correct sequence of joining parts. Place a threaded nut on the bolt with the handle already attached, turning until almost to the base. Attach a cylindrical piece to the end of the bolt, drill a hole to the internal thread, and attach it with a small bolt. Next, we secure the trapezoidal figure using bolts, one of which is recessed into the thread of the cylindrical part, the second secures the configuration from above, through the thread of the same cylindrical figure. A bolt with a prepared part at its top is pulled under a U-shaped support, fitting a threaded nut under it. Secure the bolt using a bolt that passes through the center of the U-shaped figure and is screwed into the thread of the special nut. The device is actually ready for use. By rotating the handle of the bolt, it can be loosened. By inserting the pipes at right angles and fixing the fastening device, welding can be performed.
Devices of this kind successfully replace welded magnets, which can be too expensive for simple household use.
How to make your own clamp
Most of these devices have a fixation angle of 90 degrees. However, today products are produced in which it is possible to change the mounting angle. They cost a little more, so it is recommended to make a corner clamp with your own hands, using drawings or without them.
Such a tool is structurally simple; almost every home craftsman can make it without much difficulty. The most suitable material for creating a clamp is iron.
The production of the device is carried out according to the following algorithm:
Creation of a structural foundation. For the manufacture of the main part of the device, it is recommended to use sheet iron having a thickness of 8 to 10 millimeters. The fixing component is a corner of the required size. It is advisable to fix the elements by electric welding, because the use of threads is not so reliable. Setting the clamp. To make a clamping screw, you need to use two or three nuts, which are connected to each other by welding. You need to make a bracket that has a threaded hole in the center with a thickness of 30 to 40 millimeters. The bracket is fixed with bolts. If the thread breaks, it may be easy to replace. Forming an angle
Particular attention should be paid to the position of the clamping brackets. When connecting, the corners must fit exactly together
To ensure a perfect connection, 1 corner is welded with a clamp. After this, a second corner is placed on it, which is pressed against the bracket and welded to it. Checking the mobility of the main part. Guides must be mounted on the sides of the tool, which make it possible to move the internal base of the device. To do this, a groove is cut, having a width of eight to ten millimeters along the bisector of the corner device. Drilling holes. Using a drilling tool, holes are created in the upper base of the device, into which a bolt with a nut and washer is screwed. The bases must move freely relative to each other. It is recommended to use a bolt whose threads do not extend to the head. In addition, the head can be fixed to the base using a bracket.
Also, a corner clamp can be made according to the following scheme:
- Cutting three strips of different lengths (100, 250, 500 mm) and the same width (40 mm) from a sheet of metal.
- Prepare two plates in the shape of a rectangle.
- Welding the plate to the base of the instrument.
- Welding the second plate to the smaller side of the instrument.
- Welding washers together.
- Attaching nuts to a moving component. The rod that is unscrewed must be parallel to the main part of the device.
- Welding is performed from the outside of the first sheet in the shape of a rectangle.
- The mobile element is fixed inside the device along the edges.
- Welding washers to the rod (flat).
When using an ordinary clamp, it may be difficult to perform certain jobs. This is due to the limited location of the device. It can only be positioned at an angle of 90 degrees. To eliminate this limitation, a detachable bolted connection must be placed in the tool. It is possible to use an adjustable pressure screw. Using it you can select the desired angle and secure it.
It is worth remembering that to create a correct welded joint, you need a high-quality tool that makes it possible to facilitate welding and prevent the occurrence of mismatches and adjustments.
To make the manufacturing process more clear, we recommend watching a video tutorial on how to create this device.
We also recommend reading:
https://youtube.com/watch?v=s4Zu-z42fm4
Pipe clamp
Welding metal pipes end to end is a complex operation. It is considered simpler to weld the pipe to the finished system. The design for such cases is made of a metal angle and steel plates. The halves of such a device should be fixed using the traditional method, namely with threaded rods. As a result, you can get a fairly simple and effective design, which will greatly facilitate the work when welding pipes with various designs.
There are other types of designs, including cam mechanisms, tape and wire clamps, which can be useful for working with specific structures, including particularly fragile and thin ones. However, their production is the subject of separate master classes and articles on specialized resources.
Homemade clamps are indispensable assistants for any craftsman working with metal and wooden parts and products. Making them is quite simple and very exciting.
Here it is important to follow the manufacturing technology, find the best instructions and videos. You can buy clamps, but they may ultimately not be suitable due to the specificity of the workpiece or work
This is why you should make your own clamps. Good luck working with various workpieces and making homemade quick-release clamps!
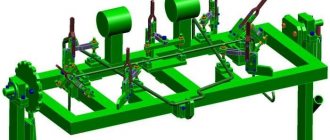
Welding area maintenance equipment
Cradles, stepladders, and special platforms provide a comfortable position for the welder when working on large-sized products. The platforms are designed to accommodate welders and welding equipment, as well as to move them to the welding zone. They are manufactured for one or more welders and can be mobile (self-propelled or non-self-propelled), portable and stationary. The figure shows a universal platform that can move along the workpiece being welded, rise and fall depending on the level of welding, and move in the direction of the workpiece.