How to qualitatively harden an ax at home? The relevance of this issue is explained by the wide demand for this tool. In addition, using the example of such a simple household tool as an ax, one can examine in detail the nuances of several types of heat treatment - annealing, hardening and tempering.
It is quite easy to find out that a new ax purchased from hand or at a hardware store needs to be hardened: if the blade of the tool is very soft (which can be determined by its wrinkles even when cutting knots of small thickness), then it needs high-quality hardening. If cracks appear on the working part of the ax during operation or the blade becomes chipped, it should be fully tempered.
Sharpening methods
There are several types of tools, which differ in the size of the ax, the shape of the wedge, and the bend of the blade. The most popular axes: construction, carpentry, lumberjack, cleaver, butcher, hunting, tourist. In production, each product is sharpened in an optimal way; regrinding is required only when the edge becomes dull or crumbles. Self-sharpening an ax with your own hands is possible in two ways: with electrically driven devices or manually using an abrasive stone and sandpaper.
The choice of method for properly sharpening a conventional ax will largely depend on the following factors:
- hardness, density of wood;
- wood moisture;
- nature of woodworking;
- ax steel grade;
- degree of hardening of the cutting edge.
The determining conditions are the hardness of the steel and the sharpening angle of the axes. In this case, not only the angle of the wedge is important, but the width and angle of the chamfer on the working edge. It is the last factor that determines how well the ax will fit into the tree and not slide off it.
When sharpening an ax at home, the chamfer width is chosen as follows: for fine carpentry work it should be larger, and for rough tree cutting it should be slightly smaller in order to reduce the load on the blade.
On an electric machine
On a mechanical machine
Using a whetstone
This is interesting: How to make a spring at home with your own hands
Important qualities of steel
Hardness: The ability of steel to resist warping and deformation after use. Hardenability: A measure of the ability of a steel to be hardened during heat treatment. Strength: How well the blade can withstand stress and force. Ductility: A measure of the flexibility of steel. Durability: The ability of steel to absorb shock. Initial Sharpness: How sharp the blade comes straight from the factory. Edge Retention: How well the blade maintains its edge without resharpening. Wear Resistance: The ability of steel to resist corrosion. Durability: How well an ax can withstand basic wear and tear over time.
It is important to remember that if the ax is being used for its primary purpose, it must work flawlessly. That being said, when a tool is abused or used inappropriately, it is unlikely that you will see positive results regardless of the quality of the steel. Make sure you know exactly what you intend to use your ax for.
Last but probably first: safety tips
- Never use an ax if the head is not securely attached to the handle or if the handle is cracked. Do not hit the end of the ax with a hammer - make sure that the blade of the ax is sharp and not rusty - pay attention to the material near the handle of the ax: if there is a possibility that slipping may occur due to humidity - wrap part of the handle with electrical tape, and it is best to work gloved.
Correct sharpening parameters
Any ax has standard parameters that determine its purpose: the angle of the cutting edge, the width of the descent, the curvature of the blade, the length of the tip from toe to heel. They need to be measured before sharpening. In the future, you can always compare the resulting result with the original values.
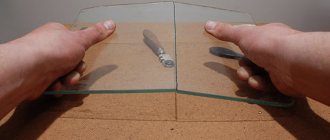
Making a template
A template made of cardboard or plastic is necessary to accurately determine the current angle and adjust it to the required values. The approximate angle is determined by applying open scissors to the wedge and transferring the obtained parameters onto paper. The points are combined with lines. The resulting angle is measured with a protractor and a template is cut out from it. For convenience, you can make several blanks for the most common angles, then use them at home during the sharpening process.
Sharpening angle
The sharpening angle of the ax depends on the sharpness of the blade. The lower this value, the sharper the product. You can choose the correct angle at which to sharpen axes from GOST 18578-89. It describes the purpose of the tool and lists all standard sizes. The general rule is that the harder the work and the greater the load on the ax, the dumber the angle chosen.
The standard value for a splitting cleaver is 35–45 degrees; carpentry tools and tree cutting models have an average angle of about 25–30 degrees . An ax with a sharpening angle of less than 30 degrees is well suited for chipping and general construction work. To make narrow, thin parts, carpenters use blades sharpened to 20 degrees or less. Similar values apply to meat axes and butcher axes.
Chamfer width
The chamfer is the distance from the axis of the blade to the side surface of the wedge. You can measure it with a simple ruler. As the sharpening angle decreases, the bevel size increases, making cutting into wood easier and increasing productivity. The size of the edge is convenient for monitoring the degree of wear of the ax. The chamfer can be straight, convex, or concave. To change its size, you need to remove excess metal from the ax.
On some axes there is a double bevel - a method of sharpening with two chamfers. One is flatter, and the second is working. This is done so that the blade can be processed by hand more quickly. Proper chamfering of the wedge is the most labor-intensive operation during sharpening.
Features of a homemade ax
An ax is a simple and common tool that is difficult to surprise anyone with. However, thanks to it you can cope with many complex jobs and ultimately get an excellent result. On sale you can find both simple versions of axes, as well as more interesting and original ones, for example, with decorative inclusions. If you don’t want to spend money on a ready-made option or you couldn’t find a suitable one among those, you can make it yourself.
Many home craftsmen, not finding the right tool on sale, decide to make it themselves. Such work cannot be called impossible or extremely difficult, but even here it is very important to act according to all the rules in order to get a good result. It should be borne in mind that there are several types of axes that you can build on your own.
For example, there are special cleavers that are very popular today:
- mechanical;
- with electric drive.
Of course, the mechanical option is the simplest and easiest to implement. It is equipped with a manual drive. Making such a model with your own hands is not difficult. The drawings of mechanical tools are quite simple and understandable, and the principle of their operation lies in simple mechanical manipulations. This device consists of the following basic elements:
- metal wedge;
- spring mechanism.
When working with such a tool, the master spends a minimum of effort and time, especially if you compare this cleaver with a standard simple ax. As for the even more advanced electric cleaver, it contains one main part, which, after activating the engine, begins its movement - constantly rotating. The master only needs to add a new batch of firewood for splitting.
You should also know about other options for axes, which many craftsmen can make on their own.
- Carpentry. This tool is light in weight and size, and has a sharp blade. It is used in cases where the most precise and accurate work with wood is needed.
- Taiga. This ax can also be made with your own hands. It is perfect for cutting down trees, removing knots and bark.
- Tsalda. This tool is made to clear an area of bushes.
- Kitchen. Such tools are made exclusively for chopping bones. A kitchen ax is a small device with a short handle and a large blade.
- Lumberjack. Suitable for cutting down trees only. Made from a long ax and a sharpened wide blade. It also has other names, for example, felling.
Read also: Gas convector with fan
The taiga types of axes are recognized as the most popular and practical. They are distinguished by the following features:
- little weight;
- small area of the stabbing area;
- unusual sharpening of the blade (the edge at the back is several times smaller and thinner than the front).
Certain tree species are ideal for making a home ax. It must be taken into account that materials suitable for such purposes can easily withstand significant vibration loads that occur at the moment of impact of the tool.
Any homemade ax is distinguished by the fact that it is ideal for the master who works with it. By making this instrument with your own hands, you have the opportunity to adjust it to suit yourself, to suit your hand. The result is the most convenient, practical and easy-to-use devices.
Features of the work taking into account the chosen method
Before starting work, the device is cleaned of rust and dirt. In addition, if necessary, remove the wedge from the ax handle and secure it to the stand. Before choosing a method, determine the shape and degree of sharpness of the ax.
Electric sharpener
The easiest and fastest way, but it requires skills, attention and special equipment. For sharpening you will need: an abrasive wheel with an electric drive, hand sharpeners, protractors and templates for different angles, a marker, polishing paste. An important condition is that you need to wear safety glasses and gloves.
For a straight blade, it is convenient to make a clamp that can be accurately aligned relative to the sandpaper. This will create two symmetrical chamfers. A curved ax will have to be sharpened on the fly, checking the template.
Procedure for sharpening a carpenter's ax:
- Use a marker to paint over the entire chamfer to make it easier to control the sharpening process and untreated areas;
- set the sharpening angle on the device or try it on manually;
- If installed correctly, the blackening on the chamfer will be removed evenly with the stone; if necessary, the angle must be adjusted;
- turn on the emery and remove excess metal with smooth movements until the nicks are completely eliminated;
- turn the ax over and repeat the operation, control the overall angle with a template or block;
- finally bring the blade sharpness to the desired value using fine-grained sandpaper and sand it on felt with a special paste;
- clean off any abrasive residue and apply a coating to the chamfer.
The cutting edge will heat up when processed on a sharpening machine. This should not be allowed, for which it must be periodically immersed in water or oil. Heating the metal and then tempering it reduces hardness and impairs working properties.
Manually
This method has its advantages: firstly, the blade does not overheat, so the quality of the edge is the best, and secondly, you can sharpen an ax at home with an ordinary whetstone, when there are no electrical tools at hand. For work you will need: a file, sandpaper and stone of different grain sizes, felt, sanding paste, gloves, safety glasses. You can sharpen an ax in this way:
- use a file to remove large irregularities and bring the chamfer to the desired size (movements from the ax to the blade);
- spread the sandpaper on a flat surface, use the blade to make semicircular movements alternately on each side;
- Give final sharpness with an emery block, polish the cutting edge and treat it with anticorrosive.
The difficulty of the manual method lies in the need to constantly monitor the position of the ax relative to the abrasive. Even a slight tilt to the side can ruin the sharpening. In addition, this method is very tedious.
Common mistakes
Despite its apparent simplicity, many people make mistakes when sharpening a tool. The most common:
- Sharpening an ax with a grinder. It’s not easy to hold an angle grinder in your hands, so lateral slips and chamfer violations cannot be avoided with it. The abrasive in the cutting disc has a coarse fraction, because of this the quality of the processed edge will be low. There is a high probability of metal overheating.
- Overheating of the edge due to prolonged exposure to an electric sharpener. It will be difficult to restore the working properties of the ax after this; hardening and regrinding of the wedge will be required.
- Use of worn-out equipment. Old discs and worn-out abrasive bars do not contribute to the formation of a high-quality edge. A faulty tool can cause injury.
It is not recommended to completely resharpen a competent factory sharpening. In most cases, light finishing of the cutting edge with a block is sufficient. For some axes (cleaver, tourist) sharpness is not a priority.
Modern axes, which are made of high-quality steel, practically do not need regular sharpening. Their working edge withstands cutting any wood well. Exceptions include accidental hits on nails or stones, in which case serious sharpening may be required. In other cases, a fine-grained sanding block is sufficient for finishing.
It is not recommended to sharpen an ax with a grinder
If exposed to an electric sharpener for a long time, the blade may overheat.
Worn abrasive wheels must be replaced with new ones.
DIY making
You can make any type of ax on your own. It can be simple, hunting, Scandinavian, hiking, intended for throwing (throwing) or simply decorative - there are a great many options. It is also possible to update the tool and build a completely new and convenient tool from an old axe. In order to carry out such work yourself at home, you will first need to make an accurate drawing with all the indicators of the planned tool. It is important to indicate the dimensions of all parts, as they can vary greatly. For example, the handle of an ax is not only quite large, but also medium or small, as is the blade.
Read also: How to make a belt sander with your own hands
From a spring
A small hatchet can be made from an old spring. This can be not only a working tool, but also an original decorative tool, similar to a Viking axe. You need to do this thing as follows.
- You need to take an old spring from a car with a width of 10 cm and a length of about 40 cm. Using a previously prepared template, draw the contours of the planned device on the springs using a marker.
- Draw the contours of the ax using a grinder with cutting wheels. Then carefully sand the cut piece, giving it the desired shape.
- For particularly complex metal work, it is permissible to use a drill.
- You can use an old chair leg as a handle. Drill 3 holes in the spring for fastening to the handle.
- Cut a piece of the desired length from the leg. Saw this part into two halves. Drill 3 holes in each of them. After this, you need to assemble the handle, fixing it with bolts and screws. Draw the shape of the part on a grinding machine.
- Finally, sharpen the blade. The result will be a beautiful mini hatchet. It is suitable for outdoor recreation or in a summer cottage.
An ax from a spring can be made independently by a master blacksmith. The handle is made of wood or reinforcement parts. Such axes are not expensive in their own way. Tools made from springs are not bulky; the ax can be made of any modification: a cleaver ax, a tourist hatchet, a mini hatchet for harvesting work. In addition, the master can use his imagination when making an ax. We offer 7 photos of homemade axes.
Do-it-yourself splitting ax made from springs. This ax is convenient for chopping wood.
Welded homemade ax from a spring. The weapon is skillfully welded from separate parts.
An ax is a cleaver made from part of a spring. The most common ax model. And for ease of use, the handle is made of wood.
A mini hatchet made from springs is an excellent option for cutting down forest thicket. Lightweight and compact, it is convenient to take it with you on a walk or quiet hunt.
Spring ax. A lightweight version with a thin handle and a sharp blade.
Homemade hatchet made from springs. It is convenient to take such a hatchet on a hike as an indispensable assistant.
A homemade ax is made from a spring, and the handle is welded from a piece of reinforcement. This ax model can be conveniently stored by hanging it on a hook in the utility room. There is no need to worry that the handle will dry out or the blade will fly out during operation.
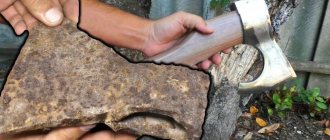
Hardening an ax at home
If the ax quickly becomes dull during use and dents appear on the tip, then the steel is soft. And this means that the ax is not hardened. And if the tip chips or cracks, that is, the steel is very hard and brittle, then this is possible if tempering has not been carried out after hardening.” A clean file with a fine notch will help us evaluate the hardness of steel, and therefore the quality of hardening.
If the hardness of the steel is high, then the file glides over it almost without catching. If the hardness of the steel is medium, then the file will take it a little. And if the hardness of the steel is low and the file takes it easily, it means that the steel is not hardened, or the heat treatment technology was violated. In the case of this axe, the file takes it easily. In this case, as well as in the case of increased fragility, the ax is subjected to a full heat treatment cycle. First, annealing, and then quenching and tempering. Correct hardening of an ax is considered to be hardening in which different parts of the ax are hardened differently. In the area of the blade, at a distance of about three centimeters from the tip, the hardness of the steel should be high. The hardness of the rest of the ax should be much less. This hardening ensures the wear resistance of the blade and the ductility of the rest. And it is a guarantee that during operation the butt will not burst or the blade will not break off.
This is interesting: Cold welding for metal - used correctly
What steel are axes made from?
For a knowledgeable person, the question of what steel an ax is made of is far from idle. The fact is that the quality of hardening directly depends on the brand, composition and other characteristics of the metal. Some types of steel simply cannot be hardened because they do not have the necessary components and cannot acquire the necessary properties during the preparation process.
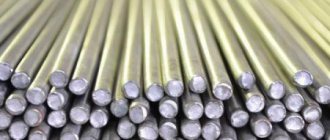
Figure 1 – Types of steel
For the manufacture of construction axes, according to GOST 18578-89, the following grades of steel are used:
- 8ХФ, 9ХФ, 9ХС, ХВГ (according to GOST 4543);
- 60G (according to GOST 14959);
- U7A, U8, U8A, U8GA, U9, U9A (according to GOST 1435).
It is necessary to take into account that a construction ax is a universal tool designed for constant and active use.
Unlike other types, this variety is used in a continuous mode, and therefore requires high-quality hardening of the blade, which prevents damage or rapid dulling of the cutting edge. It is necessary to check what metal the ax is made of when purchasing it, however, it is impossible to determine whether hardening was carried out and how well this procedure was carried out. Quality tools are sometimes marked with the grade of steel, but this information is of little use, especially for those who have never studied metallurgy.
The easiest way to determine the quality of steel is to take the tool by the handle, without touching the metal part, and sharply click on it with your finger or some hard object. If the sound is ringing and lingering, bell-type, the metal is good. A dull sound that immediately fades away indicates poor hardening or the use of unsuitable steel.
Another way to determine is to check for spark. If, when sharpening, long yellow stripes with luminous stars at the ends form on the emery, carbon steel was used, which can be properly hardened. If there are no stars, the steel is frankly weak and will not allow you to get the expected effect from hardening.
Important! The steel grade can be determined with high accuracy only in a special laboratory using a whole range of studies. At home, they only find out the metal’s ability to harden, which is usually quite enough.
GOST – 89 Construction axes
The next point that we need to know to carry out effective heat treatment is the grade of steel from which the ax is made. All construction axes that were manufactured in the Soviet Union and are now manufactured in the post-Soviet space must comply with GOST 18578 - 89 Construction axes. This GOST specifies steel grades for the manufacture of axes. Each of these steels has its own heat treatment temperature regimes. And your own quenching media.
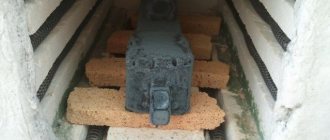
You can find out about this in steel grade books or in thermist’s reference books, which are freely available in the library. However, I want to emphasize the fact that the main materials for making axes are U7 and U7A steels. The ax I chose for experiments has a mark.
Above, the year of manufacture is 1963. On the left is the size according to GOST A2. On the right is steel. From which the ax is made. This is tool, carbon steel U7. Heat treatment modes for U7 steel are as follows:
Before heat treatment, the cutting edge of the ax must be dulled so that its thickness becomes approximately one millimeter.
Self-vacation
Self-tempering is a process that combines the hardening and tempering operations into a single procedure.
Its essence lies in the sharp cooling of the working part of the tool without additional cooling of the entire ax.
Figure 3 – How the color of steel changes when the ax is heated
A situation arises when the cooled part is heated to the required temperature due to thermal energy from the remaining part that has not been cooled.
The process is controlled by the color of the tarnish.
When the instrument acquires the desired color, it is finally cooled in water or oil.
Self-release is a rather complex procedure, the result of which depends on the experience and skills of the master. It saves time significantly, but it is better for an untrained person to complete the entire process so that they do not have to perform the entire hardening operation again.
The length of time the ax is kept in the oven, the time required for reheating and other nuances of the process depend on a lot of factors, including the size and shape of the ax, so it is unlikely that you will be able to get the expected result the first time. For the first time, it is recommended to involve an experienced thermist in the work and get a lot of useful information from him.
Hardening with self-tempering
Another method of hardening a tool is self-tempering. First, the tool is heated in a furnace to the hardening temperature. Then, the cutting part is cooled to a temperature of 150-170 degrees. After this, the cutting part is cleaned of scale in order to see the tarnish colors. Let's see how the purple color goes. The tool is kept in air until the heat from the hot part heats the cooled part to a temperature of 250-300 degrees. We judge this by the color of the tarnish. Everything is purple. Cool. Water is used as a quenching medium. Only to cool the cutting part it is heated to 30 degrees. And for the final cooling of the ax it is heated to 50 degrees.
Main stages
The procedure consists of three main stages, which are performed sequentially without interruption:
- Annealing.
- Hardening.
- Vacation.
Let's look at them in order.
Annealing
The annealing process is necessary to change the structure of the metal, cleanse the structural memory of the steel and relieve stress incurred during casting or previous processing.
Figure 2 – Heat treatment modes for steel U7, U7A
The procedure consists of performing two steps:
- Heating to a temperature of 740-760°.
- Smooth cooling up to 550° at a speed of 30-50° per hour.
Considering the temperature difference, we can conclude that the cooling process will take from 4 to 7 hours.
The main difficulty is temperature control.
Steel heated to 768° has a red-burgundy color with a dim glow.
Without experience, it is difficult to understand whether the metal has reached the desired temperature or not. An ordinary magnet will come to the rescue. At a temperature of 768°, it ceases to be attracted to the surface of the steel, which makes it possible to determine the temperature with sufficient accuracy. After reaching the desired degree of heating, the furnace is turned off, and the ax is left in it for gradual cooling. Usually the process lasts slightly longer than the calculated value - about 10 hours.
Hardening
To harden, the metal must be heated again to a temperature of 800-830°. First, the surface is cleaned of scale, for which you need to use a hard wire circle. Heating is carried out until the metal acquires a bright red tint.
Important! When heating to 800°, you will have to use your own understanding of the situation, since there are no more correct ways to determine the temperature at home. It is a good idea to look at a sample of the metal that has been heated for hardening beforehand to get an idea of what it should look like.
After heating, the metal must be cooled. Use water at a temperature of 30° and oil. The working part of the ax is immersed in water (3-4 cm), actively moving to prevent the formation of a vapor layer. The duration of immersion in water is 3-4 seconds, after which the entire ax is immersed in oil. At the same time, you need to make sure that it does not catch fire.
Vacation
Tempering is the final part of the entire process, designed to relieve metal stress and reduce its brittleness. Before starting the tempering, it is necessary to clean the surface of the ax again with a wire wheel, since it will be necessary to carry out visual inspection of the surface. It should acquire a blue tarnish color corresponding to the correct degree of heating.
The procedure is carried out in a conventional oven heated to 300°. The ax is placed in the oven and kept for 1 hour, after which it is removed and cooled naturally in the open air. Test processing with a file can be a criterion for the quality of hardening.
Attention! The higher the tempering temperature, the softer the metal will become.
Annealing
So, let's start heat treatment. The first operation is called annealing. Before hardening an ax or any other tool, it is necessary to anneal it. Annealing is a kind of zeroing of the structural memory of the metal. It consists of heating the entire instrument to a temperature of 740-760 degrees and gradually cooling it to 550 degrees. At a speed of approximately 30-50 degrees per hour. Annealing is best done in a brick kiln. The most important question is how to determine the temperature of the metal. A professional can easily determine the temperature by color. Well, a regular magnet will come to the aid of a beginner.
The fact is that steel, like iron, stops being magnetic at a temperature of 768 degrees . As the magnet heats up, we check whether the steel is magnetic. When the magnet stops sticking to the steel, this means that the temperature of our ax has exceeded 768 degrees and there is no need to heat it any more. We remember the color of the glow for a temperature of 768 degrees. It's called red-burgundy. We will need this knowledge when hardening, which is carried out at a temperature of 800-830 degrees, which corresponds to the transition from dark red to red. On the screen you see a table of heat and tarnish colors for carbon steel.
I would like to draw your attention to the fact that the camera distorts the real color, making it lighter. So, the temperature required for annealing has been reached. We move the coals away from the axe, close the stove, close the main valve and leave for 10 hours. Let the ax cool down along with the stove. During the annealing process, the microstructure of the metal is improved, internal stress is relieved and hardness is reduced. After cooling, the annealed steel becomes soft and can be easily taken with a file.
How to harden an ax yourself
First of all, you need to make sure that the procedure in question is necessary. As a rule, it is carried out in case of purchasing a budget ax model. The following mistakes are typical for unscrupulous manufacturers:
- No hardening. In this case, the material of the ax will be very soft. It will become dull quickly, and if you cut hardwood, it will leave dents and nicks on the surface of the tool.
- Violation of heat treatment technology. It is expressed in the absence of metal tempering after hardening. In this case, the material of the ax will be fragile - during work, cracks and gouges will appear on its surface.
To check the quality of hardening, craftsmen recommend using a flat file with a fine notch. It is important that it is in good condition, without defects in the working plane. If the file slides along the surface of the ax without practically catching it, this indicates the high hardness of the tool. Otherwise, the working part will be easy to process.
On a high-quality axe, the steel will be hard only in the area of the tip, at a distance of 3–5 cm from the edge. The rest of the surface will be soft. This distribution provides stress resistance for the blade. In addition, the soft spine is a guarantee that it will not burst during operation.
If, as a result of the inspection, it was decided that the ax needs to be hardened, it is necessary to determine what steel it is made of. This is the key to high-quality processing, since each material has its own temperature regime.
All axes that are manufactured in the CIS comply with the requirements of the interstate standard GOST 18578-89.
List of steel grades used:
Before we look at the features of the technological process, watch a video about hardening an ax at home.
Annealing process
The most common material is U7 tool steel. We will consider the processing process taking into account the characteristics of this metal.
Before work, it is necessary to grind the cutting edge to a thickness of 1 mm. Under the influence of high temperature, the sharpening will still melt. After this, you can start heating.
Annealing is a high-temperature operation, which results in a homogeneous metal structure without internal stresses in the crystal lattice. This occurs due to the memory of metal particles being reset to zero under the influence of temperature. The material becomes soft and easy to machine. Annealing can be carried out in a conventional brick furnace.
The procedure looks like this:
- We heat the metal to a temperature above critical. For U7 steel this figure is 760 °C. When working at home, the most important thing is to set the temperature correctly. An experienced specialist can easily determine the degree of heating by the color of the metal, but a beginner is better off using a magnet. This is because steel and iron are not magnetic at 768°C.
- We remember the color of hot metal – red-burgundy. This will be needed during the process of hardening the axe. Colors of heat and tarnish:
- Upon reaching the specified temperature parameters, it is necessary to slowly cool the workpiece to 550 °C. The cooling rate should not exceed 50 °C per hour.
- Leave the workpiece until the oven has completely cooled.
- We clean the ax from scale and proceed to hardening.
Hardening stage
To heat the instrument, you can use any convenient method: a stove, a potbelly stove or a regular fire. The temperature of the workpiece must reach 830 °C. To do this, you need to carefully monitor the color of the metal. After the metal stops being magnetic, you should wait 7–10 minutes, depending on the intensity of heating. When the workpiece turns red, you can begin hardening. It is carried out in two stages:
- The working edge is dipped into water to a depth of 3–4 cm. The optimal liquid temperature is 30–35 °C. The workpiece must be constantly in motion. Otherwise, the steam cushion will prevent uniform cooling. Duration of hardening is 3–4 seconds.
- To continue the procedure, you need to prepare the oil and a metal container. Please note: high temperatures may cause it to catch fire. As a safety measure, you need to prepare a piece of thick fabric. In case of fire, the container with oil must be covered with a cloth, blocking access to oxygen. The whole workpiece is immersed in the liquid.
Vacation
The last heat treatment operation is called tempering. Tempering is necessary to reduce the brittleness of hardened steel and relieve internal stresses in the metal that appeared during the hardening process. I bake in a regular oven. The ax is kept for one hour at a temperature of 300 degrees, and then cools in air. This is the handsome guy we got after our vacation. The color of the tarnish is blue, indicating that the tempering temperature was approximately 300 degrees. You can see this color if you turn the metal surface towards the light in a certain way. We check the hardness of the metal after tempering and make sure that the blade has become a little softer. As we already know, the hardening temperature of U7 steel is 800-830 degrees. And it cannot be reduced. At lower temperatures, hardening may not occur at all. But what should we do if, after hardening, we need to obtain ductile steel with a relatively low hardness? In this situation, we harden the steel as expected, but increase the tempering temperature. The higher the tempering temperature, the more ductile and softer the steel will be after tempering. Data on the hardness of steels after tempering, depending on the tempering temperature, is available for each grade in steel grade books.
Hardening technique
On the Internet you can find a large number of methods and videos of hardening metal objects, but most of them require special equipment, but there are ways that help improve the quality of steel using improvised means.
First you need to determine what steel hardening is. The main process is divided into two parts, or more precisely, heating the metal to a high temperature and subsequent cooling. The process looks simple only at first glance, but you have to take into account the structure and characteristics of the metal . If you start heating the steel without analyzing it, the material will most likely deform. Deformation occurs especially often with low-carbon steel, so if the structure of the metal is unknown, it is better not to use heat treatment.
Hardening of steel is justified only in some cases.
- The need to increase the strength of the tool . For example, it could be an ordinary kitchen utensil, a chisel or a chisel.
- Increasing the ductility of the metal also requires heat treatment to further simplify the work during hot forging.
You can also order steel hardening services from specialists, especially since the cost is reasonable. For 1 kg of metal of a large structure, blacksmiths usually charge no more than 100–150 rubles. If you harden small parts, the prices are about 6–20 rubles. This will not guarantee the quality of the instruments, which is why many try to use heat treatment at home in order to independently monitor the process. The first thing you need to remember when heating steel is some rules. Steel can be damaged if the temperature of the metal is raised above normal. In this case, the tool may acquire a black or blue tint , which in the end cannot even be sanded off with sandpaper. In order for such a defect to not occur, the metal must have a sufficient amount of carbon in its structure, and one must not overdo it with increasing temperature. Typically, steel is considered hot if a red tint appears.
For heat treatment of steel tools, a cutter, blowtorch, electric or gas stove may be suitable. In some cases, metal can be heated over a fire . In fact, there is no difference in where it is better to heat a metal product. Simply in the open air, when heated by a fire, there may not be enough heat energy to achieve the required temperature. Therefore, it is important to clarify the melting and hardening temperature of the material in advance.
It is also necessary to decide on the coolant during heat treatment. Any container with water is suitable for this, the main thing is that the tool fits completely. If steel consumables are being hardened, then a simple cut bottle can be used. In the case of heat treatment of an ax, crowbar and other similar tools, you need to choose a container with a large volume. In some cases, even a bathtub may be suitable, especially since there is no risk of its deformation.
The cooler is selected not only taking into account the size of the steel object, but also the method of heat treatment. Sometimes only a certain area needs to be hardened , in which case only jet cooling can be used. More precisely, plain water is poured onto the material in drops into the area that requires hardening. This method is especially often used when heat treating a drill bit for a drill or on nails to improve the quality of the tip. The hardening technique can be divided into several levels. The following cooling levels are distinguished:
- sharp;
- one-time;
- gradual.
For single cooling, a simple container of water is most often used. If two-stage cooling is used, then two different means are used in the process. This, in turn, increases not only the quality, but also the release of steel material. First of all, the steel is immersed in plain water, and then transferred to machine or mineral oil for further cooling . The process is quite dangerous, because you need to cool the product in water to prevent the oil from igniting.
Hardening methods
To calcinate the simplest blades made of structural steel, you can use a regular fire. It is impossible to raise the temperature above the required 900 °C when processing high-carbon alloys over an open fire. For this purpose you will need a special muffle furnace (chamber), you can make it yourself.
In the cell
If you want to make your own knives, it is better to use a stove made of refractory clay with a nichrome winding for these purposes. Heat treatment will take place under ideal conditions, at a sufficiently high temperature according to a given schedule. The size of this design is 200x100x77 mm.
First, a blank is made from cardboard, which is coated with paraffin. Next, clay is used - it is applied to the paper in a layer of sufficient thickness so that there are no cracks left. The joints are coated especially carefully. The door is made separately.
The clay will gain the necessary strength after thorough drying and further calcination in the oven at 90-110 °C. The final firing is carried out in a kiln over an open fire at 900 °C. The structure should be cooled slowly, so it should not be opened ahead of time. After the clay chamber has completely cooled, the doors are attached to it: they do this so that they swing open horizontally.
The well-dried workpiece is wrapped with nichrome wire, which will serve as a heating element. It will need about 18 meters. The turns should go tightly. To avoid interturn short circuits, the wire should be pre-coated with wet clay. We must not forget about making 2 holes in the oven. One is necessary to insert a thermocouple, a measuring device with which you can control the heating process. The second hole will be needed to control the process.
Scheme: 1 - nichrome wire; 2 - inner part of the chamber; 3 — outer part of the chamber; 4 - rear wall with spiral leads
Making a clay casing
Ready-made camera
On an open fire
You can harden the blade of a blade made of metal grades 45 and 50 over a regular fire or using a gas burner. To carry out the work, you will need fuel for the fire (coals), as well as a couple of large containers. One will contain machine oil, the second will contain water. Blacksmith's tongs are used to hold the hot blade.