Modern replica of a sword A passion for ancient weapons is not at all uncommon in our time of “high technology”. Today, without much difficulty, you can buy sabers, axes or armor both for purely decorative purposes and for numerous fencing enthusiasts with a “historical” bias. Such weapons are produced by many forges that successfully combine ancient and modern manufacturing techniques. Of course, such weapons are not cheap. But making a sword at home is not as difficult as it might seem at first glance. Of course, this will require certain skills in metal processing, not to mention the equipment and materials needed for this task.
How to make a sword with your own hands
Making your own sword without using a blacksmith is completely acceptable. In this case, the blade is simply cut out of sheet metal. You can’t seriously call such a sword a weapon, but you can give it quite decent characteristics by making it from good steel and hardening it.
| Basic materials | Purpose | Properties and Features |
| Sheet steel | Blade making | The dimensions of the workpiece depend on the specific type of weapon planned to be manufactured. For these purposes, used car springs with a thickness of 5-10 mm are often used. |
| Wood | Making the handle | Traditionally, durable species are used (beech, oak, etc.). After processing, two blank bars should mirror the shank of the blade |
| Aluminum bar | Making the guard and pommel of the handle | Aluminum is soft and easy to process, which allows you to shape the workpiece into any desired profile. |
The list of necessary equipment includes:
- Milling machine;
- Bulgarian (preferably both large and small);
- Drilling machine and/or drill;
- Vices and clamps;
- Grinding machine (if possible, also a polishing wheel).
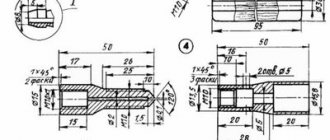
The parameters of the blank for making a blade can be: about 1 meter in length, 5-7 cm in width. The thickness of the metal must be at least 5 mm. Using a pre-prepared drawing of the sword, using a grinder with a cutting disc, the blade blank is given the desired shape. An abrasive disc is then used to grind down the metal and remove the wavy edge along the edges of the blade.
When the shape of the blade is perfect, a “full” (central groove) should be marked in the center of the blade. or if it is absent in the required sword design (for example, in the Japanese katana version), draw a line. Next, the dol is made, and this is best done using a milling machine.
It is most convenient to form bevels on both sides on a belt sanding machine; such a manual unit will require extremely careful marking. As a last resort, you can perform these operations with a grinder and abrasive grinding discs. The end of the blade should be about 1mm thick as a result. Finally, using a grinder, the tail part of the blade is cut out, where the handle of the sword will be located.
The blade should be perfectly straight, without any snags or undulations. This is achieved by hand grinding and polishing. After making the guard and the handle with the pommel, all parts of the sword are fastened with epoxy glue. Such weapons will require protection from moisture and corrosion. To be completely ready, all that remains is to sharpen the blade of the blade, and also make a sheath for the sword that matches the style with your own hands.
The full-fledged blacksmithing process of making a sword takes a lot of time and consists of several stages, each of which is painstaking and labor-intensive work. But the beauty and power of the resulting sword will be the most worthy reward.
Sword Tempering
Determining optimal sizes and parts
Trying to make a weapon, even a wooden one, without knowing anything about it is the height of frivolity.
The simplest straight Slavic sword consists of two parts - a hilt and a blade. The components of the hilt are the pommel, the handle and the guard, and the blade has a blade and a point. When making a wooden copy of a sword, you may not take into account all the nuances that were known to the true masters of damask steel of yesteryear, but you need to know something to make the weapon as convenient as possible.
Before making a wooden sword, you should figure out which hand is the dominant one and this is not necessarily the one with which a person writes or cuts.
You can do a small test:
- Take a stick in your right hand, the length of which matches the length of your forearm.
- Transfer it to your left hand.
- Whichever one is more convenient to hold is the leading one.
After determining the leading hand, you should take the stick approximately in the same way as the sword will be held and freely lower it along the body.
Then grab the stick so that its tip touches the ground: the distance from the end of the stick to the hand is the optimal length of the blade plus the thickness of the guard. Based on these values, all other dimensions are calculated. For example, if the measurements result in a value of 102.5 cm, and you are going to make the guard 2.5 cm thick, then the length of the blade is 1 m, the length of the handle is taken as 1/10 of the length of the blade (that is, 10 cm). A slight inaccuracy in size does not matter.
The main methods of obtaining iron and steel
Since ancient times, the main method of producing iron was the so-called “cheese-furnace” process, when a large amount of ore, charcoal, and fluxes were loaded into an ore furnace (forge or blast furnace) and unheated (“raw”) air was blown in to maintain combustion. In this case, most of the iron left the ore along with the slag. A serious technological breakthrough in metallurgy occurred only at the beginning of the 16th century, with the discovery of a “direct” conversion process for producing high-quality steel from ore.
The traditional “iron-making” furnace was a truncated cone 1 to 2 meters high, with a base diameter of approximately 60-80 cm. The forge was built from refractory brick or stone, coated with clay on top, which was then fired. A pipe led into the furnace to supply air, which was pumped using bellows, and in the lower part of the furnace there was a hole for removing slag.
Homogeneity was imparted to the raw material by re-burning kritsa (cast iron) fractions into steel and processing the resulting iron and steel by forging. This process solved several problems at once:
- Cleaning iron and steel from excess impurities;
- Welding different layers of steel;
- Blade making;
- Heat treatment during finishing and hardening of the finished product.
To give steel the necessary properties, blacksmiths-gunsmiths saturated the alloy with carbon or, on the contrary, burned off its excess. The required heating temperature of the metal during all processes was calculated by the craftsmen solely by the color of its glow.
Sharpening a sword with a belt sander
Required tools and materials
Wooden swords for children are very popular today. Boys strive to imagine themselves in the role of a brave knight, and an ordinary stick will not make the game realistic.
Before you make a sword at home, you need to collect material and tools:
- main material: metal block, piece of cardboard or paper, plywood;
- additional equipment: grinder and cutting disc, PVA glue, colored cardboard - depending on what base the sword will be made from;
- a piece of artificial leather - to create a sheath;
- decorative elements - a notch with a coat of arms or a bright ribbon for wrapping the handle.
Instructions for blacksmithing a sword
In the process of making a sword in a forge, a blank is initially formed: plates of various grades of rolled sheet steel are folded in several layers, forming a “package”. The cutting edge of the future blade is made of harder and stiffer steel, and the core is made of softer and more flexible steel. As a result, the blade acquires all the necessary fighting qualities and holds an edge well.
After this, the shape of the future blade is marked and the forging process itself begins. The workpiece is placed in a kiln where extremely high temperatures make it soft enough to form into a blade. In modern forges, a hydraulic hammer is used for this, which bears little resemblance to a blacksmith’s usual tool. But in any case there is a use for an ordinary hammer - only with its help is a more subtle and delicate forging of a sword carried out.
When the workpiece has taken the required shape, the blade needs to be hardened. This is one of the most important stages of the entire process, since if the material is not hardened, it will be brittle and easily break in the first fight. For hardening, hot oil is used, after immersion in which the future sword is cooled in water. This process is repeated several times until the high carbon steel becomes hard, strong and resilient.
Damascus steel
This type of steel is obtained by using forge welding technology to weld multiple layers of steel plates with different carbon contents. The special properties of Damascus steel are strength, elasticity, the ability of the blade to maintain its sharpness for a long time, as well as the presence of special patterns on the blade. They are achieved through repeated forging and further heat treatment.
Bulat steel
Damascus steel is usually called high-quality weapon steel, melted in a crucible and cooled in a special way. Edged weapons obtained from such material have high strength while maintaining the flexibility of the blade. It also has a characteristic pattern on the surface, but this is the result of crystallization. Bulat is a high-carbon matrix interspersed with low-carbon particles.
Fastening sword parts in a vice
A few words about balancing
Sometimes a weapon that has an ideal shape turns out to be uncomfortable, and when you try to work with it, your hand instantly gets tired. Too much weight may be to blame, but the most common cause is imbalance, that is, a shift in the center of gravity.
It is believed that ideally it should be on the blade, 7-15 cm below the guard. The exact location depends on the anatomical features of the owner of the sword, in particular, on the size of his palms. If the center of gravity is shifted towards the tip, then the blow of the blade gains greater force, but it becomes difficult to control the weapon. When shifted towards the handle, the strength and accuracy of the blow decreases.
For self-balancing, it is recommended to check this parameter at the stage of manufacturing the sword (before finishing the surface).
If necessary, you should make adjustments by following these steps:
- Mark the approximate location where the center of gravity should be.
- Find the real center of gravity (balance point) by placing the sword on your outstretched finger at a right angle.
Depending on the relative position of these two points, make adjustments, for which:
- Reduce the weight of the blade by removing a layer of wood. The center of gravity will move towards the handle. But it is important to consider that a blade that is too thin can quickly break.
- Reduce the weight of the handle in a similar way to move the center of gravity closer to the tip. But do not forget that a handle that is too thin will be uncomfortable.
- Increase the weight of the handle using weights (lead pads) and shift the center of gravity closer to the guard. The last correction method is used most often due to its simplicity and the ability to make changes.
The plates will need to be placed on the handle and secured with electrical tape or tape.
Having adjusted the weight, you need to try the sword again, checking its comfort for the hand, the strength and accuracy of the blow. If necessary, repeat all steps.
Perhaps, when a simple version of the sword is mastered, there will be a desire to make a weapon of a more complex shape with your own hands.
Features of forging and engraving
Forging a sword today is a rather complicated technological process. Having set up a forge in your workshop, nowadays you can forge a sword using spring steel grades (grades 65G, 55KhGR, 55S2GF and similar analogues). When selecting material, you should take into account that during forging some of the volume will be lost, therefore the dimensions of the workpiece should be slightly larger in comparison with the selected sample.
During forging, a layer of scale will form on the surface of the metal. Part of it will fall off on its own, but the entire surface will need to be periodically cleaned using a metal brush. The slopes of the future sword can be formed during the forging process, but it is better for novice craftsmen to do this approximately and then use an emery wheel.
A shank is made at the end of the blade from the handle side. To do this, part of the strip is forged from the ends and planes, forming a cone. In the place where the tang connects to the blade, the “shoulders” of the sword are formed by forging. The valleys along the planes of the blade are forged using punches or templates.
After forging, the blade blank is cleaned of scale and stabilized (tempered). To do this, the blade is heated in a forge until red and left to cool along with the hearth. Hardening is done after cooling to stabilize the metal. The sword must be heated evenly along its entire length, making sure that the supplied air does not fall on the blade, and cooled by completely immersing it in water.
The guard and other metal elements of the handle are usually made separately and assembled into the final structure of the sword using glue or plastic with further pressing of hot metal parts.
There are several ways to perform engraving, the most common of which are: mechanical, chemical and electrochemical. Nevertheless, hand-carved engraving is considered the most beautiful and valuable from an artistic point of view. To apply a pattern in this way, it is necessary to use special tools (stickers) made of alloy or tool steel. Here you need a tool called a stichel.
There are other methods of decorating forged metal:
- Scan - soldering patterns made of metal wire;
- Grain - decoration with small metal balls (“grain”);
- Perforation - application and subsequent carving of openwork ornaments.
After applying the decorative design, sanding and subsequent polishing are required.
A sword made from a spring, in the process of grinding and polishing
Balancing a homemade sword
In addition to the technology of the manufacturing process itself, it is worth learning about how balancing is carried out. Before making a sword, you need to look at the shape of the tip of real weapons and repeat it.
If you make two or three copies at once, the child will be able to invite his friends to the game PHOTO: slmogu.ru
To understand how to make a wooden sword with your own hands, you should read the simple step-by-step instructions.
On a thin beam, a pencil indicates the shape of the sword in compliance with all proportions - length, wide handle and tip.
After the product is ready, it must be sanded several times and then varnished. When wondering how to make a sword from a stick, you need to decide how realistic the product will be. You can simply attach a handle to a regular stick, but if the child wants the toy to look real, then the product will need to be sharpened and balanced.
What difficulties may arise during work?
The most difficult thing when making a sword yourself will be to correctly observe the heating temperatures, as well as to properly harden the blade. These processes are extremely important for obtaining sufficiently high-quality weapons. Overheating the metal will result in a very fragile product, and poorly hardened material will be too soft.
It should be remembered that the lower limit of ductility of low-carbon steels is in the temperature range of 800-850 degrees. Without instruments, you can determine the heating of the material in two ways:
- At a certain heating temperature, steel acquires the corresponding color. At 800-830 degrees - light red and light cherry tones;
- When steel is heated to temperatures of 768 degrees Celsius or more, it loses its magnetic properties. After cooling they are restored. You can check the presence or absence of these properties with a regular magnet.
Hardening is done when the metal becomes barely red. After this, you need to “release” (stabilize) the metal again. To do this, the blade is first cleaned and heated to a golden color, and cooling is carried out in the open air.
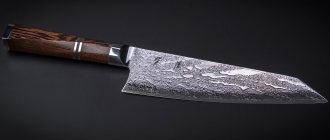
Modern Russian blacksmith's product
Swords from the Carolingian dynasty
Conventionally, the swords of Slavic warriors, according to their external features, can be divided into Carolingian and Romanesque.
The first of them appeared in Rus' in the 9th century, that is, back in the pagan period of its history, but in general, a similar design was developed a century earlier by Western European gunsmiths. In the article, swords of this type are presented in the 2nd and 3rd photographs. The name of this type of sword is explained by the fact that they appeared in Western Europe at the final stage of the era of the Great Migration, when most of the states that were part of it were united under the rule of Charlemagne, who became the founder of the Carolingian dynasty. Their design is an improved development of ancient swords, such as the spatha - a bladed weapon that was widespread in Ancient Rome.
In addition to the external features of the Carolingian type swords, which are clearly visible in the photograph presented in the article, their distinctive feature was the blade manufacturing technology, which was very advanced for that time. It provided increased hardness of the cutting edge and at the same time protected the blade from excessive fragility, which could lead to its breakage.
This was achieved by welding blades forged from steel with a high carbon content onto a relatively soft iron base. Moreover, both the blades themselves and their bases were made using a variety of technologies, which were usually kept secret. Making swords of this type was a very complex process, which inevitably affected their cost. Therefore, they were attributes only of rich people ─ princes and governors.
For the bulk of military men, there was a simplified, and therefore cheaper, design of the Carolingian sword. There were no welded high-strength linings, and the entire blade was forged from simple iron, but at the same time it had undergone cementation ─ heat treatment, which made it possible to slightly increase its strength.
As a rule, swords of the Carolingian type, regardless of whether they were made for the nobility or for ordinary warriors, reached a length of 95-100 cm and weighed from 1.5 to 2 kg. Larger examples are known to historians, but they are quite rare and were apparently made to order. The handles of the swords consisted of elements traditional for such designs, such as a rod, a pommel (a thickening at the end of the handle) and a crosshair. They are easy to see in the attached photograph.
Preparation and independent production
For production, any durable wood is used (the best option is hazel, birch, oak) without knots and rot. It is recommended to soak a piece of suitable size for several days and then dry it slowly so that the wood does not crack. With this method of wood processing, the product will be durable and light.
It is advisable to choose medium-density wood that is easy to process. Sawing the sword must be done strictly along the grain, otherwise it will instantly break.
When starting to make a wooden sword with your own hands, you need to stock up on a suitable block of wood with a cross-section of 5x10 cm.
The following tools and items will be required:
- a hand saw or other tool designed for working with wood;
- pencil;
- sharp knife;
- ruler and measuring tape;
- sandpaper.
The work of making a simple wooden sword with your own hands is divided into several stages:
- A drawing of the sword is created and transferred to the block.
- The workpiece is cut using a saw or jigsaw.
- Using a knife, a layer of wood is removed from the blade to make it a little thinner than the guard.
- The handle is processed so that it becomes oval in cross-section. If the sword seems too heavy, you need to grind off some more wood from the blade and handle. If necessary, perform balancing, then carefully sand the surface of the product with sandpaper.
- Wrap the handle of the knife with electrical tape or sealing tape. This is necessary for several reasons - the sword will not slip out of your hands, the handle will not get dirty, and the product will take on a stylish, attractive look.
- Select the guard using a file or knife, making a depression in the place where it meets the blade. You can go the other way and not cut out the guard at all, but make it separately in the form of a wooden, plastic or metal circle with a slot for the handle.
- The guard fits tightly onto the handle and is secured with wire for additional fixation.
- At the last stage, you can decorate the sword with drawings or decorative carvings and varnish it.
The stages of work on how to make a sword from wood are as follows:
- Using a circular saw, make 4 cuts and give the workpiece a diamond shape. The tip is given the desired shape, for which a belt or disk grinder is used.
- The opposite end, which will be used as a handle, can be made thinner by additionally removing a layer of wood, or left the same thickness as the blade if its shape is comfortable for the hand. In order to subsequently connect the handle with the pommel, a hole is drilled in the end for the connecting rod. The workpiece is processed with sandpaper. To make a guard, you will need two 15 cm long strips with cross-sectional dimensions of 2 x 2.5. You should put them together and draw a rhombus in the middle, the size and shape of which coincides with the size and shape of the blade.
- It is necessary to cut out each of the parts and connect them with glue or nails.
- Round off the edges of the guard and sand it.
- Place the guard on the workpiece, moving it to the desired place, and fix it with glue.
- The pommel can be made semicircular or triangular, decorated with embossing or a pattern, and connected to the handle with a metal pin.
- Coat the product with varnish.
Disassembling the sword hilt
I removed the skin and then split the wood and threw it away. The wood was glued together from several parts, but it held tightly. It was possible to carefully remove it by removing the pommel, but to do this I would have to grind off the tip of the shank and pick out the pommel, but I didn’t want additional damage.
Then I gave the pommel a little tap with a hammer and it slid down as shown in the picture below. As you can see, there was some metal at the top of the tang and it flared out towards the blade. It was impossible to remove the pommel without damaging it without splitting the wood beforehand.
Next, I simply moved the pommel down a little, freeing the tip of the shank, tapped this tip with a hammer, leveled it and disassembled the handle into a cross and pommel, as shown below:
The following picture shows only the pommel and the tip of the shank. The hole in the pommel goes all the way to the end and they had some glue applied to the bottom.
Assembling the sword hilt
to the begining
After I remade the crosspiece, I widened the hole in the pommel, shortened the tang to reinforce it, and made an additional recess at the top of the pommel.
First of all, I got the crossguard aligned with the sword's fuller. (See picture below) ..looks much better.
I also re-made the blackboard with wood lining and covered it with leather, but this will be covered in more detail later. Below in the picture is the original state of the pommel.
The next shot shows the pommel after I've milled out the hidden area for the tang.
The following illustration shows the pommel after I installed it (you can see the ugly blob). I probably nailed it too hard, but it turned out really strong. I'm sure everything is done very tightly.
In the photo below, the pommel and tang are cleaned, this is how it looks and is holding securely at the moment!
Below is a picture of the polished shank and pommel. The tip of the shank is barely visible.
The picture below shows the finished sword with the new hilt. I'm very happy with how it all turned out. Everything fits very tightly and now it has a lot more metal tang in the pommel.
Description and typology
- Armory
- Medieval swords
- Sword hilts
To make the sword convenient for use, the main metal structure had to be equipped with certain interchangeable accessories. Only a very small number of such additional devices have survived to this day, since they were made of wood or horn, leather or textile materials. Nevertheless, individual copies have reached us, and in good enough condition to tell us about production methods and changes that occurred over time.
Assembly and design of the product
The handle of the blade can be decorated with leather.
The following materials are needed:
- wood for the handle and leather, cord for decoration;
- sheet metal for the cross;
- a piece of thick rod or a cast blank for the head of a sword.
A metal crosspiece (guard) is cut out and sanded, and the recess for the blade's shoulders is adjusted as accurately as possible so that the crosspiece does not move during use. The head of the sword is turned from a blank or cast. The mass of this part should balance the blade.
2 identical parts for the sword handle are cut out of wood. In the central part, a chisel is used to hollow out a recess for the shank of the blade, mark and drill holes for fastening.
Assembling the product:
- Put on a cross.
- The halves of the handle are smeared with glue and placed on the shank, wrapped with a cord until the glue dries. The handle is secured through the holes with rivets (studs) made of soft metal (copper, brass, aluminum) or a threaded connection is made.
- Put on the head. The protruding end of the shank is heated and riveted. If desired, it can be ground flush.
It is difficult to name an invention that would have such a significant impact on the development of our civilization as the sword can boast. It cannot be considered as a banal murder weapon; the sword has always been something more. In different historical periods, this weapon was a symbol of status, belonging to a military caste or noble class. The evolution of the sword as a weapon is inextricably linked with the development of metallurgy, materials science, chemistry and mining.
In almost all historical periods, the sword was the weapon of the elite. And the point here is not so much the status of this weapon, but its high cost and the difficulty of producing high-quality blades. Making a sword that you could trust with your life in battle was not just a labor-intensive process, but a real art. And the blacksmiths who did this work can easily be compared to virtuoso musicians. It is not without reason that since ancient times, different nations have had legends about outstanding swords with special properties, made by real blacksmith masters.
Over the centuries, developed metallurgical centers were formed in different regions of the world, the products of which were known far beyond their borders. They existed in Europe, the Middle East, India, China and Japan. The work of a blacksmith was revered and paid very well.
Today, the media writes a lot about the skill of Japanese blacksmiths and the quality of the steel that was used to create the traditional katana. Yes, indeed, making a samurai sword required enormous skill and deep knowledge, but we can responsibly say that European blacksmiths were practically in no way inferior to their Japanese colleagues. Although there are legends about the hardness and strength of the katana, the making of a Japanese sword is not fundamentally different from the forging process of European blades.
Man began to use metals to make bladed weapons back in the 5th millennium BC. At first it was copper, which was quickly replaced by bronze - a durable alloy of copper with tin or arsenic.
The Iron Age began at the end of the 2nd - beginning of the 1st millennium BC. Although, bronze weapons were used for many hundreds of years. In the 12th century BC. e. wrought iron was already used to make weapons and tools in the Caucasus, India and Anatolia. Around the 8th century BC. e. wrought iron appeared in Europe, and the new technology quickly spread across the continent. The fact is that the number of deposits of copper and tin in Europe is relatively small, but the reserves of iron are significant. In Japan, the Iron Age began only in the 7th century AD.