What does the product look like?
Externally, finishing nails for platbands are similar to ordinary ones. They have a cylindrical shaft and a standard point. The key feature is the small head. Its diameter is small, and its height is equal to its diameter.
The length of such fasteners is small, up to 10 cm. This is quite enough for finishing material. The most common sizes are 3.5-5 cm.
Note! It is especially convenient to work with fasteners that have a recess in the center of the head. It is used so that the rod can be “sinked” when driving, and a center punch is used. The high head allows it to withstand such mechanical stress.
The options for using finishing nails are very diverse, it all depends on the material of the trim that is being installed and what is being attached. Depending on this, you need to choose the type of hardware, namely:
- Black ones do not have a protective coating. They are made from low carbon steel, which means they are not resistant to corrosion. This means it should only be used in dry rooms.
- Galvanized ones are the most popular, as they are cheap to produce and practical to use. The zinc coating is at least 6 microns, which completely eliminates the occurrence of corrosion. Color – dim, silver. Fully compatible with coverage. Hardware can be used in rooms with average humidity, such as the kitchen.
- Copper-plated - products have a reddish tint. They are resistant to moisture. The fasteners have proven themselves excellent in wood paneling of waiting rooms, bathhouses, and balconies. Successfully used for exterior decoration of premises.
- Brass plated – has a brass coating. The color of the product shows a golden hue. This coating option effectively protects the metal, allowing it to be used in any conditions. Most often, such hardware is used in damp rooms, but only in places where aesthetics are very important. Due to the brass coating, these metal products are very expensive.
- Chrome plated – have a silver shell and shine. They have the highest corrosion resistance. Often used for finishing furniture.
- Bronze plated. They are rare, although they have excellent consumer characteristics, and all because such coating is very expensive. Plus, the already difficult hardware becomes even heavier.
Bronzed finishing nail
Product prices
The cost of hardware depends on the coating and size. For example, one kilogram of galvanized finishing nails will cost 150 rubles. Copper-plated nails in the same quantity cost about 300 rubles.
Nails coated with bronze will be cheaper, on average 250 rubles. Brass-plated nails in the amount of 170 pieces will cost at least 600 rubles.
Finishing nails are considered the most practical and convenient fastening of interior finishing material. They reliably connect the elements and are practically invisible, which significantly improves the aesthetic appearance of the room.
Advantages and disadvantages
The key advantage of finishing guests is their invisibility. This means that nailed trims, lining and other finishing materials will look great. In addition, the rod easily enters the wood without damaging the material.
Such fasteners also have their disadvantages:
- It is almost impossible to remove them, because the cap has a special structure that makes it impossible to pick them up.
- The connection strength is lower than that of conventional nails. This is also explained by their special design.
Another feature that should not be considered a disadvantage, taking into account the functionality of the fasteners, is the inability to withstand heavy loads. This nail is designed for finishing in areas where there is no bending load.
Production technology
The production of finishing nails of any of the presented types occurs using the cold stamping method. Provided that the materials are of high quality, the products are durable and reliable. When marking fasteners, diameter and length are used. The first indicator varies between 1.5–3 mm, length – from 35 to 100 mm. Length and diameter are interdependent - the shorter the rod, the smaller its diameter.
Finishing fastener parameters
Industrial packaging is done in boxes by weight. Weight can be from 5 to 25 kg. In retail stores you can find packaging not by weight, but by the piece. In this case, the minimum quantity that can be purchased is 10 pcs.
The characteristics of finishing nails are regulated by GOST, or more precisely, they are produced according to state standard drawings. Each manufacturer stamps hardware according to technical specifications (TU). Some technical characteristics of the products:
- The hardware is made from non-hardened steel wire.
- The height of the head must correspond to its diameter; there may be a deviation, but its size depends on the cross-section of the nail.
- Point – point angle – no more than 40 degrees.
- The deflection of the rod depends on the length. With a length of 6 cm - no more than 0.7 mm.
Quality is checked in production. In this case, randomly selected specimens are tested according to all indicators of the specifications. Only those batches whose testing discrepancy does not exceed 0.5% of the tested volume are transferred for sale.
Comparison of finishing nails (right) and regular nails (left)
What it is?
If you compare ordinary carpentry hardware and finishing nails, the latter look in such a way that you can notice the difference in their heads. The finishing hardware head has a small diameter but a large height. According to GOST standards, the height of the head is the same size as the diameter of the nail. In addition to the usual models of such finishing hardware, there are also options available that have a small recess located in the middle of the head. Such a recess is needed in order to rest the end of the center punch against it and, using this device, drive the rod of the finishing hardware deep into the material.
In addition to advantages, finishing hardware also has some disadvantages:
- if it is necessary to remove this finishing nail from the material, it will no longer be possible to do this;
- Compared to construction nails, finishing hardware creates a weaker connection.
The production of finishing hardware is carried out in compliance with technical conditions, that is, according to specifications, although the drawings for this product are regulated by GOST. Modern manufacturers make finishing hardware according to GOST standards only from unhardened steel wire rod.
The characteristics of hardware finishing products are as follows:
- Errors in the cross-sectional size, regulated by the standard, are permissible;
- The cutting angle of the nail tip must be at least 40°;
- the product is allowed to deflect by a certain coefficient from the total length of the rod.
The quality of hardware is checked in the factory through laboratory tests. A batch of nails can be considered suitable if the percentage of deviation from the standards does not exceed 0.5% of the total mass of hardware.
How can it be used?
When repairing, creating furniture and other work with wood, there are a number of operations when inconspicuous fasteners are necessary. The most common uses for finishing nails are:
Platband mounted using finishing nails
- Installation of platbands on windows and doors.
- Fastening the lining.
- When attaching skirting boards.
- Laying parquet.
- In case of installation of decorative wooden elements of light weight.
- For fastening glazing beads and other thin slats.
- In furniture assembly, finishing nails are effective if the furniture is made of wood. They are not so convenient for furniture made of chipboard and MDF.
Note! Uncoated hardware cannot be used not only outdoors, but also in rooms with high humidity. They will quickly become covered with rust, and given that they cannot be dismantled, this will become a bigger problem. Only brass, copper-plated and chrome-plated products can be safely used, regardless of humidity.
General description and types of nails
Finish nails are fasteners that have a small cylindrical head instead of a wide head. Thanks to this, they practically do not damage the surface of the finishing material and are invisible even when they are not hidden after work.
Depending on the coating, products are divided into several types:
- Black finishing. Such products do not have additional coating or are not protected from moisture, so they are not used when securing materials outdoors.
- Galvanized finishing nails. Such products are the most popular because they are quite cheap. The zinc layer prevents corrosion on the products, so they can be used in rooms with high humidity.
- Copper-plated. Due to their corrosion protection, such products can even be used when lining baths or when securing materials outdoors.
- Products coated with bronze. The disadvantage is more weight. It is also worth noting that nails are more expensive than, for example, galvanized ones.
- Finishing nails are brass-plated. Such products are used in rooms with high levels of humidity. They are less popular than other types of such products, as they have a high cost.
- Chrome plated. Such products are often used to create furniture. They are smaller in size.
When driven into wood, these fasteners are completely immersed in the wood and become invisible. If necessary, you can cover them with a composition that resembles wood in color.
The minimum length of finishing nails is approximately 35 mm. If desired, you can purchase fasteners up to 100 mm long. The heads of such products are not much wider than the rod, so after they are sunk into the wood, the fastening element is practically invisible.
How to choose?
The first step is to pay attention to the place where the finishing nail will be used. Although their reliability is low, special attention should be paid to choosing the correct length. Some rules:
- A short rod will not support the weight of the finishing material.
- If it is too long it may bend during the hammering process.
- As a general rule, the length of the fastening element should be 2 times greater than the width of the material to be mounted.
- A length of 3 cm is sufficient for assembling furniture.
Weight and dimensions of nails
The dimensions of this type of hardware are small, which means their weight is also less than standard ones. The standard sizes of finishing nails are not as varied as regular ones, but this is quite enough for their intended use.
Diameter (mm)/nail length (mm)/weight 1000 pcs. (kg) for rough products:
- 1,6/20/0,35;
- 1,6/30/0,45;
- 1,8/40/0,82;
- 1,8/45/0,94;
- 1,8/55/1,09;
- 2/60/1,37;
- 2/70/1,56;
- 3/80/4,6;
- 3/90/4,87.
Brass, copper and zinc fasteners will be slightly heavier.
Finishing nails, according to their purpose, have a small diameter - from 1.3 to 4 mm, respectively, and the length varies in a small range - from 18 to 100 mm. But since the variety of finishing materials is very large, there are plenty of fastener sizes within this small range.
The table shows data for the most common parameters of finishing nails.
| Product | Rod diameter, mm | Nail length, mm | Weight 1000 pcs, kg |
| 1.6*20 | 1,6 | 20 | 0,35 |
| 1,6*30 | 1,6 | 30 | 0,45 |
| 1,8*40 | 1,8 | 40 | 0,82 |
| 1,8*45 | 1,8 | 45 | 0,94 |
| 1,8*55 | 1,8 | 55 | 1,09 |
| 2,0*60 | 2 | 60 | 1,37 |
| 2,0*70 | 2 | 70 | 1,56 |
| 3,0*80 | 3 | 80 | 4,6 |
| 3,0*90 | 3 | 90 | 4,87 |
The weight of a product coated with brass, copper, zinc is slightly higher.
Some installation secrets
- If such nails are used to secure MDF elements, you must first drill a hole in the material. The drill for this is no more than 1.5 mm in diameter.
- Driving the nail vertically will ensure a secure fastening.
- Using an electric drill is not limited to drilling holes; there is another option. The head is clamped in the chuck, and a nail is screwed into the material that is being nailed. You only need to tighten it to the width of the finishing material. With this option, swelling of the surface does not occur. The rest of the nail is driven in with a hammer.
- A metal finisher is used to hide the cap.
- The easiest way to install finishing nails is with a pneumatic gun.
- The platbands are nailed at a right angle or at 45 degrees, and even this inconspicuous fastener must be mounted not in the middle, but closer to the edge.
Pneumatic gun for nail installation
Special tools
To recess the fastener heads without damaging the finishing material, you can use a hammer - a cone-shaped metal rod with a thinned end (the one that will come into contact with the hardware). There are two types:
- With a recess for the heads - to prevent the hammer from slipping;
- With grooved depth - for secure fixation of nails with grooves.
The second side of the tool must be struck with a hammer. They don't require much experience to use. Just bring it to the head and drive it a couple of millimeters into the finishing materials.
A pneumatic nail gun is convenient and effective for fixing finishing nails. Nailers (nailers) are selected according to the size of the hardware.
Conclusion
The use of finishing nails is much wider than the installation of platbands. Their technical characteristics make it possible to successfully use nails in furniture production and in domestic conditions during repairs. When selecting, special attention should be paid to the place of use and selection of the length of the product.
Nails appeared a long time ago. The ancient people cast the first nails from bronze. Then they learned to make them from iron. The first iron nails were flat until they learned to forge a square shank and make a flat head. Since nails were made by hand in the old days, they were very expensive. The nail became widely used only after the invention of machines on which it was possible to pull wire. Now nails are mass produced, they have become round, identical and affordable.
Read also: DIY grinding machine repair
There are many types of nails, different in purpose. A separate group consists of nails used in construction.
Here are the main ones:
Ordinary construction nail
The most common type of nail. It is used in the construction of house frames, fastening rafters, sheathing for metal tiles or corrugated sheets, metal slate (PF-25) and other roofing materials. Smaller nails are used for installing wooden cladding on facades and gables and for other construction work. A construction nail is a long, straight steel rod with notches near the round head. The length of a construction nail can range from 12 to 250 mm. The nail is selected such a length that it pierces the entire package of parts to be joined, but its end does not come out.
To extend their service life, the nails are galvanized or made of stainless steel.
The nail shaft can be smooth or grooved to enhance the strength of the connection. Nails with notches (brushed) have greater resistance to pulling out and reliably fasten the parts to be connected.
Rough nail
The rough nail has a transverse notch on its shaft, ensuring a very tight fit of the nail. Rough nails are used when increased strength requirements are placed on joints, for fastening perforated connecting plates. A hammered, rough nail is very difficult to pull out; it is more likely to simply break.
screw nail
Screw nails are used for bending structures, and also if high moisture content of the wood, vibration or a large load on it is expected - these are piers, walkways, floorboards, external cladding of buildings. This nail increases the strength of the connection four times compared to conventional nails. It is very difficult to remove such a nail from its socket.
Duckert nail (finishing)
- This is a nail with a very small head. They are used for fastening wooden lining, door and window frames. The head of the finishing nail is recessed into the wood and the nail is not noticeable.
Slate nails
Used for nailing slate to wooden roof sheathing. The nail is a round rod with a galvanized head-washer of large diameter - up to 18 mm. The diameter of the slate nail rod is 5 mm, length 70 - 120 mm. It must be galvanized to avoid the appearance of traces of corrosion on the roof. When choosing the size of slate nails, they are guided by the maximum height of the slate ridges, while the length of the nail should be 10-20 mm greater than the sum of the thickness of the sheathing board and the height of the slate ridge. This is necessary so that it is possible to bend the “nose” of the nail - then in the event of a strong wind the slate sheet will not come off. Now asbestos slate is considered a harmful and obsolete material. It was replaced by galvanized metal slate (PF-25), which is attached to the sheathing not with nails, but with roofing screws with a sealing washer.
Tar paper nails
have a flat cap of increased diameter to hold soft rolled or sheet material (tar paper, roofing felt, cardboard). A wide flat head holds the material more reliably in the place of fastening.
Wallpaper nails
– used for fastening upholstery materials on doors and furniture. They have a decorative cap. Their size is small - from 12 to 20 mm.
Using nails
It is the easiest and fastest way to connect wooden elements.
The strength of the connection is ensured by the fact that the nail partially breaks and partially pushes apart the wood fibers, forming a hole in it with compacted walls. Thanks to this, it is firmly clamped into the wood and has good resistance to pulling out.
The connection of boards and beams along the length is called splicing. If the wooden elements are connected across the width, this is bonding; if at an angle, this is tying. If the wooden parts are attached to supports, this is called anchoring.
The disadvantage of a nail joint is its increased creep. To reduce the creep of critical components, the nail connection is crimped using tension bolts, and perforated steel pads are used.
It may seem like it’s not easy to hammer a nail, but it requires skill.
Following some rules will help you perform these operations better:
- - Always hold the hammer by the end of the handle if you need a strong blow. Grabbing the hammer closer to the head reduces force, but increases the accuracy of the blow;
- - in order for the hammer to hit the target accurately, you should look at the head of the nail, and not at the hammer;
- - if you drive nails at an angle to each other, the connection will be stronger;
- - the nail should first be baited with a couple of light blows, and then hammered in with strong blows;
- - hammer the nail with sharp and strong blows of the hammer - then the nail will stay in the socket more securely. If you hit a nail too many times, the wood fibers may break and the nail will not hold well in the socket;
- — the direction of impact on the head must coincide with the direction of the nail shaft. Otherwise, during impacts, stresses will arise in the nail shaft, leading to its bending.
- — nails must be driven into a healthy part of the wood, avoiding knots and cracks;
For ease of work, you need to have not one hammer, but at least two, different in weight, because... The impact force depends on the weight of the hammer. A light hammer can be used to hammer small nails. For roofing work: installation of rafters, lathing under metal tiles, it is better to use a hammer weighing 400-600 grams. Large nails are driven in with a hammer weighing 0.8 - 1 kg.
Ease of use also depends on the hammer handle. It must have high elasticity and strength. It’s good if it has a rubber or silicone handle so that the blows don’t hit the worker’s hand. The handle of the Stanley Graphite hammer has these properties.
How to properly hold a hammer while working? How to strike correctly?
There are various ways. As a general rule, the hammer is held by the middle of the lower half of the handle. Then the blows are strong and sharp. If only high accuracy of blows is needed, then the hammer is kept closer to the head.
Light and precise blows with a hammer are performed with the hand.
Stronger blows for driving nails are applied “from the elbow”.
And, if strong and sharp blows are required, the hammer swing is performed “from the shoulder.” This may reduce the accuracy of the strikes.
The higher the speed of penetration of the nail into the wood, the higher the quality of the socket
Rules for driving nails correctly:
Nails are always driven in from the side of the thinner part. The length of the nail should exceed the thickness of the board being nailed by 2-3 times. The more of the nail that goes into the wood, the stronger the joint. The diameter of the nail should be no more than a quarter of the thickness of the part being nailed.
Boards 100-120 mm wide for cladding house facades (planks, lining) are nailed at each fastening point with only one nail. When the width of the boards is more than 130 mm, they are nailed with two nails.
To give greater rigidity to the nail joint, it is necessary to hammer in the nails not strictly perpendicular to the surface, but at a slight inclination (5-10°) in different directions. Then the nail will not be an axis of rotation for the parts being connected.
Please note: a nail hammered along the grain (into the end of a block or board) holds much weaker than one hammered across the grain. Perforated fasteners, such as mounting brackets, help improve the security of end connections.
The more annual layers of wood a nail goes through, the more securely it will be fixed.
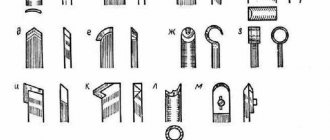
The figure shows several of the most common rules for hammering nails:
- 1. To prevent the wood from splitting and increase the strength of the connection, you can pre-drill holes for nails with a diameter of 80% of the nail diameter. In this case, the nail has greater fastening ability, since the wood fibers are not torn and compress the surface of the nail with greater force.
- 2. hammer nails using a countersink and at an angle to the surface to protect the workpiece from hammer blows or drive the nail into a recessed hole and provide a more durable connection
- 3. The holes above the nail head can be filled with putty to hide the nail.
- 4. a nail hammered perpendicularly provides a less strong connection along the axis of rotation around the nail
- 5. hammer no more than one nail into each fiber
- 6. incorrect placement of nails is shown - the resulting stresses can split the board
When choosing nails, take into account the fact that for nails with a diameter of less than 6 mm, their shear load-bearing capacity does not depend on the angle formed by the directions of force and fibers. For the strength of the connection, it is better to hammer in several thinner nails than one thick one, of the same cross-section as the total cross-section of the thin ones.
Read also: Types of dowels for concrete
Driving nails into solid wood inevitably creates splitting stresses in it, which are more dangerous the closer the nails are placed. To ensure that the nails do not wear out or split the wood, they must be driven in at a certain distance from each other.
The correct placement of nails according to domestic building codes is shown in the figure.
When placing nails in straight rows:
The distances between nails with diameter d along the fibers of the elements being connected (S1) must be at least:
from the ends of the board - 15d,
between the axes of nails in elements with a thickness equal to or greater than 10d-15d,
if the thickness of the element is equal to four nail diameters - 25d,
and in elements of intermediate thickness, the distance is determined by interpolation.
The distances between nails across the grain (S2) and from the nail to the edge of the element (S3) must be at least 4d.
When arranging nails in a checkerboard pattern or in oblique rows at 45º:
The distances between nails with diameter d along the fibers of the elements being connected (S1) must be at least:
from the end edge—15d,
between the axes of nails in elements with a thickness equal to or greater than 10d-15d,
if the thickness of the element is equal to four nail diameters - 25d,
and in elements of intermediate thickness, the distance is determined by interpolation.
Distances between nails across the grain (S2) – 3d,
from the nail to the edge of the element (S3) must be at least 3d, and 4d when arranged in oblique rows..
In multi-layer cross-joints, the specified nail spacing standards must be observed for each layer of boards.
When driving nails back and forth, if their ends overlap one another by no more than 1/3 of the thickness of the middle element, it is allowed to maintain the same markings of nails on each side of the connection.
The distance between nails along the wood grain in elements made of aspen, alder and poplar should be increased by 50% compared to the above.
Nail connections are distinguished between pull-out nails and bendable nails.
Connections with pull-out nails
used for fastening ceiling boards, floor panels, and formwork. Due to the action of loads in these joints, tensile forces N arise, tending to pull the nails out of the wood of the element to which the boards are nailed. This force is resisted by frictional forces between the surface of the nails and the surrounding wood.
The dimensions of the nails to be pulled out are selected so that the estimated length of the nail l1 is not less than 10d of the nail and not less than double the thickness of the boards being nailed.
Bend Nail Connections
used at joints and joints of plank structures, preventing mutual displacement of the elements being connected. In a joint, the nails work in bending, and the surrounding wood works in compression.
Nails have increased bending resistance because the cold-drawn wire has a high yield strength.
Technology of fastening lining with nails
The basic installation process and the location of the lining panels do not depend on the choice of fasteners, but there are certain differences in the fastening method itself. In order for the coating to have an aesthetic appearance and remain durable throughout its entire service life, you should not only select nails wisely, but also know how to hammer them in correctly. Let's look at the cladding technology in detail.
Nail selection
Nails should be selected taking into account the operating conditions of the finish. Galvanized nails are suitable for living rooms and kitchens, closed balconies; for a bathroom or bathhouse it is better to take chrome or copper plated ones. If the lining is expensive, made of exotic wood, then the nails should be appropriate - coated with copper or brass. As for the length of the nail, it should be 2.5-3 times the thickness of the material being attached. Most often, finishing nails 50-60 mm long are used to fasten the lining.
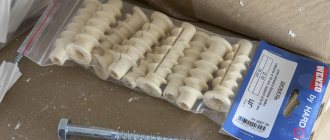
Buy nails in stock
Galvanized nail
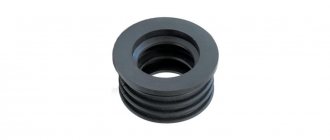
But when assembling the sheathing, it is necessary to use construction nails, which will provide the structure with the necessary strength. Again, when choosing, take into account the effect of moisture - for rooms with high humidity, take only galvanized fasteners. If the walls are not wooden, but brick or concrete, the sheathing is fastened to the base using dowels.
Dowel nail
Installation of sheathing
You cannot attach the lining directly to the wall: over time, shrinkage of the base can cause deformation of the coating, and the accumulation of moisture between the wall and the cladding will lead to premature destruction of the material. For this reason, a sheathing must be installed, and the best option for its manufacture is slats with a cross-section of at least 40x20 mm or timber 50x50 mm.
Dry planed lath
Beam 50x50 mm
The lumber must be smooth, dry and without visible defects. Before installation, the wood must be treated with antiseptic impregnation and dried.
Antiseptic
Antiseptic treatment
First you need to remove all rotten cladding boards from the facade, dismantle the drainage system, remove shutters, platbands and other elements that will interfere with the installation of the sheathing and lining. Installation starts from the bottom.
Step 1. Before starting work, remove the drainage system, shutters and loose boards
Step 2. We fix the first beam of the sheathing horizontally
It is recommended to tighten the fishing line to make it easier to level the sheathing plane. Next, attach the intermediate beams to the wall in increments of 49 cm. The beams are fixed every 40-50 cm, and 1.5-2 cm depart from the ends. All guides must be located strictly in the same horizontal plane, otherwise the lining will not lie flat.
Step 3. Attach the second beam of the sheathing
Step 4. Install the sheathing around the perimeter of the windows
Step 5. We fasten the sheathing along the entire plane of the walls and on the roof gables
Advice. The lining panels should be positioned perpendicular to the sheathing. That is, for horizontal cladding, the frame guides are installed vertically, and vice versa.
Step 6. If necessary, secure the insulation boards and windproof membrane
DIY vertical sheathing for siding
Prices for different types of bars
Bar
Fastening horizontal lining
Sheathing panels can be mounted either from the bottom up or from the top down. The first method is more convenient, but very often the top panel has to be cut, which does not look very aesthetically pleasing. If you do not plan to cover the joint at the top with a decorative plinth, it is recommended to carry out installation from top to bottom.
Possible options for fastening the lining
Step 1. Take the first board, apply it to the bottom of the sheathing so that the ridge is directed upwards and the groove, respectively, downwards. A small gap should be left between the lining and the floor covering to compensate for thermal expansion.
Step 2. The nail is placed at an angle at the base of the ridge at the level of the sheathing and driven in with a hammer. Next, they take a hammer and, with precise, neat blows, sink the cap into the tree. The panel is fixed to other guides in the same way.
Example of fastening lining with a nail gun
Prices for popular models of nail guns
nail gun
Step 3. Take the second board, place it with the groove against the ridge of the first board and lightly press on top so that it falls into place. They check the horizontal level; if necessary, they also tap it with a hammer through a special board - a pad, so as not to damage the lining lock. Next, they are fixed with nails to the frame guides. In the same way, secure the sheathing to the very top.
If installation is carried out from top to bottom, the nail is driven at an angle into the groove of the first board, making sure to recess the head with a hammer. After this, the second board is inserted into the groove with a comb and tapped so that it fits tightly into place.
Horizontal fastening of lining
Facade lining
Prices for lining
Lining
Vertical fastening of the lining
When positioned vertically, the first board is applied to the sheathing with a ridge in the corner. The nail is inserted into the groove at an angle of 45 degrees so that it falls in the middle of the sheathing beam. They hammer it in with not too strong blows, so that the wood does not split; the cap is sunk with the help of a hammer. The board must be secured along its entire length.
Direction of the nail when driving
We tap the board through a small block
Next, take a second board, insert its ridge into the groove of the previous one and fix it with nails to the sheathing.
Fixing the lining
Nail heads are almost invisible
It is very important to recess the nail heads well, otherwise they will prevent the panels from fitting tightly to each other. During the installation process, each panel is controlled by a level and, if necessary, knocked down with a hammer. If you do not notice the distortion in time, it will be difficult to correct the defect later - you will have to tear off the fixed panels and mount them again. The sheathing must be dense, without gaps or cracks between the boards.
Fastening with nails and clamps
Claypers and nails
Tools for work
Prices for popular models of screwdrivers
Screwdrivers
This method allows you to secure the lining without damaging the wood or risking cracking. Installation is quite simple.
Step 1. The board is applied to the sheathing and leveled.
Fix the first board with screws all the way through
Step 2. A clamp is inserted into the groove of the sheathing beam.
Installed clamp
Step 3. The clamp is attached to the beam using finishing nails through special holes.
Drive nails into the clamping holes
Step 4. Put on and fasten the remaining clamps, fixing the board along the entire length. Maintain an interval between fastenings of 50-60 cm.
Step 5. Take the next board, insert its tongue into the groove of the previous one and secure it in the same way.
Installation of the second lining board
Step 6. Every 3-4 rows are checked with a level to prevent the coating from skewing. If necessary, such cladding can be easily dismantled and installed in another place.
An example of horizontally mounted lining. Hidden fastening
How to hammer a nail correctly - a collection of tips
- The nail can be driven in with one hand. Hold it between two fingers, press the head against the hammer and drive the nail into the wood, then hammer it in as usual.
- When driving a nail into a recessed hole or groove, a hammer is used - a metal rod of suitable length. To prevent the hammer from jumping off the nail head, it is placed inside the tube or a bolt with a slightly screwed nut is used as a hammer;
- To make the nail fit into the wood more easily and not bend, lubricate its tip with soap, paraffin or oil.
- To avoid hitting your fingers with a hammer when driving very small nails, you can use pliers, tweezers or a clothespin to hold them. It is necessary to hold the nail until, after one or two blows, it is fixed on the surface.
- It is also convenient to drive small nails using paper. The paper is pierced with a driven nail, after several light blows the paper fastening is carefully torn off and then the nail is driven in completely.
- When hammering small thin nails 15 - 20 mm long, it is recommended to use an awl to prick a small hole into which the nail could be inserted, and then hammer it in.
- When the head of the nail sticks out 5 - 6 mm above the surface of the wood, the blows must be weakened so as not to accidentally hit the workpiece and deform it. Having hammered a nail, its head can be sunk into the wood by 3 - 5 mm using a center punch or some kind of steel core, and the resulting recess can then be filled with putty.
- To drive a nail into a thin piece of wood without splitting it, you must first blunt or bite off the tip of the nail with pliers. A dull nail crushes the fibers rather than pushing them apart.
- To hammer a nail into a wooden board without getting cracks, you must first use a drill to make a hole slightly smaller than the diameter of the nail in the place where you will hammer the nail. There will be no cracks, and the connection will be stronger.
- .When it is impossible to provide a strong support for the parts being knocked down, place a second hammer, an ax or a wooden block under the workpieces.
The quality of clapboard finishing largely depends on the method of fastening. Fasteners must securely hold the material, and at the same time be completely invisible. To fix the panels to the sheathing, self-tapping screws, clamps, and screws are used, but the most practical option is nails. But the nails for the lining are not ordinary, but finishing nails, differing in the shape of the head and some characteristics.
Nails for lining
Scheme of fixing the lining
Features of installation using finishing nails
Using finishing nails does not cause any difficulties even for an inexperienced person. This is due to the fact that a light hammer is used to secure the materials, and driving is done almost effortlessly.
Before starting work on securing platbands or other finishing nails, it is necessary to take into account the following features of the process:
- In order not to damage the surface when driving the fastener, you need to drill a blind hole in it with a drill with a diameter of no more than 1.5 mm. This should be done when attaching MDF or veneered MDF.
- It is better to hammer the product into the edge of the casing or into the groove, since when located in the middle it is more noticeable.
- In order not to spoil the surface, you need to recess the caps using a metal hammer. This device looks like a steel rod and has a small indentation at the narrow end that prevents it from coming off the nail.
- To speed up the work process, you can use a pneumatic gun, which also helps maintain the integrity of the surface.
What are finishing nails?
This is the name for nails with a small cylindrical head, the diameter of which is only slightly larger than the diameter of the rod. They are designed specifically for fixing decorative trim, as they provide a hidden fastening. These nails are thin and, as a result, easily penetrate the wood without causing cracking. It’s easy to drown a small hat in the thickness of the material using a hammer.
In the photo - the finishing nail next to the finisher
Characteristics
The rods of such hardware are smooth, with notches in the upper part, and range from 20 to 90 mm in length. The cap has an oval shape, and its height corresponds to the diameter of the rod. The diameter of the cap itself varies from 1.6 to 3.4 mm. The fasteners are made from low-carbon steel, and anti-corrosion compounds are used as a protective coating.
Unlike simple construction nails, finishing nails are not designed for high loads, since finishing materials are usually lightweight. They can only be used in structures that are not subject to shrinkage and mechanical bending or tearing loads. It is also undesirable to use them for temporary coverings: not a single tool makes it possible to pick up and pull out a nail due to the small head recessed into the wood. For the same reason, they cannot be reused.
NFL finishing nails
Galvanized finishing nails 1.8x40
Scope of application
Finishing nails are used not only for fastening lining; their scope of application is quite wide:
- furniture manufacturing;
- installation of small decor in interiors;
- decoration of window and door openings with platbands;
- fastening thin slats, glazing beads and skirting boards.
Some craftsmen use them when laying parquet and laminate flooring when they need to fix the planks, but since floor coverings are subject to constant mechanical stress, ordinary nails are more suitable here.
Driving the finishing nail. Using a finisher
How to hide hats
Despite the small diameter of the heads, finishing nails can be quite noticeable if they are located at eye level. To completely hide the fasteners, you can use:
- Furniture wax. It is enough to drown the fasteners in the wood using a hammer and cover the recess with wax.
- Circles. To close the caps, many people use special circles that are glued to the surface of the wood. Among the presented products, you can choose exactly those that match the color and structure of the wood.
- Putty of a suitable color. This material also effectively hides the caps and does not stand out against the background of the wood.
In most cases, it is enough to just recess the cap deeper into the material so that it is not noticeable.
Nailing tool
To recess the nail head without damaging the finishing material, you need to choose the right working tool. Most craftsmen use a hammer - a cone-shaped metal rod.
Nail punchers
Its working end has a small diameter, so when driving it only touches the nail head and does not catch the wood. There are two types of finishers:
- with a grooved recess at the end - this rod is designed for nails with a recess on the head;
- with a recess under the head of the hardware - the rod securely grips the nail and does not slip off when struck.
The top edge of the tool is wide and flat, specially designed for hammering. The hammer is very simple to use: the end of the rod is placed on the protruding head perpendicular to the surface, the tool is held in this position with one hand, and the wide part is hit from above with a hammer with the other. As a rule, 1-2 blows are enough to sink the cap a couple of millimeters into the wood.
Homemade nail puncher
Advice. If there is no punch, it can be replaced with a large construction nail or center punch. To do this, the lower end of the product is ground down a little or cut with a grinder so that it does not slide off the hardware head. A large bolt will also work: it needs to be turned on a lathe so that the diameter of the rod matches the diameter of the nail head or is slightly smaller.
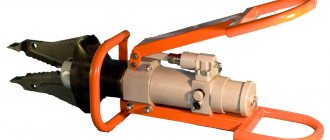
If the amount of work is large, it is very convenient to use another tool - a pneumatic nail gun. It is also called nailer and nail gun.
Pneumatic nail gun
There are special finishing nailers of various calibers designed for a certain size of nails.
Nails for air guns
This tool is quite expensive, but it has great advantages:
- reduces installation time;
- weighs little and fits comfortably in the hand;
- the nail goes in up to the head in one blow;
- fasteners do not bend, and there are practically no misfires;
- no need to exert much physical effort.
Disadvantages include the need for a compressor and connection to an energy source.
Air nailer - application
Fastening the panel with a nail gun
Tools and materials
To perform installation work you will need a set of the following tools and materials:
- construction level;
- carpenter's hammer;
- side cutter;
- drill;
- screwdriver;
- drill;
- self-tapping screws;
- nails (finish and liquid);
- latches;
- pencil.
Finishing nails
Finishing nails are often used in cladding work. The main advantage is their inconspicuousness, which is achieved due to the small size of the “hat”. Under the influence of impact, the nails are flattened and become invisible.
Liquid Nails
Using the adhesive base of liquid nails, the fastening of the platbands is more durable and resistant. The front panel is fixed by applying an adhesive base to the inside of the casing and pressing it against the wall. In this case, you must follow the rules for working with liquid nails:
- Apply to a dry and grease-free wall.
- Given the rapid hardening of the applied glue, the platbands must be pressed firmly against the wall surface for 1-2 minutes.
- To improve adhesion, it is advisable to apply the adhesive dotted or in strips, excluding surface treatment completely.
- Due to the toxicity of the material, safety regulations must be observed.
- To apply glue, use a mounting gun, which is well suited for gluing in hard-to-reach places.
Self-tapping screws
Assembly of platbands using self-tapping screws is considered one of the highest quality. To simplify the process, using a drill, prepare holes into which screws of at least 2 centimeters in length can be screwed quite easily.
Latches
Fastening using the latch method is a simple and popular method. The use of a platband with a latch makes installation simple, while a wide section of the part must be placed in a special gap and snap into place without much effort.
The only drawback of this method is based on the fact that the platband made of MDF, when constantly removed, is subject to rapid wear and delamination, which causes destruction of the joint.