Most people have encountered serious plumbing problems at least once in their lives. At the same time, such devices are among the most important and used in the home. The high loads to which bathtubs, sinks and toilets are subjected lead to the need to ensure they are in good condition.
Any leak can lead to a serious blow to the family budget, because in this case you will have to pay not only for the repair of devices, but also to eliminate all the consequences of flooding of the neighbors below. The cause of problems in the operation of the toilet is, as a rule, its tank.
In order to repair the device, you need to know how to remove the toilet lid with the button, which is equipped with most of all modern devices.
Why is it necessary to dismantle the cover?
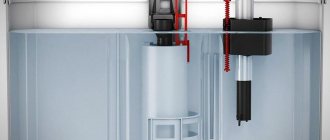
It's simple: inside there are constructive mechanisms for draining and collecting water. The container is filled to a certain level, after which a special valve is activated, which acts as a shut-off device. After pressing the button, the lever is activated and the locking device is raised, allowing water to flow into the toilet.
The principle of operation of the mechanism is simple, and the adjustment depends on the dimensions of the drain tank. Mechanisms are usually made of plastic, individual parts are made of rubber, therefore they do not have a long service life and soon fail. Consumables require replacement, therefore, if you notice problems with the plumbing, immediately begin restoration: adjusting the device or completely replacing it. If you had to resort to internal intervention, then the reason may lie in:
- continuous flow of water into the toilet;
- lack of water drainage;
- insufficient amount of water for one flush;
- water leaking out from under the tank.
Is it worth buying a toilet seat with a microlift?
Strengths of a microlift for plumbing:
- silent lowering/raising;
- absence of scratches, chips, cracks on the installed structure, thanks to the smooth,
- neat operation of the mechanism;
- long service life with proper use;
- simplicity and speed of installation;
- Some models have a presence sensor.
However, along with the advantages, the microlift mechanism for the toilet lid also has weaknesses:
- easy to break due to physical impact;
- cannot close quickly if necessary, since only one mode works - smooth;
- difficult to repair and restore, and some elements cannot be replaced or repaired at all;
- During disassembly, damage to internal parts and connections may occur.
Only after assessing the positive and negative qualities of a microlift can you make a choice for or against the purchase.
General recommendations for tank repair
Generalized rules and recommendations on how to remove the lid from a toilet with a button include:
- Sequence of actions when disassembling a device/part/assembly/mechanism. So that when reassembling the toilet cistern you don’t find out that some parts are superfluous, remember what you do and how you do it.
- Accuracy of work execution. Place fragile parts (ceramic tank lid) aside so as not to damage them. It is advisable to put fasteners in one box so as not to lose anything.
- Gradual application of force. To understand how to disassemble a toilet lid with a button, do not rush to get nervous. If you cannot remove/unscrew/turn some part, do not try to hammer with a hammer, as in the good old grandfather’s method when working with ceramics. In general, be careful not to chip the lid or reservoir.
Innovations in plumbing: we disassemble and repair a microlift
A modern modification of a regular toilet lid, called a microlift, has its own characteristics, which are easy to appreciate as soon as you start using them. The main purpose of such a design is to smoothly raise and lower the lid, completely eliminating the possibility of sharp impacts on the sanitary ware from which the toilet bowl is made. This will prevent its preliminary damage, which can significantly reduce costs from the family budget.
Design Features and Benefits
The principle of operation of a toilet with a lid that has a built-in microlift is akin to a conventional door closer, which is already so familiar to most modern people. The microlift is usually already pre-installed in the lid, so it is unlikely to be purchased separately. The microlift is made from durable plastic or its analogue, a material called duroplast. It is entirely a polymer, although in appearance it can be confused with metal or even ceramics, and in properties it is closer to it.
This mechanism implies a rigid fixation to the toilet, but the designers did not forget about air shock absorption. The lid must have compartments with shock-absorbing silicone.
- Polymer toilet seat and lid.
- A special rod that secures the lid to the toilet bowl.
- A metal or duraplast spring that regulates and balances the weight of the entire structure.
- Microlift, that is, a hinge mechanism, which ensures a smooth change of lid positions.
You need to know that in more expensive designs, instead of rods and springs, specially designed pistons and cylinders in which they run can be used. Such models are generally considered non-separable; they operate on the basis of pneumatics or hydraulics, and can only be replaced, not repaired.
Simply remove the lid of a toilet with a microlift
Contrary to expectations, almost all toilet lids are equipped with ordinary, standard fasteners, which makes them easy to remove from their place and replace. The design can be incredibly complex and even equipped with electronics, but the fastening elements remain traditional.
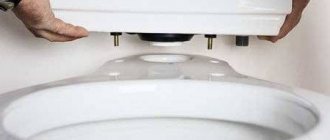
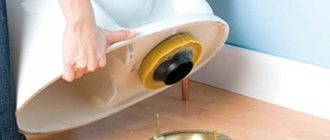
- Lift the toilet lid as if you are going to use it. That is, the lid must be raised, while the toilet seat remains in place.
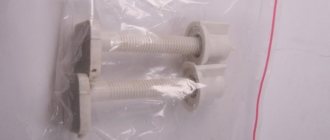
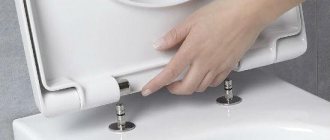
- On the left and right below the rim of the bowl there are special fasteners, which can be plastic, metal or also duroplate. Unscrew the fastening nuts first from one side and then from the other.
- Gently pull the toilet seat towards you so that the pins come out of the holes and remove the lid.
As you can see, removing a toilet lid with a microlift is not at all difficult, at least no more difficult than a regular one, so even a complete novice in plumbing can handle it. In a similar way, but in reverse order, you can easily install a new toilet lid, both with and without a closer.
How to disassemble a toilet cistern with a button
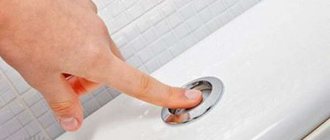
How to remove the lid from a toilet with a button? Plumbing fixtures of this modification are installed in almost every modern apartment. The button is threaded and can be easily removed by turning it counterclockwise. The unscrewed part can be easily removed, and for convenience, you can drain all the water from the tank by pressing the button. This will allow you to effortlessly unscrew the button using two fingers – the thumb and forefinger.
Replacing and adjusting the fill valve
Replacement involves unscrewing the nut securing the old valve and tightening a similar nut on the new valve. Of course, there must be a rubber gasket on the inside of the tank to ensure a tight seal.
This uses a bottom mounted fill valve. Water is supplied through the bottom of the tank.
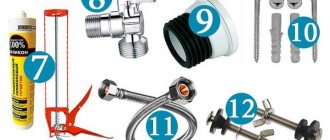
However, there are a couple of nuances associated with installing the fill valve.
- Bottom fittings are often equipped with a fine plastic filter, which must be placed between the fill valve and the hose. Throw it away immediately: it will constantly become clogged with fine sand, which is safe for the operation of the valve. A coarse filter at the entrance to the apartment is much more effective.
- The flexible hose is connected without tension or bending with a small radius. The load on the fitting will significantly reduce the already short service life of the hose.
Attention: when tightening the union nut, do not use too much force. Not only are they unnecessary for soft padding; Excessive force can also cut off the threads on the valve.
How to adjust the valve actuation level in modern kits?
There are two options.
- The float can move with some effort along a plastic rail with projections . To raise or lower it, just move the rack to the wider part of the hole in the float slot.
The float moves relative to the rack with projections.
- Screw adjustment is no less common . The float is adjusted by turning (using a screwdriver or manually) a long plastic screw.
Removing the lid from the double system tank
All that remains is to figure out how to remove the lid from the toilet with a button consisting of two parts. In this case, you won’t be able to unscrew the part; you will have to remove it from the glass, but don’t be scared - it’s not as difficult as it might seem.
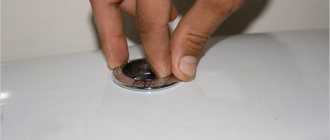
To do this, one button should be sunk into the base, and the second one should be pryed out using a sharp object (for example, a sharp screwdriver). Hidden under the buttons are fasteners in the form of nuts, hooks or screws, the modification of which depends on the manufacturer of the plumbing fixtures and the newness of the toilet model. The fasteners are easily unscrewed, the button is removed, and the cover is simply and neatly dismantled.
Now you know how to remove the lid from a double button toilet.
Universal mounts for toilet seats in the Leroy Merlin catalog
The toilet seat (toilet) is an important element that ensures comfort and ease of use of the toilet. As a rule, the seat comes complete with the toilet, but if necessary, the user can always separately buy a toilet seat and fastenings for its installation, which presents absolutely no difficulties. If it is necessary to replace broken fasteners, you can easily dismantle them and install new ones - thanks to the universal design of the fastenings, you can easily select the required set. The main difference between toilet seat mounts is the material used.
Dismantling the lid on foreign-made toilets
On Ifo toilets, the button can be removed using a flat-head screwdriver. To do this, you will have to find a 12 nut under the button and unscrew it using a socket wrench. Next, remove the glass, which is held on by special pushers. When you simultaneously press the fasteners, the glass is pulled upward. After this, the cover can be easily removed.
It’s not difficult to figure out how to remove the Jika toilet cistern lid. First you need to remove both drain buttons. A screw is hidden under them, which can be easily unscrewed with a Phillips screwdriver. Once you get rid of the fasteners, you can remove the glass, and you're done!
With Gustavsberg the situation is more serious. Press the button down and find a small slot in the end, which is designed specifically to make it easier to pull out. Insert a flathead screwdriver into the groove and remove the button. In this case, carry out the work of disassembling the toilet cistern with the button carefully so as not to damage the fragile plastic parts. Underneath there is a plastic nut that must be unscrewed using a special wrench. If there is none, replace it with pliers.
It should be noted that in order to figure out how to completely remove the toilet tank cap, remember: if there is a lever - unscrew the cap, facing one round button - unscrew it counterclockwise, when dealing with a complex flush system with two or more buttons - remove them and see what's hidden inside. Everything is simple if you remember the algorithm of actions.
Cover removal options
Some models of tanks are designed in such a way that the lid can be removed without trouble, since in such systems the button is not part of the lid. What to do in those cases when the above guidelines are not suitable? Let's consider a couple of options.
If it is not so easy to open the tank lid, you can try to unscrew the plug screwed onto the mechanism that is important for draining. Around the circumference of the button there is a plastic ring coated with chrome - you need to unscrew it counterclockwise. It may happen that a little effort is not enough - then it is necessary to apply more force, trying at the same time not to break the ring. Indeed, most likely, the button will need to be replaced at the end of a “strong” repair.
If, after lifting the lid, you can hear water draining, it means that in this design there is a chain attached to the button, attached to the drain valve. It is possible to remove the chain for convenience, but it is fundamentally important to remember and note where it was attached to the valve. If this is not done, you will have to spend a long time and painfully selecting the length of the chain for optimal drainage. Having disconnected the chain, it is possible to repair the tank normally without any trouble.
The main thing is not to forget when repairing tanks that you need to follow the recommendations given in this article and not do anything using uncouth force. The principle “there is strength, no intelligence needed” is not suitable for this case, because force can damage the narrow plastic elements of the drain system.
What is double flush
To wash away waste and clean the bowl itself, a flow of water of a certain power and duration is required. Consumption rates for plumbing fixtures have long been determined and calculated. However, in many cases such power and size of the jet are simply not needed. But the regular model does not involve any adjustment.
The dual flush model allows you to reduce water consumption and ultimately pay less for using your water supply.
Double button
We are talking about a special mechanism that creates 2 drain modes:
- economical - only half the standard volume is supplied;
- normal – full volume of water.
Rinsing process
The flow power in both cases is the same, but the different values allow for savings. The most famous representatives of this category include products from Roca and Jika. The adjustment is made by pressing the double button located on the drain tank: the part labeled ½ - economy mode, or the larger one - normal.
Roca Victoria
A variety of models with this mechanism are produced: floor-standing, for example, Roca Victoria, compact JikaLyra, hanging Gustavsberg.
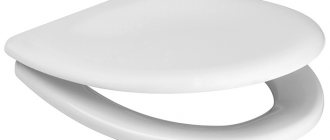
Non-specialized information
Troubles with the lid and seat happen quite often, so they are, perhaps, in second place after breakdowns of the drain tank. Until relatively recently, these devices were simply a circle with a lid, much more often made of plastic.
Nowadays, these products can be a fairly complex design, including such functions as:
- Microlift,
- Heating,
- Intestinal gas analyzer,
- Built-in bidet, etc.
Covers can break due to a variety of circumstances:
- From time,
- Due to a manufacturing defect,
- Due to mechanical damage.
The most common types of breakdowns are:
- The appearance of cracks on the surface,
- Broken fasteners.
There is no point in trying to repair the lid yourself. It is much easier and faster to buy a new one.
Removing the old seat
Removing the old seat, in principle, is very quick and effortless, however, there are times when you have to tinker. It all depends on what kind of toilet seat cover mount was used.
- Plastic bolts - as a rule, there are no problems with them, they can be unscrewed freely. If difficulties still arise, heat an old knife red-hot and quickly cut off the recalcitrant plastic bolt. Don't worry if melted plastic gets on the toilet; it can be easily removed from earthenware or ceramics.
- Brass fasteners can also be dismantled without any problems. If such a bolt securing the toilet lid is still jammed, use good old kerosene - a few drops will be enough to budge the capricious bolt.
- Steel bolts - these are the ones that can give you the “pig”. They are generally not recommended for use in bathrooms and toilet rooms due to high humidity - they very quickly become covered with rust and when dismantling the elements that they secure, big problems arise. If this is exactly what happened in your case, let's look at several ways to get rid of such fasteners.
Toilet lid fastenings
Unscrew rusty bolts using penetrating lubricant
First, you need to buy a special penetrating lubricant with a freezing effect - it is available in almost all hardware stores. Its effect is that after applying lubricant to a rusty part, the rust simply begins to crack.
When you have thoroughly lubricated the rusty bolts, wrap them with a piece of rag - this will enhance the effect of the lubricant. 10-15 minutes - this is usually enough for the lubricant to take effect and the rust to recede. Now you can try to unscrew the bolt - for this you will need a socket wrench.
However, sometimes it happens that the bolts “stick” so much that even with the help of penetrating lubricant they cannot be unscrewed. Then you can try to do this with an electric drill.
Unscrew rusty bolts using an electric drill
For this work we will need an ordinary electric drill and a set of drills of different sizes. The first thing to do is drill out the circumference of the nut where it meets the bolt. To do this, use a ¼-inch drill bit. The main thing is to be very careful and do not make sudden and hasty movements, so as not to accidentally touch the toilet body itself with the drill.
Toilet seat cover mounting diagram
Then change the drill bit to a 1/16" and continue drilling. When this job is finished, take the socket wrench. Your task is not so much to unscrew the fasteners as to loosen them. And sooner or later you will definitely be able to do this!
If you are faced with the problem of rusty fasteners and have spent a lot of time and effort dismantling them, try not to buy steel fasteners for the toilet seat cover in the future. Let's say you're lucky: the mount on your toilet is plastic, then just unscrew it. You don't even need tools for this. The fasteners are unscrewed from the bottom of the toilet. After unscrewing the bolts, simply remove the toilet lid. There is nothing complicated about it.
So, having dealt with the problems that may await you when dismantling the old toilet lid, we will move on.
Main causes of breakdowns
Closer systems produced by leading manufacturers are renowned for their high quality. But natural wear and tear of functional elements and incorrect operation of a “smart” device lead to disruptions in the operation of the system.
The main sign of failure of the mechanism is the appearance of a loud sound that occurs when the lid is lowered due to its falling
The causes of malfunctions in most cases are attempts to manually close the lid “out of habit.” The mechanism's built-in spring is designed for gradual compression. If physical force is used, the mechanical impact disables the device.
The easiest way to solve the problem is to completely replace the cover with a new one, since reinstalling damaged mechanisms is not always advisable. But still, in order to save on expenses, you can repair a broken toilet lid microlift on your own, by trying to disassemble the device and replace its failed elements.
Choosing a new seat
Before removing a toilet seat that is broken for unknown reasons, go buy a new one. Since the range of these products is huge, making a choice is not easy. Based on this, below are the main highlights of seats made of various materials:
| Materials | Highlights |
| Plastic | This material includes:
The seats, made of plastic, have stiffening ribs and rubber inserts or plastic protrusions on the bottom side. Their main advantage is low price, but among the disadvantages it is possible to highlight fragility. |
| Duroplast | This material is essentially the same plastic, but with a denser structure, reminiscent of ceramics. Duroplast products are resistant to ultraviolet radiation and substances; in most cases, they have a bactericidal coating that prevents bacteria from multiplying. The advantage is an attractive appearance and good strength, but the price of such seats is higher than plastic ones. |
| Polymer fabric with foam rubber (soft seat) | The design consists of a hard plastic base covered with polymer fabric, under which there is soft foam rubber. This seat is more comfortable, but it breaks quite quickly. |
| Chipboard, MDF or wood | Seats of this type in most cases look very attractive, but their disadvantage is their enormous weight. If it falls, the structure may become a toilet. |
Having decided on the material, you need to decide which specific functions of the product are responsible for you. It is then possible to select specific models.
Advice! Before purchasing a seat with a cover, you need to take it in your hands and make sure that there are no flaws. For example, if the seat has play or a gap, then it is better to refuse to purchase it.