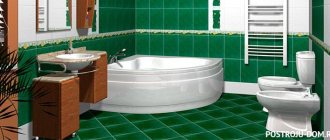
The space under the bathroom is not very attractive from an aesthetic point of view: there are pipes there, and sometimes there is a mini-storage room for household chemicals and detergents. To improve the interior, install a sliding screen under the bathtub - a simple structure made of a frame and moving sashes.
Do you want to assemble such a screen with your own hands, but have never done it? We will help you understand the main points - this material discusses in detail the stages of assembling and installing the screen. We also provided the advantages of this design and useful information about which models are the most acceptable in terms of cost and reliability.
Two in one: aesthetics and functionality
Entering the bathroom, a person sees a bathtub. If the screen is not installed, then the legs of the bathtub and elements of the plumbing system are visible.
They seem unsightly and make the entire bathroom look untidy. The screen can become an excellent decorative element that will cover everything unnecessary and help decorate the room in a single style.
During Soviet times, it was difficult to find a worthy alternative to brick walls under the bathroom. Now there are designs made of light and beautiful materials, but brick screens are still installed in some apartments
The design will protect the pipes from moisture and damage, and will become an additional cabinet where you can store household chemicals, household supplies, plumbing tools and other useful items.
Screens are not only beautiful and practical, they can act as a reliable barrier that prevents children and animals from accessing household chemicals
Mount the wall mount
Massive cast iron bathtubs stand confidently on legs and do not require additional fixation. But light steel and especially acrylic ones are also attached to the wall for reliability.
What types of screens are there?
Now you can buy bath screens of any design and made of any material. Manufacturers of decorative panels involve experienced designers in the design of models.
They develop original designs that can fit into even the most sophisticated interior.
For the manufacture of screens, plastic, metal, MDF, polystyrene, plasterboard, polyvinyl chloride, and acrylic are used. Patterns, subject pictures (photo printing), and decorative elements can be applied to the surface of the product.
Often there are models made from combined materials.
Frames for modern screens are made of aluminum, steel or plastic. Buyers often choose models with aluminum frames, because... they are durable and affordable
Glass and mirror screens look very original. They are used not only for their intended purpose, but also to model the space of bathrooms.
For such panels, they use not ordinary glass, but organic glass, because it better resists mechanical damage and shock.
When choosing a material, you should pay attention to its strength, resistance to moisture and high temperatures. A high-quality model can last for decades.
Good performance characteristics imply a higher price for the structure, but this is the case when the investment is completely justified.
Lattice-shaped models are chosen by people who care about good ventilation of the space under the bathroom. This helps to avoid the appearance of dampness, fungus and unpleasant odors.
We select a convenient design
Screens consist of a frame (usually aluminum) and panels. They can be blind or equipped with doors for access to communications and items stored under the bathroom.
There are also models with removable panels; they are usually installed under acrylic bathtubs.
The advantages of blind panels are high aesthetics and durability. The smooth surface can be decorated in any way or left plain.
It will look nice regardless of the presence or absence of additional decor. Due to the absence of moving parts, these bath screens last much longer.
The disadvantages of solid stationary structures include the inconvenience that arises in the event of breakdowns of the plumbing system. To access it you will have to remove the entire panel.
This takes a lot of time, which can cause problems if a leak develops and water accumulates under the bathtub.
In some interiors, screens perform a style-forming function. A luxurious bright model looks very attractive if the rest of the design elements are monochromatic or made in the same style
Designs with doors are more practical than blind ones. The doors themselves can be hinged or sliding. Both options have their own advantages and disadvantages.
In most cases, bathroom owners opt for sliding models.
Hinged doors conveniently open and close, providing access to shelves with necessary small items.
However, you should not choose a screen with such doors for a small bathroom. Open, they occupy useful space and make it difficult to manipulate the elements of the plumbing system.
The doors of the sliding screens for the bathtub open, sliding along the guides. When purchasing such a system, you should pay special attention to the quality of the metal.
The stronger it is, the longer the bath screen will last. It is better to give preference to steel or aluminum.
There are models with plastic frames. They are less reliable, but are quite suitable for apartment owners who do not intend to store frequently used items such as washcloths, towels, shampoos, hygiene products, and household chemicals under the bathroom.
If doors are needed only for access to communications, then you can buy a plastic system.
Doors can swing open not only to the left or to the right. There are models with folding elements. They have the same advantages and disadvantages as swing screens
Useful tips
The following advice from experts may be helpful when selecting a suitable screen fence and its installation:
- One of the varieties of screen fencing - with PVC panels, is one of the most budget types with a cost of 500 rubles. These are universal screens, that is, if they are larger in height, you can shorten the vertical posts and trim the panels at the top. For large length sizes, simply shorten the horizontal guides on one side.
- In any collapsible frame, vertical slats are sometimes located in inconvenient areas. They can be unscrewed and moved to another location by first drilling holes at the desired points on the profile guides.
- Expensive MDF screens with an average cost of 4,500 rubles. have higher strength characteristics in contrast to plastic ones. Laminated panels cannot be cut in height if the screen is larger than the space under the bathtub, so it is advisable to purchase it after installing the bathtub.
Installation instructions for a standard screen
- When purchasing, it is more practical to choose panels with cut holes instead of overhead handles. They are more reliable in operation, do not protrude beyond the plane of the panel and serve as a hatch for ventilating the enclosed space under the bathroom.
- To prevent water from getting on the frame and canvas, leading to the formation of mold and loss of their aesthetic appearance, the gap under the side of the bathtub is sealed with silicone sealant.
- The lower gap in the screen under the bathtub, although convenient for placing feet, spoils the aesthetic appearance of the room, so the screen fence is selected as accurately as possible in height. If desired, you can set the bathtub itself to the height of the already purchased fence.
- If the user is very bothered or does not like the two side stands, proceed as follows. Remove one of the vertical strips, installing the second in the middle. The corners are screwed to the ends of the lower horizontal profile. Make marks on the cladding along the holes in the corners, drill through the wall with a hammer drill and insert dowels. The side corners connected to the lower horizontal guide are screwed through the dowels with self-tapping screws, securing them to the walls.
Cost of plastic and MDF models
To install a sliding plastic screen under a bathtub with your own hands, you need a simple tool for cutting metal, with which you can adjust the horizontal aluminum guides to size. Basically, installing a standard screen barrier does not cause any particular difficulties; the vertical position of its position is checked by the level or seams of the tiles on the side walls, and increased attention is paid to the accuracy of cutting panels for pipes.
Source
Choosing a model: important nuances
First, decide on a design that is suitable for your purposes. The most convenient options:
- Blind stationary model with a technical opening without a door. This design is usually preferred by craftsmen who do everything in the house themselves. It is simple, convenient for access to pipes, but does not involve arranging a mini-storage area under the bathroom.
- Removable stationary model without technical opening. If you choose a similar model, then try to choose a panel that can be easily removed if pipe repairs are necessary.
- Screen with hinged doors. If the bath is spacious, then no problems will arise at all. If the room area is small, carefully calculate the size of the doors so that they do not take up the entire bathroom.
- Model with sliding doors. This is a universal screen that will be appropriate in any bathroom.
When choosing, you need to pay attention to the type, dimensions, design of the structure, type and performance properties of the material
Before purchasing, measure the space that needs to be covered. Standard screens have a length of 1.5, 1.6 or 1.7 m, a width of 0.5, 0.55 or 0.6 m. There are also models of other sizes.
So, on sale you can find screens 1.05x0.5 or 1.9x0.5 m.
If you set a goal, you can find a model for any bathtub. The only difference is that among screens of non-standard sizes, models with unusual designs or with unique decor are less common.
If you are satisfied with a design with a smooth, monochromatic surface, then this option can be found in any size.
Sometimes doubts arise regarding the required width. This happens when the screen is selected before finishing work in the bathroom is completed.
Often the owner himself does not know the exact dimensions until the bathtub is installed and the tiles are laid on the floor.
The problem with selecting a model of the required width is also relevant in cases where the floors of the room have a slope. This can be solved using a screen on adjustable legs.
During installation, the legs are set to the desired height on each side.
Models with adjustable legs need to be selected according to length, because... The width can always be adjusted. Adjustable screens come in plain colors or with a variety of decorations
Foot niche
When installing a screen, the comfort of using the bathtub for washing and servicing the inner surface of the bowl is reduced. In other words, the feet rest against the wall, preventing you from getting close, for example, to clean or wash large items that do not fit in the washing machine.
There are four design options to make this task easier:
- a cutout 5–10 cm high between the screen and the floor;
- niche at the same level;
- screen surface beveled downwards;
- a niche with a beveled plane in the middle part of the screen.
The video shows the technology for assembling a frame with a niche for the feet:
The main disadvantage is the accumulation of dust/dirt at the junction of the niche with vertical surfaces and floor coverings. It is possible for horizontal tile joints to shift due to an increase in the length of the inclined surface. It is also considered bad design practice.
The best manufacturers of bath screens
As for manufacturers, there are many of them - both domestic and foreign.
Among Russian screen manufacturers, the trademarks “Techno”, “Vann Bock” (), “Remstroyplast”, “Siar”, Aquamate, Ecroline have proven themselves well. Their main advantage is versatility.
Russian manufacturers take into account the diversity of the sanitary products market and produce models that are suitable for installation under bathtubs of different brands.
They offer many design options, over 30 shades of colors. The materials are varied, including semi-soft panels made of non-woven material.
A big plus of domestic bath screens is their affordable price. They are noticeably cheaper than imported analogues of the same quality, but may be inferior in design and design.
Among foreign manufacturers we can highlight the Italian brands Jacuzzi, Albatros, the Finnish brand IDO and the German Kaldewei.
All of these companies produce high quality products, but often the screens are only suitable for specific bathtub models.
Sliding models of the “Professional” collection of the “Vann Bock” trademark are made in black and white colors. There are screens made of organic glass. They are equipped with beautiful chromed metal handles
Installation stages of finished models
Ready-made bath screens are completed with frames, fittings and fasteners. All this must be indicated in the technical documentation for each specific model.
Installation instructions should also be included. Before purchasing, make sure everything you need is included.
If the dimensions are chosen correctly, then for installation you will need a minimum of tools: a tape measure, a building level and a screwdriver. Before starting work, it is recommended to fill the bath with water.
If the bathtub and screen are installed at the same time, this is not necessary.
Screens may vary in shape and design, but their installation scheme is always approximately the same:
- Measurements and markings. Before installing the frame, you need to once again measure the niche under the bathtub and mark the mounting locations for the frame. If the panels do not fit slightly due to the curvature of the walls or floor, they are trimmed with a grinder.
- Installation of the frame. The frame is mounted under the bathtub and secured in accordance with the instructions; the W-shaped guide profile for sliding models is also installed and aligned.
- Adjustment of legs. If the model has adjustable legs, they are unscrewed so as to achieve maximum fixation of the frame between the floor and the side of the bathtub. To ensure that the supports hold more firmly and the screen does not shake when water is poured into the bath, you can apply a little sealant under each leg and press it to the floor.
- Fastening the frame under the side of the bathtub. When the frame is firmly fixed, the space between the edge of the frame and the side of the bathtub is filled with foam. This will add additional rigidity to the structure.
- Installation of panels. Decorative panels are installed on the frame. If the doors are hinged, they are hung on hinges; sliding doors are inserted into the guide profile. Handles are screwed to the doors.
- Seam processing. It is advisable to treat the joints with sealant. This will help protect the niche under the bathtub from moisture.
Installing screens for acrylic bathtubs has its own characteristics. Most often, these baths are pre-equipped with screens that are suitable in shape and size. Models are usually made of plastic. The kit includes frame, panels, handles, brackets, dowels, screws.
The pictures show the entire process of installing a screen under an acrylic bathtub. Installing screens under bathtubs made of other materials has some differences. For example, in cast iron models you cannot drill holes at home, as there is a risk of splitting the cast iron
If the bathtub is not equipped with a screen, then you can make it yourself from a wooden block and ready-made plastic panels. The frame is attached to the side of the bath using liquid nails, the joints are additionally strengthened by cold welding.
To secure the bottom brackets, drill holes in the floor and install dowels. After installing and adjusting the frame to size, the screen panels are inserted into the guides.
A characteristic click is a sign that they are in place.
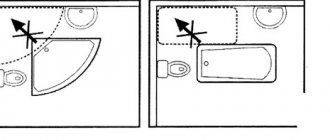
Installing decorative panels for a corner bath may pose some difficulties. The sequence of correct installation of a corner acrylic bathtub with a screen is shown in the video:
Self-production
A frame screen for a bathtub is cheaper than a similar design made of brick or partition blocks. However, the labor intensity of the work increases:
- fastening of the load-bearing elements of the frame is possible only to the walls and floor;
- To finish a frame structure with tiles, you must first cover it with sheet material (usually moisture-resistant plasterboard, less often aquapanels, DSP);
- In places where doors and hatches are installed, it is necessary to install additional racks and horizontal jumpers.
Metal carcass
On the other hand, it is most convenient to lay tiles on drywall. Therefore, frame technology is used quite often.
The masonry is very convenient for fencing sanitary bowls of complex configuration and island installation method. This method is used to strengthen acrylic bathtubs and to make steps and sides of podiums.
The masonry can be immediately covered with mosaics or tiles, the hatch/door can be installed in any convenient place.
Frame construction
The classic option is a frame made of galvanized profiles for gypsum plasterboard systems, covered with plasterboard. This diagram allows you to do the following:
- make completely removable panels on hooks or magnets;
- install hinged doors or sliding hatches;
- improve access to communications due to the small thickness of the structure;
- install a blank screen under the tiling;
- create a ventilated structure with louvered doors.
It is possible to finish drywall with tiles, porcelain stoneware or mosaics of any format. Instead of plasterboard, you can attach lining, wooden, or plastic panels to the frame if the walls of the bathroom are finished with similar materials.
From a hygiene point of view, the lining should be flush with the outer plane of the bathtub rim. Therefore, the drywall should extend 1 cm inside (the thickness of the tiles and tile adhesive). Accordingly, the racks and horizontal lintels should be located even deeper (to the thickness of the plasterboard).
Stationary deaf
Use frames only for cast iron, steel and stone sanitary bowls with high rigidity ratings. The main problem when assembling the frame is the low rigidity of the upper horizontal profile along the long wall of the bathtub. Therefore, the element is strengthened by twisting two profiles with self-tapping screws. Step-by-step instructions for the work are available in the video:
This method is convenient for covering one long side of a bathtub mounted between two walls in a niche.
Removable type
If you need constant access to the interior of the screen, its front panel is removable. The industry produces a sliding plastic screen on a frame made of a square tube to solve similar problems. But it has disadvantages:
- low rigidity;
- wide gap at the bottom;
- not suitable for interiors completely tiled.
A step-by-step method for constructing a removable screen panel is in the video:
Given the weight, the structure must be operated by two people.
Folding panel
Compared to the previous version, the folding panel or some part of it can be operated by one person. But, the ease of access in this case is reduced. Video instructions are below:
The panel is fixed in a vertical position using magnets or door closers. Instead of covering the gypsum board with tiles, you can finish it with panels made of plastic or MDF.
With louvered doors
The main restrictions for use: the presence of free space in the area where the swing door opens and the finishing of the bathroom with cladding of a similar design. The assembly algorithm is given below:
To avoid sagging of the doors, the racks, the doors themselves, and the hinges must be strong enough.
Sliding panel doors
On the one hand, making your own panel from sliding plastic panels is quite simple. On the other hand, to do this in the store you need to find a PVC panel with a width of at least 60 cm, which is quite difficult. You can assemble the doors from several narrow panels by gluing reinforcement elements on the back side, but this will increase the labor intensity of the work.
Step-by-step instructions are presented below:
In comparison with the factory one, this design is initially tailored to the specific size of the plumbing fixtures and the location of its installation. Therefore, there are no gaps at the bottom, the rigidity is much higher.
Masonry
The traditional material for masonry is ceramic brick. However, tongue-and-groove, foam concrete, and aerated concrete partition blocks are often used. It's better to process them:
- aerated concrete and foam concrete can be easily cut with a hacksaw;
- holes for hinges of doors and hatches can be drilled with a regular drill, not a hammer drill;
- the upper part of the blocks is trimmed with an ax or chisel in order to launch the masonry inside under the bathtub.
Masonry increases the rigidity of the acrylic bathtub, which is also an additional advantage of the technology. The surface of the screen does not need to be plastered/puttyed before laying the tiles.
Screen made of foam concrete block
When installed vertically on an edge, the masonry will be made in one row. This option has maximum rigidity and allows you to significantly strengthen the bath. The blocks can be laid on mortar or attached to the supporting structures of the building and to each other with polyurethane foam.
Foam concrete is susceptible to cracking over time. Therefore, it is best to reinforce the masonry surface with fiberglass fabric in a layer of plaster.
The technology of work is shown in the video:
Aerated concrete block has increased resistance to moisture and cracking compared to foam concrete
Podium for corner bath
When installing a sanitary bowl in the shape of a sector of a circle, an angular brick screen is used. The podium additionally has one or several steps that facilitate the use of plumbing by the elderly, children, and the disabled.
Sector podium manufacturing technology:
For cladding curved surfaces, mosaics are usually used; the steps do not have to be in the shape of a semicircle; a straight staircase is possible.