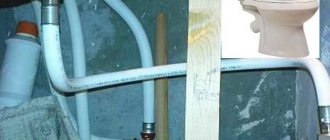
A flexible hose is connected to the water riser through a tap using FUM tape. A shut-off valve must be installed. If repair work is necessary, it will allow you to shut off the water.
Restoring the float valve is as follows:
Before starting work, turn off the water supply to the tank
Complete emptying of the cistern
Turning off the water supply to the tank Before starting work, turn off the water supply to the tank
Unscrewing the float valve fasteners
Moving the float holder
Removing calcium deposits around the valve
Inspecting the float valve diaphragm
Installing a new membrane and reassembling
Checking the operation of the repaired valve
If a leak is detected in the area of the shut-off valve, troubleshooting work is carried out in the following sequence:
If tightening the sealing nut of the shut-off valve clockwise does not bring results, we will disassemble it. To do this, remove the sealing nut
Dismantling the shut-off device
Removing the packing nut
Inspect and clean the washers around the valve
Installing cleaned or new washers
Tools for work
To fix the toilet, the best option would be to call a professional plumber. But if you prefer to carry out such work yourself, then you will need the following tools:
Toilet Repair Tools
- Pliers;
- Adjustable wrench;
- There are two types of screwdrivers: flat and Phillips;
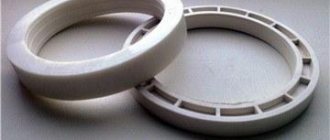
- Various rubber gaskets;
- Silicone sealant.
To fix most cistern problems, your toilet cistern valve will need to be repaired. Now let's directly understand the malfunctions that arise and see how we can eliminate them.
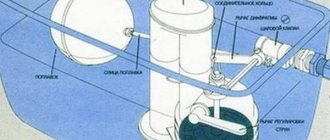
Inlet valve: its operation, malfunctions and repairs
The cistern inlet valve regulates the flow of water into the cistern through a special lever system. Depending on the toilet model, this mechanism may be located on the side or at the bottom of the tank. If this mechanism is faulty or not adjusted properly, you will face water overflow problem.
What should you do in this case:
- Manually lift the float as high as possible - if in this position the water stops flowing, then you just need to find the optimal height at which this mechanism will operate. To do this, try setting the clamp a little lower or twisting the plastic rod a little.
Usually these simple steps help solve the problem of water overflow. However, if repairing the fill valve does not bring the desired result, you will have to buy a new one. When choosing this mechanism, pay attention to how it is connected to the tank: from below or from the side, and depending on this, select the model. Or purchase a universal model of the filling mechanism - it will fit any type of tank.
Installation and repair
Considering that automation for a toilet cistern with a bottom line has been used relatively recently in our country, many craftsmen are experiencing certain difficulties with its installation and repair. However, it should be said right away that there is nothing complicated in these processes, although it has certain differences.
Some types of such structures have their own individual characteristics and, accordingly, their own installation method, suitable only for them
- First of all, it should be noted that all such products have their own technical passport, which is accompanied by installation instructions. If these documents are not included in the kit, then you should not purchase it. It is also important to mention that the toilet itself usually comes with the necessary connecting elements and fasteners.
Usually only the pipe itself is connected to the inlet valve using wrenches, although sometimes they are used to tighten the control nut on the ceramic itself
- When starting installation, you first need to install the lower part of the toilet, fixing it in the required position. Before this, it is recommended to check the correctness of the water supply and the length of the hoses. If the need arises, the supply system can be modified in accordance with the design of the product.
- The next step will be to install the tank. It is at this moment that the internal structure is installed.
Some installation instructions contain detailed drawings of these structures, which is very helpful for self-assembly, since most manufacturers supply these parts partially disassembled
- Usually, the filler valve for a toilet with a bottom connection is first installed when connecting the tank itself. To do this, sealed rubber bands and adapters are fixed. Some designs assume that the inlet valve will be installed at the same moment, but it all depends on the specific model.
- All other elements are assembled according to the instructions and drawings in it. However, it should immediately be noted that first it makes sense to completely disassemble the drainage device and then reassemble it. This will allow you to independently verify the tightness of the connections and the level of clamping of the parts.
Advice! All elements of such systems are assembled by hand without the help of special tools. However, this must be done so that the connections are sufficiently tight.
Sometimes the water level marks on the product do not correspond to reality and you often have to make the adjustment yourself
Maintenance and repair
Usually the biggest problem when setting up and maintaining such a system is the question of how to adjust the toilet tank with a bottom line. This is due to the fact that it has a fundamentally different design, although it is based on a float.
Holes that are not used for introducing water into the tank should be closed with special plugs, but they are not always included in the delivery of such mechanisms and must be purchased separately
First of all, it is necessary to fill the tank with water so that its level does not reach the overflow hole or funnel by 1-2 cm. After this, adjust the float so that, floating on the surface, it closes the inlet valve at the entrance to the tank.
Repair of such products does not require quite a long time. Therefore, sometimes it is much easier to replace an entire unit than to repair some parts. The fact is that the price of such a device is relatively low, and the simplicity of the design significantly increases its service life.
However, there are situations when replacing the flush system involves almost complete disassembly of the toilet. Therefore, it is worth remembering that products with metal elements that are subject to corrosion do not need to be purchased at all. Some craftsmen, for lack of an alternative, simply replace the brackets and strips with structures made of stainless material.
Advice! When purchasing a specific model of such a drain system, you need to immediately buy some spare parts for it. In this case, special attention should be paid to rubber gaskets and seals, which fail most quickly. The fact is that after a certain time they may not be on sale.
Partial replacement of the drain system using stainless steel parts
Recommendations from the experts
- You need to be very careful when working near ceramics with a tool. Even minor mechanical damage or impact can lead to a chip or crack.
- If, after installation, leaks were found in the contact areas between the outlet valve of the toilet cistern and the drain hole, then it is worth doing a little grinding or cleaning the surface of all contacting elements. If this defect has not been eliminated, then you should contact the seller for a refund or replacement.
- When the system is being repaired, it is worth cleaning all parts from rust. However, this must be done very carefully so as not to damage the parts on which it appeared.
Sometimes even such a simple job is associated with a number of difficulties and some people need to turn to specialists to complete it
By studying the video in this article in more detail, you can understand all the features of such structures and the principle of their operation. Also, taking into account the text presented above, it is worth concluding that the main advantage of such systems is their excellent appearance and the almost complete absence of noise from the water.
The toilet is leaking: what to do?
First of all, don't panic. If we exclude mechanical damage to the toilet (various chips and cracks), then there will be two reasons for water pouring onto the floor:
- Poor-quality fastening of the toilet with bolts;
- Wear of the rubber seal, which is located between the flush cistern and the toilet bowl.
To eliminate this problem, first try simply tightening the mounting bolts a little more. However, be careful: if you use too much force, you risk damaging the tank and breaking it. Tighten them gradually, periodically checking whether there is a leak or not.
If, after tightening the fasteners, water continues to leak onto the floor, you will have to remove the tank and change the O-ring located on the drain channel. Don’t be lazy, and if you’ve already removed the tank, immediately change the washers that secure the mounting bolts and rubber gaskets, and it’s best to treat all joints with silicone - this will provide an additional guarantee against leakage.
For tanks with bottom wiring, the problem of water leakage may be associated with a worn seal where water is poured. In this case, you will also have to change the seal that has become unusable and secure everything with silicone sealant.
Float valve: types of malfunctions and how to eliminate them
The float valve is responsible for the dosed flow and shuts off the water supply. This mechanism is quite simple and reliable, but when it breaks down it can cause a lot of trouble.
The float is designed in such a way that when water is supplied, it rises to the required level, and then, through mechanical traction, shuts off the water supply. When flushing, the opposite is true - the float lowers, allowing water to flow freely into the toilet bowl.
If this mechanism malfunctions, various types of leaks appear (a rusty strip in the toilet bowl is the cause of the float failure).
Types of float valve malfunctions and ways to eliminate them:
- Wear of the gasket: in this case, water will constantly flow into the drain tank without stopping. To fix this problem, you need to replace the gasket.
Toilet cistern valve
Float valve in tank
You can easily repair the float valve yourself using available materials. Only in case of a really serious breakdown, when no methods help, will you need to buy a new one and replace the entire mechanism completely.
There are two other types of cistern problems that you may encounter in your daily life. This is a malfunction of the start button and an excessive noise effect that occurs when water begins to flow into the tank. Both of these problems can also be fixed by yourself.
In the first case, when you press the drain button, the flush does not occur. Typically, the cause of such a breakdown is the chain that connects the external button to the drain mechanism. To fix this problem, you need to loosen the button slightly. To do this, carefully turn the decorative fastening nut several times; this is usually enough for you to slightly lift the tank lid and adjust the trigger chain.
If there is a strong noise effect when filling the tank with water, you will need to put the fallen muffler on a specially designated fitting. This problem usually occurs in tanks with a side water supply. If, after adjusting the muffler, the noise level still remains strong enough and bothers you, you should purchase and install a special float system that has a stabilization chamber. Such systems are practically silent.
So, concluding the conversation about problems that may arise during the operation of the toilet, we note that, first of all, there is no need to panic - these problems are unpleasant, but, in principle, easily solvable. Any repair of the toilet cistern valve can be quickly done with your own hands, having a minimal set of tools and available materials.
The design of the drain tank itself is very simple, and knowing the purpose of each part, you can fix almost any problem. In addition, remember that all parts of any model of drain tank are replaceable and can be purchased without any problems at the nearest specialized store that sells plumbing fixtures. And you can always find all the necessary information on problems and how to resolve them on our website.
Source
How to fix a toilet flush cistern with a button?
Plumbing equipment is subject to intense operating loads and often fails. When the toilet tank constantly leaks, it causes great losses due to excessive water consumption. It is not advisable to call specialists because the device fails, since repairs mostly involve adjusting the tank mechanism. But to understand how to fix a toilet, you first need to know how it works. Let's figure out how to independently repair a toilet cistern with a button.
Types of push-button flush mechanisms
The drain valve is connected to a button on the tank. When you press it, water drains into the toilet. Drain mechanisms come with:
In the first option, when you press the button, the entire volume of liquid in the tank is drained into the toilet. The button in the second option is divided into two parts. When the small button is pressed, the water is not completely drained. And if you press the big one, it will pour out of the tank into the toilet in full. This separation allows you to save water in the apartment and not overpay for its excessive consumption when draining.
Toilet device
The toilet includes the following elements:
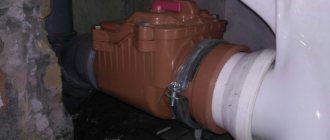
- A toilet bowl connected to a sewer pipe with a sealed cuff.
- Drainage tank with fittings that allow it to be filled with water and drained.
A water supply hose is connected to the tank. Depending on the design, it is connected from the side or from the bottom. The bowl and cistern are usually connected to each other using bolts and a seal.
- rod release mechanism with drain button;
- a shut-off device (inlet valve) connected to a float;
- rubber sealing gaskets.
Installation of valves for a toilet with bottom supply
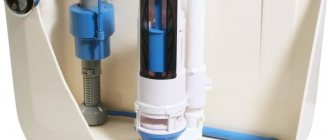
The fill valve in the toilet fittings is a fundamental element for the functioning of the entire system, as it performs the main function - regulating the water supply by shutting off and opening its flow.
The drain tank fittings consist of two main elements - drain and inlet valves
It should be noted that the entire drain system is differentiated into 3 main mechanisms:
- Filler - performs the function of regulating the water level in the tank using built-in parts (read above);
- Drain mechanism - performs the task of emptying the tank or is used in case of breakdowns and malfunction of the valve;
- Most models provide a system of buttons to activate the fittings.
In addition, the choice of valve, as well as its possible subsequent repair, is based on a number of significant criteria. It is important that the valve matches the existing valve, which is the most important point, because the valve set includes a set of parts and elements that are similar in appearance, but are not always completely suitable for unconditional operation.
When purchasing, it is extremely important to pay attention to the quality of the products, which concerns both the water inlet valve itself, the float or guide, and the rubber gaskets, since the presence of damage, nicks and other defects can lead to an extremely short service life of the fittings.
You should pay attention to the movement of the float, and emphasize that it should behave smoothly and in accordance with the water level, which also applies to the valve, because the opposite leads to dysfunction of the entire system.
How a toilet with a button works
A toilet tank with a button is a water seal that is filled with a portion of water, which is supplied to the bowl when the valve is opened. The flush is controlled by a button that needs to be pressed. At the same time, the valve opens and the water flows down under its own weight, washing the bowl. After the tank is released, the shut-off valve at the inlet opens, the tank is filled with the next portion to a certain level, regulated using a float. Access to the mechanism is provided by opening the top lid of the tank.
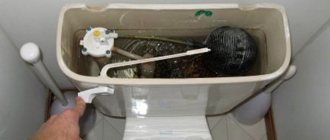
Preparation for repair
Before you can repair the toilet cistern, you need to open it. It is only accessible from the top if you remove the cover. In many modifications it is attached using a ring around the button. This ring must be pressed and turned counterclockwise. After prolonged use, the ring may not turn. Then a few drops of oil are applied to the attachment point. After the ring has turned, unscrew it, and then release the button from the plastic clothespins and remove the cover.
Models are equipped with one or two buttons. In the second case, one of them is intended for a small flush, and the other for a large one. To dismantle the cover, press one button and remove both of them one by one through the technological groove. Then unscrew the fastening screw and remove the cover.
Do-it-yourself methods for repairing the tank mechanism
Through the upper hole in the tank the entire mechanism of the drain fittings is visible. It may have the following faults:
- The tank is constantly leaking.
- There is no water pressure at the inlet.
- Uncontrolled drain mechanism.
The causes of these malfunctions can be different, and the method in which the toilet cistern will be repaired depends on them.
- The plug (bulb) does not fit tightly to the drain hole. To avoid this, you should purchase high quality plumbing fixtures. The possibility of repair can be checked by pressing the rod with slight force. If water does not flow, the plug can be slightly weighted with additional weight or the stem can be leveled. You also need to periodically clean the seal from rust and salts, due to which the seal is broken and liquid constantly flows into the bowl.
- The regulator does not shut off the water supply. At the same time, the tank will never overfill, thanks to the presence of an overflow tube. The serviceability of each element of the device is checked: float, intake valve, fasteners, rod. The failed part is replaced or the float mount is simply tightened.
- Leaking from the tank into the room. It may have a crack or the gasket seal may be broken. Particular attention should be paid to the quality of the connection between the current tank and the bowl. It needs to be tightened, and if this does not help, the rubber gasket is changed. Another cause of a leak may be wear of the cuff at the junction of the bowl drain with the sewer pipe. The seal is replaced with a new one, having cleaned the connection of contaminants and treated the surfaces with sealant.
- Weak pressure through the inlet valve. This usually happens if it becomes clogged. This can be prevented by cleaning or installing a filter in front of it.
Possible breakdowns and methods for eliminating them
If you suspect a breakdown, you must first shut off the water supply and remove the lid.
External leaks
It is not always possible to see them right away. They become visible with the formation of red spots. Disassemble the tank and carry out diagnostics. If a hard cleaning filter is not installed, elements of dirt and rust may constantly accumulate in the container. They can have a detrimental effect on the internal mechanisms of the system and cause its breakdown.
When the tank is working normally, it is filled with water to the desired level. The bulb is pressed against the drain hole and is held in this position by the action of water. When the trigger is activated, the drain hole opens. The pear should always be provided with air. A protective tube protects it from water. If a bulb or tube is damaged, the entire system breaks down. Therefore, after removing the cover, examine these items first. If they are not elastic, there are cracks, then this is the cause of the leak. Repair in this case is impossible. Needs a complete replacement. If the pear is intact, look to see if there is any dirt or rust under the rubber. They are removed with a sponge.
Next, we look for other causes of leakage:
- The gasket between the toilet and the tank may not be tight. You need to remove the tank and examine it. If it is very hard and covered with cracks, there is only one way out - replacement. It happens that it is simply installed incorrectly. Then you should put the elastic band more tightly. Although the best solution is also a replacement.
- Wear of sealing elements under the connecting screws. Solution: the screws are unscrewed, the seals are changed. Removing the tank is not required here. It is better to install cone-shaped seals - they adhere more powerfully to the working surfaces. After replacing these elements, you need to tighten the screws so that there are no distortions. Their presence will lead to a new leak. The screws are tightened slowly and one by one.
Internal leaks
Their sign is water flowing into the toilet. The reasons are usually:
- poorly adjusted overflow tube;
- damaged valve;
- damaged float.
First, check how the handset is configured. She sits up slightly. You need to see if there is any water flowing into the tube underneath. If so, the float valve needs to be repaired. If not, the lever is corrected.
Debris under the rubber band may also be the source of the problem. If wear is detected, it is better to replace it. If a valve or float breaks, they are also replaced.
Water does not flow into the tank
Here, first of all, you need to check the supply hose. It is detached from the tank, the end is lowered into any container. If there is no water, you will have to replace this hose with a new one.
Another possible reason is that the narrow part of the intake valve is clogged. Repair procedure:
- Drain the liquid from the tank, shut off the water and unscrew the assembly, which includes the valve, float and lever.
- After these steps, a hole will open to fill the tank.
- If there is a blockage there, it needs to be eliminated. A regular needle or wire will help here. For complete cleaning, the valve is removed from the inlet pipe, and any remaining dirt is removed with water.
Noises appear in the tank while it is being filled
In essence, this is not a breakdown, but it does cause a lot of discomfort. In most cases, noises occur immediately after draining the water. Then they decrease.
Solution: pay attention to the locking mechanism; you need to put a piece of tube on its pipe. It should be small. Material: rubber or plastic. The length of the tube should allow it to reach the bottom of the container. After this procedure, the noise will immediately decrease.
There is another way to eliminate noise. It involves replacing the standard float valve with another option - a valve that has a special compartment and a stabilization function. After installing it, the noise in the tank will disappear forever.
Adjusting the water level in the tank
The water level can be easily adjusted with your own hands. To do this, the float is installed in a certain position.
The optimal level is considered to be when the water supply to the container has stopped, and a few centimeters remain to its upper edge.
The adjustment method depends on the design of the valve. The simplest one is bending a metal rod. If the float moves along a horizontal plastic guide, it is fixed using fastening elements in a certain position. With a vertical layout, it is moved with an adjusting screw.
When choosing the filling level, do not forget about the overflow tube. Its upper edge should be a couple of centimeters above the water level in the filled container. If it is located lower, water will constantly flow into the bowl through the overflow.
Troubleshooting cistern
Water from the tank flows onto the floor
If dampness or a puddle of clean water appears behind the toilet, this indicates that the gasket installed between the tank and the toilet has become unusable and must be replaced.
To make a replacement, you will first need to purchase an O-ring. Then follow the instructions to fix the problem.
- Turn off the water supply to the toilet.
- Drain the water from the tank
- Disconnect the water supply hose
- Release the tank from the lid
- Remove the drain tank
- Replace gasket
- Reassemble in reverse order.
To increase the seal, you can use waterproof silicone.
Water is not delivered to the storage tank
This malfunction has several causes.
Something with a flexible hose for water supply. The check is carried out as follows. The water is turned off, the tank is emptied of its contents, the hose is disconnected from the product, directed into the toilet bowl, and the shut-off valve is opened. If water flows with normal pressure, then the hose is fine. Let's look further.- Water does not flow from the hose. We replace it with a new one. We connect the new product to the shut-off valve and check it again. The liquid has gone. The problem has been resolved. If there is no result. We continue checking.
- The inlet valve may be clogged. You can clean it with a thin wire, knitting needle or needle. Then we dismantle the valve and wash out the remaining dirt.
As soon as the water begins to flow freely, we install the valve, the valve with the lever and the float in its original position. Sometimes the valve cannot be cleaned, in which case it should be replaced.
Water constantly leaks into the bowl
- The reason is the incorrect operation of the float. It does not stop the flow of liquid, and it constantly flows through the overflow.
- The lever has changed position to inoperable
- The water supply valve is broken
If the design of the tank is from Soviet times, you should start identifying the fault with the float. Perhaps it burst, water flowed into it and it can no longer rise and stop the flow of water. If this is the reason, the part must be replaced.
Modern toilets have a flush column and do not have a float. This part cannot be repaired, simply replaced with a new one.
Water may leak due to a broken inlet valve.
- Check the lever next to the valve for mechanical damage.
- We empty the tank and watch how water fills
- You should move the lever. It closes the valve. If there is a bend, straighten the lever.
- The lever doesn't move. A jam has occurred. We are replacing the unit.
If the intake valve itself breaks down, it needs to be replaced. The part is dismantled, a similar one is purchased from the store and installed in the system.
The internal fittings have failed
Sometimes several faults occur simultaneously. The entire drain system should be replaced.
Replacing the drain mechanism with bottom water intake.
- Close the tap that supplies water to the tank and empty it of liquid.
- Remove the cover.
- Unscrew the flexible hose
- Turn the top of the column and remove it
- We dismantle the tank by first unscrewing the retaining bolts
- Remove the inlet valve and drain button
- We take out the old mechanism
- We install new fittings.
- We put the tank in its original position.
Loud noise when drawing water
This fact is not a malfunction. Top supply tanks are noisy.
Models are available where you can adjust the diameter of the hole. It won't get rid of the noise completely, but it will reduce its level.
If it is not possible to make adjustments, there is a modification option.
Take a rubber tube with an inlet diameter and a length of up to 30 cm.
The tube is placed over the inlet hole, fixed, and the end is lowered to the bottom of the tank.
This prevents water from falling from a height; filling begins from the bottom, which means the noise disappears.
A button or two buttons are stuck
A toilet model with two flush buttons is in demand. In this product, sometimes the buttons get stuck. To make repairs, you need to remove the cover.
First, the nuts holding the buttons are unscrewed, after which you can open the tank. Pressing the buttons at the same time sometimes helps them fall into place.
If the manipulation does not work, you should check the button shaft. Sometimes it gets clogged. After cleaning the shaft, repeat the check. If there is no result, a new part must be installed.
The unit is dismantled, exactly the same one is purchased and installed.
Tank Troubleshooting
The tank may leak water due to a crack in it. The same applies to the cup. In this case, the question of how to repair the flush tank or bowl does not arise: the entire toilet is usually replaced. A small crack in the top of the ceramic pieces can be repaired. To prevent it from spreading further and increasing water seepage, it is drilled at the ends and treated along the entire length with sandpaper. The work is done carefully.
If the crack progresses during operation, the toilet should be replaced.
The surface is degreased and the gap is filled with epoxy resin. After hardening, the seam is sanded.
How to choose fittings for a tank
Now let's move from theory to practice. When the question arises about purchasing new fittings for a flush cistern, a completely natural desire arises to save some money. It often leads to some typical errors:
- Despite the fact that fittings are universal, their designs from different manufacturers can differ greatly. Therefore, it is wrong to try to look for only one broken part. Chances are you won't succeed and you'll just be wasting your time. Conclusion - buy only the whole thing. As a last resort, bring the entire fitting element (column or valve) with you to the store. There is a small chance that such a spare part will be found, for example, from defective fittings.
- It is wrong to look for fittings specifically for your tank, that is, exactly as it was. This is where it is important to remember that they are universal, which means that knowing your type, with a high probability any universal one of the desired type will suit you.
This raises the question, how to determine the type of fittings you have?
To determine the type of fill valve, just look at your tank, namely, where the flexible water supply hose is connected to it. If it’s on the side, then you have a valve with a side inlet. If there is no hose on the side, then the valve has a bottom supply. Look under the tank and see for yourself.
To determine the type of drain column, pay attention to what action is performed when flushing. If you press a button, then it’s a push-button one, if you pull the rod, then it’s a column with a rod.
Determine the type of your fittings and choose the name that corresponds to yours (one of those listed above) - this is what you will need to tell the seller when purchasing.
Most likely, the store will offer you several options from different manufacturers and, accordingly, with different prices. What to choose?
The price range is quite wide - from 150 rubles. up to several thousand. To choose a quality one without overpaying, you should pay attention to several nuances:
- All connections of parts to each other must be strong. Detachable ones, as a rule, snap into place, should fit tightly into each other with a characteristic click. One-piece ones should not have any backlash.
- Sealing gaskets must be of good quality. Feel them. Soft, plastic and at the same time elastic, speak about the quality of both the gaskets themselves and, accordingly, the fittings as a whole.
- Equipment - fittings of acceptable quality include all the parts necessary for installation, including bolts securing the tank to the toilet. In some cases, the fittings are equipped with spare parts (usually gaskets). Pay attention to the quality of small items. Unscrupulous manufacturers do not pay due attention to it. The result is low quality components. This should alert you.
Generally speaking, you need to know that the price of rod fittings of acceptable quality starts from 10 USD. e., for push-button ones - from 15 USD. e. At a price of 30 USD. That is, you can buy very good fittings with an increased service life (as a rule, this is reflected in an increased warranty period).
So, the fittings have been purchased, all that remains is to install them.
Features of repair of products with bottom water supply
Not so long ago, tanks with bottom water supply began to be used, which makes them more compact due to the absence of protruding tubes. Typical malfunctions and features of repairing a toilet flush cistern with a button with a bottom water supply:
- Weak water pressure. For normal operation of the diaphragm valve, a water pressure of 0.05 MPa is required. Otherwise, water will constantly flow into the tank. The increase in pressure is created by cleaning the intake valve and filter.
- Installation errors. The outlet fittings must not come into contact with the walls of the tank.
Types of fittings for flush cistern
Since the fittings, as mentioned above, consist of two independent devices, the classification can be carried out according to:
- Fill valve type:
- with side supply - the valve is mounted on the side wall of the tank. Accordingly, the inlet connection (a flexible hose from the water pipe to the tank) fits from the side;
- with bottom supply - the valve is mounted on the bottom wall of the tank. In this case, the liner is connected from below.
- Type of drain column:
- with a button - to flush, you need to press the button on the tank lid;
- with a rod - to flush, a rod with a decorative element at the end jerks upward.
It should be noted that push-button speakers, in turn, are also divided into two subtypes:
- With single flush - one button. When pressed, all the water contained in the tank is drained.
- With dual flush - this type of speaker has a button divided into two parts. Pressing one flushes using only half of the water contained in the tank, while pressing the other causes a full flush.
Fittings for a dual-flush tank are considered more economical - you can choose the desired mode yourself. Columns with single and double flush are interchangeable, that is, nothing prevents you from buying and installing the one that suits you most, but it should be noted that the tanks have different capacities. For small volumes, a half flush may not be enough.
A hole of a larger diameter was made in the tank lid for the push-button fittings than for the rod fittings. Therefore, in most cases, replacing a column of one type with a column of another will not work.
So, taking into account all the above, we get six types of valves: with a stem with a side connection, with a stem with a bottom connection, with a single button with a side connection, with a single button with a bottom connection, with a double button with a side connection and with a double button with a bottom connection .
Separately, it is worth dwelling on the old-style fittings. Nowadays there are still many cisterns installed on a toilet with such fittings, or cisterns mounted on the wall and connected to the toilet by a pipe, in which old-style fittings are also mounted. It consists of a column with a rod (vertical or lateral) and a side fill valve. Due to design features and softer requirements for efficiency, the drain column from such fittings cannot be replaced with a modern one. All that remains is to either repair and adjust the fittings for the tank so that it does not allow water to pass through, and this is very difficult to achieve, or simply buy a toilet with a modern tank, which is more preferable, especially if you have a water meter installed.
To summarize, we illustrate all types of fittings:
Fill valves. From left to right: bottom supply, side supply, old style
Repair of a built-in tank (with installation)
It is more difficult to get to the tank mechanism installed behind a false wall. First of all, you should purchase a device that is highly reliable and rarely requires repairs. There should be inspection hatches in the wall through which you can get to the tank and replace the gaskets if the seal is broken. It is not possible to repair the drain fittings yourself due to the complexity of the design.
A coarse filter is installed in front of the hidden tank, which captures solid particles, which in most cases cause leaks.
How to choose the right plumbing fixtures?
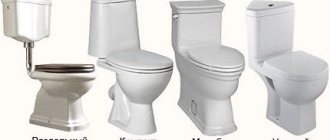
When choosing a toilet, pay attention to the following.
- Mounting method: monoblocks, compact and separate toilets. The choice is made taking into account the size of the room, design and labor intensity of servicing the tank.
- Accessories. Most parts that have low strength and reliability are made of plastic.
- The presence of positive reviews, a well-known manufacturer, a guarantee and a certificate.