Design and principles of operation of the cistern
The flush mechanism of the toilet cistern is divided according to the type of water discharge. There are models in which, when you lift a lever or press a button, all the water flows into the toilet bowl, flushing sewage down the drain. In more modern models, the economy drain is thought out. That is, there are two buttons - when you press one, the tank is completely emptied, when you press the other, part of the water is drained.
Despite this, the insides of any type of cistern are almost the same.
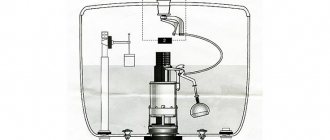
The siphon for the cistern consists of several levers, a bulb, a float, valves, a button and gaskets. The toilet flush works on the principle of a hydraulic seal.
When water fills the tank, it pushes out the float, and it gives a “signal” to the shut-off valve to shut off the flow of water. When the user presses the button, the drain valve opens and the water drains. This is how the drain occurs.
The cistern does not hold water. What to do? Focus on the four main elements of the drain system: valve, overflow, drain lever and tap.
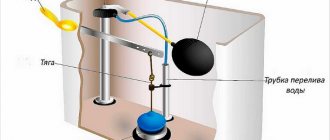
A float valve (or valve) is a part connected by a fitting to a supply hose. A locking unit is attached to it, which is controlled by a float. If the tank is empty, the float pulls down the shut-off part of the float valve, and the fitting opens. The float floats up when the tank is full and closes the fitting.
The release valve is a special hatch fixed on a hinge. It covers the drain hole. When the hatch is closed, the float valve opens and the tank begins to fill. When it is open, water drains into the toilet.
The overflow is a hollow column directly connected to the toilet opening. The main function of this element is to protect the cistern from overflow.
Drain lever - a system that controls the water release valve. Its main element is a holder with a rocker arm, which is connected at one end to the valve (hatch). The user presses a button, which presses on the loose end of the rocker arm, opening the hatch. When the button is released, the rocker and hatch return to place.
A cistern with a bottom water supply has a slightly different structure, but the elements that require replacement or repair are the same as on a cistern with a side water supply.
Non-specialized information
Many people are afraid to “touch” plumbing with their own hands and, if any breakdowns occur, they bring it to specialists. But, the design of the drain tank is quite simple and understandable, thanks to which anyone can repair it without having any social knowledge. For this, only the ability to handle basic tools will be useful.
Some breakdowns may require replacement of failed parts. In this case, you need to dismantle the faulty elements and take them to a plumbing store in order to select a suitable repair kit.
We would like to talk separately about the repair of a wall-hung toilet cistern, which is a much more complex procedure. This is due to the fact that the container is hidden in the installation, as a result of which it will be necessary to disturb the decoration of the room. The tank itself in this case may differ in shape from the classic one, but the principle of its operation is the same.
Advice! Many people do not know how much weight a wall-hung toilet can withstand, so they are afraid to install it. But, if you look into the features of this device, how many kg a wall-hung toilet can withstand, it turns out that it is designed for a large weight of 450 kg, respectively, it can withstand a person of any size and at the same time will have a large margin of safety.
Shut-off valve arrangement
The drain mechanism of a tank is called a shut-off valve in the experienced world of plumbers. Before you begin independent repairs, you should figure out how it works.
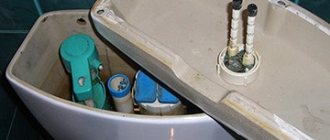
So, if an uninformed person opens the lid of the container, he will notice only two details:
- Float mechanism;
- Drain mechanism.
Below we will take a closer look at their device.
Note! The design of the shut-off valves in your tank may differ slightly from those outlined in this article. But, in any case, this is a fairly simple mechanism that is not difficult to understand.
Float mechanism
The float mechanism consists of two parts:
- A housing with a membrane that shuts off the water supply;
- A float with a lever that regulates the position of the membrane in the housing.
The water filling level can be adjusted by the position of the float.
Drain mechanism
The drain mechanism device, in most cases, includes three main parts:
- Valve;
- Frame;
- Drain button with lever system.
The operating principle of this device is quite simple - the position of the movable valve, located in a plastic case, is changed using a system of levers by pressing a button. In addition, the tank has an overflow that directs excess water into the toilet bypassing the valve, which helps prevent it from overflowing and, as a result, flooding of the apartment.
Preparatory work
For repair work in the drain tank, you may need pliers, work gloves (preferably rubber), wire cutters and spare parts.
Before repair work, you need to turn off the tap at the entrance to the tank.
Most modern toilets have a flush button built into the lid. Naturally, before removing the cover, you need to disconnect the button and the decorative ring. After disconnecting the push-button mechanism, the ring is removed (easily pryed off with any sharp object). If the tank is secured with fasteners, they are dismantled.
In the case of a two-button flush system, the buttons are pressed alternately and scrolled until they are disconnected.
Please note here that the tank cap is not considered a spare part and is not sold separately. Therefore, it must be handled with extreme caution.
Types of float devices
The type of float in the cistern of a compact toilet depends on the design of the fittings: in old-style devices there are plastic balls or cylinders floating on the surface of the water, in new modifications these are moving elements that slide vertically and resemble a glass.
The spherical float is also called a “rocker arm”. Indeed, the thick wire on which the ball is attached is shaped like a household item that has become rare. The principle of operation of an essentially primitive float is quite simple: when flushed, it sinks to the bottom of the tank and, through a rod (the same wire), opens the inlet valve.
Water enters, fills the tank, and the float rises up. At a certain point, it reaches the required level (the volume of liquid can be adjusted manually) and blocks the flow of water. The inlet valve closes until flushing occurs again and the float falls to the bottom.
The modern appearance of the float device vaguely resembles a spherical model. This is a plastic part attached to a vertical rod, which, like an elevator, moves up and down and is also responsible for the timely blocking of the intake valve.
The advantage of the improved model is a more precise adjustment of the level of water entering the tank. The rod along which the float moves is similar to a ruler with divisions, where notches are made for ease of adjustment.
It is believed that designs with a spherical float are noisier. In fact, the noise level does not depend on the type of float mechanism, but on the method of water supply. With an upper side connection, it is poured from above (a flexible hose is connected to the hole in the upper part), which is why the noise is created. In tanks with bottom supply, water flows quietly, and if noise is created, it is only due to a malfunction of the fittings.
The drain tank is leaking: possible causes
Quite often it happens that the water in the tank does not hold and constantly flows into the toilet. This happens most often due to a poor-quality siphon or other fittings, depressurization of the plastic parts of the siphon, or loss of elasticity of the bulb. There may be several main reasons. Here are some of them:
- the petal or pear does not fit tightly;
- the operation of the tank ball valve is not adjusted;
- the connection between the ball valve and the hose is not sealed;
- The connection between the toilet platform and the tank is not airtight.
So, the cistern won't hold water, what should I do? Let's try to figure it out.
You need to start with a visual inspection of the fittings and siphon for chips, cracks and other noticeable damage.
Causes of tank leaks and their elimination
If the water in the toilet tank does not hold, this can be caused by two reasons:
| Float mechanism problem | The water level exceeds the permissible norm, and water flows into the toilet through the overflow. |
| Valve problem | The device, when closed, is leaking water for some reason. |
Below we will take a closer look at the possible causes of malfunctions in these mechanisms and their correction.
Tank overflow
The tank may overflow for the following reasons:
- The position of the float is incorrectly adjusted - adjustment can be done in different ways, depending on the design of the valve. For example, if the lever is metal, then you just need to carefully bend it. Plastic levers may have a ratchet or an adjusting screw.
- There is a hole in the float - in this case, the part can be temporarily sealed and then replaced.
- The float is covered with dirt - as you might guess, the part just needs to be cleaned of dirt.
- Membrane malfunction - if the water does not shut off in any position of the float mechanism lever, then there is only one way out - replace the shutter valve. The price of the membrane is low and it is not difficult to find it on the market or in specialized stores.
Dismantling the parts is not at all difficult. In some models, all fasteners are plastic, so dismantling can be done even without tools.
Doesn't hold valve
If the water supply is turned off, but the flow does not stop, it means that the valve in the toilet tank is not holding properly.
There can be two reasons for this malfunction:
- The rubber valve has dried out;
- Debris got under the valve.
In any case, to fix the problem you will need to remove the toilet cistern valve. The design of the drainage device can be different, and accordingly, dismantling can also be carried out in different ways. Most often, the mechanism is disassembled into two parts, as a result of which the valve can be removed.
The instructions for fixing this problem are extremely simple:
- First of all, you need to clean the valve and drain hole from dirt;
- Then the device must be assembled and installed in place;
- If the toilet still does not hold water, you need to disassemble the mechanism again and replace the valve.
Other faults
In addition to those described above, some other malfunctions may occur in the drainage system; the most common ones are listed below:
- The connection between the tank and the toilet is leaking - in this case, it is necessary to completely dismantle the tank and replace all existing gaskets, including screw seals.
- Mechanical failure of any elements of the shut-off valves - this problem can only be solved by replacing the broken parts.
Note! A ceramic drain container can be quite heavy, so you need to handle it carefully so that it does not break.
This is actually all the information you need to know in order to independently repair such breakdowns of the toilet cistern as water leakage.
The pear has lost its elasticity
If the cistern does not hold water, what should I do? Be sure to check the elasticity of the pear. The manufacturer warns that its operation is short-lived, since the rubber cannot maintain elasticity for a long time. Over time, it becomes rigid and does not keep a tight connection with the saddle, as a result of which water begins to leak. The solution to the problem is to replace it with a new one.
If the deformation of the pear is insignificant, you can take the advice of specialists. Temporarily (before replacing) make it heavier by placing several stainless nuts on the axle holding it.
The saddle should hold the bag tightly. But during operation, plaque may form on it or corrosion may appear, and the pear no longer fits tightly. As a result, the water finds its way out.
You can fix it as follows. Remove the bulb and thoroughly clean the saddle. You can use fine sandpaper. When assembling, special attention should be paid to fasteners and nuts.
Selecting a locking device
Before replacing the float in the toilet, you must purchase the correct part. There are no problems with choosing the float itself - you just need to pay attention that the product is sealed and made of high-quality plastic and has fairly thick walls.
The float valve must be chosen wisely.
There are four types of these devices:
- Stabilizing;
- For powerful water pressure;
- For medium pressure;
- For low pressure.
Advice! Experts recommend installing a stabilization valve in cases where the pressure in the system is not constant.
The price of devices of different types, as a rule, is practically the same, however, the durability of the mechanism depends on the correct choice of devices. In addition, it is advisable to carry out preventive measures at least once a year - inspect the mechanism, clean it of all kinds of contaminants and, if necessary, correct malfunctions.
Here, perhaps, are all the main points that you need to know in order to independently repair a breakdown in the drain tank.
The reason is the failure of the bolts holding the saddle
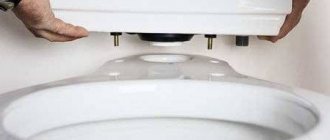
If it is for this reason that the drain tank does not hold water, repairs are carried out according to the following scheme. First, the water is completely removed. Then the union nut is unscrewed between the flexible hose and the float valve, followed by the bolts securing the toilet to the tank are removed. Next, slightly bending the tank, release the corrugation connecting it to the toilet.
Now the bolts are dismantled: both are required, even if one has become unusable. New ones (brass or stainless steel) are installed in their place. You need to tighten it carefully, without making much effort and avoiding shifts and distortions. Now you can assemble the structure and use it.
The most common tank breakdowns: repair, replacement, removal of elements
A common problem is the constant filling of the tank with water or unregulated flushing, in which it is important to adjust the float in the toilet. There are reasons for this, including:
- Worn membrane on the float.
- Float misalignment.
- Allowing water to enter the toilet cistern valve using a flapper valve.
- Hole in the float.
Methods for regulating a toilet float: why it doesn’t work
It is enough to bend the brass lever, which was installed on old-style toilets, after first determining by testing the place at which the device shuts off the water supply.
The plastic lever that is equipped with new tanks has a clear design. Inside the tank, the toilet float valve is secured with a mounting screw. This part changes the bend of the lever if necessary. The part is also held in the desired position using a plastic ratchet.
How to Replace a Stop Valve
Even inexperienced owners can do this kind of work. It is recommended to perform the following steps step by step:
- First, all the water is released from the tank and the valve is disconnected from the pipe.
- Then remove the lever and nuts intended to secure the reinforcement.
- The old float valve is removed and the new one is installed, secured with the old nuts.
- After this, the tank is filled with water, and the float valve is fixed in the desired position.
Problems with the float: does not shut off the water
A set of parts for installation in the tank.
A damaged float in the toilet tank is difficult to rise and fall due to the fact that water enters inside. There are two ways to fix a breakdown: by replacing the part or by repairing it.
To replace the float in the toilet, close the valve through which the tank is filled and drain the water inside.
Then, using an adjustable wrench, unscrew the water supply pipe and remove the damaged part. After installing the new part, the water supply is restored by adjusting the required water level.
If the float in the toilet tank needs to be repaired, the water is removed from the float and the hole inside is sealed with hot plastic or the float is placed in a plastic bag.
Adjusting the toilet float involves securing the float lever to the crossbar, draining the water and unscrewing the nut holding the flush pipe. After this, after loosening the fastening nut, unscrew the siphon and install a new valve for supplying water to the toilet exactly in the old place.
Lets water through: no gasket or anything
If water makes a loud noise as it gets inside the tank, this can be eliminated in 2 ways:
- insert a thin tube into the outlet from which water flows, which significantly reduces the noise when drawing water;
- reduce the diameter of the hole through which water enters the tank.
The tank is leaking onto the floor
The problem is rotten mounting bolts. To make sure, you should do this:
- First, turn off the water and scoop out the liquid remaining inside.
- Disconnect the flexible hose.
- Loosen the bolts and nuts connecting the toilet shelf and the tank.
- Remove the tank.
- Remove rotted bolts and clean contact points from lime and rust.
- Install new fasteners.
To increase reliability, it is recommended to replace the rubber cuff. After this, all elements must be put in place, adjusted and tested.
Markings for toilet installation
What to do if water does not flow into the drain tank: how the system with a button works
First, determine the cause of the breakdown.
If the hole in the drain valve is clogged, clean it with a screwdriver. If the problem is in the shut-off valve, then it cannot be repaired; the part must only be replaced.
If the flexible hose is clogged, the part is disconnected by shutting off the water. The hose is placed over the container and the hose is opened. If the liquid does not pour out, then it is time to change the hose due to clogging. If water flows, the problem is not in the hose and you need to further look for the roots of the problem.
Sometimes it is easier to change all the shutoff valves at once. In order not to make a mistake when buying a new set, you can take the old one with you to the store and show it to the seller. To do this you will need pliers and an adjustable wrench.
The replacement steps are clear. First, turn off the water, then unscrew the button and then remove the lid. Then remove the dial circuit and unscrew the fitting. After this, dismantle the lever with the drain valve and put it away. Installation of new components is carried out in the reverse order.
If the float in the toilet does not shut off the water, it urgently needs to be repaired.
The shut-off valve is malfunctioning
Detecting this breakdown will not be difficult. The valve must be pressed by hand. Ideally, the water should stop leaking. If it continues to leak, then the valve is faulty. The solution to the problem is to replace the valve.
You can do this yourself as follows.
Empty the tank. Carefully remove the cover, having first removed the button. Next, move the float lever together with the float (if they are not a solid structure). Now you can roll up the hose adapter and disconnect the water supply and the external fitting.
Next, loosen the nut inside the tank that presses the tap (valve). Then the outer nut is twisted, which secures the valve body inside the tank. Now the broken part can be easily dismantled and a replacement installed (the internal nut must first be screwed onto its fitting). Screw the outer nut while pressing the hidden one. Then connect the water hose and run the water.
What else should you pay attention to if the cistern won't hold water? Perhaps the reason is the deviation of the release button height adjuster. Shift of the valve relative to the drain hole leads to a stable leakage of water. To solve this problem, you need to adjust the height of the valve in accordance with the instructions included with the siphon.
If the problem persists, you will have to completely replace this part of the drain mechanism.
What to do if water is constantly flowing in the toilet
The design of the fittings of modern models differs from outdated systems with a rubber float bulb. New devices are equipped with two units: drain and float. A key or button activates the drain; it is carried out by the drain mechanism. After the container is empty, the water supply starts. It is already regulated by a float system.
Module design may vary depending on models. Their features can be found in the technical documentation or when disassembling the equipment. If the toilet tank is leaking, you will still have to disassemble it. It is important to remember that this can only be done with the shut-off valve on the supply line or on the riser entering the apartment closed. The reservoir must be emptied before doing this.
The disassembly scheme is simple. First, the drain button is unscrewed, then the lid is removed. After this it is easy to get the parts. The elements of the units are made of plastic and are fixed with bolts and plastic or rubber seals. Parts from different manufacturers are often interchangeable, so it is not difficult to find a replacement for a worn one. First you need to measure the worn-out product or bring it to the store.
Instagram vladimir_santex_churicov
Let's look at the main reasons why the toilet cistern leaks and how to fix the problem.
The seal has deteriorated
This is a ring made of rubber or plastic. It is located at the outlet of the water jet. It retains sediment, fragments of mineral deposits and other contaminants. Therefore, there are two reasons for such a breakdown: the part is either too dirty or worn out. In the second case, it becomes thinner, frayed or deformed. Whatever the reason, the water will flow constantly. The seal needs to be replaced or cleaned. The procedure is carried out according to this scheme.
- Remove the lid of the container. We dismantle the mechanism. To do this, turn the module to the left half a turn until it clicks.
- Prepare a cleaning solution with any mild soap. Cleaning the parts.
- We carefully inspect the seal. If there are cracks or deformation, replace it with a new one.
- We put the module in place.
Instagram vse_vidi_santexniki
- Plumbing equipment
How to install corrugation on a toilet: step-by-step instructions
Float mechanism failure
There may be two options here. The first is the loss of tightness of the float. In this case, it does not rise to the surface when the volume of liquid in the container increases. This is immediately noticeable upon visual inspection. When the tank is filled, the overflow system is activated, water flows from the tank into the toilet without interruption. The second option is a breakdown of the mechanism fastening. In any case, the module needs to be replaced. It's done like this.
- We carry out diagnostics. To do this, without emptying the tank, remove the lid. Press the drain key. Let's see how the float works.
- We dismantle the tank. Close the shut-off valve and activate the flush button. We unscrew the hoses and fasteners suitable for the container. Carefully remove the tank from the shelf-stand. It is heavy enough that it cannot be dropped.
- Remove the float. It must be carefully unscrewed and replaced with a new one. We place the unit in its seat and securely fix it with plastic fasteners.
- We place the tank on the toilet shelf and secure it with mounting pins. We connect the flexible liner.
- All that remains is to install the lid, open the stop valve and do a test flush.
Instagram mastervdomeufa
Short-term leakage after draining
Sometimes the tank leaks while it is being filled with new water. The cause may be a misalignment of the drain module. It's noticeable right away. The drain key begins to jam, sometimes it simply falls into the mounting hole. In this case, you need to dismantle the cover and remove the assembly. Most likely, he moved out a little from his seat. We need to place it correctly.
It happens that the water flow brings quite large particles of mineral sediment or solid contaminants. They get under the seal ring and break its tightness. In an empty tank, the pressure on the valve is low, and it allows liquid to pass through. As soon as the tank is full, the pressure increases and the stream is pinched. The problem can be resolved by thoroughly cleaning the parts.
It is possible that one of the valve components broke or was initially defective. Only replacement will help here. The unit is dismantled. Worn out elements are replaced if possible. If not, a new module is purchased. After repair or replacement, the mechanism is installed in the tank. A test run of water is being carried out.
Instagram macstep_vit
Cracks on the tank
Sometimes the cause of a leak lies in a violation of the integrity of the tank. Let's look at how to eliminate leakage if the toilet cistern is cracked and leaking. You must understand that you can fix the problem only temporarily. The best solution is to replace the plumbing, and this will still have to be done. As a temporary measure, minor repairs can be carried out. They do it like this.
- We dismantle the tank. To do this, empty it, remove the cover, and remove the fittings. We unscrew the fasteners and liner, remove the container from the toilet shelf.
- Dry the outer and inner surface of the tank well.
- Carefully seal all cracks with a suitable sealant. We act strictly according to the manufacturer's instructions. Let the material harden.
- We put the container in place and secure it with bolts. We connect the water supply and install the fittings.
It is unknown how long the equipment will work after repair. Therefore, it is advisable to plan to replace your plumbing fixtures in the near future.
Instagram mastervdomeufa
- Plumbing equipment
How to choose and correctly install a hygienic shower for a toilet
The tank continuously fills with water
The malfunction is that the float lever has shifted or skewed. The fix is quite simple: lower it below the incoming water pipe (at least 2.5 cm). And thoroughly secure all fastenings.
If the float in the drain tank is on a plastic lever, then adjust it by tightening or loosening the screw. Or, in some models, adjustment occurs using a plastic ratchet.
If adjusting it does not solve the problem, you need to inspect the pin that holds the float lever. Perhaps it's broken. In this case, it can be replaced with a piece of wire (preferably made of copper, steel will rust) of identical thickness.
The hole in the plastic valve that the pin fits into is also subject to wear. During operation, it can, for example, become oval. This damage cannot be repaired. Plumbers advise removing the valve in order to show it in the store and buy an identical one.
The float may be causing the cistern to not hold water. How to repair it? If it has become heavier due to water accumulated in it, you need to drain it, dry it and treat any cracks or crevices with sealant. After repair, the part is put in place. This is a temporary solution to the problem. Ideally, the float should be replaced.
Features of toilet cisterns with bottom and side connections
The drain button (lever) is located in 3 places:
- from above (in the center of the tank);
- on the side (used for tanks installed at height);
- inside the wall (considered the standard of modern plumbing aesthetics).
Based on the installation method, the tanks are mounted as follows:
- at the top (used in retro design, mounted high at the top of the toilet, connected to it using a pipe);
- inside the wall (requires additional costs for remaking the wall in which the cistern is hidden);
- on the toilet shelf (the usual universal option,
- implying easy operation and quick repair).
The materials for the manufacture of drain tanks are cast iron, earthenware, plastic or stone (natural and artificial).
Sectional diagram and device
Water supply can be from the bottom or side. If you adjust the flush tank with a button with water intake from below, the device works quietly and unnoticeably.
Problems with the trigger mechanism
The most common malfunction in the trigger mechanism is an unregulated overflow. In the case when its tube is installed low, and the float allows you to draw water above this level, you can correct the problem by simply adjusting the filling level of the tank.
So the cistern doesn't hold water. What to do? The scheme is simple. It is necessary to lift the overflow tube (it easily pulls up). Then there are two possible scenarios for the development of events.
First. If the water stops flowing and goes through the overflow tube, then we lift the tube and the problem is solved. And the second one. If the overflow tube is at the maximum level (which threatens to overflow water), then lower the float slightly.
How to choose and install a toilet float: all types
The price of a float for a toilet cistern is 150-200 rubles, depending on the country of origin and the material of manufacture.
When choosing a float valve, it is important to understand that the only correct solution is to completely replace the part. If the valve for the toilet tank is not replaced, it will leak again after a while.
When choosing a mechanism, it is important to consider the pressure level in the plumbing circuit. Floats are presented on the plumbing market by 4 types of valves:
- Stabilizing (convenient for houses built in regions with interruptions in water pressure).
- For strong pressure.
- For moderate pressure.
- For low pressure.
Preventative maintenance helps to avoid frequent repairs of mechanisms. To do this, it is important to check the fittings and float valve for the toilet for damage 2-3 times a year. At the same time, you save personal money and time, and also save your neighbors below from accidental flooding. A toilet float is an important element that needs to be monitored for proper functioning.
trubexpert.ru
Frequent problems due to which water constantly leaks from the drain tank
Faults that cause water to leak:
- Water flows non-stop from the water supply pipe.
- Water flows in a small stream into the drain bowl.
- Draining from the tank occurs only after much torment with a lever or button.
- The lever or button does not respond at all.
- Leaks and puddles form near the toilet.
- The tank is filling with an unusual loud noise.
How to change the cartridge in the mixer?
Which bathtub is better - acrylic or cast iron?How to clear a clog in the sink?
Unpleasant consequences of a “leaking” tank
Unfortunately, the problem of a toilet float leaking water is quite common in all types of homes. The result is a continuous flow of water into the tank. This, in turn, leads to quite unpleasant consequences:
- Uneconomical water consumption. Firstly, water is a precious resource in our world, which is becoming increasingly scarce. Secondly, in residential buildings and private houses, water meters are installed almost everywhere, which, naturally, record disproportionately high water consumption. Thirdly, the resulting water bills are simply fantastic.
- Threat of flooding in the bathroom. Potentially, this is a very serious problem that can lead not just to unpleasant, but to catastrophic consequences. Because as a result of a flooded bathroom, not only the floor covering of the room, but also the neighbor’s ceiling can be damaged. Both are fraught with serious problems. In the first case, you will have to do an unscheduled bathroom renovation; in the second - to resolve the issue of flooding with neighbors (financially, of course).
- Unpleasant noise in the bathroom. Considering the rather “modest” sound insulation in most multi-storey buildings (sometimes private ones), the noise of constantly flowing water in the daytime can strain the ears, and at night it can become an irritating factor, which will undoubtedly affect the mood of the residents.
