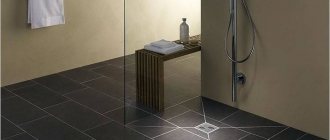
Installing a separate shower stall in the house is not a luxury, but a completely reasonable step, because sometimes instead of a bath it is more convenient to quickly freshen up in the shower. When installing a shower stall, special attention should be paid to organizing the drain; many people undeservedly neglect this stage, which can result in problems with the drain or an unpleasant odor from the sewer. For example, an incorrectly selected drain for a shower stall with a low tray will require replacement quite soon.
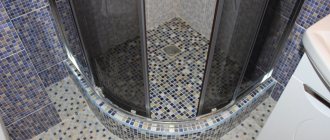
Corner tray
Design and functions of a shower drain
The simplest shower drain in a bathroom under tiles is a device made, as a rule, of metal, plastic or metal-plastic. This device ensures effective collection and drainage of water from the shower floor. The shower drain has a simple design and low cost, is easy to use and install, and is trouble-free during operation.
The design of the ladder for draining water in showers consists of the following elements:
- a funnel with a flange for receiving water from the shower, in the lower part of which there is an outlet pipe for discharging liquid into the sewer. A waterproofing membrane is attached using a flange;
- decorative removable grille for catching objects, decorations that accidentally fell on the floor, large debris;
- a siphon for creating a water seal inside the drain drain to prevent unpleasant odors from the sewer from entering the bathroom.
Thus, in addition to collecting and draining water, shower drains perform a number of other useful functions:
- retention of debris that can enter sewer pipes and cause them to clog;
- preventing the penetration of stench into the bathroom, thanks to a dry seal or water seal;
- providing easy access to the drain for cleaning it in case of a blockage.
Shower drains with a dry seal or water seal save space in a small bathroom, eliminating the need to install a bathtub or a bulky shower cabin with a high tray, which also results in significant savings on the family budget. But before you buy a drain for a shower floor, carefully understand its types, because we are choosing a device designed for a long service life.
Choosing the right drain
When choosing drain structures for shower stalls, observe the following rules:
- The body of the plumbing fittings should not be compressed by the cabin parts. It is necessary to determine in advance the distance from the floor to the bottom of the pallet. This space includes siphons no more than 20 cm high.
- The diameter of the neck must match the dimensions of the drainage hole.
- The sewer pipe must lie below the level of the drain pipe.
- The filter component ensures rapid removal of liquid from the low pan.
Types of shower drain designs
There are a wide variety of floor shower drains available for this type of tile. Shower drains may differ in shape, design, size (height), and materials of manufacture. Regarding the shape of the gratings, they can be rectangular, square or round.
And according to the design, they distinguish between wall, point and linear devices. Linear structures are installed, most often, in the corner or along the edge of the shower. Point drains can be located anywhere on the floor under the tiles, while wall-mounted devices are mounted mainly at one of the walls. The drains also differ according to the type of outlet: horizontal or vertical. Its location determines in which direction the sewer pipe will be connected to the drain.
As a rule, the design of most drains includes an ordinary water seal located in the siphon. But such a device has one significant drawback - if you do not use the shower for a long time, the water inside evaporates, and unpleasant odors penetrate into the bathroom. In this case, it is better to choose a shower floor drain with a dry seal.
Designs with a dry seal completely isolate the premises from the penetration of odors from the sewer, since in this device, in addition to the water seal, there are several more dampers that block the channel under the influence of its own weight. When water penetrates the drain channel, these valves open, allowing liquid to pass through freely, and then close again.
The drain in the tiled shower floor is installed in the most convenient place for this. The main thing is that the drain is located at the lowest point of the bathroom, ensuring effective collection of the flowing liquid. So, the drain hole can be installed in the following places:
- In the center of the shower stall or with a slight offset to one side. Standard drain location option. In this case, it is necessary to ensure an appropriate slope of the floor from the four walls.
- Near the wall. In this case, the floor slopes from one of the walls towards the drain hole. As a rule, slotted drains with high throughput are located in this way, since such devices become clogged less often.
- In the corner. This type of drain hole looks great on the floor without being noticeable. In this case, the slope of the floor surface is made in two planes to the desired angle, ensuring water flow to a certain place.
It is worth noting that when choosing a shower drain, you must also pay attention to the height of the device. This parameter determines how much you need to raise the level of the floor covering at the drain hole. Of course, everyone wants the floor height to be as low as possible, but keep in mind that the higher the height of the ladder, the higher its capacity. Therefore, there is a special type of ladder with adjustable height; by choosing it, you can adapt the device to any height of the screed.
Tools
Also make sure you have:
- A tile cutter or, in the absence of one, a grinder and a diamond wheel for it.
- Construction hair dryer or blowtorch. You can also use a gas burner.
- Construction tools: trowel, usually notched trowel, grater.
Prepare a level, square and tape measure.
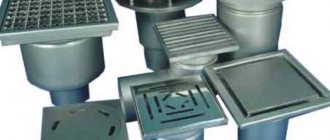
Which material should you prefer?
Tile floor shower drains are made from plastic, stainless steel, cast iron and even glass. Plastic structures are lightweight, resistant to aggressive influences, easy to clean, and have a long service life, which is why they have earned popularity both among residents of private houses and apartments. Water drains through the gap in the floor between the shower tray and the grate, and also goes through the through holes at the top of the grate.
Plastic drains are equipped with removable or non-removable decorative grilles of various shapes and patterns. The height of the plastic product ranges from 75-180 mm. You can install such a shower drain in the floor under the tiles either by point method in an open area, or by angular or linear method near the wall. Since plastic is compatible with almost any floor covering, such products are often used for public showers (sports schools, gyms, baths, etc.).
All components of the plumbing shower drain, in addition to the grille and legs, are made of high-strength plastic. And the siphon in such products, as a rule, is made using the technology of floating balls with a dry valve. After the water flow passes through the siphon, the balls sink to its bottom, blocking the penetration of unpleasant odors from the sewer channel. However, this design slightly reduces the throughput of the device.
To reduce the cost of the product, the legs of some devices are made of perforated steel tape. And to give the ladder the required height, the tape itself is bent in certain places. In addition to the steel band, the product design can use adjustable screw feet.
Sewage drains made of stainless steel have proven themselves well. Moreover, not only the body of the product can be steel, but also the decorative removable grille. They are usually installed in bathrooms and restrooms with increased hygienic requirements - medical institutions, swimming pools, sanatoriums, children's camps, etc.
Linear drains made of stainless steel look especially beautiful. They are almost invisible in floors lined with ceramic tiles, natural or artificial stone. A modern solution for stainless steel drains is one of their forms, made in the form of the Latin letter “U”.
Sewage drains made of cast iron are installed in sanitary premises with harsh operating conditions - laundries, public showers and baths, specialized laboratories. For drainage of household and rainwater wastewater, exclusively cast iron vertical drains of DN 100 mm are used.
Cast iron devices have the highest throughput and are most resistant to corrosion, so their service life can reach 50 years. As a rule, these products are produced with a water seal.
General working conditions
After taking a shower, water, which is usually called waste water, should be drained from the shower, or rather from the pan, into the sewer riser. By default, in all apartments there are special sewer crosses on the sewer riser, through which drains from the bathroom and kitchen are drained into the sewer riser.
Regardless of whether the riser is cast iron or plastic, the principle is the same: the apartment's sewer pipes with a diameter of 50 mm are connected through a cross to a riser with a diameter of 110 mm. Let's simplify the task in this article, we will assume that there is a cross on the riser and there is no need to change it.
Do-it-yourself shower drain installation under tiles
When installing a shower drain during the construction of a private house, usually, questions about how to make a drain in the floor of the shower stall do not arise. In this case, the drain is installed in the floor screed, which is then tiled, and a vertical drainage pipe for wastewater is made into the sewer channel.
With the arrangement of drainage in the apartment, things are somewhat different. In the bathrooms of apartment buildings, most often, the thickness of the screed is not enough to install a vertical drain in the shower. Therefore, to equip a cabin with this product, the floor level in the room is first raised, at the same time ensuring its slope. As a rule, a height of 12-15 cm is enough to place a siphon and drain pipe under the screed.
Install a drain in the shower floor with your own hands, following the following sequence:
- First, using a tape measure, measure the location of the drain with the expectation that a multiple amount of tiles should fit from the drain to the walls, not forgetting about the joints between the tiles (1.5-2 mm). This way the floor will look more aesthetically pleasing than with cut tiles.
- The drain is then connected to the sewer drain through pipes. The slope of the drain pipe must be at least 3 cm per linear meter.
- If it is necessary to insulate the screed, use foam sheets with a thickness of 5 cm and a density of at least 35 kg/cu. meter, but it is better to use extruded polystyrene foam, as it is harder and less susceptible to moisture.
- Sheets of insulation are laid on the rough surface of the floor and adjusted to the dimensions of the plumbing drain, and a concrete screed is made on top with a layer of about 4 cm, which should fill the entire space up to the drain flange.
- It is necessary to allow the screed to dry until it hardens completely.
- Then you need to make a gasket for the flange from the waterproofing material, which should cover the flange with a margin. It is necessary to cut a hole inside the gasket along the inner diameter of the flange.
- The upper part of the flange must be placed on the gasket and screwed to the lower part of the structure.
- After this, the screed also needs to be covered with a roll waterproofing material. The laid material should overlap the flange gasket and extend onto the walls by a few 3-5 cm.
- Next, you need to insert its inner part with a siphon into the body of the shower drain.
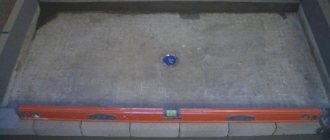
- Then you need to pour the finishing screed with a slope of about 10 mm per meter of pouring. To do this, guide plastic slats are placed on the floor surface with waterproofing, bevelling them towards the drain. You can buy ready-made systems for making shower drains.
- The pouring of the second layer of screed should be lower than the height of the siphon so that it can be leveled with the tiles. The guide rails are not removed from the screed. At the same time, to prevent the solution from getting into the drain and onto the walls, it is recommended to seal the drain grate with tape, and the corner between the floor and walls with waterproofing tape.
- Next, the surface is tiled, starting from the drain hole to the walls. The tiles should be flush with the drain grate or a few 3-5 mm. higher.
- After the tile adhesive has dried, you need to seal the seams with a waterproof material matched to the color of the ceramic tile.
- Areas where the tiles come into contact with the drain body must be carefully and carefully sealed with silicone sealant.
- At the end of all work, a protective grille is mounted and secured to the body of the shower drain.
A properly installed shower drain will make taking water procedures more comfortable and give the bathroom an original appearance.
Advice from professionals
We recommend watching several training videos. You can see in them all the stages of work performed by specialists:
If you are careful in your work and have some flooring skills, it is quite possible to make a floor drain in your bathroom on your own. It is only important to take your time, carefully carry out calculations and perform each stage of the work as carefully as possible.