Do-it-yourself installation or replacement of plumbing fixtures is becoming increasingly popular. Some people are trying to reduce their repair costs in this way, while others want to ensure the quality of the installation themselves, so as not to have the work redo by incompetent mercenaries. Many plumbing jobs do not require the intervention of a professional plumber.
It is easier to work with modern plastic materials than with metal products. For example, if the corrugation for a toilet bowl requires replacement, even a novice master can solve the problem. You just need to study the technology features of this type of work and take into account a number of important nuances.
Types and designs of toilets
Toilets sold in the retail chain differ from each other in a significant number of parameters; they are conventionally divided into the following groups according to:
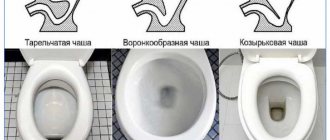
- bowl shape: plate-shaped, funnel-shaped, and visor-shaped;
- type of flush: straight (horizontal, cascade), straight circular or swirling circular;
- placement: floor and suspended structures;
- location of the tank: together with the bowl or placed upward, behind the false wall (equipment with installation);
- water supply: right-handed or left-handed;
- materials of manufacture: porcelain, earthenware, stainless steel, glass, stone, plastic and exclusive options made of gold.
Rice. 2 Types of flush
Step-by-step instructions for carrying out work
This operation is not that complicated, although it does cause some concern, which can be dispelled, like an unpleasant smell, if you know some of the subtleties of the process.
The first thing you need to do before starting work is to turn off the water in your home. Below we offer step-by-step instructions.
Removing an old toilet
Stage one. Replacing an old toilet with a new model is much easier than initially installing a toilet in a new house or apartment. Therefore, when replacing an old toilet model, you should take a closer look at the type of attachment to the sewer network (depending on the type of toilet drain pipe) and purchase a toilet of the same type that will not require adjustment or, even worse, alteration of the sewer wiring.
Stage two. If in your house, some time after installing the toilet, the floors were redone (their level was raised, floor tiles were laid), then when connecting the toilet to the pipe, you should use corrugated or eccentric cuffs.
First, it is worth carrying out a trial connection of all elements (fitting).
We connect with corrugation
Stage three. If your home has cast iron pipes, there may be problems with the tightness of the connection, which can be solved with the help of sealant. It is applied to the joints only after connecting the toilet to the sewer pipe. Plastic pipes can be hermetically connected to the toilet using eccentric cuffs, when rotated their rubber seals can successfully ensure a reliable connection.
Stage four. If you have not achieved the desired result of tightness, then a corrugated cuff, which is easily deformed, bends and stretches, will provide you with a 100% guarantee of this. It is important to know that:
- The toilet should not be fixed to the floor before it is connected to the pipe using corrugation, as it may need to be moved 10–15 cm in one direction or another;
- Corrugations may differ in quality (flexibility, etc.). It is better to use reinforced corrugation with a stainless steel coating.
Attaching the toilet to the floor
Stage five . Attaching the toilet to the floor. There are three ways:
- using epoxy glue;
- on taffeta (varnished ash or oak board) attached to the floor;
- with screws to cement floors or ceramic tiles.
While performing this work, you should wrap the sewer pipe with a plastic bag to eliminate unpleasant odors coming from the pipe.
Epoxy glue (or resin) is used on a degreased and dust-free floor surface, applying a layer of 4-5 cm. The smooth floor surface should be roughened with corundum stone for better adhesion to the toilet. The fixed toilet is left alone for 12 hours until the materials are completely dry.
For strong adhesion to the floor, anchors (or nails) are installed in the taffeta. To do this, recesses are created in the floor, filled with cement, onto which taffeta is installed with the nails facing down.
The toilet should be secured with extreme caution due to its fragility. Toilet mounting anchors are used with special rubber gaskets.
The toilet must be stable after installation. Otherwise, it is dismantled and the surface is corrected with a cement solution.
The toilet is fixed to the floor tiles using a drill and drill bits with Pobedit tips. The so-called “new settlers” are driven into the resulting holes. Nylon seals are placed under the screws on the toilet.
Connecting the cistern
Stage six. Installation of a cistern. It is important to know that the water drainage area is lubricated with silicone to ensure a tight seal. The toilet bowl and cistern are connected with bolts. Water is supplied to the tank using a flexible hose with union nuts at the ends. The water level in the tank should be 1 cm below the level of the drain mechanism.
An adjusted cistern flush will complete your job of installing the toilet and connecting it to the sewer pipe.
We recommend reading:
- the toilet is clogged, what to do at home;
- how to solder polypropylene pipes for heating.
Types of releases
The distinctive features listed above, with the exception of models with installation, do not affect how the toilets are connected to the pipeline, in contrast to the outlet designs given below.
Vertical
The outlet pipe in this modification is located at the base of the housing and goes into the floor - this arrangement after installation of the device differs from other designs in its aesthetic appearance and ease of use of the room (the floor can be washed under the tank).
Vertically located sewerage system under the toilet is popular in Western Europe and the USA; in ordinary city apartments, its implementation involves a large amount of work and is technically difficult due to relatively thin floor slabs, in which it is difficult to hide a thick sewer pipe with an outlet.
Theoretically, a vertical outlet can be made in any apartment building on the ground floor, where the pipeline will not damage the ceiling of the lower apartment, but in a private house such installation is much easier to implement due to the minimum number of restrictions.
Rice. 3 Types of toilets by release
Horizontal
Connecting a toilet with a horizontal outlet is convenient because it allows you to move the device close to a false wall in order to save free space in the toilet. The drain pipe for the toilet is located behind the wall and is directly connected to the riser.
During installation, a rigid pipe with an internal cuff comes out of the wall at the required height, and the device is moved back, pushing the toilet outlet into the pipe coming out of the wall.
Oblique
Bowls with an oblique pipe located at an angle of 140 - 145 degrees to the horizon are connected to the riser at floor level; the advantage of this design is the absence of stagnation of wastewater in a pipeline placed at an angle. The detailed connection of the toilet is universal thanks to the use of an external flexible corrugation, which can be connected to the sewer in different positions and distances from the plumbing fixture.
Rice. 4 Toilet connection diagram - example
Article on the topic:
Shut-off valves for a toilet with bottom supply - device, selection, installation . In the article you can learn about the design of a typical toilet cistern, the operating principle of the shut-off valves, and also how to install them.
Advantages and disadvantages
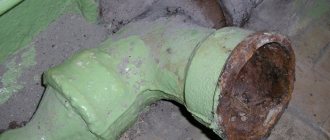
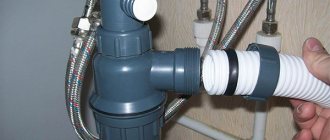
Corrugation (cuff) is a transitional element of the plumbing system, designed to connect the toilet to the sewer system. It is a fairly wide pipe with corrugated walls, made of modern thermoplastic.
The corrugated toilet connector allows you to connect plumbing to the sewer quickly and efficiently. The duration of its operation depends on proper installation
The edge is decorated with a cuff, which facilitates the process of connecting to the pipes and the toilet outlet. The design of the walls, which gave the name to this product, allows you to increase the size of the adapter to certain limits. Typically the sleeve length varies between 23-50 cm.
The diameter of the cuff that is attached to the toilet is 13.4 cm on the outside and 7.5 cm on the inside. The end that is installed on the sewer pipe usually has a hole with a diameter of 11 cm.
The main advantages of corrugation designed for toilets are low price and easy installation. This element is often used in cases where the diameter of the toilet outlet and the sewer pipe do not match. The corrugation is very convenient if the position of the toilet needs to be changed, moving it relative to the entrance to the sewer.
It is also often used as a temporary element, when during repairs the toilet is not yet fixed, but it needs to be used. However, corrugation cannot be called an ideal choice; it is not the most durable element. For example, if a piece of ceramic tile or a sharp piece of glass accidentally falls into the toilet, the corrugated joint can easily be damaged.
If the corrugation is located at too large an angle or incorrectly curved, blockages often occur in it, and an element that is too long sometimes sags under the influence of its contents. Corrugation should never be placed inside a wall; it is only suitable for open installation.
Hanging models
Recently, hanging varieties with installation have become increasingly popular, the connection methods of which involve hanging the bowl on a false wall and placing a cistern behind it. To do this, a strong metal vertical frame is mounted behind the wall, threaded studs with nuts are removed from it to hold the bowl, and a plastic drain tank is placed inside the frame; a button is placed on top of the wall to turn on the flush.
The advantages of a hanging design are space saving in a small toilet, aesthetic appearance, ease of cleaning (the floor is easier to clean under a hanging bowl).
Connection using corrugation
A corrugated pipe, which is intended to connect the toilet to the sewer system, is used if other materials simply cannot be used. Installation is carried out as follows:
- a toilet is installed in the selected location;
- mark the areas for drilling the floor covering, marking the places with a pencil installed in the holes that are located in the plumbing fixture;
- After applying the markings, the toilet bowl is set aside to make holes for dowels at the marked points;
- install dowels into the holes made, thus fixing the stable position of the toilet;
- one end of the corrugated pipe is inserted into the sewer hole, treating the joining area with silicone sealant;
- the second end of the corrugated pipe is put on the toilet flush;
- carry out all other installation manipulations and test the strength of the plumbing fixture;
- Having filled the drain tank with water and made a test drain, check the reliability of the connection;
- The absence of leaks indicates a hermetically sealed connection of all elements.
Before installing the device, check that the floor covering is level. When identifying differences in height, make a self-leveling screed. Otherwise, the toilet may wobble after installation.
It is recommended to coat the seam between the plumbing fixture and the floor base with colorless silicone. This will prevent dirt from getting under the product, which will make cleaning the bathroom much easier.
Connection tool
As noted above, installing a toilet in a sewer is not particularly difficult if you have the appropriate tools and components; for installation you will need:
- A wrench or adjustable wrench for screwing fastening hex bolts and flexible connections to a ball valve on a water supply system.
- Metal saw – needed for cutting polyvinyl chloride (PVC) pipes to the required size with rigid fasteners.
- A hammer drill with drills of a suitable diameter for tiles and concrete is necessary for attaching the bowl to the floor.
- Fittings, flexible connection to the toilet for supplying cold water.
- Dowels and hexagon screws, fasteners are usually included with the new device.
- Pipes, corrugations, eccentrics, cuffs, adapters and other shaped elements with which the toilet is connected.
How to install corrugation
After the old connecting element is removed, you should carefully inspect the corrugation. You need to make sure that no cracks or other damage appears on the pipe walls during transportation and storage. You should also check that the length of the connector matches the distance between the toilet and the sewer pipe.
But if the corrugation and the new toilet are installed at the same time, it makes sense to first connect the pipe to the toilet outlet, then install the toilet, and then connect this entire structure to the sewer system.
This procedure may turn out to be less complex and time-consuming than the procedure in which the toilet is first installed and then the corrugated connector is attached to it.
If the toilet has not yet been installed, it may be worthwhile to first attach a corrugation to it, and then install the product and connect it to the sewer system
The preparatory stage also includes cleaning the toilet outlet from contaminants after dismantling the old corrugation or pipe. These can be either particles of previous communications or remnants of cement or sealing composition.
The cleaned surface can even be degreased if this is in accordance with the instructions for use of the new sealant. Before installing the corrugation, a fan pipe should be placed on the outlet of the new toilet.
After this, you can begin to actually install the corrugation. First, the required amount of sealant is applied to the edge of the toilet outlet. To work with plumbing, it is recommended to use a special sanitary sealant based on acrylic or silicone.
Such compositions expand well and provide high tightness of the connection; they are specially designed for conditions of high humidity and prevent the penetration of fungus and mold on treated surfaces.
Before starting to work with sealant, you should carefully study the manufacturer's instructions and strictly follow them.
The corrugation is attached to the toilet hole quite reliably, but the use of sanitary sealant will reduce the likelihood of leaks at the joints to a minimum
A corrugated pipe is placed on the edge of the outlet, treated with a sealing compound. It should be turned towards the toilet with the side on which the inner membrane is located. The corrugation should block the exit from the toilet by about five to six centimeters; these dimensions are considered optimal.
It is very important that the corrugation is put on very evenly, this will ensure maximum reliability of the connection. To ensure a reliable fit of the corrugation at the connection point, it is necessary to carefully press the pipe section to the toilet outlet surface.
After this, you should wait until the sealant is completely dry, the timing is indicated in the instructions. During this period, you should not displace the corrugated connector; it is best to leave the structure alone to prevent possible leaks.
After this, the new toilet can be installed in its intended place. The procedure for connecting the corrugation to the entrance to the sewer is approximately the same. Part of the pipe must be treated with sealant and connected in the right place. It should be noted that the installation of a corrugated connector can be performed without the use of sealant.
There are special internal membranes along the edges of the pipe that allow you to fix its position. But in practice, the lack of a sealing compound often leads to leaks and displacement of the corrugation.
This is an example of the correct installation of a toilet corrugation: it is not too stretched, does not sag or bend, i.e. there are no obstacles to the free removal of waste
The main work of installing the corrugation at this stage can be considered completed, however, the reliability of the connection should be checked to prevent possible leaks. First, of course, you should wait for the sealant that was applied to the part of the pipe connected to the sewer to dry.
After this, water is supplied to the system to fill the tank, and the flush is performed. If for some reason you cannot connect the water, just pour a few liters of water into the toilet.
Now you need to observe the joints. If water seeps or leaks through them, it means that the seal is broken and the defects need to be eliminated. To do this, you do not need to redo all the work; it is enough to apply one or two layers of sealant to problem areas.
If there are no leaks, it is not necessary to reseal the connections from the outside. After repairing leaks, you need to wait for the composition to dry and check the connections again for leaks.
An important nuance when installing a cuff designed for a toilet is the degree of its stretch along the length. If the distance from the toilet to the sewer system is too large, over time the corrugation will begin to noticeably sag under the influence of the contents.
The smaller this distance and the sagging of the corrugation, the longer the connecting element will last. When under tension, the corrugation can easily break, so any additional stress on the connector should be avoided.
Detailed recommendations for installing a corrugated pipe on a toilet are presented in the following video:
Methods for connecting a toilet to a sewer system
Any user who independently installs plumbing equipment has to choose the appropriate connection of the toilet to the riser from a variety of options, while the determining factors during the work are the type of outlet, dimensional parameters and spatial location of the sewer inlet pipe.
Rice. 7 Connecting a toilet to a sewer with corrugated plastic - examples
Using corrugation
Connecting a toilet to a sewer with corrugated pipes is one of the most common options due to its low cost, the absence of problems with the alignment of the joined pipes, and the ability to stretch and bend. Most often, corrugations are used to connect a toilet with an oblique outlet to the sewer system, this is due to the fact that waste is less retained on inclined walls and blockages occur less frequently.
To connect the toilet to the sewer system with corrugated pipes, carry out the following operations:
- Insert the corrugation into the sewer outlet, covering the cuff with silicone grease, and then place the assembled toilet in the toilet in the intended place.
- Connect the corrugated pipe to the plumbing in such a way that there are no strong transverse distortions, then fill the tank with water and monitor the drainage. In case of leaks, adjust the position of the bowl and corrugation until there are no drops from below.
- Slightly lift the bowl and stick pieces of masking tape under the mounting holes, return it to its place, once again check the accuracy of the location, and use a construction pencil to mark the mounting points on the paint.
Rice. 8 Types of connecting shaped products
- They sit on the bowl and check its stability; if the tiles are uneven, draw a marker around the base around the perimeter and then look for a suitable waterproof lining material underneath. They can be strips of linoleum, a backing for laminate flooring, a rubber mat; plumbers often use sealing silicone during the installation process (they coat the bottom of an inverted bowl with it).
- The toilet bowl is removed, placed on the substrate and cut along its contour, the marked holes in the tile are first drilled with a feather drill, and after passing through the tile layer, they are deepened with a Pobedit concrete drill in perforation mode.
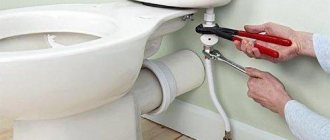
- Drive in the dowels, place the toilet on the workplace (if using a backing, place the device in the oval previously described with a marker) and screw it with hex bolts using a wrench, and put decorative caps over the caps.
- The second end of the corrugation is inserted into the outlet, a flexible water supply is connected to the tank, the functionality and presence of leaks are checked, and the position of the corrugated pipe is adjusted if necessary.
Rice. 9 Installing a toilet in the sewer using polymer elbows
Related article:
How to connect a kitchen faucet to a water supply using different types of pipes . If you don’t know how and how to connect a sink in the kitchen, be sure to read a separate article on our website. It explains all the details in great detail. tools, types of connections for different pipes and mixers.
Plastic knees
If there is no alignment of the joined horizontal holes, the work becomes more complicated and requires higher plumbing knowledge and skills in the use of rigid corner elements or rubber eccentrics.
Connecting a toilet to a sewer system made of plastic pipes using rigid polymer elbows is optimal in terms of channel permeability, preventing blockages and reducing hydraulic losses.
To connect a toilet to the sewer with your own hands, which has a horizontal outlet, using polyvinyl chloride elbows, proceed as follows:
- Purchase two standard corner elbows with outer diameters of 110 mm and sockets with an internal elastic ring.
- Connect the inlet parts to each other in the shape of the letter Z and insert the assembly into the outlet socket of the sewer pipe, move the bowl towards the assembled elbow and place its outlet into the socket with an internal rubber ring.
- Typically, standard bowls have an outlet with an outer diameter of 102 mm - 105 mm, and the elbow socket is designed to connect to a pipe with an outer diameter of 110 mm. To seal this gap to approximately 7 mm, an intermediate cuff is placed on the outlet. Its internal diameter should be about 100 mm with a wall thickness of at least 5 mm.
- The connecting unit is assembled using a soap solution or silicone grease to lubricate the rubber rings.
What tools and materials are required
Before connecting the toilet to the sewer, you need to select the necessary building materials and auxiliary tools. The type of fittings used to form connecting parts depends largely on the connection method, product model and desired location.
Basic tools needed for installation:
- silicone;
- corrugation for sewerage;
- hammer, marker, construction tape;
- hacksaw for metal or plastic elements;
- plastic bends and special corners;
- eccentric cuff;
- sealing collar;
- rubber adapters;
- parts required to dismantle the components of the previous connection to the riser and firmly fix the plumbing.
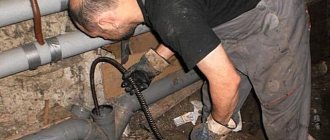
If previously cast iron pipes were used to connect to the sewer system, then most likely you will need professional equipment (a special hammer drill and a grinder).
However, in such a situation, it is advisable not to carry out the dismantling procedure yourself; it is advisable to contact specialists who have the necessary equipment.
Corrugation for toilet
The corrugated fan pipe for the toilet deserves special attention. In the recent past, in order to replace the corrugation on a toilet, it was necessary to seek the help of specialists. Modern materials have replaced the old cumbersome bends, and such a replacement can now be done independently. The corrugated toilet system is most often made of plastic. Such outlets are installed not only for the toilet, but also for sinks and bathtubs.
Corrugated pipe lasts a very long time. But experts strongly recommend using products from foreign manufacturers. The domestic assortment of this series, unfortunately, is not of the proper quality, and in this case it is one of the determining factors.
When installing a corrugated pipe, it must first be carefully inspected for damage. There shouldn't be such things. You also need to thoroughly clean the outlet edge of the system.
Put the corrugation on the side where there is a membrane, and you need to monitor the depth to which it covers the inlet hole. When working, you should pay attention to the fact that dressing is carried out as smoothly as possible, and there should be no distortions.
Watch the video
This type of assortment is very convenient to use; only the installation rules must be followed impeccably.
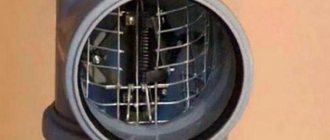
Design features and types of valves
These parts have fundamentally different devices. For example, options for a pressure network for a toilet, which are designed to prevent liquid from flowing back, have two pipes. One of them is admission, and the second is graduation.
The valve chamber is equipped with a ball of air, which, when liquid backflow occurs, forms a pressure on the membrane. That, in turn, completely covers the chamber, making it impossible for liquid to enter the pipe.
The material used for manufacturing is metal or plastic. Previously, the advantage of use belonged to metal options. They are still sold today. But, with the advent of plastic toilet systems, PVC valve devices are increasingly being installed.
ADVICE! In order for these devices to serve for a long period, they must be cleaned regularly. A removable cover is provided for this type of work. In addition, all devices have shut-off valves, making it possible to cut off the pipeline if necessary.
Step-by-step instruction
Installation consists of three stages:
- Preparation;
- installation;
- connection.
Let's take a closer look at these steps:
Preparation
The first step is to purchase the kit. Then you need to prepare the necessary tool:
- tape measure, square, ruler;
- construction (or laser) level;
- hammer drill with a set of drills;
- 13mm wrenches (it is best to use a socket);
- marker.
Only the most necessary tools are listed; additional equipment may be needed during work.
Installation and connection
When all the tools are prepared, the connection of the installation to the sewer begins, a drawing of which is attached to the user manual.
Procedure:
- frame assembly (if a block type is purchased, this step is skipped). According to the diagram, the supporting structure is assembled;
- marking. Mark the central axis of installation of the kit. Then mark the installation points of the dowels. It is necessary to ensure that the installation is positioned so that there is at least 13.5 cm from the edges to the wall;
- drill holes for dowels, attach the frame to the wall (and floor, if necessary). It is necessary to ensure the height of the toilet outlet at a height of 23-25 cm;
- install a drain tank. They bring water to it. The button must be installed so that it is 1 m from the floor;
- install mounting pins for the toilet, hang the bowl, connect it to the tank;
- connect the bowl to the sewer. use either corrugation or a standard adapter;
- check the functionality of the kit. Supply water and turn on all flush modes one by one. If there are no leaks and all drainage methods work properly, the installation is considered complete.
After completing all the work, they begin decorative finishing of the room.
Installation and replacement of valve parts
Such parts are installed during installation or disassembly of the network in the joining area of the pipe assortment, or by inserting into the network. It is important to take into account that the volume of the valve must correspond to the dimensions of the pipeline. If this is not possible, then you need to install an adapter.
A few tips for this installation:
- When choosing a place for installation, you need to remember that subsequently it should always be accessible.
- Each model has an arrow indicating the direction of fluid movement; this must not be violated during operation.
- The arrow needs to be directed towards the drain, then it will function correctly.
- Before work, it is necessary to test the device for the level of tightness.
- If the tightness is small, then high vibration and noise occurs during operation. To fix this problem, you will have to remove the cover and replace the shutter. You can not completely change the entire shutter, but install a different sealed edging. It can be dismantled very easily.
Installation of a vent system for a toilet
The sliding faucet pipe for toilets is easy to install. It is produced from a sewer assortment, which has an appropriate volume.
According to construction requirements, a sliding pipe for a toilet should only be installed in warm rooms. If there is not enough heat there, then this network freezes. In this case, the fumes from the sliding pipe dissipate poorly, and in a short time such a pipe will be covered with a green, viscous coating.
If the sliding pipe is clogged and repairs are not made immediately, the liquid may come back. Therefore, when installing a sliding system, a check valve is immediately installed, which prevents the described nuisance.
Having examined the question of why such a system is needed, we need to consider the main stages of its installation.