First of all, we don’t want to say anything bad about the connections for Grohe faucets - about those rigid or flexible tubes and fittings that are sold complete with world-famous faucets. They are as reliable, wear-resistant, aesthetically pleasing and worthy of all praise as any other products sold under this brand.
This is their advantage.
The downside is that German engineers and designers completely misunderstand that if a Russian person buys something, then he definitely needs to unscrew something and screw it in a new way, saw off or sharpen it, lengthen it or build it up, recut it or shorten it. And the branded liner for Grohe faucets is the clearest example of this.
Best answers
Gnet El:
Triangular file.
FITA:
Try screwing a thin plastic wall spike into it, with a self-tapping screw or self-tapping screw in it. Then unscrew this structure. but it is better to change the mixer.
Joanna Zalevskaya:
Pick up a screwdriver or chisel and firmly drive it into the broken piece and carefully turn it out.
Airat Sattarov:
If it’s broken due to antiquity, you’ll hardly be able to get it again - it’s stuck tightly.
Grandfather Au:
You can try to unscrew the faucet with a 3-4-sided file, it will not help, then take a hacksaw blade, grind its end halfway and cut the threads to teeth in 3 places - then remove the segments with a screwdriver
Alex Mishin:
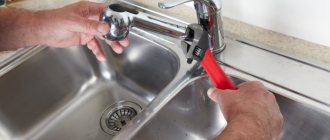
Do you mean the flexible hose that connects the faucet to the water supply? And the fitting screwed into the body of the valve broke off? There is a special tool for this - the shank is like a tap, the front end is a left-hand conical thread. But they would hardly have been able to unscrew the stuck fragment of thread.
Looks like the mixer will have to be replaced...
Installing a new faucet
As we said earlier, faucets are installed directly to the sink or countertop.
Faucet option with studs
A good mixer always includes nuts, special brackets with recesses for studs, and rubber gaskets of the same shape.
The second version of the mixer is with a clamping nut
This type of faucet is best suited for stainless steel construction. The main thing is that the surface of the sink is not corrugated, otherwise it will be difficult to press the nut tightly.
Nut fastening: step-by-step instructions
Step 1. First of all, we need to fix the rubber gasket at the end of the mixer, where there is a corresponding recess for it.
We fix the seal
Step 2. Now you need to insert the thread of the mixer into the prepared hole in the sink itself.
It is important to ensure that the polymer gasket does not fall out
Step 3. Now you need to fix another gasket from below. It is usually included as standard.
We fix the seal at the bottom
Step 4. Next, tighten the nut. There is a wide part at its end, thanks to which it is pressed as tightly as possible.
The nut must be securely fastened
Step 5: Next we will need to use an adjustable wrench to tighten the nut. It should be secured so tightly that the mixer cannot be moved. At this stage, it is important to calculate the correct direction of the tap - now you can still adjust the position of the mixer.
Securely fasten the nut
Step 6. Now you need to install flexible connections.
First of all, fix the eyeliner with a shortened fitting
Here you no longer need to use any additional seals, because the fitting already has rubber gaskets, thanks to which the fastening will be airtight. In this case, it is necessary to tighten it tightly, but do not overdo it, otherwise the gasket will become unusable.
Using the same principle, we tighten the eyeliner with a long fitting.
Now you need to install the sink in place.
Stud fastening: step-by-step instructions
The main feature of this method is that all flexible hoses are fixed before the tap is installed, otherwise they will not be able to be properly secured.
Step 1. First, we need to unscrew the nuts, after which they should be fixed at the bottom of the mixer. You can quickly tighten them using a screwdriver - in this case, it is not recommended to tighten the studs too tightly.
This is what the mixer should look like after installing the studs
Step 2. Now you need to insert flexible hoses into the prepared hole so that the fittings are on top. As in the previous case, the short and long fittings should be secured. Next it’s time to start installing the mixer.
Installing the structure in the recess
Step 3. You need to attach a polymer gasket to the studs, and then a metal plate, which is included in the package. Now the nuts are fixed to the studs and screwed.
Now use a wrench to secure the nuts as tightly as possible.
This is what the bottom of the system should look like after installation is complete.
It is important to pay attention that there are no gaps left near the mixer. This usually happens if the hole is too wide.
Now all that remains is to return the sink to its place.
Video - Installing a faucet on a sink
Answers from experts
Michael:
if you reach it, you need to use pliers to grab the rim around the hose under the mixer and unscrew it and buy one in the store, just not a cheap one, screw it back with your hands and pull it with pliers, but not very tightly (sometimes it’s enough to tighten it by hand and then screw it to the pipe with a wrench. don't pull too hard on the pipe, otherwise you will overtighten the nut and it will burst, perhaps not right away. But first unscrew it from the pipe, if the woman does not have an adjustable wrench, then you can use large pliers to grab the nut. PS, be sure to unscrew the nut, perhaps if the the water will flow slowly, make sure that the valve that shuts off the water doesn’t turn, and look at the condition of the pipes and valves, if they are rusty and don’t spin, then it’s better that Maria correctly said, don’t climb in yourself
Vitalban1:
Buy a new smestak - the higher its price, the quieter it works. All plumbing fixtures are designed to last for a maximum of 5 years, buy a new one rather than have to deal with this faucet in six months. the cartridge or axle boxes will be covered.
Maria:
Call a plumber, otherwise you will flood all your neighbors. But they unscrew it with a special wrench, and the diameter of the pipes is different, if you don’t go anywhere you don’t know, it will only cost more.
BOSS:
Key No. 11.GO!!! What's included in the mixer? Buy the same one you unscrewed...
Valery Golda:
turn off the water, choose a nag that is the right size, unscrew both hoses, buy the same ones and put them in place
Ermak Group:
Very simple. Unscrew the hoses only from the mixer side, and do not touch the pipe side.
kon mal:
It won’t work if thin pipes fit into the mixer. They don't spin.
gray-haired:
Experiments begin in the morning.. but the fact that there are basics of plumbing doesn’t matter!
Verethragna Mitra:
First you need to remove the faucet from the sink, otherwise it will be inconvenient. Well, on the merits of the question - there are hex fittings at the ends of the flexible hoses, use them to unscrew them
Arkady:
I'm sitting and laughing. Yeah, for the hexagons. Only two problems. It is difficult to get to them without removing the faucet from the sink. And second, how will you spin them? The nut, slightly loosened, begins to turn. Easy to unscrew. But the hexagons are tightly connected to the hose. You'll have to twist the hose. Most likely you will ruin it.
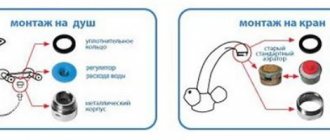
Flexible hose selection
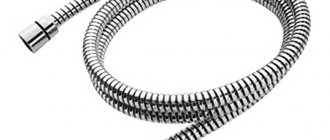
Flexible shower hoses are manufactured according to a single standard - at the ends of a long flexible tube there are two union nuts of different shapes. One of them, which has an elongated body, is designed to be connected to a watering can hose. The second nut has a small width and a ribbed surface. It is used to connect the hose to the mixer.
Most models are equipped with a protective corrugated braid made of metal. Hidden inside the braid is a plastic or rubber hose, the quality of which largely determines the service life of the flexible shower hose. A hose made of plastic does not withstand pressure changes well, so it quickly fails. To make high-quality shower hoses, rubber or nylon tubes are used.
The durability of the tap largely depends on the quality of the braid, so when choosing, you should take into account the material of its manufacture. On sale you can find hoses with three types of braids:
- Metal, made in the form of corrugated stainless steel. This braid provides excellent protection for the inner tube from mechanical stress. It can be chrome, bronze or gold plated. The popularity of metal braid is due to its affordable price.
- Hoses made in the form of a combination of a rubber tube and a plastic braid. There are models made entirely of plastic. Sometimes a plastic braid reinforced with steel wire is used, which improves the flexibility and strength of the product. With proper use they last quite a long time.
- Metal coating with silicone protection for increased flexibility. Such hoses have an attractive appearance, are easy to clean from accumulated deposits, and last much longer than conventional ones, but they are also more expensive.
When purchasing a hose, you should carefully inspect the product, paying attention to the quality of the corrugation, the color of the coating, and the thread of the nuts. A high-quality flexible hose should not have thickenings or burrs. The packaging must indicate the length of the product, material of manufacture and thread diameter, as well as manufacturer’s data.
Answers from experts
Arkady Trubetskoy:
You take the key and unscrew it.
Cat's smile:
... It’s stuck - you have no other choice but to rip these off and throw them in the trash - by the protruding ends, with platypuses - you’ll turn them out. - Then you buy others with a LONG shank - for these particular options - you don’t need to tighten them much, the gasket is reliable - and unscrew it - the long shank allows...... Py. Sy. you can get creative and throw nylon clamps inside, tighten them and unscrew them - but the possibility is that this liner is unusable - 90%
Alexander Doronin:
Cut off the braided hose, leaving what remains to be tightened with pliers. choose a tubular wrench or a socket with thin walls
Hero of the day:
With a key.
Dmitry:
The faucet is not Oras? If Oras, then the thread on the eyeliner is left-handed: to unscrew it, you need to twist it clockwise. If you can’t do it by hand, then there is an internal hexagon in the eyeliner. Take out the cartridge and unscrew it using a Allen key.
Just a king:
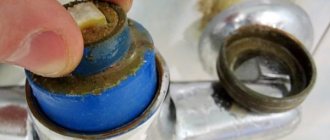
Unfortunately, what we see in the photo is hopelessly thrown into the trash. Nothing can be fixed there anymore. Need a new faucet. The eyeliner can be left the same.
Cat Oddball:
Try heating it with boiling water from a kettle and immediately unscrew it until the internal thread warms up.
Ravshan Buzoev:
WD forty overnight or kerosene, then wrap it in a rag and twist it
Podzhopnikov (c):
What, the hot water was turned off?)
Volkov Vladimir:
take a rag
Alexander:
if it’s not shiny and doesn’t get damaged, you can tap the nut a little...
Cobweb:
Ask your neighbor for the key.
Alexey Zolotov:
we wrap two sticks on one side with a rope, we clamp them like with tongs - you can unscrew them, we clamp them according to the principle of the letter A - how the crossbar is clamped with its legs
Natalya Klemyatich:
Cut a groove in the stick to fit it and unscrew it
How to replace eyeliner
When replacement is necessary
It is necessary to change the hose if:
- The flexible line broke. Breakage of the braid or rupture of the internal hose will lead to the formation of a leak and, as a result, flooding of the room. The causes of leakage may be high pressure in the system or mechanical impact;
Loss of tightness of the connecting hose
- A flexible hose leak was detected at the junction with the mixer or water pipe. The causes of leakage may be natural wear of the gasket or a crack in the fitting (nut).
Leak at the hose connection
Flexible line replacement process
To install a flexible water supply to connect a mixer, you must:
- turn off the water supply. This can be done using a tap installed in the apartment;
- open the mixer taps to drain the remaining liquid;
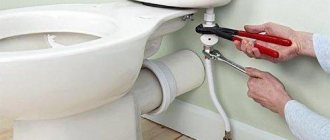
- Using an adjustable wrench or a wrench corresponding to the diameter of the union nut, unscrew the hose from the water pipe. If the connection point is rusty and the hose does not unscrew, then you should not make any effort to remove the liner. In this case, a solvent or WD 40 liquid is applied to the rust, which removes plaque;
Disconnecting a flexible hose from a water pipe
- remove the mixer. To do this, it is necessary to loosen the nuts securing the device;
Places for fixing the mixer to the plumbing equipment
Installing flexible hoses on the mixer
- Attach the supply hoses to the outlet of the water pipe.
- When you turn on the water for the first time, it is recommended to check the flexible hose and connection points for leaks. The average inspection time is 20 – 30 minutes.
The process of replacing connecting hoses is presented in the video.
Replacing flexible hoses yourself is not a problem. The main thing is to choose the right hose that meets all the parameters.
Source
Conditions and rules for installing flexible hoses.
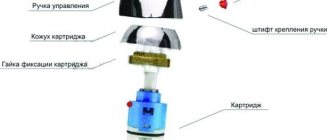
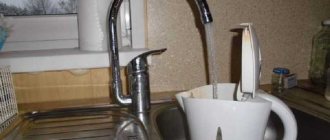
So, we came to the eyeliner that we see everywhere today. It is universal, that is, it is used for both cold and hot water supply. It consists of a rubber hose inside and a metal braid on the outside, produced in various lengths - from 15 centimeters to 2 meters. It ends with union nuts or fittings with external threads of various diameters. But...1.
Make no mistake!
Assurances about performance for 5 or even 10 years are a marketing ploy by manufacturers, and the indicated figure on the tag is just a figment of wild imagination. There is also a statement about insurance of the eyeliner! Honestly? — I have not heard of cases of compensation for losses!
We suggest you familiarize yourself with Proper ventilation in a private house with your own hands
2. The material used in the production of the liners is absolutely identical, respectively, the service life in cold and hot water supply is sharply different.3. The service life depends solely on the characteristics of the line, that is, as indicated above, on the temperature, plus the pressure in the system. We understand, right? There is a system with pressure not exceeding 2.5 - 3 points, and there is 7 and higher.4.
The thickness of the hose wall is no more than 1 millimeter.5. In addition to the above, it is very important to follow the installation rules: a) tight installation is not permissible; b) when tightening the nut, twisting the hose after it is not permissible; c) if it is necessary to make a loop, the ring should be as large as possible in diameter.
How to repair a hose?
Shower hose repair
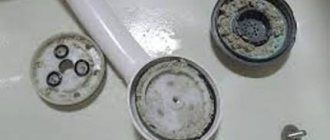
Before starting repairs or replacing the hose, you should check the position of the water on the mixer - the handle should shut off the water supply to the hose. The mixer has a union nut, it is located at the base of the hose - it should be unscrewed with a wrench. After this, the hose tube is pulled out of the mixer. Using a screwdriver, you need to pry off the plastic nipple (sometimes it can be made of brass). Behind the nipple, a tube made of rubber or flexible plastic is visible in the corrugation.
Having pulled this tube out of the corrugation, you need to check where the cracks or fractures are. If they are on the edge, then you need to remove the nipple, cut off the damaged piece of tube and reattach the nipple. In this case, the tube is attached to the nipple by pinching.
Note! The nipple must be removed and installed carefully so as not to damage it.
This repair has a drawback - pinching the tube over time leads to it cracking near the nipple. You can tie it with wire around the brass nipple, but then the tube material will dry out there. Ultimately, sooner or later, you will have to install a new hose, so it doesn't hurt to stock up on them in advance.
When the hose is assembled, it is attached to the mixer in the reverse order - it is brought to it and screwed with a nut. The principle of attaching a shower head to a hose is similar to the method of repairing a pipe. After the repair, you need to run water on the shower hose and check if there are any leaks anywhere.
We also advise you to read the article “Replacing the gasket in the mixer”.