How to make a motorcycle stand with your own hands
Like any other vehicle, a motorcycle requires periodic maintenance. However, if a car can be driven into a pit and repairs can be carried out without problems, then such a trick will not work with a two-wheeled “horse”. In this case, a special motorcycle stand is required, which is a rigid welded frame structure capable of lifting the “bike” and fixing it at the desired height.
Such “stands” can be purchased without any problems at any specialized store, but they will cost at least 5,000 rubles. Some motorcyclists prefer to use improvised stands for these purposes, the role of which is most often played by hemp. However, this is not entirely convenient. Therefore, it is much easier to make a stand yourself.
What will it take?
First of all, it is necessary to prepare an approximate drawing of the future structure. You can take a photo of any finished stand as its basis. In our case, it will be a kind of stool with four lifting legs, which will be raised to the desired height using any old jack.
The main thing is to take the necessary measurements. First, let's measure the ride height. For cross-country models it is approximately 32 mm. Accordingly, the minimum height of the stand for storing a motorcycle will be about 26 mm. In order to carry out repair work, the unit must be raised by approximately 40-45 cm. Accordingly, for this you will need to purchase 4 pipes 30 x 30 mm about 20 cm long and the same number of pipes of a slightly smaller diameter (25 x 25 mm) about 25 cm long One pipe should fit into the glass (pipe of a larger diameter) not too tightly, but it is better not to allow the elements to dangle too much. The optimal space between the pipes is considered to be 1 mm, so if you purchase parts of a different size, you should take this into account.
In order for the structure to be a full-fledged lift, when making a stand for a motorcycle with your own hands, you additionally need to prepare:
- a piece of corrugated metal, about 4 mm thick;
- corners 35 mm;
- welding machine.
Healthy! Of course, expensive equipment is difficult to obtain, so if desired, you can fasten the entire structure with ordinary bolts.
After this you can start working.
Making a stand
First you need to prepare the foundation of the future structure. To do this, you need to install the corners so that they form a rectangle and weld them. After that:
We install 4 30 mm tubes in the corners and weld them to the base
It is important to ensure that all elements are installed parallel to each other. In the resulting glasses we install smaller tubes (25 mm)
They can be pre-lubricated to make them rise and fall easier. We measure the height of all the “legs of the stool”. If they differ, then the finished structure will constantly stop. Preparing the upper platform. To do this, we adjust the corrugated sheet of metal to the required size and weld it to the ends of the pipes installed in the glasses. To add strength, we weld square pipes, angles or channels onto the longitudinal parts of the platform. We prime and paint the finished structure.
Additionally, you can weld on guide corners, which will be used as handles for carrying the structure.
After this, all that remains is to install the jack inside the motocross stand and enjoy the homemade unit. The cost of such a design will be no more than 800 rubles, and the functionality is no different from the finished product.
Alternative options
If you have an unnecessary jack at hand, then you don’t have to worry about making a “stool”. To do this, we weld two channels to the jack on both sides of the lift and two more to them. After this, all that remains is to fix the guides and enjoy the finished design.
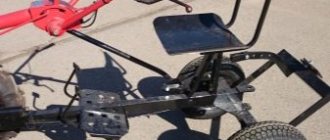
If the vehicle only needs to be transported or stored in a garage, then rolls can be made. These designs are footrests on wheels. They are installed either on the rear or front wheels. To make such a stand, you will also need a welding machine. You will also need to take measurements as shown in the picture.
The length of the product must correspond to the dimensions of the two-wheeled “horse”, so everything depends on its specific type and model.
Thus, you can save quite a large amount of money and repair your motorcycle without any problems.
Do-it-yourself collapsible partial loading trolley
Good afternoon In this article I will tell you how I made a COLLAPSIBLE partial loading roll. This is not my first tackle, the fact is that I very successfully sold the first tackle complete with wheels and belts for 25 thousand rubles, and it left St. Petersburg all the way to the Republic of Mari El.
the sold truck left my garage
My idea was that I needed to make the same design of the tackle, reducing its cost if possible, and also try to make it collapsible. I wanted to make it collapsible so that, firstly, it would be more convenient to store it in the garage, and secondly, to put it on Avito and see the demand for such a design. Thirdly, I wanted to understand how much more difficult it is to manufacture than a regular tackle, which is not dismountable.
First of all, because I wanted to reduce its cost, but at the same time make it from those components that I could buy, and not those that were in the garage or from a friend, I went to an auto parts store to buy axles and hubs with bearings from a VAZ 2108, but Having been overwhelmed by the cost (5,500 for a set of 2 hub axles, the hubs themselves and their bearings), and yet I still need to buy hardware, bolts, a coupling head and consumables, I realized that the cost of manufacturing a rolling tackle would exceed well over 10,000 rubles.
In this regard, I decided to buy a used beam assembly, since there are plenty of offers in St. Petersburg on Avito, and everywhere for about the same price of 1.5 thousand rubles. At the same time, I will sell the remains from production as scrap metal, partially recouping the cost of the beam itself.
bought a used beam
I cut off the part that I need, the rest went to scrap metal
Next, hardware was purchased. Profile 50x50x2 15 m.p. at a price of 300 r/m Reinforcement 14 mm 6 m.p. at a price of 125 r/m Pipe 40x20x1.5 3 m.p. at a price of 150 r/m
I brought six-meter long whips in a trailer without cutting them, fortunately the trailer allows this)))
Next, the rectangle of the frame was welded and the pipes for the drawbar were cut. I took the size from my previous hitch, but here I slightly reduced the length of the drawbar. If I cook more, I’ll make the width smaller.
The width of the rectangle along the outer edges of the pipe is 195 cm, and the length of the triangle is 55 cm. The height of the triangle (drawbar) to the junction with the rectangular frame is 180 cm
The next step I cut from 4 mm. iron scarves, with the help of which this structure will become collapsible. To connect the structure, bolts from the Zhiguli suspension M12x1.25x75 were used.
Frame already with gussets
I grabbed the scarves at the points and assembled the whole structure
attaching the drawbar to the frame
Connection of side braces and drawbar
Naturally, all the pipes are drilled on a machine, and after that - the fillers.
Zavtulina professional pipe, so that it does not deform during assembly
Next came the stage of assembling the wheels. I attached it using the same technology as on my last tackle.
Cut off part from the rear beam. that's all we need
I removed the hub assembly from the same beam. We will need them too
The cut-off part is welded through a piece of corrugated pipe to a rectangular frame. Naturally, all this was previously leveled so that there would be normal alignment of the wheels. Well, the collapse too.
Then it’s all scalded, 4 plates of 4 mm iron are cut out, reinforced with scarves and scalded again. In my opinion, this is the most successful solution in terms of reliability. After all, the heavy Chrysler Voyager withstood the previous tackle and didn’t even bend!
gussets are already welded
this is what it looks like
Roll on wheels
The disassembled tackle will look like this
Close-up of drawbar design
The drains are welded from professional pipe 40x20 and connected with fittings
The tackle is assembled and hooked. Now there will be a test drive)
Got caught on the tow bar. In fact, this photo does not carry any semantic meaning)
We loaded up the Mazda 3 and drove it around the garages without even tying it up. All OK
.
Finally, before giving an estimate for materials, I would like to talk about mistakes or miscalculations: 1) The 40x20 corrugated pipe on the ramps for the entry must be placed on its edge; after one exit or entry they bent a little.
2) It is not very convenient to assemble and disassemble this structure alone. 3) After tightening the bolts, the plates are compressed; therefore, after unscrewing the bolts, the pipes remain clamped between the plates, which complicates disassembly. 4) The roll turned out to be the same in width, but it had to be made narrower, about 10 cm. Firstly, there are very few cars so wide that you can carry them constantly. My Captur fits on this hitch with plenty of room, the same Mazda also left a lot of space around the edges. The Voyager, which had to be transported on the previous hitch, fit right in, but such cars have to be transported very, very rarely. And secondly, the narrower it is (within reason), the less load on the frame will be.
5) This frame design, I mean a rectangle without supports for wheels, is very good in terms of securely fastening the car to the frame. That is, when loading the car, its wheels fall into the niches and remain there; if the wheel is large, then it can be further lowered so that the car sits more tightly in the frame. But this is also a huge disadvantage when lowering the car from the roll, because the car gets stuck with its wheels in the niches of the frame, especially if the wheels are less than 15 radius. Now the estimate for materials: 1) Rear beam - 1500 rubles 2) Profiled pipe 50x50 - 15 l.m. 4,500 rubles 3) Profiled pipe 40x20 - 3 l.m. 450 RUR 4) Reinforcement D14 - 6 running meters. 750 rubles 5) Coupling head for a square 50x50 - 1,600 rubles 6) Bolts M10x1.25x75 for fastening the coupling head 2 pcs - 80 rubles 7) Nuts M10x1.25 2 pcs - 30 rubles Bolts for assembling the frame M12x1.25x75 - 10 pcs - 430 RUR 9) M12 nuts - 10 pcs. 200 RUR 10) Bolts for attaching the hub axles (trunnion) to the frame 8 pcs. 200 rub. 11) An iron sheet 1500x550x4 mm was bought for 2,500 rubles, but 1/3 was spent, a total of 830 rubles 12) Cutting all this took 3 cutting circles for a large grinder and about 10 circles for a small one - 700 rubles 13) Steel pipe VGP 15x2 ,8mm for tightening the frame, at a price of 140 rubles/m. Spent 0.5 m. total 70 rubles. TOTAL expenses: 11,340.
These are just wasted materials without painting. I haven't painted the hitch yet. The time spent took 14 hours (I worked for 2 days entirely). I probably won’t make a collapsible hitch again if I ever have to. It’s too steamy, cutting and drilling everything, etc., it’s much easier and faster to just weld the whole thing. And personally, I still have a place to store it, albeit a little cramped. Now all that remains is to paint. I posted this design on Avito for 20 rubles, sooner or later, I think I’ll sell it for that money. Until I sell it, I’ll use it myself) Maybe I’ll try the rental option)
Alternative options
Flaring brake pipes: types, tools and DIY
If you have an unnecessary jack at hand, then you don’t have to worry about making a “stool”. To do this, we weld two channels to the jack on both sides of the lift and two more to them. After this, all that remains is to fix the guides and enjoy the finished design.
If the vehicle only needs to be transported or stored in a garage, then rolls can be made. These designs are footrests on wheels. They are installed either on the rear or front wheels. To make such a stand, you will also need a welding machine. You will also need to take measurements as shown in the picture.
The length of the product must correspond to the dimensions of the two-wheeled “horse”, so everything depends on its specific type and model.
Thus, you can save quite a large amount of money and repair your motorcycle without any problems.
Do-it-yourself motorcycle stand (stand)
Floors on the ground: types of structures, features and installation technology in a private house with your own hands
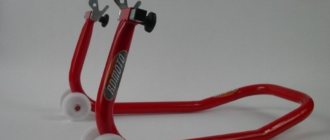
The motorcycle undercarriage is a rigid structure that simultaneously lifts and secures it. It is needed in cases of chain lubrication, engine repair, and brake system maintenance. There are front and rear scooters for motorcycles. Typically, these structures are equipped with wheels for convenience. By adjusting the frame to the bike, you can easily lift even the heaviest unit using a lever.
Before making a motorcycle tackle, you need to take a responsible approach to the drawings and calculations of all the parameters of the future device. For the front wheel, a version with a universal mount is usually made so that it can be adjusted to any type of tire. Often adapters are also needed, which are selected according to the diameter of the studs of the motorcycle model. A DIY motorcycle stand is useful for servicing your bike before a trip or for storing it in the garage in the winter. This is done to ensure that the suspension is not affected by the weight of the vehicle.
A funny drawing from one of the forums
If your motorcycle has sliders, you can take this into account. A stand for a motorcycle, the drawings of which may contain special clamps, will be able to securely hold the motorcycle, and the sliders will not damage the plastic and paint. Interestingly, a branded lift from Honda or BMW can cost several hundred euros. At the same time, a stand for a cross-country motorcycle for replacing tires or repairing a chain, made from improvised materials, can cost free, if you do not take into account consumables.
The rear lift uses two ways to secure the motorcycle - through the rear wheel axle or through bushings in the swingarm
Therefore, it is important to ensure that the rolling stock has the appropriate pitch and thread diameter. It is better to choose a wide structure and long powerful stilettos
This is due to the fact that this way you will have more space to work with, and if you replace the motorcycle with another, you can easily use the existing release mechanism.
The simplest scheme is a bracket. It has a curved shape and is very reliable. By sliding the device under the bike in one motion, all that remains is to simply squeeze out the weight of the vehicle. More complex stands may have microlifts or even large platforms, as for motocross motorcycles.
If you do not have the opportunity to do all the work yourself, order products from familiar welders or turners. When accepting work, check the wearability of the product, the correctness of the geometry and the quality of the welds. A mistake made can be costly, since a heavy motorcycle in the most tragic scenario can fall on the person who is servicing it.
Features of creating a homemade lift
Currently, the motorcycle lift market is filled with many different offers. However, due to the high price, not every motorcyclist can afford such a purchase. In addition, choosing the right option for your “beast” is not as easy as it seems.
And although some brands produce universal versions, their fixing elements do not fit all pendulums. Because of these features, many motorcyclists try to make a tackle with their own hands. A high-quality model is capable of lifting a motorcycle and locking it in a specific position. In this case, any costs will be reduced to a minimum.
If you have at least the basic skills and know how to handle some tools, this will allow you to complete the work ahead in the shortest possible time. In this case, you can create equipment that fits the size of your iron horse .
To successfully do everything yourself, be patient. It is no secret that such an action requires a lot of patience and time, so if you are not ready to sacrifice several hours to assemble all the parts, then simply do not start the work.
Step by step guide
- You can use a variety of methods to lift the rear wheel of a motorcycle. One lifts it with a bushing placed in the rear wheel, allowing the chain to be changed or lubricated quickly and efficiently. The following method is suitable for cases where the bushings have threads for fastening to the pendulum. Here it is especially convenient to unscrew the wheel to change tires.
- When making the frame, it is necessary to use welding equipment. If you don't have one or don't know how to handle it, ask an experienced welder for help. At this stage, you should weld the bushings and then calculate the angles. Take into account such a parameter as the alignment of the roll. If it is not correct enough, you will have to start the action from scratch.
- If you have successfully built a homemade lift by following the established instructions and using only the appropriate materials and tools, it will likely have increased reliability, safety, and performance.
Read also: Car leasing is in simple words
Every motorcycle owner wants to look after his “friend” in a special way, well and carefully. For this purpose, he is ready to take any measures to ensure that the iron horse works without failures.
Making a good motorcycle tackle at home is much easier than you might imagine. This solution will become an indispensable assistant in vehicle maintenance and repair, increasing driver safety while driving.
The motorcycle undercarriage is a rigid structure that simultaneously lifts and secures it. It is needed in cases of chain lubrication, engine repair, and brake system maintenance. There are front and rear scooters for motorcycles. Typically, these structures are equipped with wheels for convenience. By adjusting the frame to the bike, you can easily lift even the heaviest unit using a lever.
Before making a motorcycle tackle, you need to take a responsible approach to the drawings and calculations of all the parameters of the future device. For the front wheel, a version with a universal mount is usually made so that it can be adjusted to any type of tire. Often adapters are also needed, which are selected according to the diameter of the studs of the motorcycle model. A DIY motorcycle stand is useful for servicing your bike before a trip or for storing it in the garage in the winter. This is done to ensure that the suspension is not affected by the weight of the vehicle.
A funny drawing from one of the forums