Home |Technique and materials |Equipment for the production of blocks at home
Date: October 16, 2018
Comments: 0
The desire to reduce the cost of construction involves the use of a variety of tools and materials, many of which are advisable to make yourself. The use of cinder blocks is one such method. Although this building material is one of the “old-timers” of the construction market, the demand for such products in individual construction is comparable to the popularity of foam blocks and gas blocks, which appeared relatively recently. This is due to the fact that equipment for the production of cinder blocks at home does not require significant financial costs. The quality of building materials made at home using a machine is not inferior to factory products.
Cinder block is a very popular material from which buildings of any type are erected.
Methods for making concrete blocks with your own hands - mortar proportions and work procedure
Do you want to build a shed at your dacha or a fence, or maybe the dacha itself?!
Then concrete blocks will come to your aid. Their name speaks for itself. FBS - foundation blocks of walls. We can say that this is one of the most common types of materials used in the construction of foundations. Depending on your goals, you will choose products of different densities, weights, and heights. For example, blocks made of lightweight concrete are very mobile, since their weight is much lighter than other types. They usually consist of porous concrete or foam concrete. Lightweight ones are suitable for building both internal and external walls.
Characteristics and properties
Blocks made of ordinary concrete are heavy, so it is used less in construction. Their prices are also correspondingly lower. Load-bearing capacity refers to whether they can withstand a certain load. In this quality, heavy blocks are superior to foam concrete. But you can also find materials made from lightweight concrete that are perfect even for load-bearing walls.
Thermal insulation is also an important property. Foam concrete perfectly increases the degree of thermal insulation, as well as sound insulation. Such blocks are made specifically for internal and adjacent walls. An important factor is frost resistance and endurance. Luckily, most concrete blocks are weatherproof. Frost-resistant ones are used for the foundation and lie below.
Recommendations for purchasing
When purchasing, you should calculate the amount of building material. The price for them will vary depending on the properties. Basically, it ranges from 50 rubles and increases to 200. To calculate the amount you need, you need to divide the wall area by the size of a specific block.
The standard material has a size of 450*225 mm. and thickness from 80*240 mm. When delivering, unload them near the construction site to save time and effort. Since they are fragile and sharply pricked, you should be very careful. Of course, we should not forget about waterproofing the walls and floor of the foundation. When working, various water repellents are added to the cement solution. For external protection of walls, coating or tight waterproofing is used.
Making concrete blocks
In situations where there is a high probability of groundwater flooding, reinforced concrete basements are inferior to their monolithic brothers. If you want to reduce construction costs a little, you can make your own concrete blocks. The first step is to install the formwork. It is better to make them non-volume.
- Forms for pouring concrete can be made from available materials - plywood boards, chipboard.
- The form with which we will actually work should not have a bottom. It must be placed under a canopy on a smooth floor covered with film or a rag.
- It is better to pour in cool weather, since the time for evaporation of water from the solution increases, which will prevent cracks from appearing on the finished products.
- All formwork parts should be lubricated with oil so that later it is not difficult to remove the blocks.
- Pour sand, fine gravel, lime and cement into a special container. The ratio of mortar to cement is 1:4. Mix all this well and add water so that the cement is not too thick and too thin.
- Fill the molds halfway, then lay strong wire.
- We fill the forms to the top and smooth everything with a trowel so that our block is uniform.
- The blocks do not harden for long - after 2-5 days they can be removed, but this does not mean that they are ready for use.
- To make it easier to remove the finished material, you need to disassemble the formwork itself.
Compared to factory products, savings in self-production are up to 70%.
Briefly about making expanded clay concrete blocks with your own hands
Expanded clay concrete has good performance characteristics, due to which it is widely used in the construction industry. To build a house from it, it is not necessary to order ready-made material. You will save a lot if you make expanded clay concrete blocks with your own hands. To do this, you do not need to purchase expensive equipment or raw materials.
Required materials and tools
When constructing a building from a large number of expanded clay concrete blocks (for example, you decide to build your own house), you will need to stock up on special equipment:
- a concrete mixer (it is better to take a container of at least 130 liters), depending on the company, its cost can be 9.5-12 thousand rubles;
- a manual vibration compacting machine: it can be purchased at a hardware store for 7.5-10 thousand rubles. or order directly from the manufacturer; molds for filling in such structures are already provided, so there is no need to buy or make them separately; If desired, you can make it yourself from a metal tabletop and an old working engine.
As practice shows, if you have special equipment and a sufficient supply of molds, in a full working day, when working together, it is quite possible to get about 160 blocks. A mechanical manufacturing machine allows you to produce 1-4 blocks in one cycle (1-2 minutes). If you take a few more assistants who will bring, pour in raw materials and drag finished products, then the number of finished products will increase by 2 times.
A small number of blocks can be made without special equipment. In this case, you only need to select a container of suitable size for mixing the solution and make molds for pouring.
Making molds
To make the blocks yourself, you can use both general formwork and several separate forms. The matrices are assembled from two side parts in the shape of the letter “L” and the tray (bottom) of the product. They can be made from a regular 20mm board, metal sheet or plastic. The standard block has dimensions 39x19x19.
It is better to fasten wooden forms with metal corners and sheathe the inside with thin-walled metal. Otherwise, they will absorb moisture from the solution, which may affect the strength of future products. If metal is not at hand, you can coat the side walls and bottom of the container with machine oil. It will also protect the matrix from moisture.
Voids in the blocks are provided not only to save mortar, but also to create air spaces in the walls to increase thermal conductivity. To create hollow products, three round or rectangular cylinders must be installed inside the molds. To prevent them from moving, they are connected to each other and then screwed with self-tapping screws to the side parts of the mold.
To obtain voids when making a small number of blocks, you can even use ordinary plastic bottles. In such cases, it is better to fill them with water to make them heavier. They must be inserted into the mold after it is 2/3 filled with the solution.
So, our forms are ready. All that remains is to prepare the expanded clay concrete.
Preparation of the solution
It is not difficult to mix expanded clay concrete with your own hands. To obtain a high-quality solution, cement, sand and expanded clay are mixed in a ratio of 1:3:8. Water is added at the rate of 200 liters per 1 m3, although its amount also depends on the initial moisture content of the dry mixture. To make expanded clay concrete blocks we will need:
- expanded clay with strength P150-200: it is better not to use fractions larger than 5-10 mm, as the blocks will turn out shapeless, and their strength will be significantly lower;
- sand: to obtain high-quality products, gravel-enriched sand is used; ordinary river sand is not recommended;
- cement M400-500;
- water;
- plasticizers: ordinary liquid soap, washing powder or dishwashing detergent are often used; you will need 1% of the total amount of cement; for a 130 liter concrete mixer you can take about 70 g of soap; You can increase the plasticity of the solution not only with the help of soap, but also by adding clay, lime or wood ash to it.
When mixing a high-quality homogeneous solution, it is important not only to maintain the proportions, but also to introduce the components into it in a certain sequence. First, the exact amount of water is measured. Expanded clay, sand and cement are thoroughly mixed together, and only then the resulting dry mixture is introduced into the liquid. The consistency of the prepared solution should resemble softened plasticine.
How to make expanded clay concrete without a concrete mixer? In this case, you will have to work hard, thoroughly mixing the solution with a shovel. In this case, you will have to dilute the solution in small portions - after all, unmixed lumps can affect the quality of the final products. The solution is ready. The last question remains - how to make expanded clay concrete blocks?
Making blocks
Since expanded clay is a lightweight material, it will constantly float in the solution, which is why the production of a large number of products requires a vibrating machine. In its absence, each form will have to be compacted with a narrow wooden block until “cement laitance” appears. Solid products can be compacted using a hand tamper.
DIY concrete blocks at home
Many beginners and experienced builders sooner or later wonder how to make concrete blocks at home, and whether it is possible, in principle, to reduce the cost of this production process. As practice shows, this is an effective and cost-effective way to obtain environmentally friendly building material . Subsequently, it can be used to build a warm and cozy country house.
In terms of technical and operational characteristics, self-made concrete blocks are in no way inferior to factory-made analogues, and are cheaper in cost.
The composition for the production of blocks can be absolutely anything, it all depends on the specific requirements for the quality of the material. In some cases, preference is given to ordinary concrete mixture; in other situations, gravel and wood chips are used for production.
Making concrete blocks with your own hands - specifics of production
To produce concrete blocks at home, only 3 main components are required:
- water;
- sand;
- cement.
It is allowed to include wood chips, slag, gravel or crushed stone in the mixture. It is important to consider the density of the material, its texture and weight. Experienced craftsmen recommend using Portland cement and clean water. As for sand, regular construction sand will do.
Making concrete blocks at home
For the production of concrete blocks, experts recommend using automated units. We are talking about automatic machines designed for the production of high-quality building materials. But this requires decent financial investments. Much more affordable are installations with manual control, which can be installed directly on the construction site. As a result, the cost of transporting building materials is leveled out in principle.
Do-it-yourself production of concrete blocks includes the following processes:
- Selecting the appropriate proportion of ingredients . When choosing, they are guided primarily by the desired strength of the material. The higher the concentration of coarse fillers, the more reliable the cement will be - a simple rule.
- Features of mixing components . Experienced craftsmen emphasize the need to mix the above components as thoroughly as possible. For this purpose, it is preferable to use a mechanical mixer. At the first stage, the components are connected sequentially in a dry state. On the second, add a small amount of water.
- Recommendations for placement of the composition . The mixture is poured into special tray-forms. It is important that the form is filled evenly, to the brim. To ensure uniform distribution of the composition, concrete vibration technology is used.
- Curing . A day after drying begins, the blocks are treated with water. After 28 days, the material will be completely ready for immediate use. The quality of the blocks is proportional to the curing period.
Making cinder blocks at home
Ready-made equipment for making building blocks is quite expensive. The purchase of factory vibrating machines is justified only when carrying out construction work carried out in large volumes. In private construction, it is preferable to rent such equipment, but the option of self-production cannot be ignored.
It is the cinder block that is the most profitable material for construction on your site, because in this case the process is fast, economical and reliable
DIY concrete blocks
Concrete blocks are a very popular building material needed to build a house, barn or fence.
The width for a homemade block should be chosen to match the width of the foundation.
In addition, you can make concrete blocks with your own hands without much difficulty, this will significantly save money on construction costs.
Site and formwork preparation
First you need to decide on the sizes. Usually the width for a homemade block is chosen the same as the width of the foundation masonry. However, its deviation downward by 3-5 cm is allowed. The thickness of the bottom of the voids should be at least 2 cm, and the thickness of the walls - 4 cm. If you make a block of dimensions 29x29x44 cm with two vertical voids, then its mass will be about 42 kg.
The optimal size for blocks is 20x20x20 cm or 20x20x40 cm. Thanks to their small dimensions, the process of laying the material, as well as the manufacturing itself, becomes convenient and simple. It should also be taken into account that for special types of work it may be necessary to make half blocks.
To make concrete blocks with voids, a special mold is needed.
Concrete blocks should be made on compacted soil or on a level area (for example, built from boards). The surface must be covered with oilcloth or thick film. The molds in which the blocks are formed are made without a bottom. They are made from boards, chipboard or plywood sheets, and covered with sheet metal on top. Several liners are made from wooden logs, with the help of which voids will be formed in the blocks, due to which the building material will become lighter and warmer. The edges of the logs are sheathed with metal and handles are mounted to them, which in the further process will help you pull out the liners from the setting cinder block without unnecessary effort.
Experts say that it is most convenient to make several forms at the same time. To build them, you need to knock down or fasten with screws a frame with the height of the sides equal to the height of the block, in the middle of which plywood partitions are inserted. By the way, you should first install the longitudinal partitions, and then put the transverse partitions on them.
All elements and parts of the formwork must be coated with drying oil or machine oil, as a result of which the hardened blocks will be much easier to remove from the mold.
Laying the concrete mixture
- cement;
- fine gravel;
- sand;
- lime;
- water;
- rigid reinforcing wire.
The size of gravel grains can reach 1 cm.
The amount of materials depends on the required number of finished blocks. Cement, sand and gravel are taken in a ratio of 1:3:5.
The blocks are made of concrete based on a mixture of gravel and sand. Fine gravel, sand, lime (in small portions), and cement are poured into a metal basin. Mix the constituent elements thoroughly and then add water. There should be just enough water so that no problems arise during the process of laying the formwork (the mass should not be liquid).
The strength grade of such a material will be approximately 135 kgf/sq.cm. The size of the filler grains can reach 1 cm. Insert cores to form voids are placed in the mold when a solution 2 cm thick has already been poured and compacted. To fix the distance of the core, it is recommended to install special slats, about 4 cm wide, between the mold wall and the core. These slats can only be removed once the concrete has been loaded and compacted to one-third the height of the form.
The bottom of the form can be covered with old newspapers, which will prevent the block from setting to the previous base. The mixture should be semi-dry during installation. That is, when taken in a fist, compressed into a ball and then placed on a flat surface (for example, on a board), the mass should not spread.
Each formwork compartment is filled with a maximum of half of the solution, after which rigid reinforcing wire is laid.
To prepare the solution at home, you can use a stationary concrete mixer.
Some craftsmen make blocks using glass bottles as heat-insulating cinder block air chambers. To do this, plug the bottles with corks and install them in the middle of the block. After this, the forms are filled to the top, the solution is compacted and then smoothed with a trowel.
Ingredients and proportions for cooking
To prepare block stone from slag, the following components are usually used::
- cement;
- sand;
- slag;
- water.
Cement acts as a binder; usually a grade of material no lower than M400 is used, but M500 is also used. If we take the latter option, then it will be needed 15% less than M400 cement due to its density.
A slag mixture is used as a filler. The mixture usually contains sand, gravel, crushed stone, expanded clay or crushed brick . That is why the stone is called cinder block due to the presence of material in its composition that is not suitable for construction in this form.
Important! During cooking, be sure to follow the proportions. For 9 parts of filler, always take 2 parts of the binding component - cement.
The slag mixture usually makes up about 65% of the total mass of the stone. If the mixture is not enough, then it is diluted with sand or fine gravel. Many manufacturers use screenings or crushed concrete, which further strengthens the structure of the stone.
In the classic version, the following proportions are used::
- sand – 2 parts;
- crushed stone – 2 parts;
- slag – 7 parts;
- Portland cement - 2 parts.
Water is also added here; 0.5 parts will be needed. The finished mass should be semi-dry. To check the correct consistency, make a lump from the mixture and throw it on a hard surface . If it crumbles, but at the same time molds well back into the ball, then the consistency is correct.
Block care
The solution sets within 1.5-2 hours. Therefore, if there is a small amount of material for constructing the formwork, after this time it can be disassembled in order to make the next cinder block. In such cases, the concrete mass is prepared in portions for each mold. Using one formwork, you can make about 5-6 blocks per day.
After the building material is ready, it is covered with film. It serves to protect the cinder block from precipitation, as well as protection from excessively rapid drying. If there is no film, it is recommended to water the block daily (starting from the second day after production) for 2-3 weeks. To ensure uniform drying, the material must be turned periodically.
Making cinder blocks with your own hands, of course, first of all saves money. But if you have the necessary materials and time, anyone can handle this task.
Features of manufacturing technology
The standard process flow diagram includes three main stages:
- Preparation of a concrete mixture based on binder, water and slag screenings. Do-it-yourself mixing is allowed, but when working with large volumes, concrete mixers must be used.
- Pouring the mixture into molds and then compacting it. The length of time the solution remains in them depends on the type of equipment used: when vibrating machines are used, the element is sent for drying immediately; with simple compaction and expulsion of air, it is removed after a day. In the first case, rigid slag concrete with a minimum W/C ratio is poured into them, in the second - a more liquid mixture.
- Hardening - from 24 to 96 hours at positive air temperatures, ideally in conditions of high humidity. This stage is mandatory; items removed from the molds cannot be sent for storage immediately. Next, the blocks are placed on multi-tiered racks and ripen for another 20-27 days at a recommended air temperature of ≥18° C.
Portland cement with a strength grade in the range M200-M600 is mainly used as a binder; an alternative option is slow-hardening gypsum. The default proportions are indicated for PC M400; when backfilling M300, cement consumption increases by 10%, M500 decreases by 10-20%. Not only metallurgy waste is used as filler, but also sand, expanded clay, crushed stone, broken brick or concrete, ASG, marble chips, polystyrene foam granules and even sawdust. The best strength characteristics are observed in the manufacture of masonry elements based on blast furnace slag or expanded clay.
The size of the fractions for hollow (slotted) is limited to 10 mm, solid - 20, when preparing ingredients in large volumes, a vibrating sieve is used. The shapes are easy to make yourself; the walls are made of wood or metal and painted. To save time, several cells are connected; this homemade formwork allows you to make 4-6 blocks at a time. To reduce the consumption of components and the weight of the cinder block, punches, usually round cylindrical shapes, are inserted into the poured solution. When produced at home, their role is usually played by glass bottles (2-3 pieces per product), which are removed after a few hours.
Recommended proportions
Features of the technology include the absence of universal and strictly regulated recipes; the composition can be anything. But a number of rules are followed: the ratio of binder to other dry ingredients varies from 1:3 to 1:10 (the finer the filler, the more cement is lost), with water - within 0.5-1, special attention is paid to achieving a homogeneous state, for To increase mobility and reduce setting time, plasticizers are introduced into the composition (about 5 g per 1 cinder block). The following proportions are most often used (for Portland cement PC M400 by default):
| Type of solution | Proportions of dry ingredients | W/C ratio |
| Rigid, compacted by vibrating machine | Cement, sand, slag – 1:3:5 | 0,5 |
| Cement, slag – 1:9 | ||
| Cement, sand, crushed stone – 1:1.7:1.7 | ||
| Cement, sand, fine slag screenings – 1:2.2:1.7 | ||
| Cement, screenings, heterogeneous filler – 1:4:4 | ||
| Standard, hardened in molds | Cement PC M500, expanded clay sand, gravel, slag – 1.5:2:2:7 | 1-2 |
| Expanded clay concrete | Cement, expanded clay – 1:9, it is recommended to introduce plasticizers | 0,5-1 |
Site and formwork preparation
First you need to decide on the sizes. Usually the width for a homemade block is chosen the same as the width of the foundation masonry. However, its deviation downward by 3-5 cm is allowed. The thickness of the bottom of the voids should be at least 2 cm, and the thickness of the walls - 4 cm. If you make a block of dimensions 29x29x44 cm with two vertical voids, then its mass will be about 42 kg.
The optimal size for blocks is 20x20x20 cm or 20x20x40 cm. Thanks to their small dimensions, the process of laying the material, as well as the manufacturing itself, becomes convenient and simple. It should also be taken into account that for special types of work it may be necessary to make half blocks.
To make concrete blocks with voids, a special mold is needed.
Concrete blocks should be made on compacted soil or on a level area (for example, built from boards). The surface must be covered with oilcloth or thick film. The molds in which the blocks are formed are made without a bottom. They are made from boards, chipboard or plywood sheets, and covered with sheet metal on top. Several liners are made from wooden logs, with the help of which voids will be formed in the blocks, due to which the building material will become lighter and warmer. The edges of the logs are sheathed with metal and handles are mounted to them, which in the further process will help you pull out the liners from the setting cinder block without unnecessary effort.
Experts say that it is most convenient to make several forms at the same time. To build them, you need to knock down or fasten with screws a frame with the height of the sides equal to the height of the block, in the middle of which plywood partitions are inserted. By the way, you should first install the longitudinal partitions, and then put the transverse partitions on them.
All elements and parts of the formwork must be coated with drying oil or machine oil, as a result of which the hardened blocks will be much easier to remove from the mold.
Laying the concrete mixture
- cement;
- fine gravel;
- sand;
- lime;
- water;
- rigid reinforcing wire.
The size of gravel grains can reach 1 cm.
The amount of materials depends on the required number of finished blocks. Cement, sand and gravel are taken in a ratio of 1:3:5.
The blocks are made of concrete based on a mixture of gravel and sand. Fine gravel, sand, lime (in small portions), and cement are poured into a metal basin. Mix the constituent elements thoroughly and then add water. There should be just enough water so that no problems arise during the process of laying the formwork (the mass should not be liquid).
The strength grade of such a material will be approximately 135 kgf/sq.cm. The size of the filler grains can reach 1 cm. Insert cores to form voids are placed in the mold when a solution 2 cm thick has already been poured and compacted. To fix the distance of the core, it is recommended to install special slats, about 4 cm wide, between the mold wall and the core. These slats can only be removed once the concrete has been loaded and compacted to one-third the height of the form.
The bottom of the form can be covered with old newspapers, which will prevent the block from setting to the previous base. The mixture should be semi-dry during installation. That is, when taken in a fist, compressed into a ball and then placed on a flat surface (for example, on a board), the mass should not spread.
Each formwork compartment is filled with a maximum of half of the solution, after which rigid reinforcing wire is laid.
To prepare the solution at home, you can use a stationary concrete mixer.
Some craftsmen make blocks using glass bottles as heat-insulating cinder block air chambers. To do this, plug the bottles with corks and install them in the middle of the block. After this, the forms are filled to the top, the solution is compacted and then smoothed with a trowel.
Homemade blocks harden quite quickly - within 3-4 days, after which they can be safely removed from the formwork. However, this does not mean that they are completely dry. They can be used in construction no earlier than two weeks later.
Block care
The solution sets within 1.5-2 hours. Therefore, if there is a small amount of material for constructing the formwork, after this time it can be disassembled in order to make the next cinder block. In such cases, the concrete mass is prepared in portions for each mold. Using one formwork, you can make about 5-6 blocks per day.
After the building material is ready, it is covered with film. It serves to protect the cinder block from precipitation, as well as protection from excessively rapid drying. If there is no film, it is recommended to water the block daily (starting from the second day after production) for 2-3 weeks. To ensure uniform drying, the material must be turned periodically.
Solution for making cinder blocks
Mortar for cinder blocks: coal slag: coarse sand (expanded clay): gravel 5-15 mm, M500 cement, water (7: 2: 2: 1.5: 1.5-3). It is important to control the amount of water so that the blocks do not spread when removed. The solution should crumble when it falls to the ground, but should unite in the fist.
To make the blocks plastic, you can add a plasticizer (5 grams per block - strength, water resistance and frost resistance, fewer cracks) during vibration casting, it is also possible during vibration pressing, but you need to add too much for the effect, and this is expensive.
To make cinder blocks durable, you need to consider:
Quality of sand – you need coarse sand.
Blast furnace slag is ideal.
Cement – high-quality M400.
Equipment – in order to press better, you need to achieve vibrocompression.
How to make a cinder block with your own hands?
Step 1. Preparation of the solution
There is no ideal formula in which to mix the necessary ingredients, since all materials differ in properties, and each master selects his own ratio. The standard option is the following formula for the ratio of slag, sand, gravel, cement and water - 7: 2: 2: 1.5: 2, respectively. If you plan to make cinder blocks without adding gravel, then the proportions of slag, sand, cement and water change as follows: 7: 3: 1: 1.
To determine the amount of water needed, you can do the following test: throw the solution on the ground and squeeze it in your fist. If in the first case the mixture fell and crumbled, and in the second it came together, then everything is fine, otherwise you need to change the proportions of water.
To make a mixture for cinder blocks, it is recommended to use a concrete mixer. We do not recommend carrying out such work manually, because in this case you will receive a solution of lower quality. Even a person in good physical shape cannot withstand thoroughly mixing a heavy mixture for several hours in order to make hundreds of blocks from it.
Step 2. Pouring the mixture into the mold
Before pouring the solution, the mold must be treated with diesel fuel, machine or vegetable oil to prevent the resulting blocks from sticking to the walls or bottom of the mold.
To make cinder blocks, you need to pour the solution into the mold with a reserve, above the walls, but if you plan to make hollow blocks, then it is better to pour the mixture exactly along the line of the walls. Turn on the vibrating machine for 5 seconds to allow the solution to settle. If necessary, add more mixture and repeat. After turning on the vibrating machine for 5-10 seconds, without turning it off, remove the form.
As already mentioned, if you do not have a vibrating machine, you can use a hammer. They need to knock on top of the mold so that the mixture is compacted and all air bubbles come out of it. The fewer of them left, the stronger the block will be.
If necessary, place glass bottles to create voids in the blocks.
On average, the process of making blocks takes about 3 days, but it takes about a month for them to completely harden. During this period, the blocks should be left to dry.
Step 3. Drying the blocks
To complete this stage, you need to allocate a separate room, reliably protected from precipitation. The temperature in it should be +13°C or more, and the humidity should be 100%.
During the process of hardening the blocks, it is important to ensure that they do not crack, so they need to be moistened with water periodically, especially if the manufacturing process took place in hot weather.
During drying, it is not recommended to stack the blocks on top of each other; this is only permissible when they are completely dry.
Drying cinder blocks plays a huge role in the manufacturing process of materials. Any dents or irregularities make the blocks unsuitable for construction work.
A bathhouse made of cinder blocks is a budget option, especially if you make cinder blocks with your own hands at home. Making them yourself is not so difficult if you take a responsible approach to the choice of materials and also follow the order of work.
Preparation time and storage of concrete blocks
mother from the tape can be done in a day. Completely dry in a couple of months. After a day, the blocks can already be worn - they don’t break; they can be put down after a week.
When using a plasticizer, finished blocks can be removed from the site and stored after 6-8 hours. Without UPD - in two days. Ready-made slag concrete blocks should be stored in pyramidal stacks of 100 pieces with a small (2-3 cm) gap between the blocks so that the “sides” can dry out.
At first, concrete can be prepared by hand. Subsequently, it is more efficient and easier to use an electric concrete mixer with a volume of 0.2-0.5 cubic meters. m.
Production site - a room with a flat floor, good ventilation/heating, or a flat area outside under a canopy.
How to make: step-by-step instructions
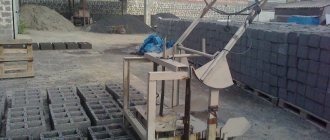
To make a cinder block yourself, you can use two methods: use improvised means or a special machine . The work goes faster on the machine, but it needs to be purchased separately, which will cost a decent amount of money. You can also make the machine yourself: it will help compact the mixture well into the molds so that there are no voids left inside.
With improvised means
This option is considered less expensive, but longer in time. First, you need to mix the solution for the cinder block: pour all the loose elements into a concrete mixer or a special container, add water and mix. Mixing can be done with a shovel in a large trough or the solution can be prepared using an electric concrete mixer.
The process of mixing mortar for cinder block in the photo:
When the solution is ready, you can start pouring the blocks into molds:
- Forms. They can be made of wood or metal: the choice is up to the manufacturer. The easiest way is to make wooden forms from available materials. The solution is poured into the mold 1/3 of the way.
- Tapping. If the vibrating table is not used, then take a hammer. Use it to tap on all sides of the mold. This is done so that excess air bubbles come out and no voids are formed inside the stone, which reduce the strength of the block.
- Next, you need to refill another 1/3 of the solution and repeat the procedure with tapping with a hammer.
- Formation of cavities. If you need to make a solid stone, then cavities are not needed. But, if you plan to create a block with voids, then plastic bottles are used. They are inserted into the block at the same distance. One stone can contain 2-3 bottles, depending on the size of the cinder block.
- Drying. The solution in the molds is left to dry completely for 2-4 days.
- After the cinder block has dried in the molds, they are opened and the stones are carefully removed.
The cinder blocks are laid out on pallets to dry and wait a few more days for the building material to dry completely.
The mixture is poured into these forms, compacted, then dried:
In this video you can learn about the process of making a cinder block using a mold:
On a special machine
The easiest way to carry out production work is using a vibrating table . To do this, also prepare a solution, then place it in a mould. The vibrating table is turned on for a few seconds and the solution is deposited. If there is not enough mixture, it is added again and the vibrating table is turned on again. The degree of filling of the forms can be adjusted by placing a clamp on the vibrating plate.
Vibrating table for cinder block in the photo:
The vibrating table is turned on again for 10 seconds, after which the mold is removed. The blocks are dried for 5-7 days, and then about another month until they are completely hardened without a mold.
Important! When special plasticizers are added to the blocks, they harden within 6-8 hours. In this case, they can be immediately folded for storage.
Production of cinder blocks on a special machine:
Advantages of cinder blocks
- low cost
- high speed of construction from cinder blocks;
- good sound insulation
- good thermal insulation
- You can make it for yourself or for sale
Negative opinions on making concrete blocks with your own hands
The machine is profitable only if there are cheap or “free” raw materials or with huge volumes of work.
A hollow block made anywhere is more expensive than a section of wall of the same size, made using removable or permanent formwork, the more you waste your time and effort. Therefore, basically, selling these machines is just an opportunity to make money on others.
Example of expenses and cost of making homemade blocks
The production of one cinder block requires 0.011 cubic meters of solution, in a ratio of 1:7 (cement: granular slag), i.e. 1 bag of cement = 36 blocks.
Legislation
Decrees of the Government of the Russian Federation dated 08/13/97 No. 1013, Gosstandart of the Russian Federation No. 86 dated 10/08/2001 and Gosstroy of the Russian Federation No. 128 dated 12/24/2001, the list of products requiring mandatory certification does not include building concrete blocks with various fillers (slag, expanded clay , sawdust, etc.), as well as vibration-forming equipment for their production.
Making your own mold for casting concrete blocks
The form for making cinder concrete blocks yourself is a box made of 3 mm metal without a bottom with handles. To make the front part of the blocks more even, they need to be dried on a rubber band moistened with a solution of some detergent.
We begin the manufacturing process
What is needed for that? First of all, you need to decide on the sizes. I suggest choosing the following sizes: 200x200x400 mm and 200x200x200 mm (these are “halves” and they will definitely be required during the work).
Now let's prepare the formwork. To do this, it is necessary to cut old furniture panels from chipboard of appropriate sizes and connect them with screws through transverse and longitudinal partitions cut from 40 mm boards (see picture).
This form is convenient because 4 blocks can be placed in it at the same time. Next, we place the form without a bottom on a flat base under a canopy, covered with plastic film. Their internal surfaces are coated with used machine oil. This is done to make it easier to install the blocks after they harden.
Now let's prepare the material from which we will make blocks. Pour gravel, sand and a little lime into a concrete mixer, or if you don’t have one, into any container. After this is mixed, add cement.
The ratio when laying should correspond to the proportion - 1 part cement to 4 parts aggregate. All this is thoroughly mixed and diluted with water to the desired consistency. The solution should be such that it is convenient to put it into the mold.
Next, two shovels of mortar and reinforcing wire are placed in the mold. On top of all this, you should also place two glass bottles, plugged with corks. The bottles will play the role of sealed glass blocks and thanks to them, two air chambers are created inside the block, creating thermal and sound insulation.
After laying the bottles, a layer of mortar with reinforcing wire is poured again. On top everything is covered with an additional layer of mortar, which is smoothed with a trowel. When pouring the solution, you need to compact it well so that voids do not form inside the mold. When the concrete hardens, the side wall of the form is removed and the blocks are removed.
It is better to make blocks in cloudy weather, since the time for evaporation of water from the solution increases, which reduces the likelihood of cracks appearing on the finished blocks. If, nevertheless, you carry out work in hot weather, then the tanks must be placed in the shade and it is advisable to cover them to reduce the rate of water evaporation. Using this method you save up to 60 percent of money.
That’s probably all I wanted to tell you about the folk method of making concrete blocks with your own hands at home.
Pros and cons of making blocks at home
Advantages:
- cheapness. You don't have to spend money buying ready-made cinder blocks, and most of the components required to make them are cheap or free;
- savings on delivery. It is permissible to make blocks at the construction site, which means that you will not have to spend money on transporting materials;
- the ability to make blocks of the sizes and even colors you need. Factory blocks are presented in standard sizes, but you can change them to suit your needs. And if you add chalk or small red brick chips to the solution, you can get cinder blocks of different shades.
Flaws:
- low resistance to negative temperatures caused by the high level of water absorption of homemade blocks;
- the possibility of a large percentage of defects, especially if you have little experience in the construction industry;
- the likelihood of high fragility of the material if the technological process is disrupted;
- low level of environmental friendliness, since blast furnace slag is used for production.
Basic requirements for the manufacture of blocks
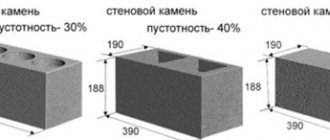
Standard block sizes are 39x19x188 mm; cinder blocks have three small holes.
It is important that the cinder blocks have the correct geometry. Various irregularities and defects significantly complicate the process of building a bathhouse or completely make the material unsuitable.
To achieve perfectly smooth sides of cinder blocks, you need to fill the vibrating mold not just to the end, but even with a small margin, because during vibration the concrete will settle a little.
It is important to consider that making blocks with your own hands at home is only permissible if you are planning to build a one-story bathhouse, garage, shed or any other small building for utility purposes. For the construction of multi-story buildings and houses, it is better to purchase cinder blocks at the factory.
What are cinder blocks made of?
Before we talk about how to make a cinder block with your own hands, you need to decide on the materials you will need.
You shouldn’t skimp on materials, since the quality of future cinder blocks directly depends on them.
To produce them you need:
- slag and its components;
- sand;
- cement;
- water.
Slag is an excellent component for blocks; this material is obtained by processing coal. But today, due to the replacement of coal with gas fuel, slag production has decreased. Now, zito concrete is increasingly being used instead. This material is also great for making building blocks at home, but keep in mind that it will cost more.
We recommend reading:
Caulking of a log house: features, choice of material. How to caulk a log house correctly?
In addition to slag, other components are added to the blocks, for example, ash, gravel, sawdust, perlite, broken brick and glass, metallurgical waste, stone screenings, etc. are often used. A good additive to the mixture, which will help make the blocks stronger, is a plasticizer : just 5 g per block is enough, and the plasticity of the blocks, resistance to frost and moisture will increase significantly. Sand is also often added to cinder blocks. The sand must be of a coarse fraction.
You need to take high-quality cement, a brand of at least M400, and preferably M500. There is no point in saving on it; from one bag of cement you will get about 35 cinder blocks, so it is better to overpay for this material. The difference in costs will be small, but the quality of the blocks will significantly increase.
Cinder block mold
We figured out what cinder blocks are made of, now we need to select the necessary tools, namely forms. The form can be purchased at a specialized store or made independently.
The simplest and most budget option is a wooden form. It is not very durable, but is quite suitable for building a small bathhouse. To make a wooden form, you can use formwork plywood; it is smooth and does not require additional processing.
Factory molds are made of iron and steel, they can withstand huge volumes of solution. If you plan to use a mold for making cinder blocks not for just one bathhouse, but, for example, also for a garage and other similar buildings, then it is better to choose a more reliable mold, in particular, a metal one.
If you decide to make this shape yourself, you will need metal sheets and a welding machine. You need to be able to weld structures evenly and firmly.
To make a cinder block with your own hands, you need to prepare the drawings before making the mold. Usually they choose standard block sizes, but some change them, choosing an option that suits the features of the future building. Afterwards, according to the drawings, you can already make the form itself.
If we talk about how to make a mold for a cinder block from wood, the easiest way to explain it is this: in appearance it will look like the formwork that you will fill with mortar. You will need to connect four boards to form a rectangle of the required size.
When making a mold for cinder blocks, do not forget about the thickness of the boards. In order to subsequently obtain the blocks of the required size, it is necessary to monitor the dimensions of the internal part of the form.
The form may not have a bottom, then during work you will need to lay a film under it and place the structure on a flat surface.
To speed up the process, you can make a form designed for 4-6 blocks at once.
To make hollow blocks, take several empty bottles, fill them with water (this way they will not float when pouring the mixture) and place them in the mold at a distance from each other.
This equipment will be quite sufficient for the production of blocks at home. When pouring the mixture, you may also need a vibrating machine. But to build one bathhouse there is no point in buying expensive equipment; you can get by with a hammer.
We recommend reading:
Entrance door to the bathhouse: types and their features. How to choose the entrance door to the bathhouse?