Home / Welding technique
Back
Reading time: 5 min
0
817
The band saw is a multi-cutting cutting tool. It looks like a closed flexible steel ring with notched teeth on one of its faces.
The tape is mounted on two friction wheels rotated by an electric motor, which allows you to make not only straight cuts, but also curved ones.
The cutting strip for metal and non-metallic parts is regulated by P54924-2010. Frequent use of this cutting tool does not exclude its rupture along the body or weld seam.
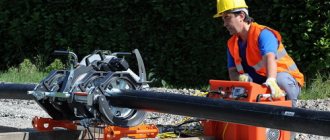
To connect the ends of the saw, you will need the services of a welder, but having some experience in metalwork and an apparatus for welding band saws, you can join them at home.
- General information
- Equipment
- Welding technology Cutting
- Stripping
- Securing the fabric into clamps
General information
When joining the ends of the saw, it is necessary to take into account its load when processing parts, subjecting the tape to constant stretching and bending.
A band saw strip made from alloy or carbon steel can withstand the force of the material being processed, which sometimes cannot be said about a welded joint.
After a period of working hours, the seam bursts. Therefore, the latter must be made of a material of the same composition as the ring with teeth itself.
The creation of a high-quality connection will be helped by the use of a special device for welding band saws, using resistance arc welding.
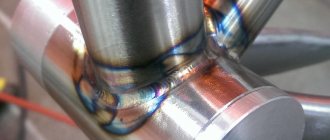
The latter is caused by uniform heating of the joints of the two parts being connected. After the described thermal operation, the ends are tightly joined, forming a one-piece ring.
Equipment
For welding the ends of band saws, there are special resistance welding machines, which have varying degrees of automation.
Inexpensive devices are characterized by manual adjustment of the type of welding and seam formation. The high cost of the device guarantees automatic welding without human intervention.
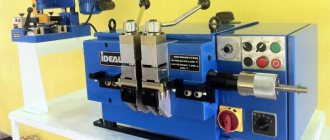
The simplest apparatus designed for welding joints of band saws, regardless of the nature of their use, is shown in the photograph. Its design is quite simple:
- device casing - 1;
- welding transformer for power regulation - 2;
- clamping mechanism - 3-4;
- start button or key - 5.
A craftsman who constantly works with saws can assemble the device himself from industrial elements.
Welding technology
Welding a band saw blade has several stages.
The material provides a detailed description of each of them.
cutting
The saw blade is sold in coils, which means purchasing a blade of a certain length. To cut metal with teeth, a guillotine and a cutting table are used, which give an even cut.
The tape is cut along the upper edge of the teeth, with an allowance of 2 mm on the cut side. This will allow you to maintain your pitch and draft.
Soldering band saw blades
All at once: Silver solder is not harder than brass - on the contrary, however, bicycle frames, for example, of a level higher than Start-Shosse, were soldered with silver solders, and to this day, high-class bicycle frames made of chromoly are soldered with it - it melts at a lower temperature and does not require subsequent heat treatment. SSh and more widespread - brass solders. The frame material is more flexible and is not scary. When restoring bikes from the last century, that’s how you solder them. The plates on the cutter are again brass, it is more difficult to melt. There are other important little details, and I will mention only one of them - the better, more accurately, and closer to polishing the surfaces to be soldered are prepared, the thinner the layer of solder, and the longer, other things being equal, the soldered joint will work. BUT - neither brass nor silver likes alternating loads - and in band saw blades it is they. And when the side of the tape is all stress raisers (teeth and cavities), it’s really sad. So you can solder, you can solder, but it’s very optimistic to expect long work from a saw blade soldered on your knee. However, there are solders that provide a very good and long-lasting connection, but I could not find them on sale (or components).
Welding. Fast and high-quality butt welding of saw blades, machined ends and with strong compression at the end of welding - everything molten along with dirt and slag is squeezed out during compression, forming a bead (then sanded off), and the seam is as dense and clean as possible. At the same time, the overheating zone is minimal, and the vacation is also simple and quick. And then marriage occurs. There are welders for this on sale, but they are expensive for the hobbyist.
Overlap welding with a spotter - in reality, with skill and subsequent high-quality processing of the joint - allows you to drive the blade welded in this way for a short time, but in a gentle mode, with a wood saw - longer. Feeds are minimal.
Semi-automatic welding - I haven’t welded it myself; I haven’t been able to find a welder who is ready for such experiments. However, I believe that such welding is possible, and the thicker and wider the blade, the better. The same applies to TIG welding - I heard, read, but did not hold something done like that in my hands.
And about welding - a good welder (this is the most important thing) will weld everything, and with high quality. But this will require appropriate experience, consumables, and time. I’m not a welder, but only a “tack”, I just observed the real work of a pro during the construction of a gas pipeline, and there I asked how, why and why exactly this way. Well, textbooks and my little experience.
Sergei Ivanovich, with tension - with a full passport, and even a quarter more - the solder does not burst. Well, for me, anyway. Checking tension with a strain gauge. I would put something untested into a saw, of course... This is about a wooden one, made of carbon. (a little bit from the experience of the 70s - when there was a shortage of bicycles at that time, a lot of things were soldered, including spokes, brake cables, and all sorts of tin - and it held up quite well.)
But what I welded with an electrode - exactly three of the 4 canvases did not pass this test. 5-15 minutes of idling with a slow increase in tension to normal - and that’s it...
Egor, the saw blade, unfortunately, is not suitable as a long crown, it is possible to make a hole with it (long enough and not without a tambourine), but a hole - alas. That’s why, by the way, they don’t make the crowns long, they are generally no more than 2-3 diameters, and they also need space for chips... they are more for sheets and pipes. If you really need a long annular one, they make it from a crown welded coaxially onto the pipe - and at low speeds in a rigid drill and with lubricant. We walked a little bit - drill out, knock out the plug, break off the core and pull it out - and start again.
Welding mode
The selection of the magnitude and polarity of the current, electrode diameter, soldering speed and arc voltage on the simplest apparatus is done manually. The process depends on the size of the canvas and its cross-section.
An increased value of the latter implies an increase in current strength. Band cutting tools are made from various metals and their alloys, which are difficult to weld.
Saw manufacturers do not provide information about the type of material for public use, which makes it difficult to select a welding mode. It, the masters, is established experimentally.
To facilitate the work of welding a band saw, the user manual supplied with the welding machine will help, which indicates all types of modes.
You will also have to manually regulate the speed of current pulses on a budget device; lack of control can lead to overheating of the metal.
It is recommended to apply current for no more than 2 seconds. Expensive welding devices adjust the time automatically.
Tools
0 votes
+
Vote for!
—
Vote against!
For the band saw to function properly, it is welded. The method by which this process is performed is selected individually, in accordance with the operating characteristics of the material. Let's look at the equipment for welding band saws below.
Table of contents:
- Band saw: device and principle of operation
- Homemade welding of band saws with your own hands
- Welding band saws price and soldering features
Band saw: device and principle of operation
There are a large number of different saws that have individual application features and a unique design. Some use a disk as a cutting tool, while others use a tape.
The sawing band is installed on the drive and driven pulleys. To tighten it, great efforts must be made, only in this case the cutting line will be uniform.
The main features of this design are individual blocks, which are complemented and expanded independently. On a simple device, into which the material for cutting is fed manually, additional mechanisms are installed, such as an electronic system for monitoring the performance of the device, thanks to which it operates without outside human intervention.
Among the main structural elements of a band saw, we note the presence of:
- a frame on which there are guides with which the belt moves;
- in order to tension the tape, a mechanism is used, which has a spring, mechanical and hydraulic drive;
- cutting tape holder;
- a screw lifting mechanism, which is installed near the belt;
- belt-type transmission on which wedges are located;
- an electric motor with a power of about fifteen kilowatts or a gasoline engine with the same power;
- eccentrics, with the help of which the log is fixed to the frame;
- a water tank and a tap that wets the part during the cutting process;
- rail strip on which the structure moves.
Also, each saw features individual design elements, such as guard guards and stop mechanisms, which increase operational safety. In order to regulate and customize the work, there are strips on the working surface with markings on them.
The principle of operation of the mechanism is based on laying a log between two guides and its rigid fixation. To determine the thickness of the board, it should be lifted using a special mechanism.
Homemade welding of band saws with your own hands
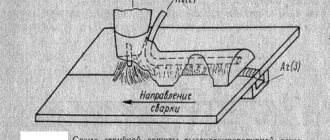
In order to connect the two ends of the band saw, they must be welded. This process is performed using special equipment for welding band saws. Contact welding of a band saw consists of electricity passing through the two connected ends of the saw, which leads to their overheating and melting of the edges on the blade. To supply current, electrodes connected to clamps are used.
There are a huge number of welding machines with which resistance welding is performed. Some improved options can provide automation of the welding and annealing cycle. Therefore, errors associated with excessive welding or incorrect timing during which the impulse is transmitted are eliminated. In simpler mechanisms, control of the annealing and welding feed is carried out by the operator.
Welding a band saw yourself is only possible if you have experience working with this type of equipment. Among the main design features of the machine for welding band saws, we note the presence of:
- body part;
- welding type transformer;
- clamping mechanisms on which there are electrodes and clamping levers;
- start button;
- clamps: movable and fixed.
The main function of the movable clamp is free movement, with the help of which the upsetting is carried out. As the ends of the saw move towards each other, a weld bead is formed. In order for the ends of the saw to be pressed against each other, a special spring is used to create pressure.
Welding band saws with your own hands consists of the following steps:
- performing saw cutting;
- cleaning its end sections;
- installation of the web into the design of the welding machine, determination of the operating mode: stroke and shrinkage;
- welding of sheets;
- performing annealing;
- cleaning seams.
The first stage - cutting, involves determining the size of the saw. To cut off the required section of the canvas, use guillotine shears or a cutting wheel. When using fabric that has previously been welded, about five centimeters are cut off on each side.
In this situation, when performing cutting, a number of rules should be taken into account:
- the place where the blades are connected to each other should be located between the upper parts of the teeth;
- during the cutting process, you should leave a little allowance to compensate for the shrinkage of the metal, the optimal allowance is one and a half millimeters on each side;
- try to make the cut line as smooth as possible, the quality of further welding depends on this.
Only in this case will the canvas have a straight line at the bend.
A fairly simple way to perform cutting is to place the saw in a certain position, trim and trim each end separately. In this case, even if there is a non-perpendicular cut line, its end sections will still be joined. In this case, the fabric after welding will have an even seam.
Further actions involve stripping the canvas. These areas should be cleaned of dirt and degreased with acetone or alcohol. Use an abrasive to clean the edges. As a result, you should get perfectly even and smooth areas.
Next comes the installation of the canvas on the surface of the device. The prepared saw should be installed inside the clamping mechanism. At the same time, one part of it remains movable, but the second does not. In the central part, the saw edges are connected to each other. The edges must match perfectly.
Using the control knobs on the device, the force, stroke, shrinkage, and operating mode of the device are regulated. These parameters for each saw are selected individually and depend on its size, steel thickness, operating characteristics, etc. As the cross-section of the saw increases, the current required for welding increases.
In order to more accurately determine these parameters, use the instructions for the device. It should contain a table according to which the operating mode of the equipment should be determined. In some devices, it is enough to select only the welding mode, without specifying the current and voltage for operation. In order to weld the saw, the lever must be set in a certain position.
Band saw welding is done by pressing a button or turning a lever. After this, the current is supplied to each clamp, and from them is transmitted to the saw. Thus, the metal in the area where the two sections meet is melted and joined together.
The spring acts on the surface of the movable clamp, which moves towards the fixed clamp, on the upset. At the same time, a weld bead is formed in the butt zone, with the help of which the saw blades are connected.
When determining welding parameters, you should select the time during which current pulses are supplied. Welding machines with automatic operation switch off the current after a few seconds from the moment they are applied. However, if this parameter on the welding machine is manually adjusted, then it is necessary to monitor it.
During the welding process, certain difficulties arise due to the material from which the saw is made. In accordance with this parameter, the operating mode of the welding machine is determined. In some cases, it is very difficult to determine this parameter without experience. If in the end you are not satisfied with the welding, then you should experiment, selecting the required mode on the unnecessary cutting of the blade. After selecting the optimal operating mode, write down its parameters to apply it in the future.
Please note that the electrodes that come into contact with the saw must be clean. Foreign substances or dirt on their surface negatively affect the welding quality of the saw.
Further actions involve annealing, which helps the metal, which has become brittle and quite hard during the welding process, acquire strength, toughness and ductility. For annealing, the same clamps are used as during the welding process. However, a different current supply mode is used for operation.
The optimal temperature at which annealing is performed is about six hundred degrees. At the same time, you should maintain the cooling of the device at a slow pace; for this, the current supply button should be held, pressed and released at a certain time. In order for the metal to cool gradually, you should periodically press the current annealing button.
If the welding machine does not have a pyrometer, then the temperature is controlled by the external characteristics of the metal surface. During the firing process, the steel acquires a red-cherry hue. Under no circumstances should you heat the metal until it turns orange or even more intensely red. The process of gradual cooling of the metal takes no more than five minutes. Some blades will require two annealing cycles. In some cases, welding and annealing are performed in the same process. In this situation, the time for cooling the seams increases by periodically applying current to the metal.
After welding, the blades should be cleaned from the bead formed on the weld. Almost any tool with abrasive characteristics is suitable for cleaning seams. The main condition for high-quality cleaning is to obtain a flat and smooth surface.
We suggest you familiarize yourself with the main errors that arise during the welding process:
1. Displacement of welded edges - in this case, the blades are in different planes. This problem occurs when there is insufficient current during the welding process or when there is a very large draft.
2. The melt located on the web is observed during the supply of a very high current.
3. Uncooked areas are formed if the pressure supplied to the system is too low.
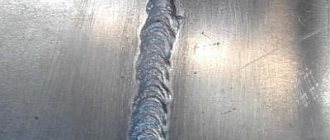
The minimum value of the seam protrusion on a well-welded slab is about one and a half millimeters.
To check the quality of annealing, the canvas is bent within a radius of twenty centimeters and inspected. If the arc resembles a standard circle and the seam remains intact, then the welding quality is at the proper level.
Welding band saws price and soldering features
The cost of welding work on band saws is determined primarily by their size, steel thickness and operating characteristics. However, there is another way to connect the saw - soldering. This option is easier to perform at home than welding.
First of all, you should prepare the blade; for this, the edges of the saw are cleaned of dirt and degreased. The ends of the canvas are connected in a butt position, but the edges must be beveled.
To give the edges a bevel shape, use an abrasive wheel. The optimal bevel size is from eight to twelve centimeters. The beveled areas should be connected to each other as smoothly as possible.
In order to solder the saw, you will need solder, the best option is silver pSR45 or pSR65. Solders with a lower silver content are not recommended for use.
As a flux, it is preferable to use a paste that is used in the process of metal soldering. This version of the flux is easy to use. In the absence of this substance, the option of making it yourself is possible. To do this, ammonium chloride is combined with borax in a ratio of one to ten. Using water, the consistency of the composition is adjusted, which should become pasty.
A gas burner is used to heat the saw during the soldering process. The heating temperature is determined by the type of solder; the optimal value is from 650 to 600 degrees. Do not overheat the metal so as not to damage its structure. Using a special device, the ends of the saw are connected to each other. The soldering process is as follows. First of all, you should apply flux to the surface of the edges. Try to apply the paste exclusively to the beveled areas.
Next, the joints are heated to a certain temperature and solder is supplied to the junction of the ends of the saw. After this, a strip appears on the surface, indicating that the soldering was done correctly. The solder is melted not under the influence of a torch, but from previously heated metal. After a few minutes, the metal cools down, only after which the saw is removed from the mechanism. If there are small deposits, the seam is cleaned with any abrasive material.
Welding band saws video:
Welding
The process of soldering the joints of the fabric is carried out on a welding machine, which, depending on the modification, is started using a key or a special handle.
After turning on the unit, welding current is supplied to the ends of the tape through the clamps to melt the metal in the area of the intended seam.
The end of heating will mean that the travel clamp should be moved slightly to form the weld bead.
To obtain a strong connection, the surface of the conductive rod must be cleaned. There is no point in cleaning along its entire length; the main thing is that the surface in contact with the tape does not have traces of dirt or other unwanted deposits.
Failure to comply with this condition will disrupt the circuit resistance, which will negatively affect the quality of the connected part.
Soldering
When the contact welding method is not available, high-temperature soldering is used with silver solders with a special borax-based paste flux. To secure the ends of the canvas, a simple homemade device is used. Heating is carried out by a gas burner.
Soldering is carried out according to standard methods. Flux is applied to the beveled ends of the saw. After clamping in the fixture, the joint is heated to the melting temperature of the solder placed nearby. Under the action of capillary forces, it will begin to be drawn into the joint. After solder appears along the entire connection line, heating stops. After cooling, the saw is removed and cleared of deposits.
Re-stripping
The process of tempering the metal creates visible sagging on it. They can be removed by repeated stripping. The latter is not so necessary for improving technical characteristics as for aesthetic purposes.
The band saw is cleaned with a grinder or any abrasive tool until the seam is visually erased.
It is also recommended to correct the recesses between the teeth, giving them the correct geometric shape.
Soldering control
It would not be superfluous to inspect the seam of a welded band saw if it was made by a novice craftsman. Control is carried out visually. The articulated area should be carefully inspected to identify possible defects.
The latter may be:
- displacement of the ends;
- splashes of molten material onto the belt;
- lack of weld penetration, which impairs technological qualities.
Displacement of the ends occurs due to low current strength, splash - due to excessively increased current. Lack of penetration occurs at low pressure or insufficient current.
Processing of sheets after welding: annealing and cleaning
During the welding process, the joint, along with strength, also acquires fragility. One targeted blow with a heavy tool breaks the integrity of the seam.
To restore elasticity to the joint, it is necessary to anneal it.
Annealing
The implementation of such a process is carried out on the same machine equipment without disconnecting the web from the clamping mechanisms.
Annealing is performed by changing the current mode and reducing the forces on the blade.
With a gradual increase in current, the connection point is heated to a temperature of 500-550 degrees. Carrying out such a procedure involves the preliminary installation of a pyrometer that controls the increase in temperature exposure at the connecting point.
After reaching the required values, the electricity supply is stopped, after which it is necessary to wait for the canvas to cool.
When installing equipment and carrying out work in an unheated room, when the saw cools down, it is necessary to periodically turn on the current supply.
A sharp change in temperature on the surface of the canvas will lead to disruption of the technology and loss of strength characteristics. Normal cooling of the metal should take from 3 to 5 minutes.
Do not forget that some types of metal require double processing. Experienced specialists simultaneously carry out annealing during welding.
Stripping
Cleaning after welding
The main requirement for such a procedure is the maximum removal of metal deposits and the creation of a clear weld geometry.
The procedure is performed with any abrasive material or tool.
The decisive factor here is the absence of any roughness on the surface of the saw. In this regard, the surface should be cleaned not in the classical way across the canvas, but along it.