A router, or manual milling machine, is a universal tool suitable for various types of wood processing. It can be used to drill holes, cut grooves, grooves and chamfers, and process the edges and edges of a wooden product.
It is very convenient for installing locks on doors, assembling floors and furniture, and other work with this material.
Carving on pre-prepared wood using a router can be mastered quickly with your own hands if you immediately choose the type of manual machine for yourself.
There are several types depending on the work performed. So, they distinguish:
- A vertical milling cutter is used both for making through holes and for cutting blind grooves in the rock
- Edging is useful for processing the edges of wood. Has low power, the big advantage is low weight
- The combined one serves both of the above purposes and has two bases for them.
Let's look at wood carving techniques using a router with our own hands
The now popular art of wood carving can also be done using this tool. There are many cutters, that is, working heads, for various purposes.
Advanced craftsmen even make cutters or parts themselves. The main task when working with a hand router is to learn how to use it correctly.
Once you master this tool, you can perform any type of artistic carving.
How to learn to cut wood with a hand router: tips and ideas for beginners
In order to learn how to carve pre-prepared wood using a router with your own hands, you can enroll in thematic courses. However, not everyone has the time or desire to visit them. For such people, there are many video lessons, which, when viewed, will give you an idea of this skill.
Even before watching the video, it is important for beginners to carefully read the instructions for using their electric assistant.
There you can find a lot of practical advice on how to assemble the tool, adjust the depth of the cut, what each cutter is needed for, read about the complete set of your router model, and also find out what additional attachments you can buy to achieve exactly your goals. Don't forget to look at the safety precautions and technical specifications section of the device.
After this, you can begin the first small steps in developing the skill of carving with a wood cutter. These training activities are described below.
Through or slotted wood carving.
To have a general idea of the learning process, suffice it to say that most craftsmen start by cutting out simple patterns using a template. To do this, you need to take a piece of wood and draw a sketch on it. There is a large selection on the Internet and in art books; in addition, looking at photos of finished works with abstract ornaments, it is easy to copy these drawings in pencil.
After the sketch is applied to the log, you should adjust the router so that it makes through cuts. Start working with the outer parts, and when the form is ready, you need to cut holes and give the pattern an openwork pattern.
If you are cutting out platbands or other elements of the facade of a house, then you need to take a blade made of hard wood. Conifers and oak are good choices.
For smaller interior products, it is better to take softer linden or birch.
Good glue for glass
Figured wood carving using a hand router.
After mastering the technique of through threading, you can proceed to more complex elements. For example, after adjusting the depth of the cutout, add a pattern to the finished trim using V-shaped or other cutters.
Not just flat figures look beautiful, but those complemented by notched carvings or made using other techniques. Chamfers on flat or rounded surfaces of large diameters will look very useful.
Various types of chamfers.
After training in these techniques, you can take on more complex ones. With the help of a customized router, it will not be difficult to make your first product using the flat-relief technique. Such drawings look amazingly beautiful on wall panels, boxes, and in addition, photographs of furniture with carved elements make you look closely and examine the entire pattern.
We hone our skills in using a router and wood carving
To achieve mastery in absolutely any task, constant practice is important. Even if the products turn out a little clumsy the first time or nothing comes out at all, you shouldn’t give up. After all, each time the cut will be smoother, the finish will be thinner, and the products will be more beautiful.
Wood carving with a router – photo for inspiration.
Video lessons and videos on the topic of the article
If you are interested in carving, wood carving with a router with your own hands will interest you even more. Carving is an ancient art that was famous in Rus'. The peculiarity of the art lies in working with tools and wood workpieces.
A few words about the main thing
A router is a universal tool that is used for processing wood. Experts often use it during repairs. For example, drill holes, install locks on the door, etc. In carving, the tool is designed for processing the edges of products.
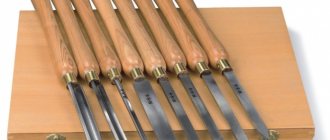
Working with a hand router is not difficult. It is enough to know the basics of work. The kit always comes with many working heads, each of them performs a specific function.
Not all craftsmen are able to work with a router. Very often in educational books you can find a quote: “Learn to work with a jigsaw and chisels. Try doing the work with your hands. Once you gain experience, it will be easier to handle the router.” When choosing, you should consult with specialists so as not to buy a low-quality tool.
To get started with the tool, you can sign up for courses. Unfortunately, they can be expensive or not everyone will want to attend them. Nowadays, it is quite easy to find tutorials. There are video tutorials that will help you learn the basics of working with a router. Examples of some of them are listed below.
A milling cutter is a difficult tool, so before watching the video you need to read the instructions on how to use the tool. Many sites and books offer the basics of assembly, settings, and tell you about the purpose of each cutter. In specialized stores you can find additional attachments for the router.
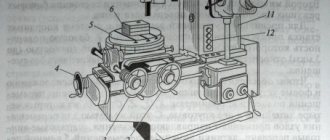
The router diagram for beginners is shown in the photo:
Material component
To create a beautiful product, you need to stock up on the necessary materials. For starters, pencils. They come in different softnesses, so you need to treat them with special care.
When a master makes sketches of his work, he uses various stationery tools - pencils, erasers, rulers and compasses. Thanks to them, the work will be flawless.
The success of the work depends on the wood. Not every tree is suitable for carving. Masters advise using linden, pine, fir and birch. There are no nicks left on them, the work goes easily.
Hammer power 1500 W
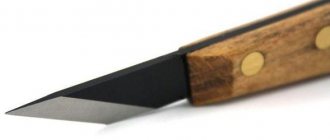
Don't forget the tools. In addition to the router, there are chisels, jigsaws, etc. If the router performs rougher work, then they are suitable for small products - boxes, sculptures, trim, animal figurines.
Where to begin
In order to “make friends” with a router, you need to practice on simple products. Working according to the template will help you get better. Take a pre-prepared blank and apply a drawing, trying to maintain the proportions. Finding templates is easy. There are options on the Internet that are easy to transfer with a pencil.
Don't forget about master classes. The advantage is that you can compare your result with the result of the work of an online mentor.
Figured carving and making crafts
Do-it-yourself wood carving
Usually, groove fillet and groove straight cutters are used for figured wood carving. Wood carving with a hand router occurs as follows:
- install a fillet groove cutter of small diameter into the unit;
- apply a design to the workpiece (you can use a stencil);
outline the applied pattern with a black marker (not alcohol);
follow the drawn lines with a fillet cutter, setting the immersion depth to 3-4 mm;
Next, you should change the fillet cutter to a straight groove cutter and select the entire inner part of the pattern;
After milling is completed, the resulting pattern should be sanded with sandpaper and varnished.
In the same way, volumetric figured wood carving is made. Only the cutter selects not the pattern, but the background around it. The finishing of the ornament is done with a drill or mini-drill (engraver).
Also, with the help of a router, not only surface wood carving is produced, but also openwork through (slotted) cutting of plywood, thin furniture panels, and MDF boards. The following picture shows a slotted pattern made with a router on plywood.
Processing of plywood is done with ordinary wood cutters.
Using the work techniques described above, you can cut out shaped elements for gazebos, kitchen facades, country furniture, etc.
Curly wood carvings can be used to decorate various wood crafts. For example, boxes, backgammon, making signs for various establishments.
The router can also be used if you need to make balusters decorated with twisted or straight carvings. To mill straight grooves, use a special device that is easy to make with your own hands.
The process of milling a baluster occurs as follows.
- A fillet groove cutter with a bearing is installed in the unit.
- To prevent the workpiece from turning, it is fixed with a screw. It should fit into one of the holes in the disk with the baluster attached to it.
- Next, the tool is lowered so that the thrust bearing is to the left or right of the workpiece and just below its center. But the cutter must be located exactly in the center of the part.
- After positioning the equipment, the unit is turned on and a rounded groove is produced (the bearing guides the tool, repeating all the shapes of the baluster).
- At the next stage, the router is moved to the side, the fixing screw is released, and the disk is rotated so that the lock fits into the next hole.
- After fixing the workpiece, the longitudinal groove is removed again. After each pass of the cutter, it is necessary to rotate the workpiece by 1 step.
The following photo shows balusters with longitudinal grooves.
To make twisted balusters you will need a more complex device.
The twisted pattern is obtained by turning the workpiece while the cutter moves along it. The rotation of the workpiece and the movement of the milling cutter on this machine are synchronized.
Wood carving: drawings of work with a jigsaw and a router
It’s beautiful when the interior is decorated with paintings made on wood. The carved paintings depicting various stories are impressive in their appearance. You can try working with wood yourself using special tools.
The master uses not only tools and raw materials in his work. He needs examples of wood carving: photographs, drawings and sketches. Based on them, the master, like an artist, creates his compositions.
The master works with various tools: a jigsaw, a milling cutter, a drill, etc. Let's look at how the work is carried out according to the drawings.
First, prepare your workspace so that nothing disturbs you, and everything you need is at hand. Make sure there is good lighting and a comfortable work surface height:
1) Choose the material you will work with. Alder is good for working with a jigsaw. The surface of the workpiece must be smooth and free of knots.
2) You can come up with a drawing yourself that you will implement on the tree. You can use the suggested sketches:
3) Transfer the desired pattern to the tree. This can be done using tracing paper. Place it on the workpiece, on top - a piece of paper with a sketch, and trace all the lines with a pencil. To prevent the design on the workpiece from smearing and ruining the entire work, go over the lines with varnish.
4) Prepare the jigsaw for work. Stretch the tool blade moderately. If the tension is weak or too tight, the fabric may break.
Project
The quality of the blank design will depend on how professionally the project was created. There are many online resources that allow you to design the required drawing on software. Their use makes it possible to visualize the design, as well as obtain a three-dimensional image of the future work, before it begins.
The program used on a CNC milling machine is compiled according to the following scheme:
- entering the dimensions of the workpiece that will be used for drawing;
- creation of a virtual drawing applied to the surface;
- setting the ratio of the specified parameters and saving them.
Do-it-yourself wood carving with a router
Processing various wood blanks, inserting door hinges and locks, making technological holes, cutting out figured wood carvings - all these works can be performed by a router. We will talk about how to work with it in this article.
Wood milling. Lessons
How to mill wood
There are certain rules for working with wood, following which you will preserve your health. They themselves are simple, we list them below.
- The part intended for processing must be securely fixed on the work table, without play. This condition will prevent the part from moving or falling out of the socket.
- The movement of the milling machine blades should be directed along the wood workpiece. If this rule is not followed, the quality of the edges of the cutting line and the evenness of its boundaries will suffer.
- To mill shapes of complex shapes, such as a circle, ellipse and others, it is recommended to use compasses that allow you to make curves of various radii.
How to mill wood
For milling wood, there are the following milling machines:
- Plunge - suitable for holes, grooves - the cutter moves along a vertical axis.
- Edging – suitable only for edges and chamfers. They have a guide bearing available.
- Lamellar - ideal for rounded longitudinal grooves.
- Dowel - suitable for grooves for dowels, for tongue-and-groove assembly.
What can be done with a wood router
It is quite possible to perform the following manipulations with wooden blanks:
- Cut grooves and recesses of absolutely any shape, from simple rectangular to oval and complex bends in the form of polylines.
- Make through and blind technological holes.
- Perform milling of edges and ends of wood blanks.
- Apply various ornaments and inscriptions to the surface of the workpiece.
- Copy details of any shape using so-called templates.
Working on a milling table
Having a milling table will make many operations easier for you. The quality of manufactured products will not be inferior to the level of professional milling machines. Here is a list of what can be made on a milling table:
- figured holes and grooves;
- connections and joints of parts;
- process and profile edges and ends.
Tables come in the following types:
- portable (mobile, portable);
- stationary (personal) tables.
The working surface of the table is equipped with the following tools:
- Side stop – serves to limit the cutting depth of the cutter. A comb and stops can be installed on the cheeks of the side stop to hold the workpiece.
- Positioner – comes complete with stop. Helps to accurately set the stop relative to the cutter.
- Angular stop - helps to set the profile of the ends and make a tongue-and-groove connection.
Steel grade st3sp decoding
The router can be attached to the tabletop in two ways:
- It is permanently attached to a removable plate, which will subsequently facilitate its dismantling.
- Can be adjusted in height using a lift with a lever having a vertical axis. In addition, there is a design with a disk or lever on a horizontal axis.
Working with a hand router on wood
Products made with a tool such as a hand cutter:
You can start restoring old furniture. Related work during restoration, which the cutter can handle, will include inserting new locks, forming grooves for new connections, and applying various shaped patterns.
The cutting depth is adjusted by a lifting mechanism (fixed distance between the pin and the washer), which connects the electric drive and the base of the router. To fix the distance from the edge of the workpiece, a straight guide is provided.
The kit sometimes includes a circular guide, which is used for milling circles with a large radius.
When milling circles of small diameter, it is quite enough to make do with technological holes for inserting a centering pin at a given distance from the cutter. The miter gauge will help when making grooves.
What kind of cutter to cut plywood with?
Compression or straight cutters are suitable for cutting plywood, since only when using them you are guaranteed no chips. If you use laminated plywood as a workpiece, other cutter geometries are quite suitable. Mills with a chip breaker are suitable for high-speed milling.
Techniques for working with a wood router. Video tutorial
Before starting work, you should make sure how well the screws and threaded parts are tightened. It is necessary to remove the safety nut and the collet and make a control cut.
Open groove
If the groove is formed at the very edge, then you need to install the tool in such a way that the cutting blade will be above the edge of the workpiece. Then the blade is lowered to a predetermined depth, and the basket is fixed. After processing the edge, lift the cutter and loosen the lock.
Deep groove
In this option, after drilling the area being processed, you have to re-adjust the new immersion depth of the cutter by turning off the router. The recommended depth should not exceed 5 mm, especially for hard workpiece materials.
Narrow groove
A flat base is attached to the router sole. There are guide rods attached to the sides, which are necessary for the straightness of the router's movement.
End surface
To obtain a clean edge, you must initially make a shallow cut, guiding the tool along the line of rotation of the knife. This way the material will be selected evenly, after which the end is cleaned in the usual way - the router must be driven in the opposite direction to the direction of rotation of the cutting element.
Curved edges
To mill edges, the craftsman needs templates with a thrust ring secured with ties on the base of the tool. The template is fixed to the workpiece using double-sided tape and tightened with clamps to the workbench. There should be no sudden movements when working with the tool. As they say, the first pancake is always lumpy, don’t be upset at the first failures. If you enjoy working with a router, this activity can turn from a hobby into a completely profitable business for the rest of your life.
Securing the cutter
When the type of work with wood changes, the need arises to change the type of cutter. To make this procedure easier, the router should be placed on its side. Lock the spindle, and if this function is not available, turn off the router and secure the spindle with a key. Then you need to unscrew the collet and pull out the cutter. Take the one you need and insert it into the collet. After this, tighten the nut and check for correct installation for runout by turning the mechanism to minimum speed. Place the router in the working position and adjust the height of wood processing.
Step-by-step production of a template for furniture
Furniture parts cut according to a template have the same shape and size.
- Such a template, made by yourself, will perform its functions no worse than one purchased in a store. To create it, you need to prepare a drawing and a cover for the processing machine. Then a test homemade product is made from a fiberboard sheet; its thickness is equal to 8 mm.
- Next, the diameter of the cutter and the machine itself is measured. Then 2 intersecting lines are drawn, the angle of which is 135°. To smooth out these indicators, an arc is taken. To calculate its radius, you should find out similar readings for the cutter and rings. The resulting difference in the radii of the rings and cutters should be subtracted from the value of the first device.
- This creates an internal arc. The flat end of the postforming is milled along its base. As the ring moves along a given radius, the cutter describes an arc whose diameter is equal to its own.
- From the drawn segment, 2 lines are laid parallel to each other. The distance between these points is equal to the diameter of the ring of the router used. 5 mm is added to these readings. The line starts from the middle of the previous arc.
- The connection point of the segments is smoothed using an arc. Its radius corresponds to similar readings of the device’s thrust ring. During movement, the cutter will no longer be able to perform arcuate movements.
- You need to draw 2 equal rectangles that imitate the contours of the tabletop. An angle is applied to them, after which it is extended to a certain distance.
- Marking the template will make your work much easier. The arcs of the top and bottom rows will not overlap. Therefore, it is necessary to carry out verification for each detail by slightly shifting these boundaries.
Rules for working with templates for a router.