Durable aluminum alloys have already entered all spheres of human economic activity. These materials are often used, break down and need repair. In addition, new structures are assembled from them. Therefore, the topic of welding aluminum at home, with various types of machines that many craftsmen have, is very relevant. To weld aluminum alloys, you need to keep in mind certain features that are important to take into account in your work, and our task is to consider in detail the technology of this process, the necessary equipment and equipment. We will try to study this topic carefully.
General principle
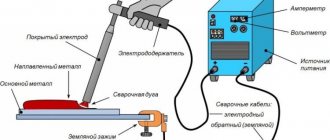
In general, welding will be carried out on the same principle as arc welding, but there are a few technical points that you should remember:
- welding is carried out with a short arc;
- welding current should ideally reach 70–100 A;
- The electron angle during cooking should be maintained at approximately 90 degrees;
- The electrode burns three times faster than during conventional welding of, for example, steel.
Operating conditions and precautions
When using the oscillator, you need to follow simple rules, adherence to which increases safety.
- The devices can be used for welding in workshops and open production areas.
- During precipitation, the use of the oscillator is not allowed - this may lead to damage and the need to repair the device.
- Work may be performed in a temperature range from -10 to 40°C, air humidity up to 98% and atmospheric pressure 85-106 kPa.
- Do not use the device in dusty or gas-filled workshops.
- Work with the welding machine should only be carried out with grounding.
- Before carrying out work, you need to make sure that the device is connected correctly and that the contacts are working properly.
- Removing the casing from the oscillator is allowed only after disconnecting it from the network.
- The working surface of the device should be kept clean. When carbon deposits form, the coating is cleaned with fine sandpaper.
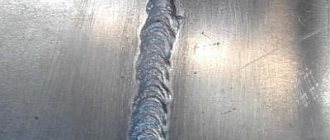
Cooking process
To successfully carry out the welding procedure, the following steps must be followed:
- We secure the parts using a vice or, if convenient, a clamp.
- We connect the minus to the bottom part, the plus to the electrode.
- Set the current to 100 A.
- We cook on a short arc, although if you are unaccustomed to catching it it can be quite difficult. But when you get used to it, you will be able to hold it quite confidently.
- When welding is completed, beat off the scale with a hammer and clean it with a brush.
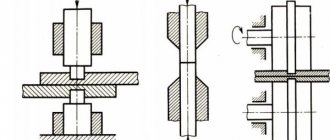
What is the transformer made of?
In general, the transformer will consist of the following parts:
Welding transformer diagram.
- Transformer housing. Before using it, you must make sure that the housing is grounded. The ground cable must have a cross-section of at least 0.25 cm and be connected to the terminal that supplies the pulse to the working surface of the welding machine. The transformer itself must be installed on an insulating surface during operation. A stand made of duralumin (no more than 0.03 cm thick) or textolite is best suited for these purposes.
- Clamp (collet).
- Handle made of steel rod.
- Magnetic core. The essence of his work is initially to create a closed path for the magnetic flux, which will have the least magnetic resistance. That is why the magnetic core is made from those materials that do not lose their magnetic penetration properties in alternating magnetic fields. Such materials include alloys of iron and nickel or alloys of iron, nickel and cobalt.
- Lever.
- Eye bolt.
- Scale.
- Transformer cover made of cast iron or steel.
- Vertical screw.
- Lead nut for vertical screw.
- Windings Conducted in two stages. The primary winding of the transformer should consist of 250-600 turns. Secondary - from 60 to 75 turns. It is advisable to make it from a copper busbar with a cross-section of at least 0.35 cm in diameter. Winding should only be done along an insulated rod in the same direction. Each subsequent step of the winding must be insulated using fiberglass or a similar type of insulator. Each winding terminal is tinned and labeled. And a cambric is attached to each end of the network part.
- Rectifier. Its function is to convert alternating current into direct current.
- Electrodes. For argon arc welding, it is recommended to use tungsten electrodes, since tungsten can easily withstand direct current of direct and reverse polarity or alternating current. During operation, the electrode must be brought as close as possible to the base of the part. Using this technology, the resulting arc will have small parameters, which is necessary when welding aluminum. The electrode should protrude 2-5 mm from the burner body, and a ceramic nozzle should be placed around it.
- Oscillator. Its action is to deliver high-frequency and high-voltage pulses.
Semi-automatic aluminum welding scheme.
Another necessary item is a burner. A clamp (collet) with a diameter of 0.2 cm is selected. Next, a copper tube with a diameter of 0.6 cm, which will be responsible for supplying gas (in this case, argon) and voltage to the electrode, should be firmly soldered to the opposite direction of the clamp. High temperatures should be used when soldering the tube.
To the other end of the burner it is necessary to attach a tube made of ceramic or quartz, 5 cm long and 0.8 cm in diameter, which will perform the working function. Care must be taken to ensure that the tube remains mobile and can be removed. Because sometimes it will be necessary to redirect the wire. An arc-shaped electrode will be installed in the middle of the tube.
The holding tube must be covered with insulating material. It is best to use fiberglass for this. It needs to be wrapped around the tube in several layers, using silicone sealants between them. After insulation, a switch is installed to the tube.
The burner itself is connected to the gas cylinder using a tube (with a diameter of 0.6 cm to 0.8 cm), and two additional wires are connected, one of which runs from the valve to the switch on the holder tube, the second is intended for voltage in the transformer. The gas supply itself occurs approximately 20 seconds before the start of the welding process.
Recommendations
To ensure everything comes out neatly and efficiently, I advise you to adhere to the following tips:
- try to move the electrode quickly, because it burns out three times faster than you might be used to;
- It is better to first clean the welding area with a brush to get rid of oxide on the surface;
- You can first heat the parts to 150–200 degrees using a gas burner, this will help make the seam better.
Of course, I only touched on the basic principles. If you want to learn more about this method and start welding even better at home, I recommend watching this detailed video:
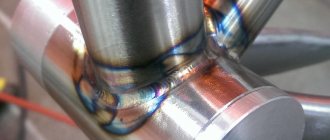
Welding technology
After preparing the elements, you can proceed to the main stage. The technology of welding aluminum with an inverter consists of the following stages:
- heating the workpieces up to 150°C;
- setting the required operating mode of the device;
- creation of an electric arc (depending on the welding method, it is performed using a contact or non-contact method);
- formation of a weld pool (the time of its formation in seconds corresponds to the thickness of the metal in millimeters; a spot with a mirror surface is detected in the area of influence);
- supply of filler material, creation of a seam.
When welding aluminum alloys, an arc of 2-6 mm is maintained, and a current of reverse polarity is used.
Let's sum it up
From the above, the following conclusions can be drawn:
- the method that I describe in this material is a little more labor-intensive than the traditional one, so you need to get used to it a little, but nothing critical;
- you can do without argon, there’s nothing wrong with that, the seam will come out exactly as strong;
- prepare more scrap so that you can practice on it before starting finishing work;
- movements must be faster than with conventional welding in order to obtain a truly high-quality result;
- Be sure to prepare the surface for welding in advance so that later it will turn out more firmly and accurately.
When using materials from thebestvideo.ru, a link to the source is required.
Difficulties of welding aluminum at home
When creating a weld, the following difficulties arise related to the properties of the metal in question:
- Under the influence of high temperatures, most materials change color. This helps control the process and choose the right degree of heating. The color of the aluminum remains the same, so the specialist cannot evaluate the result of the work visually.
- Due to increased thermal conductivity, exposure time should be limited. An increase in the duration of maintaining the arc leads to the occurrence of defects in the welded joint.
- The surfaces of aluminum workpieces are covered with oxide deposits. The melting point of such a film is 2000°C. This figure for the base metal is 3 times lower.
- Melt droplets appearing in the welding zone quickly oxidize. This prevents the formation of a uniform seam. The use of an inert gas - argon - prevents contact of the melt with air, preventing oxidation.
- The high fluidity of the material contributes to the deformation of the weld pool. Therefore, a steel sheet is placed under the joint to remove heat.
- The metal in question contains chemical elements (for example, hydrogen, H); when the temperature rises, the substance is released into the surrounding atmosphere. Cracks and voids appear in the welded joint.
- When aluminum heats up, it expands, so when it hardens, there is significant shrinkage.
- The current must be large, which is explained by the high thermal conductivity of aluminum.
What should you remember when working with argon?
Chemical properties of aluminum.
Working with argon when welding aluminum requires some precautions:
- Each worker must know perfectly all the operating principles of a welding machine, the rules of its operation, types of welds and connection methods, what properties the types of metals and alloys used have, and how all the structural parts interact with each other.
- It is necessary to have basic skills in providing medical care for all types of electrical injuries, thermal injuries and gas poisoning.
- It is mandatory to use all personal protective equipment during welding. The face, eyes, arms, legs, torso must be dressed in protective clothing, which will help avoid not only electrical injuries, but also save lives.
- Full compliance with all fire safety standards, as work is carried out using flammable and explosive materials. It is necessary to have a working fire extinguisher and be able to use it if necessary.
- It is necessary to ensure constant ventilation of the room in which welding work is carried out using gas to avoid poisoning with this substance.
- All elements of the electrical circuit must be carefully isolated from each other.
- The malfunction of at least one of the mechanisms of the welding machine does not allow its further operation without repairing the breakdown.
Thus, you can be convinced that a welding machine for welding aluminum can be completely made with your own hands, without spending so much time and materials.
Properties of duralumin
An unpleasant feature of aluminum, and accordingly its alloy, is its refractoriness, which significantly complicates welding. The alloy is highly dense and not as flexible and soft as the base metal. When welding duralumin, problems often arise with rapid consumption of electrodes and increased fluidity of the alloy. In order to avoid these problems, it is enough to harden it at a temperature of 500 degrees.
When welding duralumin, it is necessary to adhere to a certain technology and use special tools. Otherwise, the result may be of poor quality. It is worth remembering that duralumin is easily corroded, so damage may be found at the welding seams, this is due to the burnout of alloying elements.