How to choose the right pressure gauge
Pressure meters are selected for installation in a specific system, taking into account a whole range of parameters. The key parameter by which a pressure gauge is selected is the measurement range. The working range of scales of modern models is very wide.
Choosing the right pressure gauge on the scale is quite simple. To do this, it is necessary to select the scale so that the operating pressure of the system is in the range from 1/3 to 2/3 of the scale.
For example, if the operating pressure of a pipeline is 10 atmospheres, then to measure it you need to purchase a pressure gauge with a scale of 0-25 atmospheres (for this scale 1/3 will be equal to 8.3 atmospheres, and 2/3 will be equal to 16.6 atmospheres). If the operating pressure is too low (less than 1/3 of the scale), then the measurement error increases significantly. At high operating pressure (over 2/3 of the scale), the device will work under increased loads, which will reduce its service life.
Most pressure gauges come in a round housing. The device must be selected based on the installation conditions so that it can be easily accessed and does not come into contact with other equipment or structural elements. Standard pressure gauges can have a diameter from 40 to 250 mm. Also, depending on the installation conditions, devices are selected based on the location of the fitting. It can be radial and axial (end). In the first case, the fitting for connecting the device is located in its lower part, in the second case - at the rear.
Depending on the operating conditions, it may be necessary to install a specialized pressure gauge.
Such devices are designed to operate in harsh conditions - under the influence of an aggressive working environment, vibration, low (below -40 °C) and high (over +100 °C) temperatures.
When choosing a pressure gauge, the size of the connecting thread is also taken into account, which the manufacturer must indicate on the body. It should be taken into account that domestically produced devices usually use metric threads, while imported ones use pipe threads.
You also need to select a pressure gauge taking into account the calibration interval. It is most convenient to operate devices with a maximum verification interval.
LLC "GROM" Wholesale supplier of plumbing fixtures, rolled metal and building materials 195213, St. Petersburg, st. Latvian Strelkov, 27, letter A
How to choose the right technical pressure gauge.
What should you consider when choosing a pressure gauge?
Parameters that are important to consider when purchasing a device. This information is necessary if you do not have the exact brand of the device, or the model you need is not available, and you need to choose the right analogue.
Measuring range parameter.
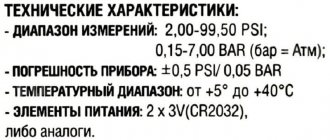
This is the most important parameter. Standard range of pressure gauges: 0-1, 0-1.6, 0-2.5, 0-4, 0-6, 0-10, 0-16, 0-25, 0-40, 0-60, 0-100, 0-160, 0-250, 0-400, 0-600, 0-1000 kgf/cm2 1kgf/ms2=0.980665 bar=0.0980665 MPa=98.0665 kPa.
Standard range of pressure ranges for pressure and vacuum gauges: -1..+0.6, -1..+1.5, -1..+3, -1..+5, -1..+9, -1..+15, -1 ..+24 kgf/cm2=bar=atm=0.1MPa=100kPa
Standard range of pressure ranges for vacuum gauges: -1..0 kgf/cm2=bar=atm=0.1MPa=100kPa.
If you are in doubt about which scale the device is needed for your purposes, when choosing a range, the main factor is whether the operating pressure falls in the range from 1/3 to 2/3 of the measurement scale.
When choosing a scale range, you need to know that the operating pressure should fall in the range from 1/3 to 2/3 of the measurement scale. To ensure stable operation, you should buy a device with a scale of 0-10 atm, since a pressure of 5.5 atm falls in the range from 1/3 to 2/3 of the scale of 3.3 atm and 6.6 atm, respectively. Provided that the pressure is less than 1/3 of the scale, the error in pressure measurement increases significantly. Provided that the measured pressure is more than 2/3 of the scale, the device operates in overloaded mode, which entails a reduction in the service life of the pressure gauge.
Accuracy class parameter
Shows the permissible percentage of error in the measurement results of the device from the measurement scale.
There is a standard range of accuracy classes for pressure gauges: 4, 2.5, 1.5, 1, 0.6, 0.4, 0.25, 0.15. You can calculate the pressure gauge error yourself. For example, if your device is rated at 10 atm and has an accuracy class of 1.5, the permissible error is 1.5% of the measurement scale (0.15 atm). If the error of your pressure gauge exceeds this value, the device must be replaced. Without special equipment, it is impossible to determine that the device is faulty. Only a specialized organization that has a testing installation with a pressure gauge of a high accuracy class, which is the standard, can establish a discrepancy in the accuracy class. The problem pressure gauge and the reference device are connected to the pressure line, and then the readings are compared.
Pressure gauge diameter parameter
This parameter is important for devices with a round body. Standard diameters: 40, 50, 63, 80, 100, 150, 160, 250 mm.
Location of the fitting.
There are two options. Radial arrangement - the connecting fitting comes out of the pressure gauge from below. End - the fitting is located at the rear, on the back of the device.
Connecting thread
The most common types of threads for pressure gauges are metric and pipe threads. There is a standard range of thread types: M10x1, M12x1.5, M20x1.5, G1/8, G1/4, G1/2. Devices from imported manufacturers are characterized by pipe threads. For domestic pressure gauges - metric.
Intervalidation interval.
The period after which the pressure gauge must be calibrated is called the calibration interval. New devices have initial factory verification. This is evidenced by the verifier's mark located on the dial or on the pressure gauge body, and a mark in the passport. Primary verification lasts for 1 or 2 years. For pressure gauges that are used for personal purposes, verification is not critical, so you can choose any pressure gauge. For departmental facilities - factories, furnaces, heating points, etc., after the expiration of the initial verification period, the pressure gauge is subject to re-verification at the center of standardization and metrology, or in specialized organizations that have a license for verification and the corresponding equipment. You should know that re-verification, as a rule, costs more than buying a new device, or is equal to it. In addition, a fee for returning the device is added to the amount. If the pressure gauge does not pass re-verification, you will also have to pay for repairs and subsequent verification.
How to find out the accuracy class of a pressure gauge
The accuracy class is indicated on the instrument scale; the letters KL or CL may be placed in front of the numerical value.
Calculation of the accuracy class of the device
Let's assume that the scale indicates an accuracy class of 1.0, and the measuring range of the device is 250 Bar. When comparing the pressure measurement results with the readings of a standard pressure gauge, it turned out that the error was 2 Bar. Does the pressure gauge comply with the specified accuracy class?
In order to answer this question, we will calculate the accuracy class; to do this, we will correlate the measurement error with the measuring range of the device and express the result as a percentage.
The result obtained does not exceed 1, which means that the pressure gauge corresponds to the specified accuracy class of 1.0.
What accuracy classes are there?
According to GOST 2405-88, the accuracy class of the pressure gauge must be selected from a number of numbers:
- 0,4;
- 0,6;
- 1,0;
- 1,5;
- 2,5;
- 4,0.
How are diameter and accuracy class related?
The diameter and accuracy class of a pressure gauge are interrelated parameters; the higher the accuracy of the device for measuring pressure, the larger the diameter of its scale.
What is the error of a pressure gauge with accuracy class 1.5
The measurement error of a pressure gauge depends not only on its accuracy class, but also on the measurement range.
Let's consider an example, the measuring range of a pressure gauge is 10 MPa, the accuracy class of the device is 1.5. This means that the maximum error of the pressure gauge should not exceed 10*1.5/100=0.15 MPa.
Pressure gauge accuracy class 2.5
The designation 2.5 means that the maximum permissible measurement error of the pressure gauge is 2.5% of its measuring range.
