There are many types of different connections that are widely used today in repairs. They are needed for assembling and repairing furniture, for connecting individual parts of some functional elements. But it is the tenon joint that has earned the greatest popularity among all types.
A tenon joint is a connection of wooden parts by tightly fitting the tenons into the holes (grooves).
The connection based on grooves and tenons is mostly used for wooden materials. It provides a fairly strong joining, while preventing the parts from deforming. This is especially good for furniture, when it is necessary to ensure maximum reliability of fasteners.
Basic information
One of the most proven methods of connecting two parts is considered to be a tongue-and-groove connection.
This method of fastening wood products is the most widespread. It is used to fasten parts of window frames, doorways, various furniture elements, and the walls of wooden boxes. Each element of such products has a specially made tenon (or several pieces) or a groove (several grooves). The types of main connections of parts made of wood are defined in GOST 9330-76. This document defines the following characteristics of such fastening of wooden parts:
- rules for abbreviation (abbreviation) of various compounds;
- drawings showing the appearance;
- permissible dimensions of each element;
- the procedure and rules for determining the size of each element;
- expressions for calculating the dimensions of the required cutting tool;
- formula for calculating the strength of assembled elements;
- inspection procedure and strength testing.
GOST 9330-76 Basic connections of parts made of wood and wood materials. Types and sizes
According to this standard, all connections are divided into the following categories:
- corner (end and middle);
- box (mainly belongs to the corner category);
- along the edge;
- the so-called “on the mustache” length.
For each of these categories, the standard has its own abbreviation (short designation). This marking consists of two capital letters of the Cyrillic alphabet and one number. For example, UK-2 means that we are talking about a connection with a double open end-to-end tenon, UK-9 is a “mental” connection with a plug-in non-through round tenon. The entire list is set out in more detail in the text of the adopted standard.
Any type is accompanied by a detailed drawing. Each of them shows frontal and profile projections indicating dimensions, formulas for calculating each element, and finished results. To obtain a strong connection, the standard defines tolerances that must be observed in the manufacture of each element. The parameters of the corner tenon (its length, pitch and bluntness) are given in detail. Based on the results presented, the guest developed recommendations for choosing the necessary cutting tools. Separate references are made to other documents (standards) that determine by what means each of the listed products must be secured.
Selecting the type of connection
In general, there are a huge number of types of joints of wooden blanks, so we can only talk about some of them, the most common.
One of the easiest ways to extend a wooden part (timber, log, board) and increase its width is an end connection. There are several options for its implementation. A simple and functional half-thickness (half-tree) method is often used. Depending on the expected load on the part, the cut can be straight or oblique. In some cases, the joint is strengthened using figured cutouts - locks. This type of connection prevents stretching, twisting, and bending. This is how the beams are spliced together for the purpose of lengthening.
Creating three-dimensional frames or wooden frames requires reliable connections at various angles. In this case, it is rational to use a tenon-groove or tenon-eye connection. The nodes at the junction of parts can withstand displacement, bending and compression loads. If the structure requires high tensile strength, the cutouts are made trapezoidal.
Additional connections of frame products, which impart rigidity to the structure, are implemented using T-shaped or cross-shaped connections. The main load at the joints is compression, displacement and rupture. In special cases, the structure is additionally reinforced with metal corners, screws or nails.
To connect boards together into box-shaped structures at right angles, it is convenient to use a special box groove. As the name implies, this method is often used to create three-dimensional structures, including furniture boxes. A high-quality box joint looks monolithic, has an attractive appearance and can withstand impressive loads. When creating wooden furniture, dowel, dowel and domino joints are often used (when the groove is oblong, as opposed to a round dowel).
Half-tree connection
Quite often in carpentry they use various options for half-timber joints (simple or straight lock). This type of assembly of wooden structures is characterized by ease of manufacture and high reliability. The following varieties are distinguished:
- cross connection;
- half-tree - dovetail;
- gusset;
- on the mustache;
- half-tree splicing.
The first two methods are used to connect parts that intersect at right angles. Especially popular is the dovetail, in which the neckline is trapezoidal and the sides are not at right angles. The lock groove widens slightly from the end, providing a more reliable fixation. It should be noted that a tenon joint can also be called a dovetail if the tenons are cut in the form of trapezoids.
The second and third methods form a completed angle. Splicing is used if it is necessary to increase the length of the workpiece.
The principle of connection and its varieties
In terms of design, all tongue-and-groove joints are made according to the same principle: a protrusion is made on one part, and a recess is made on the second. They are exactly the same in configuration and size.
When these two parts are tightly joined, a strong technological unit is obtained.
When building houses, such a connection prevents the shift of one part of the structure relative to another; in the manufacture of furniture, it significantly increases the area on which glue is applied, thereby providing additional strength to the product.
Based on the geometric shape of the protrusion and recess, such joints are divided into two main types:
- rectangular cross-section (sometimes with rounded edges of tenons and grooves);
- in the form of a trapezoid (also called a “dovetail”).
Based on the number of spikes and grooves that need to be made for one joint of parts, these connections are divided into:
- single-spike;
- multi-spike.
Important! Regardless of the number and geometric shape of the protrusions and recesses, they must be made only parallel to the grain of the wood.
Types of corner connections for timber
Separately, it is worth mentioning the connection of timber or logs when making a log house for a house or other building. This construction technology has been used for centuries; high-quality logs guarantee a long service life for the building.
There are two main types of corner joints when building a log house:
- without a trace (in the paw);
- with the remainder (into the bowl).
Cutting without residue means that the stacked logs will form an even angle, their ends will not protrude beyond the building; a separate type of it is a warm angle. Cutting with the remainder, in turn, means that a weave of protruding ends will be formed at the corners of the building. The second method is more expensive in terms of the amount of material, but the building retains heat better and is more stable.
There are various ways to connect wooden parts; the ability to determine the optimal one for a particular type of work will significantly diversify the range of products that a craftsman can make.
- Subscribe to the channel, leave comments, like, share the article with friends. This motivates us to continue publishing articles! Thank you!
- I recommend looking at the article about manufacturing or
- creation
Application area
The tongue-and-groove connection has found application in many areas of our daily life. For example, when arranging the floors of premises according to this principle, common coverings such as laminate, parquet, parquet boards, ordinary floorboards, chipboard, fiberboard or MDF boards are joined together.
Wood, as one of the most environmentally friendly materials, is used to make a wide variety of furniture (from a simple kitchen stool to a designer set for a living room or dining room), roller blinds, blinds and much more. And all these products are mainly made using a tongue-and-groove connection.
When constructing wooden frame buildings, houses made of timber, when arranging the beam-and-truss structure of the ceiling and roof, one also cannot do without arranging protrusions and recesses.
Start with the Basics: Basic Rules for Male-Socket Joints
Regardless of how you form your tenons and sockets, these tips will help you achieve perfectly-fitting, strong joints for any project.
- Correct connections always start with careful markings. Use a proven steel ruler and square, and mark the marking lines with a sharp pencil, surface planer or marking knife.
- A simple rule that is easy to remember: when marking a socket on the end or edge, the thickness of the workpiece must be divided into three equal parts. The outer two thirds will become the walls of the nest, and the middle third must be removed. So, in a board 18 mm thick, a 6 mm wide nest is made in the center of the edge of the workpiece. When using material with a thickness of more than 18 mm, the width of the socket can be more than one third of the thickness of the workpiece, provided that the thickness of the walls of the socket is at least 6 mm - this is due to strength considerations.
READ How is the density of wood species determined?
- Fitting a crossbar tenon to a socket with rounded edges is easier than making a rectangular socket. To round corners, use a rasp or a knife with replaceable blades.
First make the nests, and then form the spikes that match them. It is much easier to precisely adjust the tenon than to change the dimensions of the finished socket.
- A correctly fitted tenon should be held in its socket without glue and should not fall out when parts are turned over, but at the same time, only a small amount of hand effort should be enough to assemble and disassemble the joint.
The highest bond strength is achieved when the mating surfaces are smooth.
- Drilled or milled sockets will have rounded ends. To fit them to a rectangular tenon, you can trim the corners of the socket with a chisel. To save time and effort, you can simply round the corners of the tenons.
Now make the spikes and fit them to the sockets
Plug-in tenons are convenient to use with milled sockets. Saw off the tenons from a long piece that has been machined to the required section.
Depending on the chosen method of selecting sockets and the tools available, you can make spikes at the ends of the parts, or insert (separate) spikes that connect two parts to the sockets.
The use of insert tenons involves selecting sockets in both parts to be joined, into which a sawn tenon suitable for both sockets is inserted (photo on the right). Instead of buying blanks for inset tenons, you can make them yourself from scraps of hardwood (to be safe, process scraps that are at least 305 mm long). Just sharpen the workpiece to a thickness that ensures a tight fit of the tenon in the socket. If the ends of the socket are semicircular, mill the corresponding roundings on the blanks for the tenons. After this, saw off the tenons of the required length from the workpiece.
Method No. 1. A groove disk will help you quickly deal with spikes
The stackable groove disk allows you to cut out tenons with high precision and minimal time. Fine adjustment of the disc thickness is not required as excess material is removed in a few passes. To cut tenons using this method, use two outer discs, between which install three intermediate chipper discs with a thickness of 3.2 mm. To prevent chipping at the exit of the disc from the workpiece, attach a plywood or MDF pad to the transverse (angular) stop of the sawing machine.
After installing the mortise disk in the machine, adjust its extension so that it just touches the tenon marking line on the workpiece. Using a piece of material the same thickness as the workpiece, make one pass on both sides and check the fit of the resulting tenon. Adjust the blade offset and make test passes again. The result should be a tight fit of the spike in the socket.
THE GROOVE DISC SIMULTANEOUSLY FORMS THE SHOULDERS AND CHEEKS OF THE TENON
The grooving disc works quickly and is easy to use, but often leaves characteristic marks in the form of scratches that require additional cleaning.
First, use a groove disc to cut out the front cheeks of the tenon, and then the side ones. The high overlay of the cross stop will provide support for the workpiece when cutting out the side cheeks.
Now install the longitudinal (parallel) stop of the machine so that it limits the length of the tenon. Measure the distance between the stop and the teeth of the outer disk farthest from the stop - this distance determines the line of the shoulders of the tenon. Provided that the rip fence is parallel to the saw blade and the grooves for the cross fence, making a pass will not lead to the blade pinching or the workpiece being thrown back. With these machine settings, cut out both face cheeks of the tenon on all workpieces. After this, without changing the position of the longitudinal stop, form the side cheeks of the tenons, adjusting the offset of the disk accordingly to obtain the desired width of the tenon. Having finished cutting out the tenons, remove roughness from their cheeks using a zenzubel or a sanding block.
Method No. 2. With a tenoning carriage, the tenons will be smoother
A tenon carriage like the one shown in the right photo below costs about the same as a good mortizing disc ($100-$150), but it provides a cleaner surface on the tenon cheeks. Set the offset of the saw blade to match the width of the hanger. Then, while pushing the workpiece along with the cross fence, form all four shoulders of the tenon, as shown in the left photo below. If necessary, when cutting out edge (side) shoulders, adjust the offset of the disc. Pre-forming the hangers ensures they are clean and crisp.
First make the cuts that form the shoulders of the tenon. Feed the workpiece using an angular (cross) fence, using the longitudinal fence as a tenon length limiter.
Adjust the tenon carriage so that after sawing out the tenon cheek, the trim falls freely to the side and is not pinched between the disk and the carriage.
To cut cheeks, simply secure the workpiece standing at the end in the carriage, adjust the carriage by aligning the marking line with the edge of the saw blade, adjust the blade overhang and make the cut. Turn the workpiece over and file the opposite cheek of the tenon. A tenon cut in this way will be positioned exactly in the center (if the tenon is to be offset to one side of the workpiece, it should be cut in two different settings). Tenoning carriages allow you to form tenons not only at right angles, but their back stop can be tilted. If you want to save money, make a tenoning carriage yourself.
Method number 3. Tenons on a band saw - rough and fast
Setting up a bandsaw for tenon cutting is as easy as setting up a regular rip saw. Pre-shape the tenon shoulders on a circular saw as described in Method No. 2. After this, set the rip fence of the band saw so that the thickness of the tenon being cut is approximately 0.8 mm greater than required, and make the cut (photo below).
When forming the tenon cheeks, feed the board slowly so that the saw blade does not bend and result in crooked tenons. Be careful to stop feeding the workpiece after the cut falls away to avoid accidentally sawing through the tenon shoulders. The cheeks cut on a band saw will be slightly rough. For better glue adhesion, make them smooth using a sanding block or a sander.
Method number 4. Why saw if you have a milling table?
You can rout smooth, neat tenons on your router table with just one bit and a crosscut and rip fence. First, insert a straight bit of the largest available diameter into the router collet and adjust its offset along the tenon marking lines. Set the router table rip fence so that it limits the length of the tenon. In this case, it must be installed parallel to the groove for the transverse (angular) stop - this ensures that the shoulders of the tenon will be perpendicular to the edges of the workpiece.
The gap between the longitudinal stop pads allows you to remove chips with a vacuum cleaner.
Once you've finished setting up, start routing by first making a pass along the end. Consistently perform one pass after another until the end of the workpiece slides along the longitudinal stop. (If you first form the shoulder of the tenon, there is a risk that during subsequent passes the workpiece may be torn out of your hands.)
Marking and making a tenon
To ensure the reliability of the structure, the manufacture of a tenon must begin with careful markings. At the first stage, it is determined what type this element will be manufactured and where it should be located. According to its location, positions are distinguished: corner end, middle and box. In addition, you need to decide how many of them will be in the connection. One of the factors influencing the quantity is the thickness of the workpiece. If the part has a thickness that does not exceed forty millimeters, choose a connection with one tenon. If the width is in the range from forty to eighty millimeters, two or three are made. For thicker workpieces, a triple or multiple connection is cut. The experience of professionals shows that the tenon should have a thickness equal to one third of the total size of the part, and the length should be equal to the thickness of the elements being fastened.
The main stages of making a spike are:
- marking the future spike (horizontal and vertical);
- tool preparation;
- sawing;
- cleaning the walls;
- fit.
Marking the locations of the required cuts is done using measuring tools in both planes. The choice of cutting tool depends on the capabilities of the manufacturer. At woodworking enterprises, this operation is performed on special machines. If you plan to make a tenon with your own hands, use ordinary saws. The most suitable are: a bow saw or a hacksaw. After making the spike, its surface is cleaned. This is done using files and sandpaper. Next, the insert tenon is adjusted to fit the prepared groove. After completion of this operation, its final fixation is performed.
Tools used
In this case, the sampling of material is carried out on the surface of the beams and boards from the side. The main thing is that the proposed connection maintains its dimensions in terms of geometry.
To complete the process using a milling cutter, it is possible to use tools equipped with shanks with a diameter of 8 or 12 millimeters. The so-called groove cutter will become a universal option when performing any type of work. The device is equipped with a cutting part, the basic operating principle of which is described as follows:
- The side surface is involved in the formation of the sides of the tenon, the wall part of the grooves.
- The side with the end part is used when processing the bottom. After this, the required layer of material is removed from the base of the spike.
The result is the simultaneous formation of both tenons and grooves on the surface on the sides. The sizes can be individually adjusted, and the owner has quite a wide range of options in this regard.
Sometimes for grooves and tenons they choose not a rectangular shape, but the so-called “dovetail” type. This option is relevant if increased requirements are placed on connection reliability. Accordingly, the cutter used is also called a “dovetail” in this case. Such work can be easily done with hand tools if the need arises.
T-shaped (T) connection
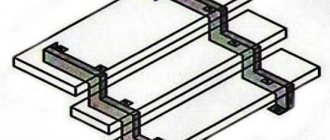
The lap joint is another variation of the half-timber joint, which is widely used in the creation of frame structures. In this case, the end of one part is adjacent to the middle of the second. A fold is cut out on the first (according to a similar pattern as in a corner joint), and a landing groove is cut on the second. Below is one of the schemes for creating such a groove manually.
Make markings on the front side, focusing on the width of the counter part.
Using a thicknesser and a square, mark the edges.
Make cuts in the waste part. They will facilitate subsequent sampling with a chisel.
Use a wide carpenter's chisel to remove the waste. Remove layers, moving from the center to the edges.
Making a device for picking out a tenon
When parts are processed manually, the milling cutter itself does not have additional spatial fixation. But the overall result of the work and the accuracy of the connection itself in the future depend on this.
To assemble the simplest design that can cope with the task, you will need to use:
- Several guides that remain stationary. They should be side and top or bottom.
- The length of the sample is adjusted through the use of an appropriate movable bar.
For manufacturing, the following sequence of actions is used:
- A plywood sheet is taken, from one edge of which the side elements are mounted in a vertical plane. It is necessary to create appropriate cutouts in the center of the material.
- The sides are equipped with guides. The base of the hand cutter moves along them later.
- The side strips are fixed on the upper guides. Then the movement of the working milling cutter associated with these parts becomes limited.
- The plywood sheet, which became the basis for the installation, also serves as a surface for installing the moving element. Then the amount of edge overhang for the future workpiece is easier to control under any circumstances. Fixation is ensured with ordinary screws and other types of fixing devices.
Tenon selection: straight version, dovetail modification
Video 1 shows in detail how to make a tenon at home, making a simple device for one-time or mass production. The technology for working on the created device for a straight tenon is as follows:
- the part is placed on the lower supporting plane on the side opposite to the movable bar;
- the edge of the workpiece on which the tenon is milled is extended into the cutout of the upper guides until it stops at the movable element at the required distance (tenon length);
- the movable bar is fixed with a thumb or clamp;
- the workpiece is wedged with a special element between its upper plane and the upper guides;
- a manual router is placed on the upper guides;
- the lower end of the equipment removes wood from one side of the tenon;
- the workpiece is turned over, the operation is repeated for the other side of the tenon.
Dovetail connection diagram.
The technology provides high productivity for the same parts. Thanks to the device created once, you can make a tenon on parts of any configuration and size. The router is configured after installing it on the upper guides:
- the cutter is lowered all the way to the bottom plane of the plywood;
- the thickness of the part is measured;
- the equipment is raised to the required height (usually the thickness of the workpiece divided by 4).
This ensures a long service life of the connection and prevents loosening of the load-bearing frame of buildings and structures during furniture operation (Fig. 3).
The choice of cutters for a dovetail connection is arbitrary; experts recommend a groove of approximately half the thickness of the part. A simple method for making a structure with this connection is shown in video 2. The sequence of operations is as follows:
- horizontal placement of a sheet of plywood with a manual router attached to the bottom;
- fixing one side of the guide bar with a screw (the consumable piece of the board is attached to the beam from the side of the cutting tool);
- installing the guide bar at the required distance from the center of the cutter and fixing its second edge to the plywood with a clamp (the width of the workpiece minus the diameter of the dovetail cutter in the wide part, divided in half);
- cutting the groove to the required length (width of the workpiece with a tenon);
- setting the guide beam to the required distance for removing the tenon (the clamp is removed, the cutter is cut into the consumable piece of the board so that the distance from its vertical plane to the center of the cutter is: the width of the part minus the width of the groove, divided in half);
- fastening the second side of the guide beam with a clamp;
- sampling the side surfaces of the workpiece.
After fitting the tenon into the groove, the thickness of the tenon is adjusted. It should fit into the mating groove without effort, with a small gap necessary to accommodate the adhesive. If necessary, the guide beam is shifted, and milling is repeated until this condition is met.
Thorn in socket
A more complex connection is the tenon-to-socket method. It requires more skill, but is much more reliable and durable. The scope of use is the same as in the previous case, namely T-shaped joints. The difference between this method is that the tenon is made at the end of the vertical part, and a socket is cut out in the body of the horizontal part.
This is one of the most common furniture connections. There are connections with a through tenon and with a blind one. The difference is that in the first case a through socket is cut out, in the second the slot is made to a certain depth.
Types of tenon joints
Very often, when making various wood products, it is necessary to connect different parts by gluing. The use of a tenon joint gives the product the necessary strength.
The tenon joint consists of two parts - the tenon and the eye socket. A tenon is a protrusion that is located at the end of one of the parts being connected. The spike is inserted into the eye or socket of another part being connected. You can find single, double and multiple spikes. Spikes are divided into solid and inserted. A single tenon is a tenon that forms a single whole with the part. The insert tenon is made separately from the part. In addition to the above, there are several more solid tenon joints: dovetail, toothed joint
In addition to increasing the strength of the product, the tenon joint can be used to increase the useful yield. The figure shows a furniture panel with and without knots.
The furniture panel without knots has a better appearance compared to the previous one.
Types of spikes: a - single; b - double; c - round; g - one-sided dovetail; d - multiple; , e, g - “dovetail”; z - toothed.
As you know, there are various types of structural defects in wood that can significantly worsen the appearance of the product. These include knots, cracks, wane, etc. (Fig. 2). These defects are cut out (Fig. 3), the tenon joint is milled (Fig. 4), and the remaining parts of the bars are spliced along the length. A jagged tenon in some way visually worsens the appearance, so such parts are used for painting (Fig. 5).
Gluing short lengths of solid wood lumber together increases yield. End gluing is characterized by low strength (less than 10% of the strength of natural wood) and is therefore not used. Miter gluing (Fig. 6) is a fairly strong connection. However, this requires a long tenon length and, as a consequence, increased material consumption. Tongue gluing is most preferable as it provides 50-60% of the strength of solid wood.
Defects in the structure of wood in lumber
Scheme for removing defects
Tooth tenon connection
Gluing along the length
Types of toothed tenon joints: a - miter gluing; b - gluing onto a toothed tenon.
Assembling spline connections
Splined connections are designed to transmit high torques and have the following advantages compared to keyed connections:
- with a spline connection, more accurate centering of the part along the shaft is achieved;
- the shaft is almost not weakened, especially with a large number of splines, when the depressions can be made shallow;
- When assembling spline joints, no fitting operations are required, since after machining the parts of such joints, they are completely interchangeable.
In Fig. 2; a, b, c, d show straight-sided, involute and triangular spline profiles. The most common spline profile is straight-sided, but now splines with an involute profile have also begun to be used, which provides better centering of parts than straight-sided ones.
Triangular splines are used only for light loads and on small diameter shafts.
Spline joints with movable fits are assembled manually without adjustment. Spline connections are distinguished by the method of centering the sleeve relative to the shaft.
There are three ways to center the shaft: along the sides of the splines (Fig. 2, e), along the outer diameter (Fig. 2, f), and along the inner diameter (Fig. 2, g).
Rice. 2. Spline connections: a, b – straight-sided; c – involute; g – triangular; d – centered on the sides; e – centered along the outer diameter; g – centered along the inner diameter
When centering accuracy is not essential and at the same time it is necessary to ensure sufficient strength of the connection, centering is used on the sides of the splines (universal joint in cars).
When it is necessary to achieve kinematic accuracy in mechanisms (machine tools, cars, etc.), centering along one of the diameters is used. Centering along the outer diameter, as it is more economical, is used for thermally untreated female parts, as well as for those parts whose hardness after heat treatment allows calibration by broaching. If the hardness of the female part does not allow calibration, then centering along the inner diameter is used.
Fixed joints that have an interference fit are assembled in special devices or by heating the part before pressing.
After assembly, movable spline joints are checked for rolling, stationary joints are checked for runout.
Before assembling spline joints, it is necessary to make sure that the external chamfers and rounding of the internal corners of the splines are present and in good condition, since if these elements are performed incorrectly, the splines may jam when assembling the joint. In stressed joints, the female part is usually pressed onto the shaft with a special device; It is not recommended to assemble such connections with a hammer.
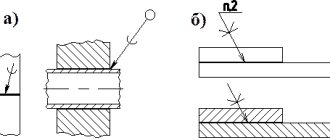
For very tight spline joints, it is advisable to heat the female part to 80-120° C before pressing. After pressing, the female part should be checked for axial and radial runout (Fig. 3).
Rice. 3. Checking the assembled spline connection for runout
In easy-to-release and movable spline joints, the female parts are installed in place under the influence of little force and even by hand. In this case, the covering parts, in addition to checking for runout, are checked for rolling. In a correctly assembled assembly unit, pitching or relative displacement of the female and male parts under the influence of manually generated torque is completely unacceptable.
Critical spline connections are also checked for paint.
Creating tenons on bars and boards
Processing is performed using the following sequence of actions:
- The part to be processed is mounted on a plane from the bottom side.
- The edge of the part where the tenon is formed accommodates the cutouts at the guides at the top. The structure moves inward until it hits the end.
- A movable type element must be fixed while maintaining a certain position.
- We use a wedge tool to connect the guides and the plane located at the top to each other.
- Connection of a hand router with the upper guides.
- Using a router tool on a home router table, wood is removed from one side.
- When the first side of the workpiece is processed, begin the second.
The operation will be successful only with high performance and accuracy parameters. Setup refers to the required steps before the instruments are turned on. To resolve the issue, actions are performed in the following sequence:
- The milling tool is lowered until it reaches the surface of the base.
- Measuring the thickness of a part.
- The thickness result is divided by 4. The result is the distance parameter that is maintained when lifting the cutter above the base.
Tongue-Groove connections
As a rule, we are all accustomed to standard connections, for example, permanent tongue-and-groove connections. But even these ordinary connections can be made in a special way that is beautiful and functional!
Flat tenon. A straight tenon can be made in three different ways: 1. With hand tools: using a handsaw and a chisel
2. Using a power saw Typically, connections of this type are made in a carpentry workshop on a milling machine. However, if you do not have a milling machine or cannot currently use one, you can use a mounting circular saw for this type of work.
3. Using a router and a special tenoning device
or using a router and a milling template:
There are a great many options for using this type of tongue-and-groove connection:
Hidden spikes, as in the photo below, look so that it is unclear how this structure is made and how it is held in place:
door assembly in the final stage, made using classic tongue-and-groove joints. Nice moment of completing work! Gluing is done using Titebond glue, popular among professionals.
The photo below shows a designer table from Matthew X. Curry (USA): a tabletop made of figured walnut with the addition of wenge inserts and a crossed “X” in a natural knot.
Planing the end part of the tenon with a hand plane (a miter plane or even number 4 or 5 for wide tenons as in the photo) helps to finally form the decorative, attractive appearance of the joint:
The main “feature” of this connection in the photo above is the production of a three-dimensional product from flat elements - plywood. A regular tenon is used, made in different planes.
In the photo above, the decorative element in the form of an X is the simplest tenon joint, which is made elegantly and beautifully, but not hidden, but on the contrary, “open” - the joint is placed on the front surface of the tabletop. Technologically, a locking connection with a cross-mounted wedge into a tenon is used here. The connection only seems simple: its execution requires high manufacturing precision. Coffee tables with beautiful tongue and groove connection options:
Everything about this photo above is mesmerizing! And the beauty of the wood, and the craftsmanship, and the genius and simplicity of the connection itself (tenon and groove).
Imagination and skill are limitless when you have experience working with wood and stone!
Another original example of a combined tongue-and-groove and dowel joint on contrasting wood. The trick is that the table leg is not attached in the classic way from below to the tabletop, but crashes into the solid surface of the tabletop. The base with drawers is completely missing.
Tongue and groove connection method
First you need to determine for what purpose this connection method is needed. If this is a table, then the jumpers in it are usually connected to the vertical legs.
Consequently, the wood fibers run vertically and horizontally. If this is a wall table or a bedside table with drawers, then the jumpers here will be located a little differently. They will be horizontal relative to the legs.
Detachable connections: with screws, screws, ties, wedges.
As a rule, we are all accustomed to standard connections, for example, detachable ones with screws. But even these ordinary connections can be made in a special way that is beautiful and functional! Connections with nails, pins and staples : This type of connection is used mainly for fastening or finishing, decorative elements or in frame house construction. We will not talk here about the “seven secret ways” of working with a hammer and show the “beauty” of joints made with nails. But let’s “stop” with special hammers, literally in a nutshell. Hairpin hammers:
Special hammers for frames and windows. They can be with a rotating striker.
Japanese hammers have become extremely popular. They are convenient for both hammering nails and working with tools, for example, chisels.
Jewelry hammers:
Pneumatic pins and nailers
Now they are used in a wide variety of areas: for installing platbands, fastening lining, boards and simply fixing two workpieces before gluing.
Fastening platbands to a micropin (0.6 - 0.64 mm) using pneumatic guns (pins):
Options for trim and door panels:
A micropin or finishing nail (up to 1 mm thick) is also used in the manufacture of caskets and all kinds of boxes:
Pneumatic guns working with staples or finishing nails are convenient for fastening lining, glazing beads and other wooden decorative elements.
In carpentry work, air guns with more serious nails are used
Screw connections :
Direct connection. This type of connection is widespread. And that’s why we focus a little on the types of screws.
Types of screw heads:
Types of thread - single-start and double-start:
To speed up construction and finishing work, primarily the installation of drywall, use screws in a tape and a screwdriver to work with them:
Oblique connection with screws
Due to the ease of use of the device, which provides sufficient accuracy, this type of connection has recently become widely used by both home craftsmen and professionals. The screws can be closed with dowel plugs.
Popular photo
The connection with an oblique screw allows a Craftsman with any level of training to make a variety of products, including furniture, quickly, beautifully and accurately. The screw, hidden in the oblique hole made with the help of the Conductor, does not spoil the front surface with its appearance. And decorative plugs installed in the holes make the product original. The workpieces are fixed to each other and tightened using special clamps - hand vices directly through the holes.
To make such “oblique” connections on a screw, the Kreg Jig system is used. Its essence is that the screw is wrapped at an angle of 15 degrees into both workpieces being connected, which allows you to hide the screw. The hole for the screw is drilled with a step drill using a jig that ensures drilling at a given angle. A step drill drills a hole for the working body of the screw and for the head.
Screw and bolt connections:
The photo shows examples of the use of screw and bolt connections:
The two parts are connected with 2 confirmation screws at an angle of 90 degrees; this is a simple and quick type of fastener. But unlike other types of fasteners, it remains visible, so plugs or overlays are used to hide the confirmation head.
Tie connections:
New connection from Festool using Domino connectors - essentially the same couplers, but with improved characteristics:
Tenon-groove connection: tenoning device and cutters for a hand router
Knowing how to make a tenon and groove with a hand router, you can even at home make not only beautiful but also reliable furniture, but also various wood structures characterized by excellent load-bearing capacity. The tongue-and-groove system connects not only elements of various furniture (tables, chairs and shelves), but also frames of low-rise buildings that experience significant loads during operation.
A tongue-and-groove joint made by hand
In order to make a tenon on a wooden beam using a hand router, several conditions must be met:
- securely fix the workpiece and correctly orient it in relation to the guide sole of the router;
- set the height of the working part of the cutter so that the tool removes a layer of material of the required thickness from the surface of the workpiece.
Even using the simplest tenoning device for a router when performing such processing, you can not only increase its productivity and quality of the result, but also make the technological process safer.
It is especially important to use such a device, which can be made with your own hands, in cases where furniture is produced not in single copies, but in series (in this case, the craftsman has to perform a large number of similar operations both with the same type and with wooden pieces of different shapes and sizes details).
The use of devices will speed up the process of making joinery joints using a router
Forming miter angles
One of the best ways to create corners of various volumetric products is a miter joint. It allows you to create a monolithic structure, hide the fibers of the end, thereby providing an attractive appearance. This method is suitable for a wide variety of products, but is most often used for the manufacture of frames and cabinet furniture parts.
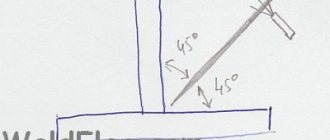
To create a joint, cuts are made in each of the wooden parts at an angle equal to half the angle at which the workpieces meet. Most often, this angle is right, therefore, cuts are made at 45 degrees, however, the angle can vary widely. The work is performed according to the following algorithm.
First mark out the details
It is important not to forget that the marking is done along the long side, otherwise you may not guess with the dimensions
On the edges that will be connected, draw a line at the required angle. Using a combination square, the markings are transferred to each side of the workpiece. Then the cut is made, for which it is better to use an electric miter saw, but you can also work with a hand tool
When working with a hacksaw, it is important to control the cutting angle; it would be useful to use a block as a guide
The finished parts are placed next to each other, checking the accuracy of the fit. Unevenness will have to be smoothed out with a hand plane, and the angle will have to be adjusted using sandpaper. Wood glue is applied to both surfaces, and the product is fixed using clamps. Additional strength can be achieved using nails
When working with a hammer, it is important to control the impact force so that the workpieces do not move
Particularly critical connections are reinforced with bars that are glued into the inner corner. A joint that will not be visible can be additionally reinforced with a metal square.
The result of quality work will be a perfect seam. If a small gap has formed, it can be hidden by straightening the adjacent wood fibers using a smooth cylindrical surface. The shaft of a regular screwdriver is suitable for this.
Tips for working on connections
Anyone can make a tenon joint, but before serious assembly you need to practice properly if you do not have any carpentry skills. As a result, you can get a fairly high-quality fixation. And if you additionally fasten it with metal corners, then the strength of your furniture will be at a high level.
Manufacturing of dovetail tenon and mortise.
There are many ways in which a tenon joint can be made. But before considering the main most common ones, it is advisable to take into account some rules and subtleties that will definitely need to be followed while performing the work:
- If you have the opportunity, make the tenon using special precision equipment. This will ensure that the sizes of the tenons and grooves match each other as closely as possible. Such equipment is available in every carpentry shop or industrial labor training room.
- It happens that you are going to make furniture that does not require much precision. Then you can make the connections yourself. To do this, the tenons must be cut exclusively along the grain of the wood. In this case, the width should be approximately 17-20 times the thickness of the main part. This way you will be able to avoid chipping and cracking.
- Things are a little simpler when cutting tenons on plywood. In this case, the thickness of the spinal sinus can be absolutely any. The width of the main parts does not affect this. But the principle of matching in the direction of the fiber remains the same.
- After the tenons have been cut out and their size has been checked, the wood must be slightly dried. This refers to the usual keeping of the material indoors throughout the day. This way the wood will be able to take a permanent shape, which will help avoid bending of the joint in the future.
Marking of the second part
Tenon joint elements.
After this, we move on to marking the second part of the connection. To do this, you need to take the two parts that are supposed to be connected and attach them tightly to each other. In this case, you need to ensure that it matches the lines of the cuts. When the parts are perfectly attached to each other, it is recommended to clamp them in a vice so that they do not move.
Now that the parts are properly fastened, you need to apply marks with a pencil on the second part that has not yet been marked, and then make the initial cuts with a file. These will not be solid lines, but just thin marks, similar to scratches. But it is still necessary to do them, since it will be easier to work later. Only when making marks, try to do it in such a way as to achieve perfect evenness and avoid bending.
Related article: Painting lining on loggia and balcony
After this, it is necessary to release the parts and move them further relative to each other. It is important to take this into account. If you move the parts just a little by the width of the file, the connection will turn out to be quite rigid. And if you make the shifts a little more, it will be freer.
However, it cannot be said that any of the options is bad. It all depends on the nature and size of the parts being connected. And also on the specific type of wood used. If you use plywood, then you can make shifts only along the width of the cut, since in any case it will not be subject to severe deformation.
DIY tools and accessories
If you need to make some kind of piece of wood, then it is not economically profitable to purchase an expensive electric router. Most likely, everyone on the farm has the necessary set of tools, and if they have to buy more, it will be very few. In addition, additionally purchased devices may be useful in the future for minor repair work (for example, repairing wooden furniture). In order to make a tenon-groove joint with your own hands using only ordinary hand tools, you will need:
- wood hacksaw (fine teeth);
- carpenter's thicknesser (a special device for applying markings) or a regular construction square;
- Ruler and pencil;
- wood chisel.
Sources:
- https://lesoteka.com/obrabotka/shipovoe-soedinenie
- https://DrevoGid.com/materialy/soedinenie-derevyannyh-detalej.html
- https://SevenTools.ru/oborudovanie/soedinenie-fanery-v-ship.html
- https://stroyboks.ru/cvoimi-rukami/sovetyi-masteram/shipovoe-soedinenie-4-sposoba-izgotovleniya.html
- https://WoodShpala.ru/oborudovanie/posledovatelnost-shipovogo-soedineniya.html
- https://instanko.ru/drugoe/ship-paz.html
- https://pilka-nn.ru/izdeliya/ship-paz-svoimi-rukami.html
- https://extxe.com/6729/tehnologija-skleivanija-massivnoj-drevesiny/
- https://pilka-nn.ru/oborudovanie/stolyarnye-shipovye-soedineniya.html
- https://ooocentrsvarki.ru/raboty/chem-sdelat-paz-v-bruse.html
- https://MetizTorg72.ru/raboty-s-metallom/kak-sdelat-shipovoe-soedinenie-vruchnuyu.html
- https://dekormyhome.ru/remont-i-oformlenie/kak-mojno-samostoiatelno-sdelat-shipovoe-soedinenie.html