The washing machine is connected to the water supply using an inlet hose. With its help, the machine can draw water for all stages of washing clothes. The hose is connected to the water supply system through a special ball valve, which is pre-cut into the cold water pipe. The inlet hose that comes with the washing machine may not always meet the user's requirements. Perhaps it will be too short or, conversely, it will be too long. Some people prefer to replace the complete one with a hose with aquastop. In any case, in order for the water supply device to meet any specific requirements, it will have to be purchased separately.
Types of inlet hoses
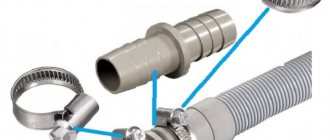
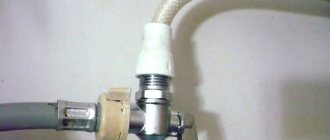
The inlet hose for a washing machine is a polyvinyl chloride tube , reinforced with nylon braiding with nuts and fittings, one side of which is connected to the water supply system of a private house or apartment, and the other to the washing machine. Nuts and fittings are made of plastic, so they must be tightened by hand or they may crack. At the junction of the fitting with the pipe, a high-quality inlet hose has metal pressed sleeves installed. Each product is marked with numbers indicating operating pressure and temperature. The standard inlet hose can withstand a pressure of 4 Bar. To prevent the hose from expanding under water pressure, its base is wrapped in several layers of reinforced threads. Inlet hoses for washing machines are:
- with a fixed length of 1−5 m;
- in a bay (length up to 10 m);
- telescopic hoses, which due to the corrugated wave, the hose increases in length;
- hoses with the Aqua-Stop system, protecting the washing machine from leaks;
The Aqua-Stop system needs to be discussed separately. The fact is that when water is supplied to the washing machine, a lot of pressure is applied to the hose, so it may not withstand it and burst , flooding the neighbors and damaging the property in the apartment. The Aqua - Stop system will not allow this. It is a double inlet hose that can withstand pressure up to 70 bar , with a knob filled with a special powder or equipped with a solenoid valve.
If the hose suddenly breaks, water begins to flow into the knob. The powder expands, thereby cutting off the water supply from the tap. Or the valve is triggered and stops the flow of water. The valve control sensors are securely hidden under the outer sheath of the flexible hose. The sheath envelops the entire hose until it ends inside the washing machine. Even if the hose breaks at the very exit, the water will still not flow out, but will collect in a special tray located at the bottom of the washing machine. The pan is equipped with a sensitive float, which rises when water appears and closes the microswitch contacts. In addition, the valve is triggered when the working tank is overfilled, the machine pipeline is damaged, or due to an overdose of washing powder, foam rises outside the working tank .
In some models, the Aqua-stop system is equipped with
an emergency pump, which begins to pump out water if the emergency valve does not operate. It is worth saying that the inlet hose with the Aqua-Stop system operates only once in the event of an accident. Once the system has been activated, the hose cannot be reused and must be disposed of. However, maybe this particular incident will help you avoid a flood and great material damage to yourself and your neighbors. The inlet hose with the Aqua-Stop system is sold in the same department as household appliances. Every self-respecting brand produces hoses with the Aqua-Stop system for its washing machines, in addition to regular hoses. With such a hose, you don’t have to worry about flooding in your absence.
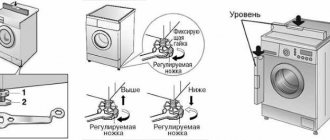
Incorrect position
It often happens that due to improper positioning, used water stagnates in the tank and sometimes flows out onto the floor. This happens because the hose is skewed or the drain channel is unevenly located, for example, a critical height that prevents the flow of water - it does not leave during draining and partially remains in the tank.
Inlet hose clamp with gasket
To correct this reason, it is important to bring the hose at the junction with the water pipe and drain into a uniform position, so that the skew is no more than 45 degrees. The plastic part should lie flat right up to the drainage point. It is important that the water pressure is distributed evenly. If in any part the pressure is lower than expected, then a leak begins there.
Technical characteristics of inlet hoses
| Company manufacturer | Specifications | Manufacturer country | Length | Price |
| Uglich Polymer Plant |
| Russia | 3m | 66 rubles |
| Cotali UDI-BLACK |
| Italy | 2 m | 358 rubles |
| Electrolux |
| Sweden | 1.5 m | 806 rubles |
| Reflex |
| Italy | 1.5 m | 165 rubles |
| SCANPART 11.200.901.23 |
| Germany | 2.5 m | 599 rubles |
| CODO |
| Russia | 1.5 m | 155 rubles |
Rules for replacing defective hoses
If the leak is not due to a worn gasket, you will likely need to replace the hose. In order to replace the inlet hose with aquastop, you do not need to call a specialist or have any technical skills. This is quite easy to do. To do this, try to follow the step-by-step instructions exactly:
- Turn off the water supply to the tank
- Carefully unscrew the clamps
- Remove the old hose
Now, following the same pattern but in reverse, you can screw on the new one. Before starting, open the tap and clamp the outlet with your palm to check the reliability of the fastening. If you find any, unscrew the adapter and screw it back, but so that everything is level.
Securing the hose
Ready! The inlet hose is in place. Now you can check again to see if there are any leaks. If it no longer drips, then the problem is solved. If it drips in other places, then you have to fix other possible problems with the equipment.
How to connect the inlet hose to the washing machine?
There is only one limitation regarding the length of the inlet hose: that the total total length from the hose to the drain does not exceed 15 meters. This means that the maximum length of the inlet hose should not exceed 3 m. Otherwise, the load on the drain pump will be too great and it may break.
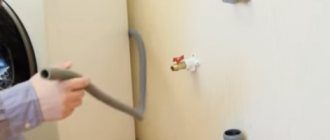
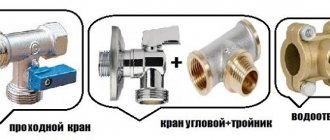
The inlet hose has a standard ¾ inch thread and connects to a stopcock. The connection to plastic water pipes is inserted easily and simply. In new houses and during major renovations, the location for installing the faucet for the washing machine is designed in advance. If the house has not undergone major renovations and the water pipes are not designed to connect a washing machine, then in this case the inlet hose is installed in front of the bathroom faucet or screwed onto the float valve of the drain tank. For this:
- Unscrew the flexible water supply hose from the float valve;
- screw onto the inlet valve;
- a flexible hose is attached to it.
To seal, FUM tape is wound onto the outlet thread of the float valve. If the inlet hose is attached to the mixer, the mixer itself is removed, and the connection tap to the washing machine is screwed onto the eccentric with cold water, and the coupling is screwed onto the eccentric with hot water. The mixer itself is installed on top of this. Of course, this is not the best option, but you never know, it will also come in handy. There are even special taps for connecting to float valves of toilet tanks, as well as wall-mounted faucets.
The drain hose as well as the inlet hose are included in the kit. It serves to drain the water used during washing into the sewer. However, the length of the hose offered for the washing machine does not always allow you to reach the drainage point, so drain hoses are no less in demand among consumers than inlet hoses. They have pipes at both ends, and such a hose can be stretched in length. The pipes provide
hermetic connection at the junction points. Drain hoses do not have technical characteristics and are designed only for the natural pressure of the drained water. The material for their manufacture is rubber, which, under the influence of hot water and chemical detergents and bleaches, cracks and bursts, despite the reinforcement with a wire spiral.
The connection is not strong enough
One of the main reasons why water flows after draining is unreliable fastening. In this case, the drain hose may become loose at its connection to the machine or to the place where dirty water is drained after the next cycle. The reasons why the washing machine drain hose is leaking may be the following:
- The gasket located at the hose connection points is worn out. A round-shaped rubber gasket serves as an additional plug in the places where the hoses for supplying water to the washing machine tank are connected. Over time, the gasket wears out, becomes less elastic and gradually loses its shape, and a white coating forms on it. Most likely, in the places where the tie and clamp are located, it begins to leak during operation. Most often, this occurs after moving the washing machine to another place, especially when transporting it to a new apartment.
- The diameter of the rubber drain hose of the washing machine does not allow it to fit securely into the drain hole, as a result of which water flows out onto the floor.
- Hose is clogged
All these problems are easy to fix. If the washing machine hose is clogged, then you can clean it with either a long wire or a stream of water, and if the problem is a worn gasket, then you need to buy a new one. To avoid mistakes and unnecessary hassle, you can simply take an old, faulty gasket with you to the store and ask the seller to bring you the same, but working one. Gaskets are very cheap and plumbing stores have a very large selection, so you won’t have any problems purchasing this spare part.
Inlet hose
How to connect the drain hose?
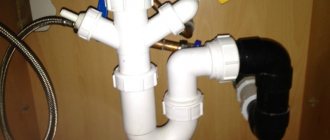
Using a plastic guide, the drain hose is attached to the edge of an acrylic bathtub or sink. You can use a siphon from the washbasin as a drain, or buy a special double siphon with an additional outlet for the drain hose of the washing machine. If you do not have enough length of the hose to drain the water, then this situation can be easily corrected. You need to purchase a plastic extension, another drain hose and two clamps. The hose coming from the washing machine is inserted into the plastic extension, and the second hose is inserted into the other side of the extension. Both hoses are secured with clamps. That's it, the extended hose can be connected to the sewer.
Replacing the drain hose is easier than replacing the fill hose. This is due to the fact that in order to get to the base of the drain hose, you need to slightly disassemble the washing machine and climb inside it. Some brands of washing machines have a drain hose attached at the top of the body, and some at the bottom. To find out what the connection is in your washing machine, you need to remove the cover of the washing machine. Although for some brands, for example, AEG, Siemens and Bosch, it is necessary to remove the front part of the case .
However, let’s focus on replacing the drain hose through the back of the case, as is done with the brands Indesit, Ariston, LG, Candy, Ardo, Beko, Samsung, Whirpool. For these models, the drain hose is located at the bottom of the rear housing cover. After removing the panel (this is done easily):
- unscrew the screws and the cover itself can be easily removed;
- slowly remove the drain pump filter, having prepared a rag and bucket in advance;
- Pour water out of the washing machine, first placing a bucket and tilting it forward;
- Remove the volute , whose bolts are previously unscrewed. It is best to take a photo of how the clamp was secured so that you know how to attach a new one;
- Loosen the clamp securing the hose to the pump and disconnect the hose. We pull it and take it out of the washing machine;
- Install the new hose and secure it with a clamp in the same way as the previous drain hose was attached.
- Install the volute and screw the other parts with self-tapping screws, as it was before replacing the hose. Before replacing the rear panel cover, you need to make sure that the new hose connection is tight .
- Using a screwdriver tighten the self-tapping screw and replace the rear panel cover.
Replacing the drain hose is done completely differently in models where the hose is located on the front panel.
We take out the dispenser container. Then we remove the base panel, loosen the clamp securing the door cuff, and detach the cuff from the door wall. Then the drain pump filter is removed (you also need to prepare a rag and a bucket first). After the residual water has drained out, the front part of the panel is removed. To do this, screw the screws using a screwdriver. The bottom of the panel wall must be moved towards you until a gap of 5 cm is formed. We put our hand there and by touch we look for the hatch locking device. We detach the connector with wires from it. After that, pull the panel towards you and remove it.
We had access to the drain hose. The fixing elements are removed from it, and the hose is disconnected from the pump. We remember the location of the hose and fasteners. Disconnect and remove the hose. We connect the new hose, secure it and assemble the machine, having first checked the tightness of the connection of the hose to the pump.
Top-loading washing machines have a drain hose located on the side. To replace it, you need to do all the steps that were described in previous cases, only you remove not the back or front panel, but the side one.
Poor joining of rubber and plastic components
A leak may also appear inside the hose. For example, in the place where the junction occurs between the plastic and rubber parts. In most cases, the reason is the wear of the rubber half. Over time, the rubber deteriorates, loses its former elasticity and resilience, as a result of which the pressure of the fixing metal frame weakens and begins to leak in this place.
This problem may also occur when moving the machine to another location. At first, you can clamp the adapter with pliers to eliminate or minimize leakage. However, please note that this is a temporary solution and, most likely, you will soon have to install and replace the drain hose inside the washing machine. Actions should be taken in stages. To find out how to disconnect a broken one and attach a working one, read the material below.
Drain hoses for washing machines
| Company manufacturer | Specifications | Manufacturer country | Length | Price |
| Uglich Polymer Plant |
| Russia | 3m | 77 rubles |
| Orio |
| Russia | 3.6 m | 60 rubles |
| Helfer |
| Germany | 2,5 | 190 rubles |
| VIR Plast |
| Russia | 4 m | 71 ruble |
| TSG |
| Italy | 2 m | 110 rubles |
Technical features
Before extending the hose, you must understand its parameters. Remember: in no case should you raise it higher than 1 meter so that the drainage pump can normally pump waste water out of the tank. If you neglect this recommendation, the low power of the pump will not be enough to drain, and water will linger in the tank.
During connection, you must take care to keep the tube tension free, especially paying attention to the top point. It should be 60 cm higher than the lowest point. This is typical for all machines, regardless of brand and model. But still, if you have everything calculated down to the centimeter, you need additional information. To find out the exact value, look at the user manual - everything is spelled out there. If nothing is indicated in the manual, look for other technical documentation for the SM.
Required Tools
Connecting a washing machine will require you not only to study the instructions or your own knowledge, but also to have some tools. So, prepare:
- adjustable and gas wrench;
- ball valve;
- fitting, tee or ferrule (depending on the type of pipe);
- threaded adapter;
- withdrawal - as necessary;
- flexible hose.
Washing machine installation tools