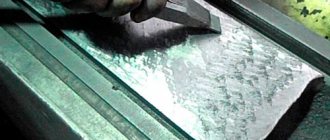
Scraping is the process of processing the surface of a part with a cutting tool - a scraper, with the help of which a thin layer of metal (0.005–0.01 mm) is successively cut off from the part. Scraping is usually used for final manual finishing of surfaces in the manufacture or repair of precision parts: guide frames and supports of metal-cutting machines, bearing shells, control and measuring plates, parts of instruments and tools, etc., i.e. in cases where the necessary equipment is not available or it cannot provide processing with the required accuracy and roughness.
Scraping is used, as a rule, after processing the surfaces of parts with a milling cutter, cutter or file for better finishing and obtaining more accurate dimensions, shape and location of the surfaces of the part.
Both wide and narrow straight and curved surfaces of various parts are subjected to scraping. Scraping is usually carried out with the adjustment of the surfaces being processed according to plates, rulers, standards and mating parts. To identify which places need to be scraped, the part is placed with the surface being treated on a surface plate covered with a thin layer of paint, lightly pressing on the part, and moving it along the plate in different directions. As a result, protruding areas on the surface of the part are covered with a layer of paint. These places are treated with a scraper. By scraping, processing accuracy in terms of flatness and straightness can be ensured up to 0.02–0.005 mm over a length of 1000 mm. The quality of scraping is determined by the number of points of contact of mating surfaces in a square with sides of 25 mm. For normal precision machines, 6–8 points are sufficient. For scraping various surfaces, scrapers are used: solid, composite, single-sided with a wooden handle and double-sided without a handle, flat, triangular, with straight and curved edges.
Purpose of scraping
Scraping is used to smooth the plane of elements that are in constant motion relative to each other. Similar nodes are found in the following devices:
- measuring equipment;
- control devices;
- plain bearings;
- guide elements of machines and units;
- internal combustion engines.
Scraping allows you to reliably attach the lubricant to the rubbing parts and ensure their tight connection. This ensures precise and continuous operation of the entire unit.
Types of metal scraping
According to the accuracy of scraping, scraping can be:
- dimensional;
- decorative
Dimensional scraping of parts is used to create a perfectly flat surface. Decorative scraping is intended for rough polishing of metal.
According to the method of scraping, there are:
- manual;
- mechanical (on machines).
Manual scraping is performed with a special tool that has a main and working part. The main part is used to grip and hold the tool. The working part is used for direct scraping of the surface of the material.
The technique of professional hand scraping is very labor-intensive
Mechanical scraping is carried out on specially equipped machines. This processing method reduces the time and effort required to polish the metal. Performing mechanical scraping requires many years of experience and skills in working on complex metalworking machines.
Device for mechanical scraping of metal
Please note: mechanical scraping of metal on machines is not used in the production of products with a complex design of flat and curved outline.
Types of scrapers by design and shape of the cutting edge
Initially, there are two types according to their intended purpose - a construction one, which can be used to work on various soft materials, and a metal one. It is made of durable steel and is designed for metal working. Structurally, it differs in a number of elements.
Surface for different types and principles of scraping
The cutting part of the knife can be:
- Flat – optimally suits flat surfaces. The blade can have one side or two, the second option is more durable. Length – 25-40 cm. Width from 5 mm to 3 cm – the narrower the edge, the more accurate and finer the scraping.
- With several edges - penetrates well into cracks, corners, and the inner sides of cylindrical objects. There is a straight or curved tip.
- Special configuration for a specific task - they need to be used wisely when stream processing is in progress. It is often collapsible - several different tips can be installed in the handle.
Handle and working part of the scraper
Different purposes require different sharpening. In order not to get confused in the mass of products and not to sharpen them every time in a new way, you can use replaceable plates. Such a universal weapon has several components:
- handle;
- metal body;
- clamp holder with screw;
- set of inserts.
The working part is fastened by turning the handle.
Degrees of automation
There is an electric scraper. But a scraper is a mechanic who works a lot with his hands, because an electric scraper can only process straight surfaces or carry out primary processing, while the finishing remains with a regular tool. The automated construction device is multifunctional; it removes residues of glue, putty, and other building materials, but is absolutely not suitable for metal.
Advantages and disadvantages of metal scraping
Metal scraping has the following advantages:
- High wear resistance of the material. This is achieved due to the absence of abrasive material residues on the treated surface.
- Low coefficient of friction of parts. The scraped surface is perfectly lubricated and retains lubricant for a long time.
- Using the simplest ways to assess the quality of work.
The quality of metal scraping is assessed in the simplest and most accessible way - by the number of paint spots per unit area.
Along with its advantages, scraping has a number of disadvantages. Metal scraping is one of the most complex and time-consuming processes. This processing method is little mechanized and is practically not used when working on machine tools.
Main characteristics of scraping machines
High-speed tool steel is used to manufacture scrapers. This steel is characterized by a low carbon content and the presence of special (alloyed) additives.
Depending on the stage of processing, the cutting edge is sharpened at different angles to the center line of the tool:
- during roughing, the sharpening angle is 75–90°;
- for semi-finishing – 90–100°;
- when finishing - 90°.
In addition, the sharpening angle of the cutting edge depends on the hardness of the material and is:
- for soft (wood, plastic) - from 35 to 40°;
- medium hardness (iron, steel) - from 75 to 90°;
- for hard materials (bronze, cast iron) - from 90 to 100°.
The main operating characteristics of a scraping tool are the width and radius of curvature of the cutting edge. These characteristics, depending on the stage of work, are accepted:
- during roughing – 20–30 mm;
- for semi-finishing – 15–20 mm;
- during finishing processing - up to 15 mm.
The cutting plane is drawn through the cutting edge and the cutting speed v
The scraping of curved surfaces is carried out with scrapers that have a complex cutting edge shape. Sliding bearings are scraped with a tool with a ring-shaped cutting part. Concave and convex surfaces are processed with a tool with two (or more) working edges.
Flat product scraping technology
Scraping of flat products is one of the simplest and most common types of metal processing work.
To determine the amount of scraping work, a special dye is used. Its role is most often used:
- Prussian blue;
- Dutch soot;
- ink.
The dry dye is rubbed using a metal bar or roller. To obtain a liquid composition, dry dye is diluted in machine oil.
The resulting mixture is used to paint the surface to be treated. To rub the scouring paint, use a cloth swab or a rubber roller for painting work.
A rubber roller allows you to apply a thinner and more uniform layer of paint. When applying paint with a swab, the dye layer turns out to be uneven and thickened.
The position of areas on small parts is determined as follows:
- scouring paint is applied to the surface of the surface plate;
- carefully lower the side of the part being tested onto the surface plate;
- move the part along the bench plate in a circular motion;
- Carefully remove the part from the surface plate.
Large and heavy parts are scraped as follows:
- the dye is applied to a control tile with a perfectly flat surface;
- this tile is applied to the plane being processed;
- move the tile along the plane in a circular motion.
The nature of the paint distribution over the surface determines the number and location of uneven areas.
Visual determination of the nature and size of irregularities is determined by the color and number of spots.
- dark spots characterize areas with the greatest depth of depressions;
- gray spots have the smallest depressions;
- areas with white spots indicate bumps that require scraping.
Painting surfaces when scraping
Sharpening the scraper
The cutting edges of the scraper are sharpened on a sharpening machine with a fine-grained wheel. First, the side edges are sharpened, then the end surface, and then finishing is carried out. Only one end of the scraper is ground, and not the entire flat part. When sharpening, the strokes from the wheel should be located along or diagonally on the flat part of the scraper. To do this, when sharpening, scraper 1 is placed along the outer surface, along the rotating circle (Fig. 6, a).
Rice. 6. Sharpening (a, b) and finishing (c) of the scraper
The end part is sharpened on a wheel using spacer 2 (Fig. 6, b). When sharpening a blade, the scraper is placed in the center, perpendicular to the surface of the circle. The pressure on the scraper should be insignificant to avoid burns. It is allowed to periodically cool the scraper with cold water.
Finish or straighten the scraper after sharpening on abrasive stones with a grain size of No. 12 and below, coated with a thin layer of machine oil. Good results are obtained by fine-tuning the scrapers on a cast-iron plate coated with a liquid paste of emery powder and machine oil. The end and side surfaces of the scraper should be smooth, without streaks, and the cutting edge should be free of blockages, burrs and without sharpening strokes.
When finishing on an abrasive stone, the scraper is placed in a strictly vertical position (Fig. 6, c). First, the cutting end surface is adjusted by moving along the narrow side. In this case, you cannot tilt the scraper to the right or left in the direction of travel. The end surface in the transverse part should be smooth without streaks. The flat sides of the scraper (side edges) are finished after finishing the end surface. This allows you to destroy the resulting blockages when sharpening the end surface and prevent possible rounding on the cutting edge. When finishing, you need to move the scraper intensively, making about 60 movements per minute, so that with slow movement rounded cutting edges are formed.
When scraping, the scraper is adjusted or adjusted periodically every 1.5–2 hours of work, and after 4–5 adjustments the scraper is sharpened.
Effective scraping methods
Scraping is carried out in two ways: “from yourself” and “toward yourself”.
For your information. As many years of experience have shown, self-scraping has higher efficiency.
By moving towards itself, the scraper removes a layer of metal of the required thickness. The reverse movement of the tool is carried out without removing the metal layer. During operation, the tool is moved in different directions, crossing movements at an angle of 45-60°.
The scraping paint layer is removed using a solvent. The treated surface is wiped dry. A new layer of dye is reapplied.
How to make a scraper with your own hands
You can buy it online or in specialized stores, but you can try to get a homemade assistant.
Simple at home
Take a rod (body) of the required size, use a grinder to make a cut in the end part, place a plate there, insert a screw on the side and tighten tightly. Make a comfortable handle on the reverse side.
Difficult
Manufacturing is possible with a milling machine. The difference from the previous version is that a helical spiral will be cut on the rod, which will allow you to attach a head to the body - a vice, into which the blade will be placed and secured with a screw.
From a file
The tool simply needs to be subjected to two procedures:
- sharpening the edge at the desired angle;
- by filling diamond paste onto an abrasive block using movements similar to sharpening a table knife.
Decorative scraping
How to evaluate the quality of scraping
The quality of scraping of flat products is assessed using a control frame with side dimensions of 25x25 mm. To do this, place the frame on the surface to be treated and count the number of dark spots within its boundaries.
The quality of work performed is assessed on the following scale:
- rough – with the number of spots up to 5;
- finishing – from 6 to 10;
- semi-finish – from 11 to 14;
- exact – from 15 to 22;
- thin – more than 22.
To control the quality of smoothed curved surfaces, special grid templates are used.
Scraping with abrasives
For ultra-fine leveling with a thickness of the layer being removed up to 0.0001 mm, grinding with abrasive materials is used manually or on machines. During the grinding process, two types of abrasives are used:
- hard (flint, diamond, quartz, corundum, synthetic albor);
- soft (paste-like compositions).
Hard abrasives are used for grinding in cast iron and steel parts. Soft abrasives - for parts made of copper, aluminum, tin and other soft metals.
According to the method of performing grinding, there are:
Rules for scraping
- manual;
- mechanical (on machines).
Manual abrasive processing is performed using a special tool called a lapping tool.
Depending on the outline of the surface being processed, scraping laps can be:
- flat;
- cylindrical;
- prismatic, etc.
Lapping tools are made of wood, metal, glass, bronze and other materials.
The process of applying abrasive materials to the lap is called caricature.
Mechanical lapping is performed on special lapping or conventional lathes equipped with lapping attachments. One type of mechanical lapping is sandblasting.
Where is a metalwork scraper used?
Practice shows that scraping in the professional field of plumbing works takes about 20% of all operations. However, the niche in which products manufactured in this way are used is quite limited.
Basically, scrapers are used in the manufacturing processes of parts for machine tools, machines, industrial equipment, etc. It is important not to forget that scraping is a method of obtaining highly precise surfaces in terms of smoothness. Moreover, the surfaces themselves can be curved.
For example, high-quality bearings with optimal radial planes can only be obtained in this way.
How is lapping with abrasives performed?
At the beginning of the process, abrasive materials are applied to the working part of the lap. When working on machines, the caricature process is fully automated.
Lapping is an operation for finishing the surfaces of a product.
Lappings with a flat surface of the working part are carved with a steel roller or block. Round and cylindrical laps are caricatured by placing the tool between two bars.
Flat parts are lapped in a circular motion on lapping plates or machines. Lapping of cylindrical parts is done manually using a wrench or a brace. To mechanize work, special lapping machines are increasingly being used.
Modernization of machine tools and the constant development of scraping technology is one of the most important tasks in the development of the metalworking industry of our country in the coming years.
Scraping, lapping, finishing and polishing during metalwork
Scraping is the final metalworking operation for removing a thin layer of metal from the surfaces being processed using special cutting tools - scrapers. Scraping ensures a tight and tight fit of the parting surfaces of the parts being connected, and improves the fit of surfaces in plain bearings. Scrape pre-treated surfaces.
When scraping, the surfaces of parts are checked “for paint” or dry - “for shine” using cast-iron surfaces or squares. Soot or blue diluted in industrial oil is used as paint. The paint should be liquid, but not spread on the surface plate. Paint control is carried out by the number of touch spots in a square with a side of 25 mm and by the uniformity of their distribution. High precision is achieved by scraping: deviations from flatness and straightness up to 0.002 mm over a length of 1 m and up to 30 spots over a surface area of 25 × 25 mm. Types of scraping depending on the purpose are given in table. eleven.
When scraping, metal is cut off from convex areas in contact with the surface to which this part is fitted. Gradually, these areas become smaller and smaller, and their number increases until there is a sufficient number of contact spots. Convex areas are determined by testing the paint.
Table 11. Types of scraping
| Scraping | width , mm | Length of strokes, mm | Number of spots on the square 25 × 25 mm, parameter Ra, µm | Purpose |
| Draft preliminary | 20…25 | St. 10 | 4…6; 1,25 | Preparing for semi-finish scraping. Breaking large spots into smaller ones |
| Semi-finish | 12…16 | 5…10 | 8…15; 0,63 | Finishing of guides, bearings, housing parting surfaces, etc. |
| Finish (final) | 5…10 | 3…5 | 20…25; 0,08 | Processing of calibration instruments (rulers, plates, bridges, prisms, squares) |
| Decorative (inducing “frost”) | Giving the surface a good appearance |
When scraping flat surfaces, the scraper handle is rested in the palm of the right hand, the thumb is placed along the handle, and the remaining fingers clasp the handle from below. The palm of the left hand is placed on the scraper in the middle, wrapping the fingers around the tool. In the working position, the angle of inclination of the scraper relative to the surface being processed should be 30...40°. By moving the scraper back and forth over a length of 10...15 mm, cut off the painted areas. The forward movement is a working move in which it is necessary to apply pressure with the left hand. At the end of the working stroke, the pressure on the scraper is released to avoid the appearance of burrs. After each transfer of paint to the part being scraped, the direction of movement of the scraper should be changed.
It is advisable to scrape surfaces at an angle to the marks and marks left from the previous treatment. The chess scraping method is common. Alternate scraping in different directions is alternated with checking against a control plate. Scraping is completed when a given number of spots appears on an area of 25×25 mm with their uniform location. When scraping flat parallel surfaces and flat surfaces located at an angle, control is carried out using a prism with an indicator.
Cylindrical surfaces are scraped to remove marks and adjust the inner surface of the bearing shells to the shaft journal. The inserts are processed with a triangular scraper with a sharpening angle of 60° and sharpened cutting edges. In this case, the painted shaft journal is placed on the lower bearing shell, and the upper shell with a cover is placed on top, the bearing is tightened with nuts and the shaft is turned left and right. Take out the liners and clamp them in a vice. By moving the cutting edge of the scraper along the surface of the liner to the right and left, the middle part of the cutting edge scrapes the areas covered with paint. Scraping is alternated with applying paint until 2/3 of the surface of the liner is covered with uniform spots.
Workpieces made of cast iron are scraped dry, and for workpieces made of steel or other metals, soap emulsion or kerosene is used. To increase productivity, scraping is sometimes combined with lapping. In this case, after preliminary scraping of the surface, a layer of coarse GOI paste diluted in kerosene is applied to the lap, then the surface is rubbed in, checked for paint, and the resulting stains are cut with a scraper.
Depending on the shape of the surface being processed, scraping is carried out using scrapers of various types (Table 12).
For large volumes of scraping work, scrapers with insert plates are mainly used. Scrapers made of steels U12A, R6M5, ShKh15, R18 are sharpened on machines with a corundum wheel with a grain size of no more than 25 and hardness SM1 and SM2, and scrapers with plates made of hard alloy T15K6 - with carbide wheels or diamond wheels. The hardness of the working part of the scrapers over a plate length of 50 mm is at least 60...65 HRC. The working part of the scrapers is finished. Recommended sharpening and cutting angles when scraping, depending on the workpiece material, are given in table. 13.
A flat scraper is sharpened using two settings; first the cutting edge from the end, and then the flat surface. The end surface of the scraper is sharpened with an abrasive wheel of small diameter. The end surface is concave, which makes it easier to finish it on the block. The scraper is taken by the handle with the right hand, and grasped with the left hand as close to the working end as possible. Leaning the flat edge of the scraper on the tool rest of the sharpening machine, smoothly bring the end end to the circle. The position of the scraper must be horizontal.
Table 12. Main types of scrapers
| Scraper | Purpose and brief description |
| Flat | For flat surfaces (plates, rulers, prisms, squares, machine guides and other flat surfaces). Attaches via thread to the tubular handle. The following varieties are produced: straight, radius and with hard alloy plates |
| Flat double sided | For flat surfaces. The width of the working part is 12...25 mm, thickness 2.5...4 mm; total length 350 or 400 mm |
| Flat with insert plates | For flat surfaces. The use of high-speed steel or carbide inserts significantly increases the durability of the scraper |
| Disk | For wide, flat surfaces. Disc diameter 50…60 mm, thickness 3…4 mm. As the disc becomes dull, turn it and secure it with a screw. |
| Trihedral | For curved surfaces (holes, sliding supports, etc.) |
| Spoon-shaped | For flat surfaces located at an acute angle to each other |
| Annular | For sliding bearing inserts. Can be made from tapered roller bearing outer rings or piston rings |
| Shaped | For shaped surfaces. The plates are secured to the handle with a nut; they can have different shapes and sizes |
| Curved | For surfaces in hard-to-reach places |
Greater curvature is given for finishing scraping, and less for rough scraping. When sharpening a scraper on a flat surface, its end is smoothly placed on a rotating circle and slightly pressed towards it. As a result of sharpening, a complex-shaped surface area is formed in one step, which facilitates the finishing of the cutting edge. During the sharpening process, the scraper must be cooled with water. The dressing or finishing of the scraper is carried out manually on fine-grained bars. For finishing scraping, final finishing is performed with GOI paste applied to a cast iron plate. To facilitate sharpening and threading, longitudinal grooves are made on the side surfaces of triangular scrapers.
Table 13. Recommended sharpening angles β and cutting angles γ when scraping workpieces, °
| Scraper | Steel | Cast iron, bronze | |||
| β | γ | β | γ | ||
| Flat Triangular | 75…90 65…75 | 90…112 90…100 | 90…110 75…85 | 105…125 90…100 | |
The scraping process is mechanized by using special scraping machines and heads, electric and pneumatic scrapers. The latter are especially effective, as they operate smoothly when changing the direction of movement and allow you to adjust the number of double scraper strokes per minute. Mechanized scrapers are used for rough scraping, and final scraping is done manually.
Lapping is a finishing operation that is more precise than scraping. The surfaces are ground in after final mechanical processing: grinding, precision turning, milling, reaming and scraping. In this case, the roughness parameter should not exceed Ra = 2.5...0.63 µm. The lapping allowance is left no more than 0.03...0.05 mm. Parts can be either heat-treated or non-heat-treated. By lapping and finishing, dimensional accuracy of up to 0.005 mm is achieved with a roughness parameter Ra = 0.014...0.008 µm.
Lapping is used during the assembly process to obtain precise dimensions of parts or a tight fit of surfaces, ensuring the hydraulic tightness of the connection. The surfaces of fittings, plugs and valve bodies, as well as other parts are subjected to lapping. Lapping and finishing of tool working surfaces is widespread. The lapping operation consists of mechanical or chemical-mechanical removal of metal particles using abrasive materials. The relative movement of the part and the grinding operation cause rotation of the abrasive grains, which are introduced both into the lap and into the part, cutting off micro-irregularities from its surface; In this case, oxidation of the surfaces occurs and the phenomenon of hardening occurs.
There are two ways to perform lapping. The first is that the mating parts are ground one after the other. Abrasive materials in the form of powders and pastes are applied to the surfaces of parts. In this way, for example, valves are ground to seats, plugs to valve bodies. The second method consists of lapping each of two mating or one non-mating part against a special part - a lapping surface, the surface of which is carved with an abrasive material. This is how plates, covers, flanges, rulers, templates, gauges, etc. are ground.
Hard (above the hardness of hardened steel) and soft (below the hardness of hardened steel) abrasive materials are used as lapping materials (Table 14).
Hard ones include grinding powders with grain sizes 12, 10, 8, 6, 4 and micropowders with grain sizes M63...M5 from corundum, normal electrocorundum, white electrocorundum, alloyed electrocorundum, green silicon carbide, boron carbide and synthetic diamonds. Soft abrasive powders are chromium oxide, iron oxide, and Vienna lime. GOI pastes of three grades are made from soft abrasive materials (65...80% chromium oxide) (Table 15).
Table 14. Abrasives
| Name | Color | Purpose |
| Grinding powders 12…4 grit: | Lapping in parts: | |
| emery | Brown gray | made of bronze and mild steel |
| corundum | Gray to brown | from brittle (hardened) metals |
| electrocorundum | Dark brown to taupe and pink to white | all steels, except nitrided and hard alloys |
| carborundum | Black | made of hard alloys |
| extracarborundum | Green | from nitrided steels and hard alloys |
| boron carbide | Black | Same |
| GOI pastes | Dark green | Rough finishing and lapping |
| Green | Medium finishing, lapping | |
| Light green | Final finishing, lapping |
Table 15. Composition of pastes (%) for chromium oxide
| Material | GOI finishing paste | Lapping pasty paste | Polishing paste in bars | ||
| coarse (40 µm) | medium (15 µm) | thin (7 microns) | |||
| Chromium oxide | 82 | 76 | 74 | 63 | 66 |
| Silica gel | 3 | 2 | 1,8 | – | 2 |
| Stearin | 12 | 18 | 20 | 20 | 15 |
| Petroleum paraffin | – | – | – | 10 | |
| Oleic acid grades A and B | 1 | 2 | 2 | 12 | 5 |
| Bicarbonate of soda | – | – | 0,2 | – | – |
| Kerosene | 2 | 2 | 2 | 5 | 2 |
GOI pastes are used for lapping both hard and soft metals.
Components such as oleic and stearic acids included in many pastes destroy oxide films, accelerating the grinding process. Kerosene, machine oil, turpentine, animal fats, and gasoline are used as lubricants. They help speed up processing, maintain the sharpness of grains, and reduce the roughness parameters of the processed surface. The composition of lapping powders, pastes and lubricating liquids is selected depending on the materials of the parts being ground (Table 16).
The lap material must be softer than the material of the workpiece. The grains of the abrasive powder are pressed (characterized) into the surface of the lap and held in it like small cutters in a kind of frame. The materials used for lapping are pearlite cast iron, bronze, copper, glass, fiber and hard wood.
Lapping of surfaces begins with the preparation of the lap and the surfaces to be treated. The lap is wiped with kerosene, abrasive powder and lubricant or paste with lubricant are applied to it and rolled by rolling a heat-treated steel roller over its surface.
Another way to prepare the lap is to coat it with a layer of lubricant and abrasive powder. Lapping is divided into preliminary (rough) and final (finish). Preliminary grinding of flat parts is performed on a plate with grooves, and final grinding is performed on a smooth plate. The part being lapped is moved in a circular motion over the entire surface of the lap (plate), periodically adding lubricant. During lapping, it is necessary to correctly distribute the load on the part, since the surface may collapse and the shape of the lap may change. Periodically, the ground surfaces are checked with a straight edge. The grinding is completed when the entire flat surface being processed is smooth and matte. Lapping of narrow flat and shaped surfaces, such as templates, squares, rulers, is carried out using special guide bars, cubes, prisms, etc. The part to be lapped is pressed against the block and together they are moved along the lapping plate.
Lapping of cylindrical and conical surfaces is carried out in a similar sequence.
To mechanize lapping, electric and pneumatic manual machines with rotary movement of the working body, as well as special machines, are used. In all cases, a complex movement is imparted to the laps or parts being ground in order to ensure that the lap marks do not overlap each other.
Table 16. Materials for lapping valves and sealing fittings
| Material of used parts | Rough lapping | Final grinding |
| Steel 20Х13 | Corundum M14, sandpaper M14 or M20, coarse GOI paste | Skin M10 |
| Nitrided steel ХМУА | Electrocorundum M20 and M14, GOI paste coarse | Electrocorundum M10, GOI paste medium |
| Gray cast iron and steel 30Х13 | Corundum M14, sandpaper M14, GOI paste coarse | Corundum M10, sandpaper M10, GOI paste medium |
| Bronze and copper-nickel alloy | Crushed glass, coarse GOI paste, M14 sandpaper | GOI paste medium, M10 sandpaper |
Lapping of movable cone joints is carried out mainly without lapping. One of the parts is given a reciprocating rotational movement with periodic lifting. It is convenient to grind cylindrical parts on a lathe. The inner diameter of the lap-ring is adjusted with special screws. Lapping is carried out at a peripheral speed of 6...10 m/min.
After careful pre-treatment to achieve low roughness, in some cases grinding is carried out with diamond pastes. The laps can be cast iron, steel or copper.
Finishing is the final stage of grinding in to obtain the exact shape of the surfaces being processed. Achievable dimensional accuracy up to 0.1 microns; mirror surface. The finishing allowance should be no more than 2...5 microns. For preliminary and final finishing, abrasive micropowders and pastes are used. To obtain a mirror surface, use thin GOI paste, chromium oxide or aluminum powder diluted in gasoline. Finishing techniques are similar to lapping techniques. When finishing, it is necessary to correctly distribute the applied forces and not put strong pressure on the part, performing the movement at low speed, which ensures a surface with low roughness parameters.
Polishing is a finishing operation that is performed to reduce the surface roughness parameter without eliminating shape deviation. The polishing allowance is no more than 0.01 mm.
The polishing process is carried out using abrasive tools on a soft base, which provides a cutting pressure of 0.03...0.2 MPa, regardless of the configuration of the surfaces being processed. The specified surface roughness parameters are achieved by sequential polishing (Table 17). Elastic wheels (Table 18) and sandpapers are used as abrasive tools for polishing.
Typically, polishing is performed on special machines, and in conditions of installation or large-scale assembly, hand-held electric grinders and electric drilling machines are used. A polishing mastic consisting of a binder (a mixture of paraffin, petroleum jelly and kerosene) and polishing powder (aluminum, iron or chromium oxides) is applied to the working surface of an elastic circle rotating at a speed of 30...50 m/s.
Table 17. Sequence of transitions during polishing
| Transition | Grit size of abrasive material | roughness parameter Ra, µm |
| Rough grinding | 50…40 | 2,5…1,25 |
| Grinding | 25…16 | 1,25…0,32 |
| Polishing: | ||
| preliminary | 12…8 | 0,63…0,16 |
| final | M6…M20 | 0,32…0,04 |
| M10...M15 and thin paste GOI | 0,08…0,02 |
Table 18. Circles on an elastic ligament and their area of application
| Circle | Application area |
| Felt with rolled abrasive grain | Pre-polishing; Ra = 2.5…0.32 µm |
| Felt and felt with supply of abrasive paste to the cutting zone | Finish polishing; Ra = 0.32…0.08 µm |
| Textile with supply of abrasive paste to the cutting zone | Finish and mirror polishing; Ra = 0.16… 0.02 µm |
| On vulcanite bond | Polishing precision surfaces while maintaining geometric parameters |
For shaped polishing, electrocorundum and silicon carbide sandpapers are used on a fabric and paper basis with a grain size of M8...M40 and M20...M14 to obtain a roughness of Ra = 0.32...0.08 and 0.16...0.04 microns, respectively.
693
