When the screw in the thread rotates normally, it is unscrewed with a screwdriver or screwdriver. But how do aircraft with non-unscrewing screws get out?
Screws can become sour in the threads due to corrosion, or they can dry out due to spillage during painting (paint flows under the head of the screw and dries there).
For reasons of minimizing damage to surrounding elements, it is best to try to unscrew the screw. If the screw cannot be turned with a screwdriver or screwdriver, you must try to prevent the tool from slipping out of the slot. When it jumps out, it usually damages the spline along the way, and the screw can no longer transmit the same torque as with an undamaged spline. Therefore, it is important to maintain the slots on the screw head and therefore the bit or screwdriver must match the size and type of slot of the screw and not dangle in it.
If you try to unscrew a screw and it won’t turn, then you don’t have to force it a hundred times in the same way. We must try to press the instrument and transmit the maximum possible torque. For pressing, a screwdriver is no longer very convenient, and I use a brace or ratchet with a long handle (1/2″ square). There are rotators of a meter or more in length with two handles of half a meter each. If it is conveniently and evenly pressed against the screw, then they sometimes manage to dislodge the stuck screw. We don't have those now.
To increase friction in the spline we have a special paste:
Judging by the sensations, it consists of a fine abrasive powder with some kind of liquid binder. We apply it to the screw slot, press the rotor or ratchet firmly, and try to turn it. It usually turns out much better than without paste. The blue drop on the left below the tube is a little of that paste.
The paste really does a good job of keeping the tool in the slot. I found a similar paste from Liqui Moly - its article number is 3811. They write that it increases friction fivefold. It is especially effective to use it in conjunction with bits that have notches on the working surfaces.
If this method does not help, but the splines are still not completely torn off, we begin to work under pressure.
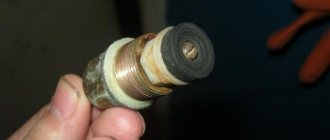
This, in fact, is a lever that allows you to significantly increase the pressure on the screw being unscrewed, and not allow the bit to jump out of the slot. This device only works when there is something to push against. Normally, to use it you need to have at least one unscrewed screw close to the problem one. A threaded adapter is screwed into the thread of the unscrewed screw:
, and the lever hinge is screwed into the other end of the adapter:
(in the lower left corner of the photo) Then we bring the moving part to the screw and insert the bit in the fixture chuck into the screw slot.
It would be good to apply a drop of that same paste into the slot.
We firmly press the other end of the lever, and use an open-end wrench to turn the hexagon of the device with the bat. Usually there is nothing to oppose the screws against such scrap, and they unscrew.
Devices based on this principle may have different designs and different effectiveness. I remember that the aircraft had a device with a similar operating principle, but much smaller; called Vera Quick.
You can also spray WD-40 on the threads, but in our work, to access the back of the screw, you usually need to remove the panel that it holds :) I also sometimes tap the head of the screw with a hammer through a drift. By doing this, I hope to move the screw slightly on its axis and break up the dried paint under the screw head. I don't know how effective this is.
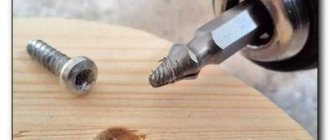
If these measures do not help and the splines are torn off, then the next step is to use an extractor.
A hole of slightly smaller diameter than the screw itself is drilled in the head of the screw directly along the axis. Then the extractor is screwed into this hole using a knob like this. It has a left-hand thread with sharp edges.
When the knob is rotated counterclockwise, the extractor is screwed into the hole and pulls the screw to unscrew. Usually this helps to unscrew it quickly enough. To work, you need well-sharpened metal drills and new extractors - then there are usually no problems.
When a tool is bad, sometimes a core helps. I drill a small, preferably blind, hole in the screw head right near its edge. Then I put the core to the hole tangentially to the circumference of the cap and hit it with a hammer, trying to move the screw counterclockwise. This method is inconvenient (the core breaks off), and if you have a normal tool, it won’t work.
As a last resort method to eliminate an interfering screw, you can drill out its head. This is not very good, since you can easily damage the panel itself, which is held by the screw. And the panels are mostly plastic. After removing the panel, you can try to unscrew the screw by grabbing the protruding piece of its body with pliers. This is not always possible, since the approaches can be very inconvenient both from the front and from the back.
In my experience, the propellers on the A320 turn sour much less frequently than on the B737. The situation is especially sad on the 737 Classic. I think this is largely due to the age of such aircraft. It happens that up to a third of the screws on the panel cannot be unscrewed simply with a screwdriver or screwdriver. And the panels there are rich in screws :)
Probably, experienced locksmiths know and can do many other ways to unscrew screws, but I described those that I used myself. And yes - in my practice, an impact screwdriver has never helped unscrew a screw.
Fastening any products with screws is a convenient and reliable way. However, almost everyone who has ever screwed or unscrewed a screw with a semicircular head or a countersunk head from a wall or board has encountered the problem of how to unscrew the screw if the crosspiece for the screwdriver has been torn off. Let's try to figure out how to make unscrewing more effective.
Types and types of screws
Screws are cylindrical rods with a screw groove and a formed head. Hardware is manufactured in accordance with GOST 1144-80, GOST 1145-80, GOST 10619-80, 10620-80, 10621-80, DIN, ISO.
There are two main types of screws: self-tapping (“self-tapping”) and, in fact, “classic” screws. When designating hardware, its diameter and length are most often used (for example, 5x35 mm, self-tapping screws length 35 mm, diameter 5 mm).
They are classified according to the design of the head and the design of the slot for the screwdriver
:
- Countersunk head (flat head screw);
- With reduced concealment;
- With hemispherical;
- With a press washer.
All of the above types can be made with a straight slot, a Phillips slot, a Torx slot (commonly known as an asterisk), an internal hexagon, and a number of other less common ones. Combinations of splines (for example, straight and cross-shaped) are also possible.
Separately, we can highlight self-tapping screws with a hex, octagonal turnkey head (roofing self-tapping screws); they can also be made with various slots.
There are also screws with special heads (ring screw, hook screw, hairpin screw, furniture screws (confirmed screws, although logically it would be more correct to call them furniture screws), etc.
According to the type of threaded part, they are also divided into types, determined primarily by the scope of application and the materials being fastened (self-tapping screws for metal, self-tapping screws for drywall, screws for small household appliances); in this article we will not dwell on this classification.
All hardware can be manufactured either with a coating (chemically phosphated, galvanized) or without it. Why does a screw with a flat head or a hemispherical head break off?
More precisely, the slot in its head breaks off. There can be quite a few reasons for the breakdown of edges, let’s look at the main ones:
- Use of low-quality, unsuitable size (type) or worn-out tools;
- Applying insufficient (and as a result, the tool jumps out of the slot) or excessive force when screwing in or out;
- Using a self-tapping screw for other purposes (attempting to screw into an unsuitable material, without pre-drilling when required, etc.);
- Corrosion in the product, both the screw head and the screw thread (so-called “acidification”)
- Incorrect screwing (“hammering”).
Unscrewing
So, how to unscrew a universal screw with a countersunk head or a self-tapping screw with torn edges or, worse, without a head at all.
The first thing you need to do is inspect the tool with which the eversion is performed and replace it with a suitable one. The tip of the tool should fit tightly into the slot and not be worn out.
To remove a screw, the screwdriver must completely match the shape and dimensions of the slot. If the replacement does not give anything, we use other methods. Self-tapping screws for drywall can most often be unscrewed using a thin sheet of rubber, placing it between the screwdriver and the slot.
When unscrewing boards and other wooden products, it is effective to hit the head of the screw, followed by tapping on the screwdriver at the moment the force is applied. If a universal screw with a semicircular head is not fully screwed in (protrudes at least a millimeter above the surface) or the design of its head allows this to be done, then you can use pliers or a gas wrench to try to unscrew it.
A few drops of brake or lubricating fluid or kerosene will make the screw rotate. You can heat the hardware, it will expand and deform the surrounding materials, and cooling will allow you to turn it out.
It is possible to use adhesives (superglue, “liquid nails”, “cold” welding, and if time permits, then epoxy compounds), soldering, or if the parts being fastened allow, then welding. If the screw does not begin to unscrew, we proceed to radical measures.
Carpentry Tricks. 10 Methods for Removing a Broken Screw.
Vinegar essence
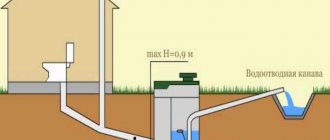
Experienced locksmiths shared their experience on how to unscrew a rusty bolt at home or in the garage. The liquid that housewives use in the kitchen comes to the rescue. 70% vinegar essence is a real acid, which means it can defeat rust and oxides.
The area is cleaned with a metal brush, then the rag is generously moistened with liquid and the fasteners are covered with this rag. After some time (usually 20 minutes is enough, but it can be more), the bolt will unscrew. At first with tension, and then everything becomes easier.
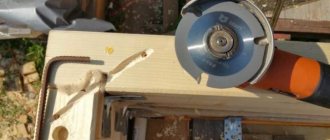
Sawing edges
Regardless of the type of head and the original type of slot, you can try to unscrew it using a flat-head screwdriver. To do this, you need to cut a straight slot in the head using a hacksaw or grinder.
It should be borne in mind that the depth of the slot should not exceed half the height of the head, otherwise there is a risk of its destruction. Using sawing in conjunction with the methods listed above will increase your chances.
Using Extractors
Another way to remove screws is to use extractors. To do this, you need to select a drill whose diameter is less than the diameter of the recesses of the threaded part of the screw, drill a hole in the head, cut a left-hand thread in it and, using conical extractors, unscrew the hardware.
This method is suitable for unscrewing fasteners with all types of heads. But it is not suitable for unscrewing screws, because... they are made hardened.
There are spline extractors, which are a hex washer with a slot that is located on the internal channel instead of a thread. The spline extractor is placed on the head, and the internal spline is screwed into it.
Unscrew the self-tapping screw with torn edges
Self-tapping screws with torn edges or with a torn head are easiest to unscrew by applying heat or by welding (if the unscrewing force is not very great, then gluing) to the remaining part of the nut or lever, or by making a cut.
How to remove a self-tapping screw?
If all of the above methods do not produce results, the fastener is very rusty, you can drill it with a metal drill of a suitable diameter and screw a larger one in its place. To drill a self-tapping screw, you need to take a carbide drill. Hexagonal head, practically does not break off. And if it breaks, you can use the tips above.
How to unscrew a torn screw, how to unscrew a self-tapping screw with torn edges
This is a very common problem when the slots for a screwdriver grind off on a screw, screw or self-tapping screw.
This can happen for various reasons: the screwdriver was chosen incorrectly, the force was applied incorrectly, etc. As a result, it would seem that the situation is almost hopeless and you will have to put in a lot of effort to unscrew, for example, a screw with licked edges. It's not always as difficult as it may seem. I will show you a very simple way to remove a worn-out self-tapping screw. And for this you will not need absolutely any sophisticated materials or tools.
"Coca Cola"
This is not a joke at all, but one of the ways to unscrew rusty nuts and bolts. Everyone knows that the popular drink contains phosphoric acid. It is used for degreasing and to combat corrosion products. Naturally, this will take more time than with essence or WD-40, but if there is nothing else, you can try.
Everything is very simple. The surface near the fastener is generously filled with a sweet drink, and then all you can do is wait. After a few hours you can try to unscrew it.
A simple way to unscrew a licked screw
All you need is a small piece of rubber or rubberized material.
Suitable: medical tourniquet, rubber from a bicycle or car inner tube, rubber ball, etc. Basically, cut out a small rectangle from what you have. Place it on top of the licked screw. We rest against it with a screwdriver and slowly begin to unscrew it. Yes, it's that simple! The main thing is to direct more force to apply pressure from above onto the self-tapping screw.
After a few turns, edges can be imprinted in the rubber band and the screwdriver will begin to twist. To do this, transfer the rubber band to a new surface and continue unscrewing the screw further. I did this with a harness and a bicycle tube folded in half. The result is excellent, everything unscrews without problems.
This was the easiest way to unscrew a licked screw without using a drill or other tricky devices. Also the fastest. So friends, take this advice into account. Watch the video If you don’t quite understand how to act, watch the video.
The problem of licked edges of a screw for a Phillips screwdriver has long been known to everyone. There are few solutions to how to get out of such a situation and remove a broken screw. I will only offer you seven that I personally had to use.
Solvents
Speaking about chemistry, one cannot fail to mention folk remedies. You can unscrew a rusty bolt using gasoline, kerosene, turpentine, or white spirit. A can of WD-40 is quite expensive, and purchasing it just for one harmful bolt is not always wise. Therefore, you can use solvents. All of them have very high penetrating power and can easily get inside rusty threads.
So where to start? The area around the fastener is thoroughly cleaned with a wire brush, then the fastener is generously filled with kerosene, gasoline or other chemicals that are at hand. After 15-20 minutes you can try to turn it away.
How to unscrew a licked screw?
Unfortunately, there is no almost universal solution. And each method presented is good for its own situation. Therefore, everything is learned by comparison and applied to a specific individual situation and one’s own situation.
First method: use a tourniquet
You will need a piece of thick rubber. This could be a piece of a medical tourniquet, a piece of an inner tube from a bicycle, or the like. The denser and stiffer the material, the greater the twisting force that can be created. Berm a screwdriver that is as similar as possible to the groove of the screw. We take the tourniquet. We place a tourniquet under a screwdriver or a bit and insert it all into the licked head. Next, with simultaneous pressure and a rotational movement, we try to unscrew the screw. With the right amount of force, you can unscrew the screw with a significant screw-in force.
Method two: how to remove a screw using an impact screwdriver
If you have an impact driver (or ask a friend), you can use it. Of course, the screw cannot be completely unscrewed, but the connection can be loosened significantly, and then we use a regular screwdriver.
Third method: use a special bit for bolts with ground crosses
Since the problem of slick edges is not new, ready-made solutions have been sold on the market for a long time. For example, a special bit for unscrewing licked bolts. We insert it into a screwdriver or screwdriver and unscrew it. Sharp edges at the right angle engage perfectly and the screw can be rotated.
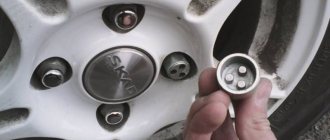
Fourth method: extractor
Special tools designed for repairing broken screws, studs, bolts and the like include an extractor. It works the same as the bit in the example above, but with a slight difference. Insert the bit into the screwdriver and unscrew it. You may first need to select an extractor based on the recess, since the diameters of the heads vary.
Fifth method: unscrew with the left drill
On sale, in addition to the drills we are all familiar with, there are also drills with a left-handed spiral. Such a drill can be used as a tool for unscrewing a broken screw.
Sixth method: use core
This method is well suited for removing small screws. We take the core, rest it against the edge of the cap at an angle of approximately 45 degrees and gently hit it with a hammer in the direction of rotation of the cap. The core, due to its sharpness, has good engagement, which means that the screw is more likely to be unscrewed.