Equipment such as a milling cutter is necessary for any walk-behind tractor, since it can be used to carry out most work related to soil cultivation. Basically, the tiller comes complete with the unit, but in cases where you need to change the width and depth of processing, you should purchase the equipment separately.
Additional cutters allow you to increase the functionality of the walk-behind tractor and simplify the work with it. Experts recommend having several pairs of cutters in your arsenal.
Which cutters are best for a walk-behind tractor?
Such “knives” for tillage can be divided into two large groups. Each of them has its own characteristics and is suitable for a certain type of work.
Saber cutter for walk-behind tractor
The most popular and versatile models that are effective when performing various excavation work. These models use the optimal shape of knives, for the manufacture of which manufacturers choose high-quality durable steel.
The models have a collapsible design, so their installation and maintenance are as simple as possible.
Cultivator cutter assembly process
There are two types of knives:
- Sharpened. The “petals” easily enter the soil without adhesion to the surface. This reduces the load on the engine and reduces the consumption of fuel mixtures. But sharp blades cannot completely remove weeds; they will soon sprout again. You need to work with such canopies carefully so as not to damage the plants and for your own safety;
- With semicircular edge. They are safe to use. But when loosening, more resistance arises, and rototillers are more likely to get stuck. Such cultivator knives deal with weeds more effectively.
There are two ways to attach the “petals”:
- With rivets. The element is not removable. In this case, storing and transporting the device is not very convenient;
- Bolted on. The part is being sorted out.
To assemble the cutter on a motor cultivator, it is important to follow the direction - the sharpened part of the “petal” must be positioned in the direction of movement of the machine.
The number of sections is equal to the mounting plates: with their identical arrangement, only three elements can be installed. If they move, four to six sections should be secured. Knives must be pre-marked.
How is the rototiller assembled?
- When installing a tri-blade cutter, the first blade is fixed to the plate - there is no need to fully tighten the bolt first. The two remaining knives are fixed on the opposite side of the plate;
- On a four-blade and six-blade cutter, right and left knives are alternately attached. It is worth dividing the “petals” into right and left in advance;
- If necessary, an additional section is mounted with a pin;
- The structure is secured with bolts as rigidly as possible;
- At the end, a protective disk is attached to the shaft to protect the plants from damage.
Crow's feet
These models appeared on the market relatively recently.
With their help, any virgin soil can be processed; they are also effective when cultivating hard and difficult soil. Features of this type of cutter:
- solid design, which ensures high accuracy of work;
- the equipment fights weeds well;
- ease of use, ability to replace spare parts at home.
Such models, unlike saber-shaped cutters, are made of carbon steel, which is slightly inferior in strength.
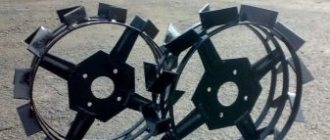
Not so long ago, milling cutters began to be used for walk-behind tractors, which were called “crow’s feet”. They have proven themselves well and are most often used for processing hard and complex soils. These are the cutters that are used when cultivation needs to be carried out in difficult conditions, on rocky soils. The design of the “crow’s feet” is made solid, which ensures the highest levels of equipment strength. The cutters are available in standard sizes:
Crow's feet cutter.
- the width of the knives is 41 cm;
- the length of the knives is 38 cm;
- structure height – 38 cm;
- the weight of the cutter is 16 kg;
- The permissible operating speed of a motor cultivator with such blades is 2-5 km/h.
What are the advantages of a crow's foot cutter? Is it possible to install it yourself? It is convenient for cultivating soil and controlling weeds. Other models will not be able to do the job better. For rocky and hard soils, a crow's foot cutter is simply irreplaceable. Among the advantages, it should be noted that the steel of the cutter in this case can be welded. If necessary, you can carry out repairs at home rather than buying new knives, as this is expensive.
This type of cutter also has its disadvantages. The main disadvantage is that ordinary carbon steel is used for manufacturing. The strength of the structure itself is at a high level, but the material is slightly inferior to other varieties. Such a cutter should be regularly inspected when work is carried out on clay soils or when cultivating virgin soil. The cutter blades may be bent or simply broken. However, the repair is not too complicated; a welding machine is usually used for a broken knife, after which the fracture site is carefully polished.
When assembling the circuit, two people should work together, since the weight of the structure is significant
It is important not to confuse the direction of installation of the knives on the axis. When assembling, the sharpening point should face the direction of the cultivated soil.
To strengthen the cutter, a stopper is used; it is placed on the output axis.
Homemade cutters for walk-behind tractor
Manufacturers offer different options for soil cutters for walk-behind tractors.
You can use one set of cutters or purchase two different types of devices, changing them depending on soil cultivation conditions. Some craftsmen prefer to use homemade products, which, if assembled correctly, will be no worse than factory ones.
The main advantage of creating a plow cutter yourself is that it can be tailored to the specific features of the site.
How to make it yourself
It is difficult to assemble a mower onto a walk-behind tractor without experience in metalworking. You should not do this work when you do not have the necessary tools and components at hand. But if you understand the design well, prepare the necessary drawings and work strictly according to them, you can save money and make equipment that will not be inferior to the factory one.
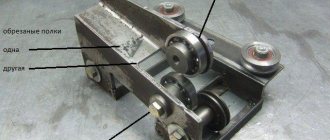
Rotary mower
A difficult option, since you need to find a drive that will make the structure work. You can buy it in the same place where they sell finished products; they usually sell spare parts there as well. It is necessary to collect in the following sequence:
- Find a ready-made one or make a new one. Consider the dimensions, features of fastening to the walk-behind tractor, and the power transmission system from the equipment to the mower.
- Buy a disk drive. It must ensure that the axes move towards each other.
- Select metal disks by size. Any options will do, as long as they are made of steel and have the same diameter.
- Weld the frame. Think about how to attach the mechanism to it. Attach the disks; for this you can make axles from a thick-walled pipe or metal rod.
- Attach 3-4 knives at equal distances along the edges of the disks. They are placed on small axles so that when they rotate, they move outward.
- Secure the drive pulley and tension roller. Here you need to take into account the length of the belt, you need to tension it well.
Advice! Secure a frame made of pipe or angle in front of the discs; if there is a stone in the grass, it will prevent damage to the working parts.
Secure all parts firmly. Use high-quality fasteners, tighten the connections with self-locking nuts; they do not unscrew during vibration. Paint to prevent the metal from rusting due to high humidity and plant debris.
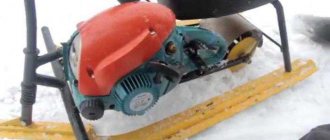
Segment mower
It is much easier to assemble it. But at the same time, you need to find an eccentric mechanism that will ensure the movement of the working part; it is difficult to do it yourself. You will need a welding machine, several rectangular pipes and bolts at least 8 mm thick. Do this:
- Find a drawing or make one from a ready-made sample. Apply dimensions accurately.
- Weld the supporting frame. Both the working part and the unit with which the mower will be fixed to the walk-behind tractor will be attached to it.
- Make guides on the frame in which the bar with knives will move. The easiest way is to make them U-shaped.
- Assemble the element with knives and secure them to the bar. Check how it moves in the guides.
- Install two rods that will ensure the movement of the working part. Attach them to the eccentric mechanism. Install a drive through which power will be transmitted.
After assembly, check how the mower is placed on the walk-behind tractor. Install the belt and make sure the roller provides good tension. Carry out a test run at low speed. If the movement is not linear, or there is some kind of play, figure it out and make changes to the design.
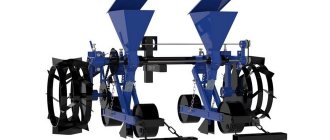
Mower wagon
This option is the easiest to do, since there are no complex components in the design. An adapter can be used as a cart, which is used for plowing and other agricultural work. But it is not difficult to assemble, following simple recommendations:
- Make a drawing. Consider factors such as processing width and cart length. If it is ready, then adapt the parameters to it.
- Place the wheels on the axle, weld the drawbar to connect it to the walk-behind tractor. Place a seat and footrest on top.
- Make the mower body. Weld it from sheet steel with a thickness of 1 mm or more. The size of the box should be 10 cm larger than the diameter of the knife.
- Install an angular gearbox on top to rotate the axle through the pulley. Make the knife out of steel, secure it at the bottom.
- Bolt the housing to the trolley. Provide a height adjustment system.
Tip: Make the mower removable so you can use the cart for other purposes.
Ensure ease of control of the walk-behind tractor. The important part is the belt drive, firstly, the tension must be good, and secondly, it is better to place the casing on top so that the moving part is closed. You don't have to make a seat, but put the wheels in the back for support and work as usual.
Assembling a mower for a walk-behind tractor with your own hands is only possible if you prepare a detailed drawing and have all the necessary parts. It is easier to buy a rotation mechanism ready-made, since it is difficult to manufacture. It is necessary to precisely fit all the elements to each other and connect them with strong fasteners that prevent loosening of the connections due to vibration.
How to properly assemble cutters on a walk-behind tractor?
Assembling the cutter with your own hands should be done as correctly as possible. And here it is especially important to ensure that the active part crashes into the ground during operation. To do this, it is initially recommended to study the drawings and then begin manufacturing the equipment.
To create cutters, the following tools are required:
- The rotor axis is of the required length. It can be divided into two parts if you need to assemble a cutter from two blocks.
- Short axis.
- Gearbox with clamps.
- Left and right knives.
- Bolts, washers, nuts.
Assembling the structure does not take more than an hour, but here it is important to install the knives in such a way that they do not interfere with the rotation.
- The long rotor axis is equipped with knives at an angle of 30 degrees.
- It is necessary to combine four knives on one block, securing them to the gearboxes.
- Next, the correctness of the design is checked and all fasteners are tightened.
This design is very reliable and can withstand fairly high loads.
Mills for cultivator (motor cultivator)
It is quite easy to make cutters for a motor cultivator yourself, without resorting to large financial costs. As a rule, they are already present in the set of agricultural machinery, but this attribute does not always have a width suitable for processing. DIY equipment is a great way to get equipment that fits properly. Let's study the types of cutters, the features of their independent production and installation on a cultivator.
Is it necessary to sharpen cutters for a walk-behind tractor?
Any tillers are self-sharpening tools.
Sharpening is not necessary for them, as it can only ruin the design. Only in some cases, if you have been using a cutter for a very long time and see that it has begun to work the ground poorly, you can sharpen the knives. The tiller is an important element of each unit. Homemade, correctly assembled cutters can be used on any modern walk-behind tractor, in particular on Neva MB 1 and MB 2, MTZ and others. Such structures will help in cultivating the land and make agricultural tasks easier.
The operating principle of the cultivator and its main advantages
A cultivator for a walk-behind tractor is an agricultural unit for loosening, moisture conservation, and hilling up soil without turning over the top layer.
Types of cultivators
Cultivators are:
- with passive, or stationary, knives;
- with active, or driven, knives.
By type of drive there are:
- manual;
- mechanized;
- aggregated with a tractor.
Among the cultivators, the following types are distinguished:
- with disk cutters;
- with pointed paws;
- ploughshares;
- with rotary cutters;
- mulchers;
- Chisels.
For the Neva walk-behind tractor, the basic package includes 6-8 cutter-cultivators with a diameter of 360 mm and a working width of 1200 mm.
Device
The walk-behind tractor differs from the cultivator in its greater weight and the presence of a power take-off shaft. The cultivator is equipped only with cutters, and any mounted and trailed equipment that meets the characteristics of the equipment can be attached to the walk-behind tractor.
Cultivators are equipped with different engines - 2-, 4-stroke gasoline, diesel and electric, powered by mains power or built-in batteries. They are compact, but inferior in power to motors built into walk-behind tractors.
How to make a cultivator for a walk-behind tractor
Before making a cultivator for a walk-behind tractor with your own hands, it is necessary to treat all metal elements with a special anti-corrosion compound to prevent the premature appearance of rust after frequent contact with the ground.
Simple models can be made without drawings. To make and correctly assemble more complex devices, it is necessary to plan the work, calculate the dimensions of the module and parts.
A homemade cultivator made from a pitchfork is a simple way to reprocess (remake) products. To do this, the teeth of the mechanism are bent with a hammer like a corkscrew and placed on the handle. A shovel handle is used as a handle. Electrical tape is used for fastening.
Some craftsmen manage to make a cultivator with their own hands from a bicycle frame with a wheel. A steel rod is welded or bolted between the 2 base blocks. The head is mounted to the crossbar. For this design, it is recommended to take a medium-sized wheel.
In order to correctly assemble a disc cultivator and work correctly with cutters, it is necessary to design diagrams of components and individual parts. Taking into account the deformation of the discs, special adjusting nuts are used. The discs are welded to bushings located on a rotating axis with brackets. It is necessary to provide a protrusion on the bracket where the pipe will pass. The cultivator handle is attached to the pipe surface.
DIY cultivator knives
To make knives for a cultivator with your own hands, you need to take alloy steel 0.5-0.8 cm thick. The triangular shape of the knives with a pointed corner is optimal in terms of efficiency. The width of the knives should be selected within 5-9 cm. Overly bulky knives create increased resistance, as a result of which they often break.
As cutting elements, you can use knives from a segment mower, which must be hardened before installation on the cutter. This version of knives is not suitable for processing virgin soil.
DIY cultivator cutters: crow's feet
Before starting manufacturing, you need to familiarize yourself with the drawings, calculate the number of segments and the total weight of the structure, so as not to load the low-power unit. On a cultivator cutter, it is best to install 3 “legs” in one segment.
Making a cutter for a crow's foot cultivator with your own hands consists of the following steps:
- First you need to make an axle with flanges. As an axis, you can take a steel pipe with a cross-sectional diameter of 2.5-3 cm. The flanges for attaching the “legs” are made of steel plates 5 mm thick, holes are drilled in them for mounting bolts, and welded to the axial pipe.
- Make triangular knives (see in the previous section) and stands. For racks, it would be best to take metal strips of the same grade of steel. The edge, which will come into contact with the soil during operation, can be sharpened. A knife is welded to one end of the rack, and holes for fastening are drilled in the other.
- Next, the resulting “legs” are connected to the flanges using bolts or rivets. The cutter is ready, you can carry out the first run-in of the homemade installation.
Do-it-yourself active cutter for a walk-behind tractor
Before you start making an active cutter for a walk-behind tractor with your own hands, you need to decide on the type and study the drawings of the design most suitable for a particular soil.
If the chosen design has shaped parts, they can be ordered from a turner; the remaining elements can be made independently.
Let's look at the features of manufacturing an active (saber-shaped) cutter for a walk-behind tractor. The dimensions of the working elements should be no more than 50 cm, which allows them to go 25 cm into the ground - this is enough for effective plowing. The width of the tool can be selected based on the distance between the rows on the site, the weight and power of the walk-behind tractor.
What you will need for production:
- steel pipe with a diameter of 4-5 cm;
- springs from a car or alloy steel strips for future knives at the rate of 3 blades per segment;
- welding machine;
- Bulgarian;
The manufacturing process consists of the following stages:
- To make blade knives, strips of steel or springs must be made equal in length, heated and bent on one side by 90°, the length of the bent part should be 60-80 mm.
- Weld the knives to the pipe, placing them segmentally, 4 knives on different sides of the axis. If you want to make a prefabricated structure, make an axle with flanges similar to the analogue discussed earlier.
- Sharpen the blades on the side where they enter the ground. Sharpen with a diamond wheel, the sharpening angle is 45°, it must be strictly observed.
- Install the finished active cutter to the cultivator, test and adjust.
Manufacturing an active cutter
Now let's look at how to do it
saber rototillers. Assembly of this option is also not particularly difficult. As with the previous option, you should first carefully study the design and create a drawing.
The set of parts from which the device is assembled includes:
- rotor axle (solid or split, length is determined individually);
- fixing component;
- knives;
- fasteners (bolts, nuts).
When assembling, it is important to take into account that the movement of the cutting elements occurs counterclockwise. In general, the process is similar to making crow's feet. The only issue that requires special attention is the technology of creating knives. They should be bent after heating at an angle of 90 degrees. The length of the knife part after bending should be about 8 cm. After manufacturing, it is necessary to harden and install it on the flange.
READ Do-it-yourself mini tractor on tracks from a walk-behind tractor
Active sabers
The name of the cutters is determined by their appearance - the knives are large in size and have an elongated curved shape. On cutters of this type there are several sets of four knives located relative to each other at right angles.
Typically, two or more sets of knives are placed on one axis. This rather powerful design of the equipment is highly durable and copes well with processing heavy soils and virgin soil, and is not afraid of stones and roots.
"Crow's Feet"
"Crow's feet" on a walk-behind tractor
- another version of the equipment, the name of which is also determined by the shape of the knives - triangular, similar to crow's feet, and located at the ends of the racks of the cutting elements. As in the previous option, the number of knives determines the quality of cultivation and varies depending on the power of the unit.
There are three-row and four-row crow's feet with different axle diameters. Three-row tillers on an axle with a diameter of 25 mm are installed on walk-behind tractors Texas, Neva, Krot, Cayman, and four-row ones are suitable for units of the Salyut, Farmer, Favorit brands. Equipment on a 30 mm axis is compatible with Cascade, Master Yard devices, some models of Neva walk-behind tractors and a number of others.
“Crow’s feet” are cutters for walk-behind tractors that show high efficiency when processing heavy, clayey soils and virgin soil, but can become clogged when working in areas full of roots.