As a homebrewer, I believe the best part about brewing (besides tasting your own beer) is building your own brewing setups. There are several obstacles, overcoming which we will significantly improve the resulting product. One of them is organizing fermentation at a constant temperature. This can be done in many different ways, simple or complex - depending on your desire. The best part is that a complex method does not have to be expensive.
I knew I wanted to pair my new FTSs system with a glycol heater/cooler before I even got it. The question was how to do it. I was looking for a ready-made system. Yes, they exist, but only if you don't mind shelling out $2-3k for just one glycol cooler. I thought there must be a less expensive way here. After some more searching, I settled on a system that uses a standard window air conditioner and an aquarium heater. Next, I will describe how I designed my own brewing equipment.
You must understand that there are countless ways to make such equipment. I'm sure this isn't the best thing to do, but it works fine in my setup. I highly recommend customizing this system based on your capabilities and needs. Use what you have on hand. A window air conditioner will fit any size, it does not have to be new. Even a dehumidifier can be converted into a cooling element. Use an old, unwanted refrigerator that only collects dust and debris from CPVC or PVC pipes and hoses.
The final price for the entire device was less than $125. I don't think you can beat this result. Plus, I enjoyed the process of creating it specifically for my brewing setup and tasting the improved end result - brewed beer!
So, use this manual as intended - as a equipment design guide to complement the excellent product that SS Brew Technologies has made available to the brewing community.
System components
Rectangular insulated container with a volume of 51 liters (smaller or larger will also work). Two containers can even be used in pairs. One as a heating container, and the other as a cooling container. This is likely my next conversion - using a solenoid valve to switch between a cooling and heating reservoir.
5000 BTU Window Air Conditioner - Again, more or less will do.
Aquarium heater 300 W. I recommend using a heater with a power of 300 W: it will quickly heat a 51-liter container filled with glycol. But a heater with a lower power will also work, it will just take a long time to initially heat the container.
Temperature controller for controlling the air conditioner and maintaining the refrigerant temperature. In addition to what is already in FTSs.
¾" CPVC pipes
Remember! You should use what you have on hand or what you can get easily and inexpensively. Customize the system to suit your brewing setup.
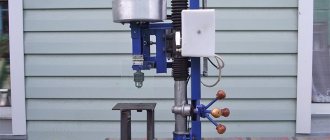
Do-it-yourself homemade chiller for a brewery - step-by-step instructions
If you are brewing homemade beer or want to do it, then you simply cannot do without a cooling system. Today I will show you how to make a very simple but quite effective chiller that can cool your wort from 83 to 25 degrees in just 10 minutes!
To make a chiller we will need:
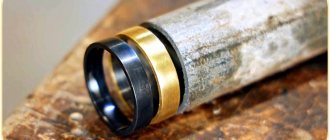
- Flexible bellows-type gas connection, preferably made of stainless steel, 1/2 inch. In the store I found a maximum of 5 meters, but this is quite enough. To connect water, you will need 2 bronze fittings with external threads.
- Plastic ties and stainless wire, specifically stainless steel, or ordinary metal should never be used!!! Otherwise, the wire will instantly oxidize and when cooling you will spoil the wort!
Chiller manufacturing
Armed with plastic ties, we begin to tie the hose every 7-10 centimeters. We twist the hose carefully, loop on loop...
As soon as the hose ends, bend its end as in the photo below. The twist of the hose should lie at the bottom of the pan, and the bend should cling to its upper edge.
The beginning of the hose must be bent in the same way as the end, but the bend must be inside the ring.
Now we take the wire, always made of stainless steel, and repeat the same thing as with the ties. To put it simply, we replace the plastic ties with wire.
After completing the work, we cut off the plastic ties and we have a finished chiller!
All that remains is to screw on the fittings and you can move on to testing!
Chiller test
I heated the water to a temperature of 83 degrees and placed the chiller in a container of water. I tightened the fittings and connected the water.
Initial temperature 83 degrees.
I turn on the water and the stopwatch. The water pressure was not strong, the liquid cooled to 27 degrees in just 13 seconds. There were other numbers in the headline - having made small, approximate calculations, and if you open the water harder, the results will be exactly the same and, even better!
The result, in my opinion, is quite good, I would say simply excellent! Therefore, if you want an inexpensive and powerful chiller, then I advise you to pay attention to this option, you definitely won’t go wrong!
That's all, I hope the information was useful! Don’t forget to share the article on social networks, it’s very important to me! :))
My channel also has information on
how to make a simple home brewer , as well as step-by-step instructions for making delicious homemade beer.
Author of the publication
offline 1 month
Administrator
0
Comments: 4Publications: 97Registration: 05/13/2019
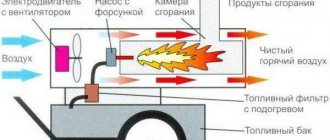
Operating principle of an industrial refrigeration plant
In order to be able to regulate and maintain a certain level of water temperature, installations with the following characteristics are used: power and performance directly depend on the volume of water in the container/reservoir. Often these small devices are installed in a specially designated office room. The cooling unit for the font is mounted in the water mass circulation circuit, connecting it to the power supply.
The peculiarity of chillers is their silent operation, absence of vibration and minimal energy consumption. Such characteristics allow you to effectively use the device at minimal cost. It is noted that the systems are easy to maintain and reliable in operation.
Advice for brewers
To increase the density of beer, you need:
- use roasted and caramelized malts. The latter type of malt has long chains of sugars that have no taste and are not fermentable at all. Remaining in the finished product, they enhance the overall taste. 500 grams of such malt increases the beer body of a 20 liter batch. Roasted malt has other elements that also increase the finished body, impart a sweetish flavor, increase the body of the product and enhance the aroma;
- Use unmalted grains that contain protein. These crops include: oats, wheat, barley flakes, barley. Proteins are not fermented and affect the taste of the product. These components reduce the transparency of the finished beer, so their use is rational in dark varieties of the drink.
- When mashing, use high temperature. The temperature range should be between 68.5 - 69.5 degrees. This temperature will allow you to preserve as many sugar chains in the product as possible, which are not fermented. They help increase the density of the beer.
- use a yeast strain with a reduced fermentation rate. This will result in low consumption of complex sugars by the yeast. The result is a dense drink with a full beer body. If possible, then to increase density you need to choose yeast with a fermentation degree of at least 70%. These may be a variety of ale yeast.
Thanks to these tips, you can brew dense, rich and tasty beer at home. The above recommendations can be combined or used separately.
Follow us on VKontakte
Read us in Zen
Read us on Telegram
Tell friends:
Return to articles feed
Manufacturing secrets
To make a high-quality, functional homemade chiller, you need to know that the larger the diameter, the higher the heat exchange area. The more turns, the better the cooling performance. The third secret is the coil diameter. For home brewing of beer (no more than 50 liters), a 10 mm radius will be sufficient.
Source prom.st
Share
What material should I choose for the chiller?
Before you make a chiller for cooling water with your own hands, you need to choose the right material. Glass is a good option, but it cannot be processed in the home. The best material is metal. You can take:
- stainless steel;
- aluminum;
- copper.
Stainless metal is expensive and does not have the best thermal output. Aluminum is harmful and can oxidize beer. What remains is copper. Copper tubing can be found at any hardware store. Copper has good thermal output and can bend easily.
Assembly
Here photographs will help more than a lengthy description in words.
I started by insulating the water blocks. The block was filled with foam, after drying, insulation was placed on the tubes and the whole thing was covered with electrical tape.
This way I insulated all three water blocks.
All that remains is to isolate the motherboard. I smeared the entire space around the socket and chipset with dielectric grease, did the same with the blocks, then made gaskets from foam rubber. I treated the back side of the motherboard and video card in the same way, then installed foam rubber and secured it with acrylic plates.
When the blocks were ready, I started working on the air conditioning. I completely disassembled it, being careful not to break anything.
To easily and painlessly bend the tubes in the right places, I recommend using a tool called “pipe bender” (I don’t know the exact Russian name).
The air conditioner evaporator is installed in the tank.
The same foam was used for insulation; I attached the temperature sensor to the pump installed inside.
Then I insulated the pipes near the compressor and installed a fan to cool the condenser.
After that I added methanol. The first check in a couple of hours showed the following results:
The water chiller freezes the refrigerant rather slowly, but the reverse process occurs in a well-insulated tank for quite a long time. After 12 hours of inactivity, the temperature rose to just -12C. And now - the final stage, installation into the system. Be sure to make every effort to insulate both the water blocks and the circuit boards. As you can see, the goal has been achieved - the processor is pleasantly cool at -9C.