(semi-automatic welding)
Now we will talk about how to make welds using a semi-automatic machine if you are welding critical structures or are going to submit them under control for NAKS certification.
Here's how this is done using the example of two workpieces (plates) 12 mm thick, butt welded in a vertical position using a SKYWAY 330 inverter.
The plates need to be prepared: cut using a plasma cutter or grinder.
Also, for the correct progress of work you will need: • lead strips (2 pcs.) - necessary for starting and finishing welding, since it is difficult to obtain a high-quality seam at these stages. The strips are technological and subsequently cut off;
• devices that prevent reverse bending of our blanks (2 pcs.);
• a template for controlling the gap (any piece of hardware that allows you to set the gap, in our case 2 mm).
In order to properly prepare our connection for further welding work, you need to familiarize yourself with the requirements of GOST 5264-80 (click to download page with text). Look for the compound you will be working with, in our version it is C17. GOST specifies how to prepare this connection: you need to bevel the edges at an angle of 30° and blunt them. The plates must be cleaned of oxides, dirt and rust at a distance of at least 10 mm from the boundaries of the future weld.
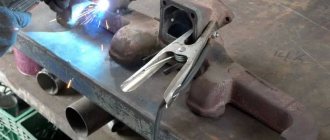
For proper assembly, it is convenient to use a magnetic square. It will align the plates relative to each other and prevent them from moving during the process of tack placement.
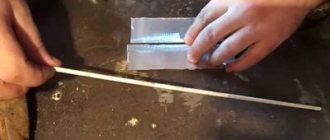
We control the two-millimeter gap with a template, the role of which can be played by any suitable piece of metal. Attach the template to the place where you intend to start welding and set the gap exactly according to it. At the end of the weld, the gap needs to be slightly increased, due to the fact that the plates will be pulled together during the crystallization of the deposited metal.
Next, a device is installed to prevent bending and tightening of the workpieces. They grab one device, then control the displacement and set the gap, as was said, a little more than 2 mm, for example, 2.2 ... 2.3 mm. Then they place spot tacks on the second “fixture”.
Prisp-I, preventing deformation of plates, stuck points
After you have installed the tacks, you need to see if the plates have moved. To do this, you can use the same template to set the gap. If it has a smooth edge, it can be used to control how evenly the plates being welded are aligned relative to each other - simply apply the smooth edge to the joint and see that there are no gaps.
Checking the offset with a template
If such are found, at this stage you can always straighten it with a hammer or other special tools. devices.
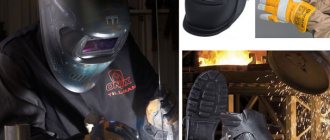
Now you can weld a continuous seam. We put on gloves, a mask, and arm ourselves with a semi-automatic burner. You don’t need to scald it too much, because the devices against bending of the workpieces perform a technological role and they will need to be knocked out.
Welding lead strips
The preparation of the planks is the same as for the base metal. The edges are beveled; their thickness must also correspond to the thickness of the structure being welded. They are installed on tacks.
Lead strip tacked to the base metal
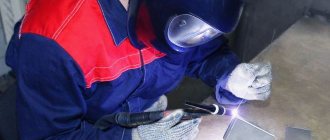
In order to increase the level of complexity of the task, it is better for the welder to perform a vertical seam of the connection, this will allow him to fully test his skills and abilities. It is also necessary to correctly set the welding parameters on the SKYWAY 330 power source. The parameters can be adjusted through trial and error. In our case, for a workpiece thickness of 12 mm, the following welding mode was selected: U = 17V; Vfeed = 3 meters; Uadjusted=-5; L=0, where L is inductance. Consumables (they are optimal for the given case): Electrode wire Ø1 mm; Gas mixture 82% Ar+18% CO2.
According to the rules, in order to avoid hydrogenation of the weld, which leads to the appearance of pores, the plates must be heated to T = 100 ... 120 °C. Rules are just rules, to be circumvented. Undoubtedly, pores represent seam defects and are a rejection sign. However, it should be assumed that during the passage of the seam, the moisture present on the surface of the metal will immediately evaporate. After all, no one thinks of preheating the wire before welding. However, if you are taking the NAKS certification exam, you should know about the existence of such an operation - this is a mandatory requirement. In industrial conditions, the operation can be performed in an oven, in other cases - using an oxy-acetylene torch or torch.
Progress
We perform the following passes:
1. Root During the welding process, take a comfortable position so as not to tear off the torch, take your time so as not to burn the base metal of the root of the weld and form a full-fledged return bead. The first pass must be cleaned with a grinder. This is necessary in order to get rid of the so-called “pockets”, which can further lead to the formation of defects.
2. Filler Technically simpler than the previous one. It is also subject to cleaning, but not so scrupulously.
3. Facing During the welding process, make sure that there are no undercuts along the edge of the seam.
All that remains is to knock down all the technological devices and strips with a hammer and clean the metal from any remaining filler material.
Depending on the type of flaw detection inspection of the seam, which will be used further to identify defects, it may be necessary to clean the front and back beads of the seam flush.
Technological options
- the weld is completely performed by manual argon arc welding with a non-consumable electrode (recommended for wall thickness up to 3 mm);
- the weld is performed using a combined method: the root seam is performed using manual argon arc welding with a non-consumable electrode, and subsequent layers are performed using manual arc welding with a coated electrode (suitable for pipe wall thicknesses of 4 mm or more).
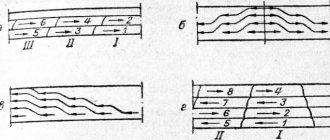
Approximate location of layers and beads (1 – in joints welded using various technological options
| Option | Wall thickness* of welded pipes, mm | ||
| Up to 4 | Over 4 to 7 | Over 7 to 10 | |
| Combined | Vertical joint | ||
| Argon-arc | |||
| Combined | |||
| Argon-arc | |||
* For wall thickness up to 2 mm, the joint section should be welded in one layer
Manual argon arc welding with a non-consumable W-electrode is used for fixed joints of pipes made of low-carbon, low-alloy and alloy (corrosion-resistant) steels. The diameter of the welded pipes is less than 100 mm, the wall thickness is up to 10 mm.
Preparation
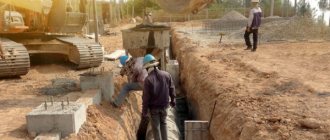
Welding pipes through transmission requires preparatory operations. It is necessary to clean the ends of the pipes at the place of their future joint. Do not leave traces of dirt, rust, corrosion or paintwork. A grinding machine is best for this. The remaining metal irregularities and burrs can be removed using a cutter, file, sandpaper, or wire brush.
Then it is necessary to degrease the prepared surfaces using a solvent and wipe them with a dry cloth. After this, bevel the edges of the combined surfaces.
If welding will be done using the manual arc method, then it is necessary to correctly select and prepare the electrodes. They need to be dried and calcined. Then set the modes on the welding equipment. The current value must correspond to the thickness of the pipe walls. It is recommended to carry out work with direct current in straight polarity mode.
Competent and high-quality welding of the root of the seam under the clearance will largely depend on the performance of these operations.
Selecting mode parameters
The welding current is selected: for single-pass welding - depending on the thickness of the pipe wall, and for multi-pass welding - based on the height of the bead, which should be 2 - 2.5 mm. Welding current is prescribed at the rate of 30 - 35 A per 1 mm of electrode diameter.
The arc voltage should be minimal, which corresponds to short arc welding.
The welding speed is adjusted as follows. to ensure the penetration of the edges and the formation of the required dimensions of the seam.
The consumption of shielding gas depends on the grade of steel being welded and the current mode (from 8 to 14 l/min).
Filler wire with a diameter of 1.6-2 mm is selected according to the grade of steel being welded (see article Welding materials).
Approximate modes
Diameter of W-electrode, mm
Additive diameter, mm
Welding current, A
Arc voltage, V
Gas consumption, l/min
Minimum current modes depending on the brand of W-electrode
Diameter of W-electrode, mm
Direct current (A) polarity
Alternating current, A
Welding begins immediately after installing the tacks, which must be remelted when performing the first layer. In hard-to-reach places, the first root weld can be made without filler wire if the gap and edge mixing do not exceed 0.5 mm, and the blunting of the edges does not exceed 1 mm. The exception is the joints of pipes made of steels 10 and 20, which always need to be welded with an additive.
The order of applying layers when welding a fixed joint by one welder
The arc should be ignited and extinguished at the edge of the pipe or at an already applied seam at a distance of 20-25 mm from the end of the seam. The supply of argon is stopped 5-8 s after the arc breaks.
Welding of pipelines made of high-alloy, especially corrosion-resistant, steels is carried out with protection of the weld root either by supplying argon inside the pipe, or using FP8-2 flux paste.
When welding high-alloy steels, a number of conditions must be observed:
- minimum current modes;
- short welding arc;
- maximum welding speed without interruptions and reheating of the same section of metal;
- avoid lateral vibrations of the burner;
- the filler wire should be fed evenly so as not to create splashes of molten metal, which, once on the base metal, can subsequently cause corrosion.
On thick-walled (more than 10 mm) pipelines with a diameter of more than 100 mm made of low-carbon and low-alloy steels, the root seam is welded using the argon arc method without remaining backing rings.
Welding should be carried out in a reverse-step manner in sections no longer than 200 mm. The height of the root seam must be at least 3 mm. In this case, it is necessary to ensure smooth transitions to the surface of the pipe.
Direction and sequence of laying the root layer
Argon arc welding is also used when welding the backing ring in pipes made of carbon and low-alloy steels. The ring is installed tightly, but without tension, in the pipe, leaving a gap between the ring and the inner surface of the pipe of no more than 1 mm. The ring is secured from the outside with a fillet weld 15-20 mm long with a leg of 2.5-3 mm to pipes with a diameter of up to 200 mm in two places, and with a larger diameter in three or four places.
Tack welding, regardless of the steel grade of the pipe and backing ring, is performed with Sv-08G2S filler wire with a diameter of 1.6-2 mm. The backing ring is welded with a single-layer fillet weld with a leg of 3-4 mm with the same additive.
Tacking and welding of the backing ring is done without preheating, regardless of the steel grade and pipe wall thickness. The exception is pipes made of steel 15Х1М1Ф with a wall thickness of more than 10 mm - the end of such a pipe is heated to 250 - 300 ° C.
There are few real specialists in electric arc welding of steel pipes. This work requires meticulous precision and a lot of practice. Welding the root seam is the most critical stage of the process.
Professional pipe welding
- Welding machine for polypropylene plastic pipes: how to choose a tool, equipment, video, reviews
- Welding polypropylene pipes: video instructions, heating temperature and time, soldering technology, how to weld plastic fittings correctly
The highest quality connection of steel pipes of any size is provided by electric arc welding. The parts being connected melt under the influence of an electric discharge. The article contains visual lessons on welding.
general information
So, first of all, let’s define the term “transmission welding” or “under transmission welding”. Transmission root welding is simply welding pipes with a through gap between them. The name “through the light” means that such a gap is visible through. Typically, pipes with a diameter of up to 12 millimeters are welded using this method, but there are exceptions.
Sometimes the term “through transmission” is used to describe welding of pipes before undergoing radiographic inspection. After all, the essence of such control is that the rays penetrate the metal, as if “transparenting” it. But often transmission welding is still called conventional welding with a visible gap between the pipes. By the way, two joined pipes prepared for welding are simply called a coil.
Well, now that we have understood the terms, let's get down to the welding itself. Next, we will describe in detail how to weld a coil under clearance.
Technology of electric arc welding of metal pipes
Electric arc welding has technological standards and specific features depending on the material, wall thickness and intended purpose of the pipes.
Welding of fixed pipe joints
The connection of fixed joints is carried out in three ways, which depend on the location:
- vertically;
- horizontally;
- at an angle of 45 degrees.
The vertical method includes 4 stages:
- Welding a pipe to create a root bead. The most important stage is the formation of the joint, which will be the basis for all work. The inclination of the electrode relative to the surface: “backward angle.” The length of the arc should be adjusted: if the penetration is insufficient, set it to short; if it is normal, set it to medium. Keeping the weld bead in a liquid state for a long time leads to the occurrence of defects. Therefore, with a large volume of the weld pool, the welding speed is reduced.
- Welding three beads and sealing. The rollers are performed at high speed. Depending on the direction of the slag, rectangular or “backward angle” welding is used. The top edge of the last roller must have a minimum value up to the top edge. Usually equal to the diameter of the electrode.
- Forming a lock at the beginning and end of the rollers. The formed lock is the beginning of the roller with a 5 mm offset from the previous one. When making a joint, the roller must be continuous along its entire length.
- Welding on the front side. It is performed at high speed and aims to form a flat surface. Welding ends when it goes beyond the beginning of the seam.
The horizontal method requires professional skills. It is produced at different welding current values and at different angles to the part. This technique involves three stages:
Within one stage, welding takes place continuously, starting from the “backward angle” position and ending with the “forward angle” position.
Welding at a pipe angle of 45 degrees begins with creating the first bead at an electrode angle of 90 degrees. The seam is made by continuously melting the second roller. After filling the base, the first roller is melted. This creates connections horizontally and vertically.
Welding pipes “under clearance”
The technology provides the following conditions:
Read also: Kharchenko antenna for TV
- dullness size: 2-2.5 mm;
- gap between edges: no more than 3 mm;
- opening angle: in the range from 60 to 70 degrees;
- additional processing of edges by chamfering to give them the required shape and eliminate irregularities;
- the difference in the thickness of the welded walls should not exceed 3 mm or 10%.
Welding of high pressure pipelines
A feature of welding high-pressure pipelines is the need for preheating of the joined elements to 300 degrees C, which is maintained throughout the entire tack and welding process.
When cooking gas pipelines, take into account:
- That thick-walled pipes are used for gas mains, which increases the overall labor intensity of the work.
- There are increased demands on the quality and reliability of the weld, so professionals with extensive experience are involved in the work.
- The entire system as a whole (pipe, as well as joints, welds) must be resistant to corrosion. After the end of cooking, to relieve thermal stress, a section of 10 cm in each direction from the seam is heated to 500-600 degrees C. For this, thermal ovens, induction heaters, and gas burners are used.
When heated, the ends of the pipes are closed to prevent cooling and air movement in the pipe.
Automatic welding
The so-called submerged arc welding involves feeding an electrode wire into the combustion zone of an electric arc using an automatic welding head. In the molten state, the wire metal enters the weld pool and mixes with the base metal.
Automatic welding allows:
- speed up and stabilize the process;
- make the arc invisible;
- expand the range of parts in thickness;
- make the seams more resistant to the formation of cracks and pores.
Flux has a positive effect on the stability of the arc and the chemical composition of the weld. To carry out automatic welding, the ability to rotate the joint is necessary.
Welding large diameter pipes
In more than half of the cases, the connection of steel main pipelines is carried out using pipe welding machines. When it is impossible to use the mechanical method, for example, due to localization features or limitations in manipulating the pipe, manual welding is used, carried out by a team of welders.
For main pipes with a wall less than 6 mm, two layers of welding seam are used, and more than 6 mm - three. The reverse roller of the root seam can have a height of up to 3 mm. In those places of the root weld that are welded poorly, additional welding is carried out from the inside of the pipe. This requirement also applies to that part of the root that was made in the ceiling position: the lower quarter of the joint perimeter is welded from the inside. Rotary joints require welding along the entire perimeter of the joint. Welding is carried out with 3-4 mm electrodes.
Large diameter pipes require the use of special centering equipment.
Welding steel pipes “through transmission” - step-by-step instructions
Pipes with thick walls, in which 2 mm is only the amount of dullness, are welded “through the light”.
Preparation and cutting of edges
The abrasive method is the least reliable due to the introduction of abrasive particles into the metal, which interferes with high-quality melting and leads to the appearance of cracks.
- Use a double-sided Y-shaped symmetrical groove with an angle of 65 degrees, an optimal amount of bluntness and a gap of 2 mm.
- processing on a milling machine;
- manual bevel processing;
- cutting using abrasive wheels;
- processing with slotting-type edge cutters.
- Clean the joints of the welded products to white metal. There should be no irregularities, burrs or rust left.
- Treat surfaces with acetone or any similar substance. The presence of grease, dirt, and dust prevents the high-quality connection of metal molecules.
Centering and joining of pipes
- Centering and joining of small-diameter products is carried out by fixing them using improvised means or using assistants.
- Center large pipes (from 60 mm) with special equipment - a centralizer: internal or external. Both have an electro-hydraulic drive. Internal ones are more preferable due to the fact that when they are used, the joint remains uncovered. This allows the use of automatic welding machines, and also does not limit manipulations during manual connection.
- Do not allow deviations when using the manual alignment method. It is impossible to dock perfectly without a centralizer, but try to minimize the deviation.
- Having connected the pipes exactly, proceed to welding the root seam.
Root welding
- Cook the seam under the following conditions:
- minimum current;
- reverse polarity;
- short electric arc;
- dry electrodes;
- lack of wind in the pipe.
- Cook vertically, the electrode is perpendicular to the plane.
- Use an electrode to melt the edges - a bridge will appear between them, which is called a weld pool. In front of the jumper there is a so-called technological window.
- Carefully monitor the size of the technological window: throughout the entire process it should remain the same diameter.
- Make a root seam no more than 1 mm high. The return roller should also not exceed this value.>
- Clean the beginning and end of the seam and the transition area between the electrodes to avoid the formation of pores in the metal, the presence of which will sooner or later lead to loss of the pipe’s tightness.
Filling and capping of the weld
- After welding the root, fill the entire seam section.
- Depending on the wall thickness and material, use a single-layer or multi-layer penetration method.
- The movement of the electrode during filling is a triangle: edge 1 – edge 2 – technological window.
- Pay attention to the heating of the edges and root seam. The greater the heating, the wider the filling step.
- After each layer, clean the surface of slag.
- If you have the skill, and if the wall diameter allows, fill and cover in one pass.
Video lesson on welding pipes under clearance
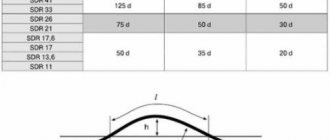
Selecting the gap size
The size of the gap will depend on the thickness of the walls of the pipes that are being prepared for connection. It is usually set within two to three millimeters. If the wall thickness exceeds ten millimeters, then a gap of three millimeters is selected.
A convenient way to set a gap of the intended size is to insert an electrode of a given size, for example, three millimeters, between the parts.
Welding gas pipes under pressure
Welding special gas pipes for transporting high-pressure contents places increased demands on the process.
Gas pipe welding technology
Features of welding pipes for transporting high-pressure trains are determined by two characteristics:
- Thick walls and small diameter.
- Aggressive effects of transported gases.
Pipes up to 10 cm in diameter are welded manually, above - using semi- or automatic welding with manual welding of the root of the seam. For diameters greater than 6 cm, special rings are used. The weld is made multi-layered - from 4 layers and above, depending on the load on the pipeline and the characteristics of the material. After completing the work, a mandatory inspection is carried out - flaw detection inside and outside the welding site.
Yulia Petrichenko, expert
Video lesson on welding gas pipes
Pipe welding stage
After the surface preparation has been carried out and the welding force has been selected, the transmission welding process can begin. At the beginning of creating a joint, several tack points are formed.
These elements will protect the root of the seam from deformation during operation. The number of tacks is created depending on the diameter of the pipes. Larger diameters require more tacks.
The number of points should be enough to hold the parts together. This fastening must be reliable, so you need to weld the potholders in the same way as welding the seam.
After all points are created, the joint is cleaned. This is done to identify root defects. At this stage, they can still be removed and remade. If the root has defects during subsequent processing, the part will be damaged.
After creating a reliable seam, uniform filling of the joint begins. When welding a pipe through the gap, this is a simple step.
During normal stripping, the root is melted at a level of thirty percent. A good degree of stripping will reduce root melting.
If during welding it is necessary to change the filler rod, then you need to continue working slightly below the stopping point. This will give the connection accuracy and protect against defects.
Possible errors and defects in the weld
- A large current when cooking the root leads to the formation of a hole instead of a technological window through which the metal will drip down. Provide a current of such strength that the metal has time to cool literally immediately after the movement of the electrode.
- If the process window is not visible, most likely the current strength is too low, and it must be increased.
- A small bluntness leads to an increase in the technological window and to sagging of the metal inside the pipe.
- A gap of more than 2 mm guarantees the appearance of pores in the seam - the work will be unsatisfactory.
- When welding with an electrode, you cannot make jump movements of more than 5 mm in length.
Welding steel pipes is not an easy task for a beginner. With practice will come experience and an intuitive feeling of what should be done and at what moment in order for the weld to come out perfect.
Perhaps you are a professional welder and have something to share with your readers. Leave your opinions in the comments.