Soldering stranded wires
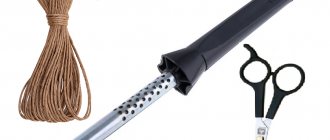
Stranded conductors quickly heat up from a soldering iron and are easily tinned. To solder wires you will need a stripper (wire stripping pliers), a soldering iron, liquid rosin and solder.
For this job, choose a mini wave tip. It is massive, and since it will require a lot of solder and a large heating area.
The insulation can be easily removed with a stripper. It does not damage wires, unlike side cutters, pliers or blades.
We prepare both wires.
Apply liquid rosin to the joint. Liquid rosin penetrates inside the wires and thereby improves the quality of soldering. And rosin is cheaper than any other flux. Expensive and high-quality fluxes are not required for such soldering. Especially when you need to solder hundreds of wires.
Soldering temperature up to 300 °C. At this temperature, the soldering iron will not damage the insulation on the wire.
We apply solder to the soldering iron and go over the soldering area with several even movements. Soldering time is no more than 3 seconds. During this time, the rosin has time to evaporate. And without rosin, the solder will begin to gather in piles and will be difficult to solder.
If there are lumps of solder or cracks on the contact, repeat the procedure again. Wait until the contact cools down, otherwise you may damage the brush from the liquid rosin.
Another way
An alternative is to tinning the contacts before soldering them. This method reduces the speed of work, but it allows you to achieve high quality soldering.
We twist the two wires into a single core separately from each other and tin them with solder. Next, we lean them against each other, apply rosin and solder them.
The quality of the contact is higher, but more solder is wasted.
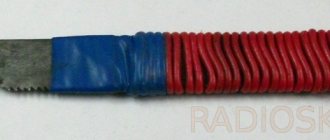
Insulation and shrinkage
Wires must be insulated, be it headphones or a power supply. Heat shrinks are suitable for this purpose. They come in different sizes, colors and materials.
We cut off the heat shrink with a margin.
We close the contact.
If you have a soldering station, you can get by with 100 °C. If not, you can use fire from a lighter or match.
We heat the heat shrink from one end, smoothly moving to the other.
The heat shrink is glued to the wire.
If there is no heat shrink, you can use electrical tape. And blue electrical tape adds psychologically +10% to contact strength.
Soldering iron for microcircuits - how to choose the right one
All electric soldering irons that can be found in a store or on the Internet differ in their characteristics. To answer the question of how to choose a soldering iron for soldering microcircuits, you need to determine its main parameters:
- · Power. For micro-soldering of microcircuit pins, it is enough to choose a soldering iron with a power of 20 to 35 W. More powerful soldering irons may cause components to overheat.
- · Dimensions and weight. The best thing is a small soldering iron that fits comfortably in your hand. The soldering iron is always held in the fingers, like a ballpoint pen, so it should be miniature and light. You should not buy massive soldering irons with wooden handles - they cannot be properly grasped in your hand. It is not recommended to purchase pistol-shaped soldering irons - they are difficult to solder parts on printed circuit boards.
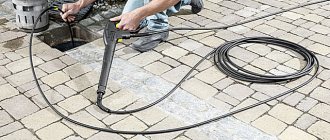
- · Design. When choosing, you need to pay attention to the material of the handle (it should be comfortable, non-slip, and not rub calluses), the design of the electrical cord (the cable must be double insulated, with a wire cross-section of at least 2.5 mm, elastic so that it does not interfere when working).
- · Availability of a temperature controller (thermostat). To ensure high-quality soldering, the temperature of the soldering iron tip should be from 260 to 300 °C, not higher. If there is no built-in controller, it is better to choose a soldering iron with a power supply of 12 V or 36 V. According to reviews from radio amateurs, Taiwanese 220 V soldering irons are the worst at controlling temperature - they overheat, which is why it is not possible to solder the microcircuit properly. As a way out, the soldering iron is turned on through a power regulator, which you can purchase or make yourself.
- · Shape and type of sting. The best choice is a soldering iron with interchangeable tips. For soldering planar microcircuits, a tip with a diameter of 2 mm with a cut of 45° is best suited, which is convenient for soldering legs with “wave solder”. Thin conical nozzles are convenient for soldering microcircuits with pin terminals in metallized holes on the board. Soldering tips must have a special coating that prevents the appearance of carbon deposits. You should not use ordinary copper attachments - they quickly burn, oxidize, and need to be cleaned periodically.
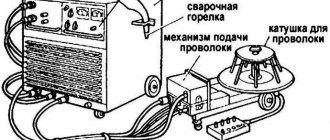
- · Availability of a soldering station. A soldering station is a separate unit with a controller and temperature regulator, to which a soldering iron and other elements (hair dryer, thermal tweezers) are connected via a connector. The station is used mainly for professional or permanent soldering work; for one-time repairs at home, its cost is too high (from 3 thousand rubles).
On video: How to choose a soldering iron, advantages and disadvantages of certain models.
Soldering single-core wires
Single-core wires are difficult to solder because they are massive. For example, twisted pair is much more difficult to solder than stranded wires from a power supply. Therefore, we will use the second soldering method.
Remove the insulation from the wires.
We earn reasons one by one. The main thing is not to hesitate and solder quickly. Soldering time takes no longer than a second. Apply a drop of solder from one end to the other.
It is useless to raise the temperature above 300 °C. Overheating will occur and the rosin will begin to evaporate faster.
We connect the tinned wires.
We apply canfol and solder them with solder from a soldering iron.
And in this case, soldering should be fast, in one touch. Otherwise the solder will be lumpy.
The final stage is heat shrinking.
Additional accessories and materials
To perform soldering of radio components and microcircuits, the following set of devices is required:
- · Soldering iron holder. It looks like a stand with a spiral into which a soldering iron is placed in between solderings.
- · Sponge. Used for wiping soldering iron tips from solder. Metal shavings are often used to wipe the tip.
- · Antistatic wrist strap and mat. Necessary when performing any operations with microcircuits, so as not to damage them with static electricity. The bracelet must be grounded. During soldering, the printed circuit board must be placed on a grounded antistatic mat made of special rubber.
- · Special syringe for solder suction. It is needed to clean the holes in the board from solder residues after dismantling the chip. Instead of a syringe, you can use a medical or sewing needle with a diameter of 1 mm. The sharp tip of the needle needs to be cut off.
- · Tweezers. Needed to hold the radio component during soldering.
- · Magnifier. It is better to choose special radio mounting magnifications with a magnification of 5 to 10 times for soldering small radio components and fine-pitch microcircuits.
- · Brush or cotton swab - for wiping solder joints from flux.
- · Medical syringe for applying flux to soldering areas. The following materials are used for soldering:
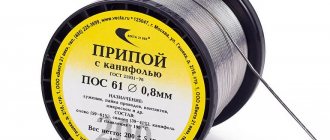
- · Solder. It is best to use special solder for soldering microcircuits in the form of a thin wire of 0.5-1 mm - it is very convenient to bring it to the soldering site.
- · Flux. This is a special liquid that is applied to the contact pads and legs of the microcircuit to increase the spreadability and wettability of the solder. Flux facilitates soldering and removes oxide film from the terminals of radio components. A solution of rosin in ethyl alcohol is usually used as a flux.
- · Ethyl alcohol or refined gasoline. After soldering, be sure to remove any remaining flux with a brush dipped in ethyl alcohol or gasoline.
- · Acetone or varnish remover. Used to remove varnish from varnished printed circuit boards before desoldering a failed chip.
- · Metal braid (braided shielded wire). Used to remove excess solder from the legs of the microcircuit.
Which sting is better?
The working parts of soldering irons, depending on the size, are of two types:
- ordinary, the diameter of which is 0.5 cm;
- miniature with a diameter of 0.2 cm, used for soldering very thin wires and copper parts.
The working parts of soldering irons can have the shape of a needle, cone and blade. The last form is the most common, as it makes it possible to scoop out the required amount of solder. In addition, for ease of soldering, the tip can be straight or curved.
How to solder a chip
When soldering a microcircuit, you need to avoid overheating the chip - touching each leg with the soldering iron tip during soldering is allowed for no more than three seconds, after which you need to cool the soldering area and touch the soldering iron tip again (if re-soldering is necessary). Before soldering, the chip leads need to be tinned - apply a thin film of solder to them to improve solderability to the contact pad. To do this, the legs of the chip are generously moistened with flux (not reaching the body 2 - 3 mm) and the tip of a soldering iron with solder is passed over them. A properly tinned terminal has a smooth, shiny surface without icicles or solder sagging.
Soldering microcircuits with pins
Soldering should be done in the following order: 1. Install the chip into the holes on the board. 2. Apply flux to the pins of the microcircuit on the back side of the board. 3. Solder each pin of the chip into a hole on the back of the board. 4. Remove any remaining flux.
Installation of SOIC chips
It is convenient to solder SOIC chips using a “wave of solder”. The method is based on the capillary effect, under the influence of which liquid solder flows between the lead and the metallized area, wetting them and forming a drop.
Soldering microcircuits with a “wave solder” using a soldering iron is carried out in the following sequence:
1. Tin the contact pads and apply flux to them. 2. Install the chip on the board, align the legs with the board pads and solder one corner pin (any). 3. Solder the second corner pin to the metallized pad, located diagonally on the chip opposite the first soldered leg. At the same time, make sure that the remaining pins of the microcircuit are aligned with their metallized pads. 4. Apply flux to all pins of the chip. 5. Pass the tip over the pins on each side of the chip several times to disperse the solder across the pins. 6. If solder bridges have formed between adjacent terminals, remove the excess using metal braid. It should be placed on top of the jumper and heated with a soldering iron tip. Excess solder will be absorbed into the braid. Then run the soldering iron tip across the leads again.
ATTENTION: When soldering with “wave solder”, liquid flux must be applied to the soldering areas in excess to ensure wettability of the board pads.
On video: Soldering a SOIC chip