A table is a necessary attribute of kitchen furniture. Today, manufacturers use a lot of materials to produce tables. There is a great variety of table leg shapes; there are more than twenty of them. The traditional version has four legs. In most cases, standard models have a square or rectangular tabletop shape.
Wooden rectangular dining table with four legs
A table with three legs is usually round. It can be used as a small coffee table or as a dining area.
Round wooden kitchen table with three legs
Tables are also produced with two legs; they can be of various types, but the most common models are those with two X-shaped legs or durable ones made of solid wood.
Wooden table with X-shaped legs complete with chairs for a summer cottage
What types of furniture supports (legs) are there?
In general, furniture supports are designed to perform a protective and aesthetic function.
Table legs perform a protective and aesthetic function.
Nevertheless, despite all the variety of designs, there are three main types of legs:
- Solid. The most common classic version. It can be made of wood, plastic or metal.
- Sliding. A more technologically advanced solution that allows adjustment in height or, less commonly, width.
- Decorative. A variety of materials can be used, since its function is rather decorative.
All of these types require either their own unique or compatible installation method. In addition, the number of furniture supports also influences the mounting option. So, in addition to the classic solution with four legs, there are tables with three and even one.
The table can also be installed on one leg.
Master class – 6 steps on the path to a new life
In this tutorial on how to easily restore a dining table with your own hands, we will update, repair and repaint an old veneer table with a moderate number of defects.
So, to update your kitchen table you will need:
- a sander or sandpaper of coarse, medium and fine grain, as well as glasses, a respirator and gloves;
- alkyd enamel paint of the desired color (or other desired coating, such as stain), as well as a flat, non-fading paint or art brush;
- wood primer and a small roller/brush for priming;
- wax paste or varnish.
Step 1. Inspect and repair parts
We carefully inspect all fasteners in the structure and defects of the tabletop - how much the veneer has delaminated or the wood has been damaged.
If the table is a little loose, you just need to tighten all the screws. If it requires a more serious restoration, then you need to completely disassemble the table, re-fasten all the parts, or clean and sand all the grooves and joints so that the new glue adheres better, fix the glued parts with clamps or self-tapping screws, and then remove them after 15 hours. when the glue is completely dry.
- Sometimes the base needs to be replaced, not only because its parts are very worn out, but also because the legs can completely transform your old table. For example, if previously the legs were simple, now you can replace them with beautiful carved balusters.
- When disassembling furniture, do not forget to mark the installation location of each of the parts, this way you will not get confused and will complete the task faster.
On the structural influence of seasonal deformations
Any board, be it laminated board or solid wood, is subject to swelling and shrinkage depending on the time of year and fluctuations in humidity. Tightly fixed countertops, deprived of the ability to freely contract and expand, begin to deform under the influence of internal stresses - warp, bend, twist and eventually crack.
With seasonal changes in humidity levels, wood expands and contracts predominantly across the grain. The countertops of a room or kitchen set vary in width within 1 cm, depending on the size of the lid and the type of wood. Linear changes along the fibers are insignificant.
Fastening the tabletop with screws
This is a simple and time-tested option for attaching the table top to the table frames without the use of additional fittings. The special conical extension selected in the frame ensures slight mobility of the screw when changing the size of the tabletop. The cover itself is securely attached to the body.
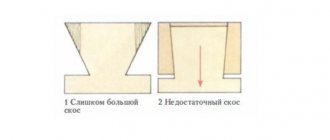
Having made the basic markings, an end hole is drilled in the drawer. After this, using a wide semicircular chisel, select a pocket for hidden installation of a screw.
Using a narrow chisel, make an angular expansion on the upper edge of the drawer. The extension of this groove is always done across the grain of the tabletop, since wood expands and contracts in this direction.
Installation using screws in such pockets allows you to get rid of unnecessary structural elements under the table cover. It is traditionally used in classic-style furniture, where they prefer to use exclusively wooden parts. For all its advantages, this method of hidden fastening is quite labor-intensive.
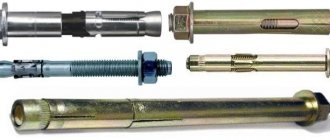
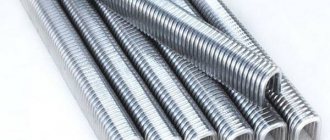
Basic fasteners
To install the countertop you will need several types of fasteners. Their number depends on the dimensions and shape of the plate attached to the table. The master must prepare in advance:
- Tongues. These are elongated parts with locks that connect several elements into one monolithic structure.
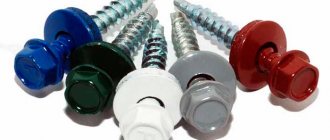
- Metal or plastic corners with self-tapping screws - two thin plates connected perpendicular to each other. Used to prevent deflections when working with chipboard.
- Eccentrics. These are cylindrical bushings with plugs for screwing the tabletop to the base.
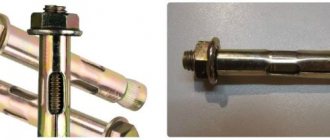
- Eurobolts are long screws used for tightening corners.
Also, fastenings can be combined. To do this, two types of connections are used simultaneously - mechanical and adhesive. In this case, tongues are used together with corners. This method is considered one of the most reliable when working with chipboard. It is what is most often used by professional furniture repair and installation specialists.
Tongues
Corners with self-tapping screws
Eccentrics
Eurobolts
Nuances of choice
When choosing supports, it is important to pay attention to the following points.
| Selection criterion | Characteristic |
| The presence of soft padding on furniture legs | Felt protective pads on furniture legs prevent the leg from damaging the bottom of the furniture. Felt is also used for their manufacture. Felt underlayment is very effective and affordable, and extends the life of the support. Therefore, you should not refuse to purchase such gaskets. Stickers for furniture legs can be picked up in the store. The choice of lining shapes is wide. |
| Material of manufacture | Metal models are more durable and practical to use, while wooden and plastic models are slightly less durable. However, when choosing a manufacturing material, a lot depends on the design features and its stylistic direction of decoration. For laconic high-tech only metal models are suitable, for country - wooden supports. |
| Design | The external aesthetics of the design must fully match the aesthetics of the headset, so when choosing such products, be sure to bring a photo of it to the store. This will allow you not to make a mistake in your choice and choose the most attractive supports. |
Materials used
Depending on the type of support, as well as design features, fastening for table legs may require:
- For plates: mounting pad, bolts, screws.
- For Z and 8-shaped holders: the holders themselves, screws, self-tapping screws.
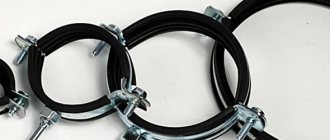
- For wooden clamps: screws and, in fact, clamps.
- When mounting with T-nuts: eye bolts, nuts.
- For permanent installation: side drawers, screws.
Depending on the type of legs, different materials will be required.
Perhaps the main attribute of a room for eating - a dining room or kitchen - is the kitchen dining table. When choosing any furniture for a small-sized kitchen in a typical city apartment, you have to make a compromise between the free space in the room and the spaciousness and comfort of the furniture, this fully applies to the choice of table. It is not easy to find a small kitchen table with the desired shape of the tabletop in stores; custom-made ones promise considerable additional costs. There is a decent way out of the situation - making a table with your own hands.
For a room with an area of 6-8 sq.m., probably the most suitable tabletop size will be in the range from 800x500 mm to 1200x600 mm, with a standard height of 750 mm from the floor. The elongated shape of the tabletop - oval or rectangular - allows you to place the table along the wall, saving free space.
Selection and purchase of materials and accessories.
When making a kitchen table, it would be the right decision to use a factory-made material intended for the same purpose, namely a post-forming countertop made of chipboard. These countertops are covered with wear-resistant decorated plastic, used in the furniture industry in the manufacture of kitchen sets, supplied in the form of sheets about 3 m long, 600 mm wide, 26 mm or 36 mm thick (standard). Postforming countertops have a low price. Their front overhang (end) has an aesthetic semicircular shape and is also covered with plastic. Standard fittings are available for them: end and connecting strips, edges for processing ends, couplers, etc. There is no need to purchase a whole piece of kitchen countertop just for one third of its length. The required piece can always be found (purchased for a proportional fee) in furniture workshops, where they accumulate in large quantities as remnants from the production of kitchen sets. There, in the furniture workshop, you can immediately ask to cut the part on a format cutting machine to obtain a rectangular workpiece with the required dimensions.
Postforming type tabletop.
However, chipboard countertops have one feature - they have only one or two plastic-covered overhangs along the length of the canvas. For the table, we need to have all the ends processed (on all sides). For this reason, it will not be possible to directly (without processing the ends) use ready-made kitchen countertops. Moreover, you will have to cut off the front factory overhang. The open ends of the chipboard must be treated taking into account protection from water ingress, not forgetting the aesthetic appeal of the treatment. There are two main ways: apply (glue) a special edge tape or use PVC-based furniture edging. We will take the second path, as it is the most practical from an operational point of view and forgiving some minor mistakes of the master. We will use furniture edging with sides (girths), this will not only give the tabletop a more solid appearance, but will also provide additional protection. A piece of edging of the required length can be purchased at a furniture fittings store. A T-shaped (with a central tenon) PVC edging with girths is required for chipboard with a thickness of 25 mm or 32 mm. When purchasing a 25-mm edge, you must first make sure that it can be put on a 26-mm end without any problems. The use of a 32nd edge is also quite acceptable and gives the tabletop a visually thicker edge.
T-edge with girths (sides) in section.
Another important point is the legs (supports). Today there is a wide selection of both piece supports and ready-made bases for tables. The most common solution is a round leg with a height of 710 mm and a diameter of 60 mm. Legs of this type are collapsible, adjustable in height, have a low price, are easy to install, and come in several external coating options (shiny, matte, painted in various colors). If you need to transport or compactly store the table, it can be easily disassembled. Legs are also sold in specialized furniture stores. As a rule, the manufacturer packs them in packs of 4 pieces, unassembled. When purchasing a whole pack, the kit must include a hex key.
Table leg. Dimensions.
Set for making a table: a piece of kitchen worktop, four legs, edging.
The process of making a table.
How to trim the end of a chipboard with PVC edging, and what tools are needed for this, has already been described in detail, we will not repeat ourselves, we will briefly list the main stages and dwell on some of the nuances.
Step 1. Apply markings. On the front (working) surface of the tabletop we apply markings with a pencil according to the design of the future table. All roundings must be made with a radius of at least 60 mm, in order to avoid changes in the color of the edging in places of sharp bends (depending on the edging manufacturer).
Step 2. Give shape. Use a jigsaw to follow the markings, leaving a small gap of 2-3 mm, and cut off the excess. The jigsaw file must have the opposite (reversible) direction of the teeth (see the article about installing a sink) in order to avoid chipping the plastic coating, even though the edging with its girths can partially hide small chips in the cut. Use a belt sander to ensure that the contours of the table top exactly match the markings.
Step 3. Mill the groove. Depending on whether the edging is used exactly along the width of the tabletop (25 mm) or larger (32 mm), the groove is milled exactly in the center of the end, or with an offset. The exact milling parameters are calculated after measuring the geometry of the edge used with a caliper. In the absence of a “native” cutter with which you can make the required groove width in one pass, you can perform multi-pass milling using a cutter with a smaller tooth height.
Measuring the edge with a caliper: the internal width and thickness of the tenon.
Milling a groove for a 32 mm edge in a tabletop 26 mm thick (the groove is offset downward relative to the center of the end).
Step 4. Stuff the edging. Before filling the edging, the end of the tabletop must be coated with silicone sealant. It will not be superfluous to put the sealant in the groove, and also apply it to the upper edge (girth) of the edge, directly adjacent to the working surface of the tabletop. This will ensure maximum protection against water penetration. The edging is stuffed with a rubber mallet, starting from the place where the joining seam will be least noticeable. After completing the stuffing, accurately join the ends of the edging using a sharp knife. The last operation will be to remove from the surfaces of the tabletop any excess sealant that was squeezed out during packing. The tabletop is ready.
Applying sealant to the chipboard end. It is enough to apply only to the upper half, which is above the groove.
Edge padding. When securing the tabletop using struts (as in the photo), you need to take care of the spacers under the tabletop to prevent damage to the lower, protruding edge of the edge.
Joint seam.
Step 5. Attach the legs. To attach the legs (more precisely, their cast holders), on the underside of the tabletop we apply pencil markings in the form of two perpendicular lines at the location where each holder is attached. As a general rule, a good option is to install the legs about 100mm from the edge of the tabletop (see photo). The holders can be secured with self-tapping screws 20-25 mm long with a countersunk head. All that remains is to put the legs on the holders, securing them with a hex key, and the dining table for the kitchen is completely ready to use.
Markings for attaching leg holders.
Screwing the leg holders with self-tapping screws.
Fastening the leg to the holder using a hex key.
The table is ready.
Table option with an oval tabletop.
The design of a kitchen table made from a postforming table top is simple, unpretentious, accessible for self-production, and reliable. However, it must be remembered that if handled carelessly - a strong blow to the leg in the side direction - there is a possibility of breaking the holder, made of a relatively brittle alloy. With careful handling and proper care, the table will last for many years.
Similar articles:
- Finishing the ends of chipboard with PVC edging
- Connecting tabletops at a 90 degree angle
- Installing an end strip on a kitchen countertop
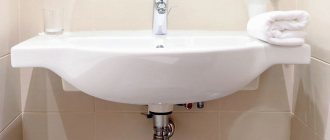
- Installation of a built-in kitchen sink
- Gluing the melamine edge
Kitchen table: we make it ourselves from wood - quickly, simply, beautifully and reliably
Please note that if you plan to cover the bottom of the kitchen unit with a plinth, then step back 80 - 100 mm along the front edge to secure the legs. This is done for the purpose that when you stand at the desktop, your feet will not rest against the plinth. Where the legs will not be closed with a plinth, move 50 mm away from the edge.
To fix and install one kitchen leg, move 50 mm away from both sides, draw a cross and put a dot at the intersection. Place the kitchen leg on the bottom of the module so that the point is under one of the four holes. The other two holes should be above the lines of the drawn cross. Screw in three screws according to the markings, then screw in the fourth. Do the same with the remaining legs.
installing kitchen legs
Then, when you have installed all the legs on the kitchen unit, start leveling the lower cabinets on the countertop using a level and adjustable supports. Cover the lower modules with a tabletop. Achieve a horizontal position of the countertop by adjusting the outer legs of the kitchen set. Then unscrew the remaining supports so they sit firmly on the floor.
Installing legs on a kitchen set with your own hands is not difficult; it requires care and accuracy.
Using Z-shaped holders
Using small metal Z-brackets is another popular way to secure a countertop. The main advantages of this method are low cost, maximum simplicity and accuracy of installation, and no need for additional structural elements.
One end of the steel holder is screwed to the table top with a screw. The second is inserted into a groove sawn in the upper edge of the drawer. The recess is made in such a way that the edge of the bracket does not rest against the wood and moves freely in the groove as it expands. Thus, the fasteners allow the tabletop to change its dimensions in any direction without consequences.
Mounting on wooden clamps
Using homemade wooden clamps is a simple and reliable way to attach a tabletop to a tabletop without purchasing hardware. Clamps work on the same principle as metal Z-clamps. They are easy to make in series from scraps that can be found in every workshop. Of course, this takes time, but often not much more than it takes to go to the store for accessories.
When making wood clamps, be sure to maintain the correct grain orientation as shown in the diagram to give the bracket proper strength.
Mounting methods
The legs of the table are attached to the sides of the supporting frame, and the tabletop is, in turn, attached to them
Many craftsmen know that improperly secured legs are the root cause of the table swaying and tilting. There are adjustable mounts that can correct a large percentage of tilt, but quality assembly is paramount.
There are several options for attaching legs to tabletops:
Attaching the leg with surface plates
Attaching the Legs with T-Nuts
An option for attaching the table top to the table frames without using additional fittings using screws
Using small metal Z-brackets is another popular way to secure a countertop.
| Fixation with surface plates | Let's say you bought legs without the appropriate fittings. To install them, you will need eye bolts for larger tables and threaded dowels for smaller ones. |
| Fixing with T-nuts | This mounting option is suitable if you intend to restore the front surface of the table and thus give the interior an updated look. You should have T-nuts, eye bolts and eye bolts available. |
| Screw mounting | This is a common and time-tested method of attaching the table surface to the drawers without the use of auxiliary fittings. Suitable for classic furniture. |
| Application of Z-shaped holders | The use of small iron Z-fasteners is another popular method of fixation. The main advantages of this method are low cost, simple and reliable installation. |
| Use of wooden clamps | An easy and durable method of attaching a tabletop without using commercial hardware. They are similar to Z-shaped holders. They are made from any scraps; it is enough to observe the orientation of the fibers. |
| Using Figure Eight Holders | These metal fasteners are widely used in securing countertops. They come in two types - with washers of the same and different sizes. |
| Application of spacers with grooves | In this case, 2 or 3 auxiliary spacers with rectangular grooves, the length of which is 10-15 mm, are attached to the frames of the kit. |
Required Tools
The above methods require the use of your own tool. However, it makes sense to keep a complete set of everything you need on hand:
- Screwdriver, set of screwdrivers.
- Chisel: thin, wide flat, and also narrow semicircular.
- Drill with a set of drill bits for wood.
- Hammer, pliers.
- Hacksaw.
It is better to have all the necessary tools at your fingertips.
How to make legs yourself?
Without the proper experience and special equipment, it is most likely impossible to make a full-fledged furniture support. However, if you need a temporary replacement for a broken support or it will be placed where appearance is not important, you can try making it yourself.
You can make the legs for the table yourself. To do this you will need a beam, preferably square. Next, you need to saw off a part of the required length from the lamella and process it: sand it, remove sharp corners and clean it with sandpaper. If desired, the “leg” can be opened with stain and varnish, and then attached to the tabletop using already known options for attaching legs to the tabletop.
For manufacturing, timber is used, ideally with a square cross-section.
Wood is the most accessible material, while being the easiest to process. This should be taken into account when deciding whether to make a support yourself.
Compared to other materials, wood will be the easiest to process. Thus, the ability to “deal with” a broken leg or correct a loose fastening of table legs to the table top will be useful in any case, since at home tables and chairs are subject to the greatest wear and tear among all available furniture. It is known that there is nothing more annoying than a swaying table!
The ability to independently secure or change a table leg will never be superfluous.
Manufacturing process: step-by-step instructions
Drawing of a wooden table with four legs
First, you must make a drawing. Decide which legs you will attach - purchased ones or make them yourself. The form can be any.
Curly balusters or legs for a homemade table
If the tabletop is 0.8 m wide, then the legs should be 1.2 m long. To ensure the tabletop is smooth, sand it with a sander. There should be no gaps between the joints. To prevent the tabletop from deforming due to high humidity, the boards must be laid with a counter texture.
Tabletop boards at least 30cm thick
At the ends of the boards to be joined, you need to drill holes 8 cm deep, keeping the gap between them at 10-15 cm. We go through the prepared areas with sandpaper and lubricate the edges, dowels and holes with glue. We insert the dowels into the holes, thus connecting the tabletop. Remove excess glue.
Option for attaching legs to a wooden table
Using glue and screws, we connect the transverse and longitudinal boards to the legs. On top of the latter we make two recesses to attach the tabletop. We wait twelve hours and install it. We cover the structure with varnish, stain or paint.
Table with fixed top, frame and legs
Important! When using stain, consider the following: choose the thinner wisely, the surface before coating must be carefully sanded, the main thing is to properly adjust the gun (the shape of the torch should be oval, and the layer you apply should cover the existing one by half).
Cover with varnish or wax to protect the top layer
Having familiarized yourself with the options for attaching legs to the tabletop, it will not be difficult for you to make a table with your own hands, thereby updating the interior with such an original thing.
Folding leg design
For any table you can make folding legs with your own hands.
Thanks to this design, you can disassemble the table and put it in the pantry. The shape and size of the tabletop in this option does not matter.
Before you start making legs, you need to make a calculation. To do this, you will need to know the height of the table and the dimensions of the tabletop overhangs. And one more important point - the distance between the legs should not be less than their height. If this condition is not met, the legs will not be foldable.
The folding structure is a frame that is assembled using spikes. It is made from wooden blocks with an upper jumper (tsar) and a lower one (leg). To attach the legs to the bottom of the tabletop, you need to use cross beams with a width no less than the width of the legs. But as for the thickness of the bars, it should be different. Different thickness sizes are a necessity. When the structure is folded, the legs will not interfere with each other.
Piano hinges are used to secure the legs to the cross bars. They should be positioned so that the legs, when unfolded, rest against the edges of the planks. If you do not adhere to this condition, the table will be unreliable. For greater stability, the legs must be secured with a crossbar.
Fastening the table legs
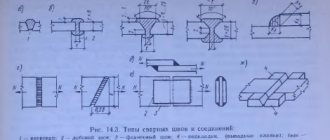
The legs of the table are attached to the sides of the supporting frame, and the tabletop is, in turn, attached to them. In order to ensure a tight connection between the drawers and the legs and to compensate for the shrinkage of the wood due to fluctuations in humidity, the following fastening methods are used.
Joiner joint tenon-socket
Advantages : high strength, lack of additional fittings and unnecessary fasteners, ease of manufacture.
Disadvantages : the connection is non-separable and does not compensate well for shrinkage.
Wooden corner ties
Advantages : proper connection strength, the ability to disassemble, good compensation for seasonal deformations of wood, an alternative to purchased fittings.
Disadvantages : difficult to manufacture, rarely used for mass production of furniture.
Connections on dowels
Advantages : reliable carpentry connection without visible fasteners, as simple as possible to manufacture.
Disadvantages : inseparability, poor compensation of deformations.
Metal corner ties
Advantages : they perfectly compensate for shrinkage, are easy to disassemble, provide a permanent tight connection, and strengthen the entire frame.
Disadvantages : relatively labor-intensive installation technology, the presence of protruding metal elements under the table cover.
Metal table supports are durable and strong. They can withstand heavy loads, distributing them evenly across the tabletop. Can be used with plastic, wood, glass, stone surfaces.
The supports consist of three parts:
- Round base made of stainless steel. It has a smooth texture without seams or roughness, which increases the safety of use.
- Fasteners. Provides ease of installation.
- Plastic linings. They protect the floor from deformation and simplify the movement of furniture. Allows you to adjust the height, compensating for uneven floor coverings.
The sleek design of the support legs is universal. They complement furniture in different styles.
Photo gallery
Did you like the article? Tell your friends about it:
How to choose a plinth for the kitchen
By and large, the choice is small; the two most popular materials for kitchen plinths are chipboard and plastic. Both types will cope with their task perfectly, but they differ fundamentally in possible use cases. Therefore, the choice of base material should be based on the tasks assigned to it.
Fig.1.
Fig.2.
Fig.3.
The plinth for the kitchen, chipboard, will be made of the same material as the kitchen set itself. The advantage of chipboard is that such a base can be made of any size, which is important for a non-standard kitchen. Another advantage is that there are a huge number of color options when using chipboard, which will allow you to make the base and kitchen unit the same color or choose a contrasting color at your discretion. When choosing a plinth for a kitchen made of chipboard, you should be sure to provide an edge on the chipboard panel; this will protect it from moisture, which is always abundant in the kitchen.
Fig.4.
Fig.5.
Fig.6.
PVC plinth for the kitchen is no less popular. The main advantage of a PVC base is its resistance to mechanical stress and moisture, which is very important for a kitchen. The PVC base is equipped with various connecting elements, which, when installed in the kitchen, allows you to hide the joints of the panels. If you are the owner of a kitchen with smooth curves, then plastic is practically the only option to make a base with a bend.
Fig.7.
Fig.8.
Fig.9.
A plastic kitchen plinth cannot be made to order; its dimensions are standardized, as are the colors. This circumstance is certainly a disadvantage of the plastic plinth, but it must be taken into account at the kitchen design stage. The main characteristic of a plastic base is its width. It can be 100, 120, 150 mm. The width of the plastic base should be less than or equal to the length of the legs of the kitchen set.
Fig. 10.
Fig. 11.
Fig. 12.
Installation of tabletops using figure-eight holders
Steel figure-eight fasteners are another popular hardware option used to secure countertops. The bracket is installed in a small recess drilled with a Forstner drill or a square recess selected with a chisel so that it is flush with the upper edge of the drawer. The holder is fixed with two screws: one to the body, the second to the back side of the tabletop as shown in the photo. As the board swells or contracts, the bracket rotates slightly, preventing the wood cap from bending. The recommended distance between fasteners is 15-20 cm.
Figure-eight holders come in two types: with washers of the same and different sizes. In the latter case, a washer with a large diameter is attached to the drawer. When deciding to attach the tabletop to a kitchen or room set in this way, you need to make sure in advance that the thickness of the drawer matches the diameter of the washer.
Cabriole style with carvings
You can make a design of legs that was used by the ancient Chinese and Greeks. In Europe, it became fashionable at the very beginning of the 18th century, when it was included in the curvilinear styles of furniture produced in France, England and Holland.
Today, it is much easier to create such a shape with your own hands than before, because there are electric tools that speed up the work. In any case, carved bent legs should be made from a single piece of wood without knots or core, and not from laminate.
- The first step in production is preparing a template drawn on hardboard or cardboard. After which you can start working directly.
- From the template, the drawing is transferred with a pencil to two adjacent sides of a block of wood. Accuracy and correctness of markings are very important.
- Then the shape is carefully cut out.
- Carved wooden legs are placed in clamps and, using rasps, they begin to be rounded.
- Then the leg is polished. The goal is to achieve smooth, fluid lines. Perfectly round shapes are the result of the work of a true master.
- Next, when all 4 elements of furniture are made by hand, carvings are applied to them.
- The carving is made according to the design using a special knife. This is perhaps the oldest way of working with wood.
In what ways can you update your table?
To update your kitchen table with your own hands, you can use one of the following proven technologies:
- Traditional painting – we will look at this method in detail in a step-by-step master class.
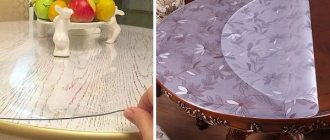
- An interesting way to decorate and paint furniture is to paint through tulle - the tabletop is painted through it, and a lace pattern is formed using the principle of a stencil.
- Ceramic tiles will allow you to decorate a dilapidated, badly damaged countertop and make it more practical - you can put hot items on such a surface and wash it in any way.
- You can update an old table using the decoupage technique. We will also talk about it in more detail.
- An easy way to modify a table with your own hands quickly and on a budget is to cover it with self-adhesive film.
- Burning will renew an undamaged wooden surface.