Through dovetail connection
The through dovetail is a traditional connection for joining the ends of solid wood boards. It is widely used in drawer designs and furniture making. For the machine production of such connections, electric milling machines and special devices are used.
Marking the studs
Set the cutting thicknesser to the thickness of the wood.
Draw a line of tenon shoulders (“TAILS”) around the end of the tenon piece along all of its faces and on the sides of the socket piece. Where risks from a thicknesser may further spoil the appearance of the finished product, use a sharpened pencil and a square.
Then mark the nests (or partitions between them). Size and quantity may vary depending on the width of the boards and the type of wood (softwoods require larger and less spaced tenons than hardwoods). The appearance of the finished connection can be no less varied. As a rough guide, to give the product a good appearance, the spikes should be the same size and evenly spaced, but wider than the partitions between the sockets.
Start by drawing a pencil line across the end of the workpiece at a distance of 6 mm from each edge, then divide and mark the distance between them into an even number of equal parts. Set aside 3 mm on each side of the marks and draw lines across the end.
Mark the slope of the tenons on the front side using a dovetail marker or stencil. Mark the excess to avoid any confusion later.
Cutting out the thorns
Position the workpiece so that one side of each tenon is pointing vertically. Using a reward, cut out one of the side vertical edges of each tenon. Stay close to the marking line on the take-off side and take care not to cut past the shoulder line.
After reinstalling the workpiece in the vice, cut out the other side edges of the tenons. Place the part horizontally in the vise and cut off the side waste along the shoulder line. Remove most of the excess wood between the tenons with an openwork saw.
Cut off the remainder with a chisel or chisel with an oblique cutting edge, working from both sides to the middle to the line of the shoulders.
Marking nests
Rub the end of the prepared workpiece with chalk and place it vertically in a vice. Place the cut tenon piece in place, making sure the faces of the joint pieces match. Carefully line up the edges and shoulder line of the tenons on the chalked end and mark out the shape of the tenons using a scriber or knife, then continue the lines to the shoulders on each side of the socket blank. Use a pencil to mark the excess.
Cutting nests
Place the workpiece vertically in a vice. Saw to the shoulder line at the angles marked along the tenons. Make a cut in the waste part so that it just touches the marking line. Remove the main part of the waste between the partitions of the nests with an openwork saw, cut the rest evenly to the line of the shoulders with a chisel or chisel with a beveled cutting edge. Work from both sides towards the center. Clean the corners by holding the cutter under the angle of the inner edges of the sockets.
Connection assembly
Dovetail joints are manufactured very precisely and only need to be completely assembled once. To check the fit of the parts, assemble the product piece by piece dry (without glue) and carefully cut off the excess in places that are too tight. Clean the insides of the pieces before gluing.
Apply glue to both halves of the joint and, using a hammer and a piece of wood to protect the surface of the product, connect the parts tightly. If you are working with a wide joint, tap across the entire width to connect the elements evenly. Remove excess glue before it hardens. When the glue has dried, sand the piece with a jointer, working from the edges to the middle so as not to chip off the end layers.
Angles in dovetail
The angle of the dovetail should be neither too steep nor too sloping. Too much dovetail draft creates weak short grain at the corners, while insufficient draft can reduce the bond strength of the joint. On a piece of wood, mark the bevel and install the mortar along it, or use a stencil or template. For hardwoods the slope should be 1/8, and for softwood it should be 1/6.
Application of the method with wood
The wooden tenon and fastening groove must have an identical shape and be connected into a tight, sealed unit. The dovetail connection, the drawing of which is intended for different products, helps to form T-shaped and corner fastenings of boards, beams or logs without overlaps in the places where internal partitions are installed. The technology for assembling wooden structures makes it possible to use building materials of smaller diameter for interior partitions. If protection from wind and drafts is necessary, the corner joints of the structure of a capital structure are sealed with jute fibers.
A classic example of the use of connecting elements is the drawer of a furniture set. The electric joinery equipment used to construct a tenon and mortise system for a hand router allows for interlacing of tenon elements using the natural resistance of the joint to the force applied to the face of the product during extension.
The connection, the drawing of which is drawn up for each item individually, can be made in different ways.
Most craftsmen working in furniture production and house construction prefer the method of through-joining joints because of the decorative nature of the repeating pattern. The elements are prepared on a milling machine using a special device.
Decorative dovetail through-hole
Elegant and neatly executed through connections are pleasing to the eye and are often used in furniture designs. Decorative options are used to emphasize this property and demonstrate the skill of the craftsman.
The design of the connection complies with the basic principles of proportion and disproportion of the elements of the connection. The example shown here uses thinner than normal baffles.
Marking the studs
Along the entire perimeter of the end of the workpiece with spikes, apply a line for marking the shoulders with a pencil or very lightly with a thicknesser.
Continue the lines to the end and mark the excess.
Cutting out the thorns
Select the waste in the same way as for regular through-and-through dovetail joints, using a tenon and trace saw. Clean up with a chisel or chisel with an oblique cutting edge, working from the ends to the middle.
Marking nests
Rub the end of the part with the sockets with chalk. Using a cutting thicknesser solution equal to the length (height) of the small tenons, mark the thickness line of the small partitions between the sockets at the end. Mark the partitions along the parts with tenons using the tip of a saw or scriber. Continue the lines to the shoulder line on each side and mark the excess.
Cutting nests
Remove the bulk of the waste with a tenoning saw and an openwork saw and trim the shoulders with a chisel or chisel. To cut small partitions to size, press the piece on a flat board against a workbench or work table.
Make a cut across the grain near the shoulder line. Mark the ends of the tenons. Carefully cut off excess, working along the grain. Then repeat the operation and stop at the shoulder marking line (thickness gauge) and the thickness line. Apply glue and assemble the joint as you would a regular dovetail through lock.
Making a device for picking out a tenon
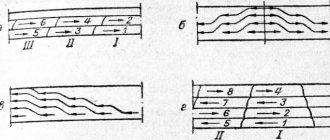
Unlike a professional machine, the working tool is not fixed in space. It is fed onto a stationary workpiece with both hands. Therefore, the manufacture of a device for clamping the part at the first stage is a justified necessity. The simplest device for this is a design (Fig. 2) of fixed guides (upper, lower, side) and a movable bar, which adjusts the length of the sample. To assemble it, you need to perform the following steps:
- fasten the side vertical elements of the same height with the central cutouts to a piece of plywood (along its edges);
- cover them with guides along which the router sole will move;
- install side bars, limiting the movement of the power tool along the upper guides;
- install a movable element on the bottom plywood that regulates the overhang of the edge of the workpiece that is being milled.
Figure 3. Scheme of tenon sampling.
To fix the movable bar, use a standard wing screw or special fasteners. The dimensions of all structural elements are selected individually:
- the height of the upper guides is equal to the thickness of the workpiece in which the tenon is made, taking into account a small gap for installing the fixing wedge;
- The width of the cutout in vertical elements depends on the length of the tenon created by a hand router.
Read also: Wood-burning gas cylinder boiler
A manual milling cutter of any modification, manufacturer, is suitable for working with this device, since most models provide adjustment of the cutting speed, feed, and reach of the working body.
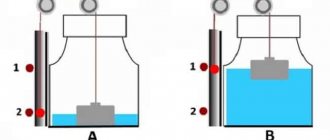
For a dovetail tenon, a device with the opposite principle is used:
- a power tool is fixedly fixed in a sheet of plywood located horizontally;
- its body is located at the bottom, the cutter comes out from the back side of the sheet into a through hole;
- a block of hard wood (beech, birch, oak) is attached to the desktop;
- A 2.5 cm piece of board is attached to the block, which is a consumable material (used once with a certain cutter diameter).
Structurally, fixing a hand router in a sheet of multi-layer plywood can be solved with several options - clamps, self-tapping screws. It is important that the fasteners do not protrude onto the working side of the plywood. The sheet itself can be attached to a workbench, rest on a couple of chairs, or be fixed on several rows of timber, trestles, or scaffolding.
Through-joint dovetail with bevel
Sometimes a through dovetail lock is combined with a corner connection with bevels, so that a chamfer with a shaped profile can be made on the edge.
The depth of the beveled part depends on the chamfer profile.
Marking the studs
Using a thicknesser, mark a shoulder line on both sides and the bottom edge of the tenoned piece. Mark a bevel line on the top edge. Measure from the top of the end the depth required for the chamfer. Draw a line along the mark across the end and around to the shoulder line. Make a faint pencil mark 6mm from the first mark and also 6mm above the bottom edge. Distribute the required number of spikes between these marks. Mark the excess.
Cutting out the thorns
Saw through the sides of the tenons and along the chamfer depth line and remove the waste with an openwork saw. Trim the shoulder with a chisel or chisel with a beveled cutting edge. Leave the excess on the bevel for now.
Marking nests
Using a thicknesser, draw a light line of shoulders on both sides of the socket piece. Mark a bevel line on the top edge. Rub the end with chalk and mark the nests (partitions) and bevel waste along the workpiece with spikes. Draw tenon lines on the end and along the sides to the shoulder line, and to the bevel line - only on the inside. Mark the excess.
Gluing
Before applying glue evenly and thinly to all tenons and grooves, lightly sand the surfaces to be glued without rounding the edges. Then try connecting the parts without glue. You will immediately see if they fit together and what else can be corrected.
Carefully connect the boards so that the tongues and grooves do not split. Keep in mind that grooves are especially prone to cracking.
The glue is applied evenly in a thin layer over the entire surface of the tenon. To do this, use the spout of a bottle of glue or a thin brush.
Through connection with rebate in dovetail lock
Making a box using a dovetail joint, which has a bottom inserted into a rebate along the bottom edge of the walls, requires some modification of this corner joint to avoid gaps in the lower corners. This is achieved by shifting the position of the shoulder of the tenon, which closes this gap.
Marking the studs
Using a thicknesser, draw a line for marking the shoulders on the sides and across the top edge. Also, using the frame, draw a line for the depth of the fold along the inner edge, across the end and along the front side to the line of the shoulders. Mark the inside of the part with the sockets using the same thickness planer setting.
Reinstall the thicknesser if necessary and mark the width of the rebate on the edges of both parts of the joint. Make one pencil mark on the tenon piece 6mm below the planned rebate depth, and another 6mm from the opposite edge. Between these marks, mark the position of the spikes. Draw a line across the edge of the intended bevel on the tenon part to match the rebate on the socket part, and mark the waste.
Marking nests
Using a thicknesser, draw a line of shoulders on both sides of the part with sockets. Rub the end with chalk and mark the sockets along the part with spikes using a scriber or a sharpened pencil. Mark the excess.
The very first mount
Let's start with the history of this mount. The receivers of the first guns had the simplest form, designed mainly for the simplicity of the mechanisms for feeding a bullet into the barrel, but not for the installation of sights. Many guns with a long history still force amateurs to come up with different solutions for installing sights. In general, the sight body also has the shape of a cylinder. That is, we need to connect the cylindrical shape of the sight and the receiver. This is how small grooves appeared on the first guns, which when cut looked like a trapezoid. This figure was very similar to that same swallowtail. Such a fastening is not an innovation, since something similar exists in the connection of logs.
Dovetail joint with bevel
This dovetail design is completely hidden by the bevel and is often called a hidden dovetail or hidden lock. This connection is used for delicate work and requires careful and careful execution. The parts to be joined must be of the same thickness and cut to length. The spikes can only be marked along the sockets, which are cut out first. Marking and cutting grooves Set the cutting thicknesser to the thickness of the workpiece and mark a line of shoulders across the inside, working from the end.
Using a marking knife and a chamfer, mark a bevel on each edge between the thicknesser line and the outside corner. Set the thicknesser to the width of the overlap and mark the fold.
Mark the end from the outside, and the rebate depth line from the end. File off any excess seam and level the surface with a shoulder plane. Start marking the nests by drawing a line with a thicknesser (parallel to each edge) from the line of the shoulders to the overlap. The distance should not exceed 6 mm from the edge.
Mark the width and position of the sockets at the end between the lines drawn with a thicknesser. Make a cardboard stencil for the dovetail and press it against the side of the overlap to keep it in place. Continue marking to the shoulder line and mark the excess with a chisel or chisel.
The saw may cut into the overlap a little. File off the excess bevel. Place the workpiece vertically and use a chisel or chisel to cut off the main part of the waste from the overlap bevel.
Trim the bevel with a shoulder plane. Use a miter fence to help guide the plane correctly.
Marking and cutting
Follow the recommendations for making a part with sockets up to and including cutting the fold. Place the part with the tenons on the workbench, with the inside facing up. Place the part with the sockets vertically so that its inner side is flush with the marking line of the thicknesser. Use a scriber to mark the nests (partition). Continue the lines to the end and mark the excess.
File off the excess bevel. Then saw through the stones of the tenons and cut out the waste between the tenons and between the outer tenons and the shoulders of the bevel. Finally, trim clean and bevel the overlap like the socket piece. Test the assembly before gluing.
Installing the strip
Due to the wide distribution of brackets and sights for the dovetail rail, it is this one that is most often chosen to create a seat on a weapon - models that, for various reasons, do not have it installed at the factory. On most shotguns and carbines, the rail is attached directly to the receiver: top or side position.
Typically, installing the rail, this simple plumbing work, is done in gunsmith shops, but you can install it yourself if you are sure that the internal mechanisms of the gun allow you to install screws or rivets.
The installation sequence is the same for all strips. We have prepared the instructions described below based on the experience of user impeller from the Guns.ru forum for the “EST” side bracket. The point is that to install you must already have a set of scope + rings + dovetail rail.
- Before drilling the receiver.
- Degrease the sight rail. Degrease the box.
- We glue the strip to the box with cyanoacrylate glue, for example, “Super MOMENT”.
- Let the glue harden.
- We install the crowns with a sight on the bar.
- We lean in, we look, we try. Hereinafter, we recommend using a cold zeroed cartridge for the appropriate caliber: just make sure that the laser dot matches or is close to the sight's reticle set to zero.
- If you don't like it.
- We remove the crown with a sight. By lightly tapping with a mallet or a suitable piece of wood, we knock down the plank (the glue is fragile to impact loads).
- Wash off any remaining glue with acetone.
- We repeat the “glued, figured” operation. Until we achieve the desired result.
- If you like it.
- Carefully pry the box. Along the centers of the holes in the plank.
- We knock down the bar as described above and clean the surfaces.
- Carefully drill holes with a thin drill.
- We take a drill of a slightly larger diameter - for cutting threads.
- We cut the thread.
- We glue the surfaces with two-component glue.
- Screw the bar.
- If the bracket still fits onto the box a little crookedly, we correct it with spacers of different thicknesses in the rings of the bracket.
Angled dovetail joint
This compound is used to make rigid joints. This is not an easy task, as it is difficult to visualize, difficult to mark, and all the edges of the parts are at an angle, which requires careful cutting. The workpieces must be of the same thickness and seamed in length and width. It is necessary to make a drawing in projections, from which to calculate the dimensions of the workpieces before marking the connection.
Execution of the drawing
Start with a side view of the finished frame joint. Indicate the thickness of the wood, and the dotted line indicates the initial dimensions of the workpiece. Draw a vertical projection (plan) under the side one. Then project the side view onto a horizontal plane.
Marking and cutting ends
Cut the pieces to length and width as shown by the dotted lines in the side view. Set the jig to an X angle. Mark this angle on the inside, working from the joint angle. Saw off the ends at this angle. Place the second small piece at the corner U. Mark it on the edges, measuring from the outside.
Connect the marks on the edge to form a guide line for planing the bevel of the edge. In fact, the bevel should be checked perpendicular to the edge during the planing process to ensure the true bevel angle is obtained. With the workpiece in the vise so that the end is in a horizontal position, carefully plan the end bevel on each workpiece.
Marking and cutting connection elements
Mark the tenons on the front side of the part with the tenons. First, measure the thickness of the material on both sides of both pieces, measuring along the beveled ends. Connect lines on each edge of the tenon piece. Using a small marker applied to the end corner X, mark a line from the inner lower corner along the edge of the part with spikes.
Make marks 6mm below the top edge and 6mm above the bottom. Calculate and mark the shape and position of the tenons between these marks. Then, placing a cardboard stencil on the square, mark the tenons on the outside.
Mark the slope of the tenon ends on the sloped end of the tenon piece. Use a crowbar set at an X angle. Hold the claw block so that it is located in a parallel plane with respect to the end. Using a square and a cardboard dovetail stencil, mark the tenons on the inside. Mark the excess. Carefully cut out the tenons exactly according to the marked corners. Place the workpiece in the vise at an angle so that you can cut vertically.
Using the cut out tenons, mark the end of the part with the sockets. Rub the end with chalk so that the scriber lines are more clearly visible. Place the piece with the tenons on the end so that the edges and inner shoulders match, and draw around the tenons. Using a small tool set at an X angle, draw parallel lines from each tenon to the shoulder line. Mark the excess, then use a saw and chisel or chisel to carefully remove it according to the mark.
You can plan the slope on long edges both before and after gluing. In both cases, use a small tool set at an X angle to check. Slanted sides can create difficulties when gluing. If, during assembly, you hammer a joint to fit the elements into place, use a piece of wood as a spacer to protect the parts from damage.
Source: Woodworking Bible / A. Jackson, D. Day; lane from English Yu.E. Suslova. - Moscow: AST: Kladez, 2015. - 320 p. [ill.] - (Master Golden Hands).
Types of stoppers used
A rather important nuance of dovetail fastening is the presence of stoppers. Many air rifles boast zero recoil, but what about firearms? When recoil occurs, the gun moves in the direction of the shooter, if you remember Newton's law, it will become clear that the reverse force moves the sights in the opposite direction. With fairly large recoil, the sight can move along the bar, thereby disrupting zeroing. To prevent the sight from coming off, there are several options:
1. Retaining “wall”. It represents a small barrier to prevent the sight from “walking.” It is located mainly at the end of the bar relative to the shooter's eye. When installing optics, you must move the bracket close to the stopper.
2. Locking pins. Designed for recesses in the bracket for mounting optical sights or collimators. Can be located anywhere on the landing strip. 3. Stopper holes. Designed for the presence of retractable bracket stops. Possible location in any part of the landing strip.
There is another way - limiting the grooves. A fairly common option for ensuring installation strength. The edges of the seat go to zero; during installation, the brackets move towards the end of the grooves, thereby locking. Most often found on planks with a rounded shape.
Assembly of connecting joints
For the production of products whose parts are connected using the dovetail method, almost all types of wood, plywood, and plastic are used. A special feature of the method is its non-separable technology using fastening agents (wood glue). Accuracy check and fitting of parts is carried out after:
- preliminary “dry” assembly of the final product;
- removing excess material;
- stripping or sanding tight areas.
The adhesive is applied to the contacting sides of two pieces of wood. To tightly connect the parts of the structure, a hammer and a wooden spacer are used, which protects the product from accidental damage.
After tapping the joint along the entire line, it is necessary to remove excess glue, the product is sent for drying, followed by cleaning with a jointer in the direction from the edge to the middle.