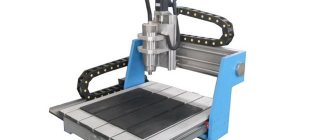
Graphite soldering rods
Graphite solder rods are known in the welding industry as infusible welding electrodes. They are used in
welding work involving soldering and cutting metals with a high-temperature electric arc. The use of graphite rods is particularly widespread, for welding non-ferrous metals, burning holes, cutting tacks and welding connections of twisted copper wires in assemblies of electrical equipment, graphite electrodes for soldering batteries and connecting their sections, arc furnaces and many other types of welding.
Soldering of small parts and electrical products with a graphite electrode is also popular. Welding wires and parts together provides a low-resistance connection that prevents heating when electric current passes through the welded contact. The connection after welding with a graphite electrode is durable, reliable and does not corrode.
Graphite electrodes for soldering wires are resistant to the passage of electric current and have high electrical conductivity and do not oxidize at high temperatures. They last a relatively long time. They are produced by manufacturers in different shapes of tips and the length of the electrode itself. Graphite electrodes are sometimes coated with a copper-plated layer of up to 5% of the composition. They are dark gray in color with a metallic tint. The rods have the corresponding grades EG, EGS, EGP, EGSP - electrode graphite, special, impregnated. The composition includes petroleum coke and coal tar pitch.
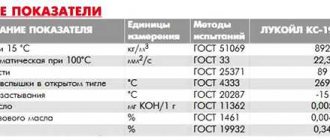
The main physical indicators of a graphite rod:
- density – 1.55 g/cm3;
- electrical resistivity 8 – 11 µOhm/m.
For welding small parts and wire ends, use a graphite electrode holder for indirect soldering. It is improved by adjusting the dimensions to fit the graphite rod. To clamp the mass, “crocodiles” with additional insulating handles are used. The source of the welding current is conventional inverter power supplies that support a welding current ranging from 50 to 120 amperes and an arc voltage of 25 V. Prices for graphite rods vary significantly and the price ranges from 20 to 100 rubles per piece.
Source
Pros and cons of graphite electrode
If you have not worked with graphite electrodes before, it is important to evaluate the strengths and weaknesses of the material.
Advantages of a graphite electrode:
- they are made from leftover rods from smelting furnaces. This is why the electrode is easy to use;
- the ability of the electrode to withstand high current levels;
- act as excellent electrical conductors, which has a positive effect on the quality of welding;
- durability of the electrode due to resistance to aggressive factors, does not oxidize.
The disadvantages of graphite electrodes include:
- serious requirements for the shape and sharpening of electrode tips;
- during welding with electrodes there is a possibility of an increase in the amount of carbon;
- the minimum diameter is 6 mm, which narrows the range of applications for a graphite electrode.
How to weld thin metal using a battery
Batteries are found everywhere in our lives - they are reliable power sources for many household appliances.
But how does a battery produce current? It involves a chemical reaction between two metals placed in a special solution. As a result of the reaction, electricity is released.
That's how books are written. However, it is sometimes not easy to understand from books where electrics actually come from. The real concept comes only with practice. This article will tell you how to make a battery out of a simple pencil and get electricity from it.
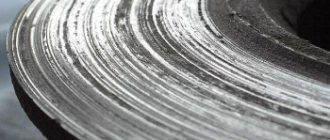
Where to get a graphite rod from a battery
Hi all! Today we will talk about graphite. If you were assembling a serious metal detector, then you probably had to shield the coil (sensor). This can be done in two ways: wrap the coil in foil or cover the entire sensor with graphite. Covering with foil is not a very good way, so many people cover the sensor with graphite. But if, in some unusual way, you are unable to buy graphite, what will you do? For example, you spent all your money on radio components and assembling the electronic unit of a metal detector, but there is no money for graphite. Don't give up! You can get graphite from regular batteries. C and D format batteries will have more graphite.
You might be thinking, “If I don’t have money, where will I get batteries?” Friends, it's very simple. You've probably noticed that in large stores, shopping centers or markets, they put boxes for collecting unusable batteries and accumulators. That's where you can get these batteries for graphite mining. We have these boxes with batteries in our ATB stores, so you can easily find different types of batteries. I rummaged through this box and took out three D-type batteries.
If you have found such batteries, congratulations, you can start “mining” graphite. All we need is: pliers, a screwdriver, an awl. Before disassembling the battery, I advise you to lay a newspaper or some sheet of paper on the table.
The first thing to do is remove the label. It is simply glued to the battery, so there will be no problems with it.
Next, you need to inspect the battery and find the side from which you can disassemble it. In my case, this is the positive side of the battery.
Since on the other side the battery is not collapsible, on that side it will be inconvenient for us to disassemble the battery. When we have decided which side we will disassemble the battery from, take a screwdriver and bend the curved edges with it.
When the edges are folded back, the battery will look something like this:
Now take an awl and remove the battery contact pad. My battery had two small holes (probably for the release of evaporated gas), so it was not difficult for me to do this.
When the contact is removed, the battery will look something like this:
We can see the end of the graphite rod, and the plastic plug.
We remove this plastic plug with an awl.
After removing this plug, our next task is to remove this black powder (a mixture of manganese oxide 4 and carbon). You can carefully try to pull out the graphite rod with pliers, but I couldn’t do this because the powder got in the way. Use an awl to loosen the powder and shake it into a bag. After which, you can get the graphite rod without any problems.
Graphite rod can also be used in welding. So get more batteries and get some free graphite. That's actually all I wanted to share with you. Good luck to everyone, see you soon. Kirill was with you.
Cheap batteries have been developed from waste graphite and scrap metal
Lithium-ion batteries sometimes catch fire and the cost of raw materials for them is rising, forcing scientists and engineers to look for alternatives. Researchers from the Swiss Federal Laboratory for Materials Science and Technology (Empa) and the Swiss Federal Institute of Technology Zurich (ETH Zurich) say their developments will make it possible to produce batteries from waste graphite and scrap metal, Science Daily writes.
Maxim Kovalenko's research group is based at ETH Zurich and the Empa Laboratory for Thin Films and Photovoltaic Systems. The team's ambitious goal is to create a battery from the most abundant elements in the earth's crust, such as magnesium or aluminum, which would quickly scale up battery production in a simple and inexpensive way. In addition, these materials are safe to use, even if the anode is made of pure metal.
In traditional batteries, electric current is generated by metal cations moving back and forth between the anode and cathode. As an alternative, large but lightweight organic anions can be used. However, this raises a number of questions: in what medium should these light anions move and what material is suitable for making the cathode? In lithium-ion batteries, the cathode is made of a metal oxide that can easily absorb small lithium cations during charging. However, large organic ions are too large and have a charge opposite to that of lithium cations.
To solve this problem, Kovalenko's team turned the lithium-ion battery principle on its head. In conventional lithium-ion batteries, the anode is made of graphite, the layers of which contain lithium ions in a charged state. In contrast, in the Kovalenko battery, graphite is used as a cathode, and large anions are deposited between the graphene layers. The anode, in turn, is made of metal.
Laboratory employee Konstantin Kravchik discovered that graphite, the so-called graphite spel, can be used as an accessible material for cathodes. Natural graphite, supplied in the form of flakes and having an open molecular structure, into which large anions can more easily penetrate, is also suitable. At the same time, fine-grained graphite, usually used in lithium-ion batteries, is not suitable for the Kovalenko battery: in such graphite the layers are crumpled, and only small lithium cations can penetrate inside.
A battery with a cathode made from graphite spel or raw graphite flakes can be very cost effective. And, as the first experiments showed, it is durable: the laboratory prototype survived thousands of charge and discharge cycles for several months. The aluminum graphite chloride battery can last for decades in everyday household use, the team said. The research team is currently working on increasing the battery voltage and energy density.
Welding copper with graphite electrode
Copper wires can be welded using electrodes. This is a great alternative to other methods. Professional welders highlight a number of advantages of this technology:
- it is possible to achieve maximum reliability by creating a high-quality connection;
- the bases are soldered at the end, the main surface remains intact. Due to this, it is possible to avoid overheating of the structure. Therefore, it is possible to increase the loads;
- efficiency of the process. Heating takes a couple of seconds, which simplifies working with graphite electrodes.
Reading room
O. Holguin. Experiments without explosions
Imagine what happened: you started an electrochemical experiment, assembled a circuit, and suddenly the battery died, and there is no spare battery. What should I do? But that's not so bad. It’s much worse when a flashlight goes out on a dark evening, especially in the forest. And what a shame if the batteries of a transistor radio fail just at the moment when your favorite song is broadcast on the radio, or during a broadcast of a football match. But what can you do?
In the meantime, something can be done. If you don’t have a spare battery, don’t rush to throw away the old one, but try to “revive” it.
Many modern batteries - Krona, Mars, Saturn, KBS and others - consist of elements of the manganese-zinc system
. During operation, the negative electrode of these batteries is zinc
the glass - gradually, but very slowly, dissolves, and the positive electrode -
manganese dioxide
MnO2, is reduced to
manganese metahydroxide
(its formula can be represented as MnOOH). It gradually covers the oxide grains, penetrates deep into the grains and blocks access to the electrolyte. Even half of the manganese dioxide has not been used, and the element has already stopped working; By that time, even more zinc remains, up to four-fifths! In short, an almost usable battery has to be thrown away.
Checking the work
Using a tester, we check the voltage at the battery terminals. One small product 4-5 cm long produces up to 0.5 - 0.6 Volts of voltage. We connect an LED to three series-connected batteries and lo and behold, light appears, current flows, and the battery starts working.
The batteries can be placed in a container, such as a cocktail straw. We insert the container inside a paste pen with a transparent body. Before doing this, remove the writing rod from the pen and cut it so that the container with three batteries and an LED fits in the body. A luminous pen with batteries made from a simple pencil is ready!
Simple homemade devices from scrap materials for generating electric current allow you to know and understand the nature of electricity as an energy source that does real work. The construction of such devices is of invaluable educational value for children, replacing hundreds of pages of textbooks trying to explain what electricity is.
And no measure can measure that indescribable joy when everything made by their hands suddenly magically lights up and flashes with multi-colored LEDs. This is precisely why such homemade products are important.
Extracting graphite pencil lead
Using a sharp knife, carefully, very carefully, so as not to damage the lead or your fingers, make longitudinal cuts along two opposite edges of the pencil. We split the pencil along the cut lines, remove the lead rod, and clean it of any remaining wood. If the lead breaks into pieces, it’s not a big deal; for work you will need rods as long as a matchbox, up to 4-5 cm.
Which batteries have a graphite core?
A salt battery will depressurize faster when discharged. I don't care about alkaline. In general, it must be said that, firstly, the problem of the influence of manganese-zinc alkaline and salt batteries produced at the present time or in the recent past - that is, already mercury-free batteries on the environment is greatly exaggerated. There is nothing particularly toxic inside them. After dilution and neutralization by the soil buffer system, the electrolyte will become indifferent to the environment, zinc is a necessary trace element that will slowly transform into a bioavailable form without creating dangerous concentrations of soluble zinc, manganese dioxide from the positive electrode is generally not biologically available.
Search data for your request:
Wait for the search to complete in all databases. Upon completion, a link will appear to access the found materials.
Go to search results >>>
WATCH THE VIDEO ON THE TOPIC: Mini welding and electric pencil from the graphite rod of a battery and transformer.
Graphite rod: application
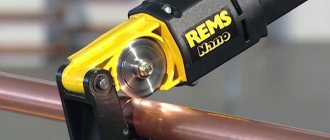
The graphite component from old batteries is not only the basis for a new energy source, but also an element that can be used for electric welding. This is done according to a simple scheme:
- Sharpen a graphite rod from an old battery at an angle of 30-40 degrees.
- Using an alligator clip with a non-conductive handle, connect it to the “+” and “-” AC or DC power sources.
- Connect “0” and “-“ to the stripped part.
- As the electrode burns out, it must be sharpened periodically.
How to make a battery at home? You will need available materials, a little enthusiasm and perseverance. In exchange you will receive alternative energy sources.
Graphite electrode consumption
During the melting process, the graphite rod is consumed. Although the material is considered melt resistant, slow melting occurs. This process is significantly slower, unlike other types of consumables. If, when exposed to high temperatures, the diameter of the rod decreases and becomes smaller than normal, then extension is necessary. For this purpose, nipples are used, which are sometimes included in the kit from the manufacturer.
With standard furnace operation, consumption ranges from 4 to 8 kg per ton. To reduce the cost of consumables and make the process more economical, you need to control a number of parameters:
- quality of consumables used;
- features of the smelting furnace;
- heat treatment mode and set temperature;
- steel quality and burner type.
In general, graphite electrodes are practically not consumed. Loss of mass of consumables occurs due to the evaporation of the graphite itself.
Let's sort out the batteries!
The site helps you find something interesting in a huge range of stores and make a successful purchase. If you bought something useful, please share the information with others. We also have a DIY community where reviews of DIY items are encouraged. I mix cheap tobacco liquid. Register Login or email
Remind password Password. Login Remember me. Enter or register. Add a review. Blog Shops in China. Blog RSS Subscription. COM Products prof. What do carburizing steel, lubricating locks, and fingerprinting have in common? You will find the answer under the cut, although the spoiler is this small bottle. One day I came across a video about how you can significantly strengthen steel at home.
The author of the video gutted ordinary AA batteries, took out the graphite rods from them and sawed them with a file. The resulting powder is suitable for carburizing steel. Simply put, this is the saturation of steel with carbon atoms.
They are embedded in the crystal lattice of iron and enhance the energy of its interatomic bonds. All you need to do for this process is to dip the part in graphite and heat it up high.
There, in the video, a nail flattened and processed in this way was used as a metal drill. A nail is like a drill for metal. For metal, Karl! Of course, I was very impressed, but then it didn’t come to the point of cutting up the batteries. Now you no longer need to hoard dead batteries, tear them apart with wire cutters, fiddle with sticky reagents, take out graphite and saw it with your blackened fingers on a file.
The professionals did everything for us. Here it is, a bottle of graphite dust: Unfold the package: Open the cap: The bottle is polyethylene, sealed. We must not forget that the main purpose of graphite powder is to lubricate rubbing mechanisms. The thing is that oil is not very suitable for lubricating locks. Dirt quickly sticks to parts soaked in oil and soon the lubricant begins to act as an abrasive.
This is especially true for locks with through keyholes. Dust is driven into such drafts, no worse than a cooler into a system unit. So, here is the graphite: Let's look through the microscope. The ruler division value is 0.5 mm. But we blow it into the lock: It works smoothly and reliably. Now let's try metal cementation. To do this, I made an improvised tray from a steel gypsum profile: I used a welding machine as a power source. The guinea pig was a bit from a screwdriver.
Before starting, I made a notch on it with a needle file. It cuts at about the same level as a pencil, but maybe a little worse. Then the cementation process began: Similar reviews Other reviews from tykhon. It was not useful to buy, DIY. We roll rolls in a new way. That is the case when, instead of two Chinese, three Russians get in. To cement steel like this, you need to keep it for weeks.
Faster using German technology, in a methane atmosphere. What kind of technology? The British on their first battleships were faced with the fact that ordinary iron was lousy at holding shells. And they began to cement the slabs. It's in the coal. The process was very long and expensive. Krupp instead used methane cementation. I don’t remember how thick it was in an hour, I need to look at the tables, but not a day, and especially not a week.
Testing of graphite (graphene, carbon) thermal film. It was fun !
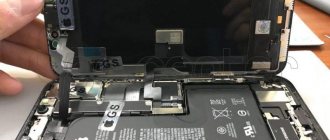
Hello everyone! On the Internet, with the release of the AMD Radeon VII video card, videos and more about its disassembly began to crawl. And during the disassembly, everyone saw that between the memory crystal and the base of the radiator, there was some kind of thermal pad. But don’t rush to shout, this thermal pad is not an ordinary “thermal pad”, but a graphite one. And now, Chinese forces have produced an inexpensive analogue. Today I’ll try a new product for myself, graphite thermal pad (thermal film) produced by Arsylid. Thermal pads are a fairly well-worn topic, but graphite pads have appeared extremely rarely, although they have been seen for a long time. The AMD Radeon VII graphics card uses Hitachi Chemical TC-HM03 thermal pad. It is a high-quality thermal pad, because... Replacing it with liquid metal or thermal paste gives virtually no effect within the error.
The main features of the graphite (graphene, carbon) thermal interface (its various types and subtypes): - the highest thermal conductivity from 400 to 1800 W/mk (!), but in the horizontal plane, i.e. wide distribution of heat. — high vertical thermal conductivity from 10 to 80 W/mk — mostly electrically conductive, unless additional “additives” are used in the composition — wide temperature range from -300 to + 400 degrees Celsius. — the ability to cut the required size and select the required thickness. — are very flexible, allowing you to cover the entire relief for heat removal. - reusable. — it is advisable to avoid aggressive environments (salts, solvents, direct sunlight).
But this is all in general terms, and now let’s move on to our specific thermal pad, as the manufacturer Arsylid has already said.
I would like to note right away that these thermal spacers are mainly used to dissipate heat from any elements on the board. For example, from the processor to the case, even if it’s plastic. Sometimes in laptops they dissipate heat from the chips across the motherboard. Those. It copes with heat dissipation, but we’ll see how it performs as a conventional thermal interface. Although the lot says about the GPU and processor, maybe for search, or maybe for purpose.
The film (and judging by the thickness, it is more of a film than a gasket) is packaged in foamed PVC plastic, or rather from 2 cut pieces rewound with thin, similar to masking tape.
Inside we have a sheet of film measuring 85*147 mm and a stated thickness of 0.025 mm. We ordered a sheet of size 70 * 150 ± 2 mm, so in fact we are in the black, there are practically no pluses, the width would have been preferable, it would have been enough for more processors, instead of 6 parrots there would have been 8). I have nothing to measure such thickness with. Doesn't shine through.
I don’t know where it comes from, but there’s this one...
Mount microscope
You can’t call it a microscope, but let it be a microscope.
Just for fun, I took a few photos through it.
Photo through a microscope
Our film is versatile, matte on one side and glossy on the other.
But the gloss is kind of suspicious... plastic-cellophane. I picked at the edge with my fingernail, nothing came off, then, armed with a knife, I was able to separate that same plastic-cellophane film and under it the surface is also slightly glossy, but not so obvious and, most importantly, it is slightly adhesive.
And this property allows us to stick the cut-out gasket onto the processor cover without fear that it will move off when installing the cooler. However, for example, the instructions for Keratherm graphite gaskets say:
In the case of using thin heat-conducting substrates with an adhesive composition, the adhesive composition is applied to the back side of the substrate and covered with a protective layer. In this case, after removing the protective layer, the substrate is attached with the adhesive side to the heat sink or body. When using, make sure that the protective layer is removed.
And once on the forums I saw that, on the contrary, it is better to glue it to the processor.
Well, okay, let's check. There is definitely horizontal heat distribution! I held a third of the sheet between my palms, let go, touch the opposite end, which was in the air, and it was warm!
The declared vertical thermal conductivity, in theory, should cope with heat removal, just like thermal paste. That is why I decided to use it like regular thermal paste or thermal pad. In addition, we have a fixed layer (thickness), which means some commentators will be simply happy that a very important condition for testing the thermal interface has been met, namely the thickness and uniformity of the layer.
Characteristics:
The test took place on an AMD Phenom II X4 955 3.2 GHz 125W stepping C3 processor, overclocked to 3.8 GHz. I heated it with AIDA64 - Stress FPU - for 45 minutes, because it heats the stone the most. Cooler Zalman CNPS10 Performa.
The stand is open. The motherboard is on the table, respectively, the coolers are in a vertical position, the power supply is taken away so as not to interfere with its valve. I decided to remove the speed control; in the stress test they will still reach maximum speed. The application method is a drop, I apply a cooler with a clamp, twist it in place a little and hook the bracket/tighten the screws. Each cooler change, applying a new paste, after cleaning with cotton pads and degreasing with Nefras S2-80/120 “galoshes”/“galoshes”. Room temperature 22.5-23.5 (unless otherwise indicated) during testing, doors and windows closed from drafts. Don't forget that each test is individual, different coolers, different processor covers. I have these results, you will have different results on the same hardware, because... the unevenness of the surfaces is not the same, the stars and the moon are not in the right phase, etc.
Cut it to the size of the processor cover. We wash our hands, remove the protective layer and glue it to the radiator base. The thickness of the film is really very small.
It is highly advisable to place the cooler exactly right away so as not to “scrape” on the film, because it is afraid of mechanical damage, and with such a thickness, it cannot be avoided at all. Let's run the tests.
Result:
As Commissioner Zhiber from the film “Taxi” would say, “Gentlemen, this is a disaster!” This is truly a disaster. I slowed down the test at 6 minutes because the heating was 110 degrees, and it did not turn off. I stopped the test early. Perhaps if you stick it in reverse on the processor it will give some result, maybe its conductivity is one-sided, who knows these Chinese. But now I’ll try to stick a film on the processor, thereby increasing the thickness, maybe it’s not enough.
Photo of the film after removal from the processor:
The film was not damaged at all.
Cut out another piece.
I labeled it with “like a bull pissing”, but oh well, it’s unlikely that this side will have a big impact on us. Let's cut the length.
The result is an even greater disaster. It was 105 degrees already at 9 seconds. I interrupt the test and try to tear the film off the cooler and leave it only on the processor. When taken away, this picture appeared. It’s as if a pencil lead had been ground and rolled between two films. And it seems to smudge a lot. It's all carbon, no doubt about it.
Almost repeats the first experience, only a little worse. Let's try something completely wild, the result of which is already known - we'll stick one strip on both the cooler and the processor cover, and suddenly a miracle will happen! As you can see, I didn’t wash my hands anymore...
18+
The result is that no miracle happened. This is a catastrophe.
I decided to add the result without thermal paste at all. Bare processor cover + bare radiator base. I don’t know why I didn’t do it earlier on this pair.
The result is tolerable for an overclocked stone - 72 degrees. But apparently the evenness of the lid or processor leaves much to be desired. But we won’t do anything with this couple, because... There will be more tests and it will be more convenient to compare them with others already received. Those. We will not level/sand/polish/lap.
Result:
It turned out to be an excellent heat insulator. Of course, I haven’t tried it on my finger on a bare processor, maybe this film will be barely warm. The cooler was almost cold. At least wrap the pipes if you need to prevent frost from penetrating them so much or to prevent heat from escaping. In general, if there are heating pipes in the attic, you can wrap them up, there is no waste of heat, although such wrapping will cost the price of the house.
But seriously, this particular “thermal” film is not suitable at all as a thermal interface. Do not use this method for cooling electronics under any circumstances. If you glue a small thin plate or foil to the laptop and remove heat from the board onto the foil through this film, this is quite a workable task, but I am not interested in it, at least for now.
After such results, it is interesting to try Keratherm or Thermal grizzly carbonaut. But that’s all later and it’s kind of like full-fledged thermal pads.
Thank you all for your attention, it was fun and sad at the same time. I accept questions and criticism below in the comments and in PM.
Offtopic
There is a tradition, either on Muska or among some authors, of posting cats at the end.
I have cats, but I’d rather post something interesting or funny. Although I might also take a photo of the cats, perhaps from me, my mother-in-law, my parents and brother, that is. for 4 families there will be 5 cats, 1 cat, 2 dogs and several fish). Today we have photos of butterflies. A butterfly exhibition came to us, my wife and child went to see it. Overall interesting and beautiful. There are probably about 20 types and different sizes. Very friendly, easy to sit on people. It was quite interesting to look at. Photo
Using a graphite rod from a battery
A TV remote control, a player, a photo flash, a children's toy - everything is powered by batteries. Salt electrolyte batteries, also known as zinc-carbon batteries, are the cheapest commercially available chemical power sources. A layer of manganese dioxide is placed around the anode, and the remaining space between it and the walls of the container is filled with a paste of ammonium chloride and zinc chloride diluted in water. As the battery operates, the zinc gradually oxidizes, small holes appear in the container, from which electrolyte begins to ooze and the battery can damage the equipment. During the Soviet era, this was a very common phenomenon. But, nevertheless, you should not leave a dead battery in the device for a long time. These batteries are ideal for operating remote controls, watches, and electronic thermometers. Alkaline translated from English means alkali, which is why this type of battery is popularly called alkaline. These batteries are more expensive. The negative terminal of an alkaline battery consists of zinc powder, which increases the speed of the chemical reaction, and therefore the current produced by the battery.
Features of graphite electrode
The structure of the rod consists of two elements with an insulating gasket. Copper or aluminum oxides are used as an insulator. Graphite electrodes are made from compressed carbon. For this reason, the percentage of carbon in the metal may increase during the metal welding process.
The composition and technical features of the electrode depend on the manufacturer. To obtain comprehensive information on the electrode, decipher the product labeling. All consumables must be produced in accordance with GOST standards and other regulatory documents. The technical characteristics of a graphite electrode include the following indicators: density, ash impurities, resistance force, strength, elasticity.
Potato battery
- two potatoes;
- three wires with clamps;
- two chrome nails;
- two copper nails.
So, how to make a battery from tubers:
- Give a symbol for each of the potatoes - “A” and “B”.
- Insert a chrome nail into the edges of each tuber.
- On the opposite edge - a copper nail. The nails should not intersect in the body of the potatoes.
- Take any battery-powered device, remove it, and leave the compartment open.
- The first wire should connect the copper pin of the tuber "A" to the positive terminal in the battery compartment.
- The second wire connects the chrome pin of potato "B" to the negative terminal.
- The last wire connects the chrome tuber nail "A" to the copper tuber nail "B".
- As soon as you close all the wires in this way, the potato will begin to supply energy to the device.
Potatoes in this experiment can be replaced with banana, avocado or any of the citrus fruits.
Lemon battery: two options
For the first option you will need:
- lemon itself;
- galvanized nail;
- 2 small pieces of copper wire;
- copper coin;
- small light bulb.
The working process is as follows:
- Make two cuts on the fruit at some distance from each other.
- Place a nail in one cut and a coin in the other.
- Connect a piece of wire to both the nail and the coin. The second ends of this improvised wiring should be in contact with the contacts of the light bulb.
- And that's all - let there be light!
You can also make a homemade battery from sour fruit using:
- the same lemon;
- paper clip;
- light bulbs;
- 2 pieces of insulated copper wire with a diameter of 0.2-0.5 mm and a length of 10 cm.
The algorithm is as follows:
- Strip 2-3 cm of insulation from the ends of each wire.
- Attach the exposed part of one wire to a paperclip.
- Make two cuts in the lemon 2-3 cm apart - along the width of the paperclip and for the second wiring. Insert these elements into the fruit.
- Attach the free ends of the wire to the contact part of the light bulb. If it does not light up, it means that the selected lemon is not powerful enough - connect several fruits in series and repeat the experiment.