When building a house and landscaping a site, it is often necessary to make round holes in the ground. They are needed when constructing a fence - for installing poles, when building gazebos, installing arches and other light utility structures. The same holes, but with a larger diameter and depth, are required when constructing a pile foundation. These holes are made with a motorized or hand drill. There are plenty of them in stores, but many people prefer homemade ones: they are often more productive and reliable than factory-made products. In addition, you can make a drill with your own hands of any design, and there are many of them.
Designs and Applications
There are three main designs of earth drills:
- Garden. Usually these are two semicircular blades welded at an angle to one another. A hand drill of this design is used to organize holes for planting plants, which is why it is called “garden”. But the same tool is used to make holes when installing posts for fences, gazebos and other light buildings.
An example of a homemade earthen garden auger
The auger drill is distinguished by spirally wound several turns of the spiral
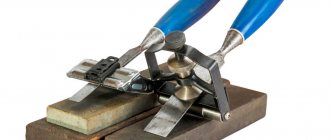
Folding blade - features of the TISE pile drill
Garden earth drills that are easier to make. Depending on the type of soil on which drilling is carried out, their design is slightly modified. This is the beauty of homemade drills - they can be “sharpened” to specific conditions and it’s not just about the size - the blades can be made removable, bolted on, but also about the design features. Yes, ordinary drills in the store are inexpensive, but they are “universal”. They work well on “light” soils.” On loams, clays, marl, etc. they are ineffective.
Preliminary calculations
Before you start drilling holes for pillars, you need to make preliminary calculations. To install any pole you need a hole. Its diameter is slightly larger than the size of the structural element itself. The pit must strictly correspond to the parameter of the pillar. For this purpose, preliminary calculations are made. They are often quite simple. If the hole is made too spacious, it will lead to loosening of the soil. This is unacceptable for a columnar base. The foundation will be shaky and not rigid.
Making a garden drill
A garden auger is the simplest but most effective design. It consists of:
- Cutting part. It usually consists of two steel semicircles with sharpened edges. The diameter of the blades is selected depending on the diameter of the holes that need to be drilled. For convenience, the blades can be made removable - bolted.
The post drill can be equipped with a prefabricated rod
This is a basic design, and there are many modifications to it. But let's first talk about what an earth drill can be made from.
Materials
As already mentioned, the rod is most often made from a round or square pipe. Diameter - from 3/4′ to 1.5′, profiled pipe can be taken from 20*20 mm to 35*35 mm.
Blade knives can be made from:
- sheet steel with a thickness of 4 mm;
- saw blade for an angle grinder of suitable diameter.
Earth drill with blades made from a saw blade for an angle grinder
It is easier to make blades from a saw blade. In this case, the cutting edges are already ready. It will be possible to further sharpen the side edges to make the soil easier to cut.
The spear-drill is made from different materials - there are many different designs. They just make a sharpened rod. Then you need a piece of large diameter rod. The second option is to make something like a drill from the steel strip. And yet - a combination of these two.
And finally - about the pen. It is more convenient if it is made of a round pipe. Its diameter can be selected according to the circumference of the palms. The main requirement is that you should be comfortable.
Knives and fastening method
First of all, you need to decide whether you are making a drill with your own hands with removable or stationary blades. If the blades are removable, weld shelves made of thick steel at one end of the rod. The shelves are made at an angle - so that the planes of the knives are separated at an angle of 25-30°.
After the shelves are welded, two or three holes are made in them for fasteners. Then the same holes will need to be made in the blades, and installed on bolts of substantial diameter.
One rod can have several sets of cutting blades - for holes of different diameters
You will have to cut holes in the center of the disks themselves so that they fit more tightly to the rod, but this operation is also required for the monolithic version - with welded blades.
Sheet steel
If you are going to make the blades from sheet steel, cut out a template from paper and use it to create a circle of steel. Drill a hole in the center - you will need to insert and weld a rod into it. Circle or square - depending on the chosen rod. The hole dimensions are slightly larger than the dimensions of the rod.
Next, you need to decide what kind of blades you will make - from two halves of a circle (as in the photo above) or in the form of an open circle with offset edges - one turn of a spiral (in the photo below).
Manual drill with one turn
The edges should also be separated by 25-30 degrees. In this case, drilling efficiency will be maximum. If you work on dense soils (clay, loams with a predominance of clay), the blades may collapse under load. To avoid this, stops are added from a corner or a thick strip of steel.
Strengthening a hand drill for drilling wells in dense soils
The blades bend due to the fact that unhardened steel is used, but it is almost impossible to find it in the sheet, and even if it is possible, it is unlikely to be bent.
From a saw blade
If you have an old saw blade of a suitable diameter, you have found an almost ideal option. They use hardened steel, which is elastic and durable. But such a disk cannot be bent, so it is sawed in half and these halves are placed at the required angle.
The disc is sawn in half
This homemade drill for excavation works shows quite high productivity. Even used wheels have a well-ground edge. And to make drilling even easier, they also sharpen the drill on the sides with their own hands.
Modifications
In dense soils, it can be difficult to cut the soil with large blades. In this case, several blades of different sizes are welded onto the rod. From below, near the peak, the smallest ones are welded; above, retreating a few centimeters, the large ones are welded. There can be three such tiers, maximum four. The entire cutting part should not be more than 50 cm, otherwise it is physically very difficult to work.
Cutting blades can be arranged in several tiers
If a drill is needed for shallow holes - for installing poles, etc., then this design is optimal - it is relatively light in weight and easy to work with. The working process is as follows: they lowered it into the hole, turned it several times, pulled it out, and poured out the soil stuck between the blades. But if you need to drill deep holes, you will suffer from carrying a small amount of soil from the depths. For such cases, a box for collecting soil is welded above the blades.
Read also: Installation of a gas pipeline in a private house
A homemade drill with an earth receiver is suitable for installing poles and piles
And all these are hand-made drills. All of them are highly efficient - it’s much easier to work than store-bought ones.
How to make a homemade earth drill (pit drill, earth drill)
When building a house and arranging a site, it often becomes necessary to make round holes in the ground. They are needed when constructing a fence - when installing poles, when building gazebos, when constructing arches and other light structures of the house. The same trenches, but of a larger diameter and depth, are required for the foundation of the piles. Make these holes using a motor or hand drill. There are plenty of them in stores, but many people prefer homemade ones: they are often more effective and reliable than factory-made products. In addition, a drill with your own hands can make any design, and there are a lot of them.
Designs and Applications
There are three main versions of drilling rigs for excavation work:
- Garden. Usually these are two semicircular blades welded to each other at an angle. A hand drill of this design is used to organize planting holes for plants, of which it is called a “garden drill.” But the same tool is used to make holes when installing posts for fences, gazebos and other light structures.
An example of a homemade garden auger for soil.
It differs in that it has a longer cutting part. It serves the same purpose - making holes for posts. Due to its design - the longer cutting part - it has to be removed less often, so drilling is usually faster. Auger drilling is characterized by several turns of the TISE pile driving machine. This design is similar to a garden drill, but has an additional folding blade that creates an extension at the bottom of the pile, characteristic of this type of foundation.
Articulated blade - features of the TISE pile driving machine
Easy to make drills for garden soil. Depending on the type of soil in which drilling is carried out, their structure changes slightly. This is the beauty of homemade drills - they can be “sharpened” to specific conditions, and not only in size - the blades can be made removable, with self-tapping screws, but also in terms of design features. Yes, regular store-bought drills are inexpensive, but they are “universal.” They feel good on “light” soils. On loams, loams, marls, etc. They are ineffective.
Making a garden drill
A garden drill is the simplest but most effective design. This consists of:
- Cutting part. It usually consists of two steel semicircles with sharp edges. The diameter of the blades is adjusted according to the diameter of the drilled holes. For convenience, the blades can be removed using self-tapping screws.
The post drill can be equipped with a Rhodium prefabricated rod. It is a round or profiled pipe (square cross-section). You can also use scrap metal, but it is very heavy and will be difficult to work with. The length of the strip is equal to the required trench depth plus 50-60 cm. If shortened, the last centimeters will have to be drilled at a large angle, which is not at all easy. If in these calculations the total height turns out to be more than 1.5 meters, it makes sense to make prefabricated timber. Then the rod is expanded with pieces of pipe of the same diameter, creating an articulation system. Pen. Often a T-shaped crossbar is welded to the crossbar. The minimum length of the handle is 40 cm, the optimal length is 50-60 cm. Tip - drill. This is the part under the shoulder blades. Firstly, it loosens the ground, and at the initial stage it is responsible for centering the drill - it is easier to hold it in a vertical position.
This is a basic design that has been improved in many ways. But first, let's talk about what an earth drill can be made from.
Materials
As already mentioned, the rod is most often made from a round or square pipe. Diameter – from 3/4' to 1.5', pipe shape can be from 20 * 20mm to 35 * 35mm.
Knife blades can be made from:
- steel sheet 4 mm thick; saw blade of the correct diameter.
Ground clamp with circular saw blades
It is easier to make blades from saw blades. In this case, the cutting edges are ready. It will be possible to further tighten the side edges to make it easier to cut the ground.
The hammer drill is made from a variety of materials - there are many designs. Only sharpened timber is produced. Then a large diameter rod section will be required. The second option is to make something like a drill out of a steel strip. And also a combination of these two elements.
And finally, about the door handle. It is more convenient when it is made of a round pipe. Its diameter can be selected depending on the diameter of the hand. The main requirement is that it should be convenient for you.
Knives and fastening method
First of all, you need to decide whether the drilling rig should have replaceable or fixed blades. If the blades are removable, thick steel flanges must be welded to one end of the bar. The shelves are made at an angle - so that the planes of the blades are separated at an angle of 25-30 °.
After the shelves are welded, it is necessary to make two or three holes for fasteners. After this, it will be necessary to make the same holes in the blades and secure them with self-tapping screws of a solid diameter.
It is possible to install several sets of cutting knives on one bar - for trenches of different diameters.
It is necessary to cut holes in the center of the disks themselves so that they fit more tightly to the bar, but this operation is also required in the monolithic version - with welded blades.
Sheet steel
If the blades will be made from sheet steel, cut a template out of paper and wrap it in sheet steel. Drill a hole in the center into which you will insert and weld the rod. Circle or square - depending on which bar you choose. The hole size is slightly larger than the size of the rod.
Then you need to decide how you want to make the blades - from two halves of a circle (as in the photo above) or in the form of an open circle with offset edges - one turn of a spiral (in the photo below).
Boroyam is controlled manually with one turn
The edges should also be set at an angle of 25-30 degrees. In this case, the drilling power will be maximum. When working on dense soils (clay, loam with a predominance of clay), the blades may bend under load. To prevent this from happening, stops are added from a corner or a thick strip of steel.
Strengthening a manual drilling rig for drilling dense soils
It is impossible to bend the blade due to the fact that the steel used is not hardened, but it is almost impossible to find it in the sheet, and even if it is, it is unlikely to bend.
From a saw blade
If you have an old saw blade of the right diameter, you've found an almost perfect option. They use hardened steel, which is resilient and durable. But such a disk cannot be bent, so it is cut in half and these halves are bent at the desired angle.
The disk is cut in half.
This homemade earth-moving auger has quite high productivity. Even used discs have well-sharpened edges. And to make drilling even easier, you also sharpen the drill on the sides with your own hands.
Modifications
On dense soils it is difficult to cut the ground with large knives. In this case, several blades of different sizes are welded to the block. The smallest ones are welded from below, next to the shovel, and the larger ones above it, with a gap of several centimeters. There can be three such levels, maximum four. The entire cutting part should be no more than 50 cm, otherwise it is physically very difficult to work with it.
If a drill is needed for shallow holes - for installing poles, etc., this design is optimal - it is relatively light in weight and easy to work with. The working process is as follows: lower it into the hole, turn it several times, pull it out, and pour out the soil stuck between the blades. However, if deep excavations are required, you may become fatigued when moving small amounts of soil from the depths. In such cases, a box for collecting soil is welded above the blades.
A homemade earthen collector auger is suitable for installing pillars and piles.
And all these are handmade drills. They all have high performance - much easier to use than purchased ones.
Auger drill
The spiral snail puts significant resistance due to the large number of scrolls, that is, it is much more difficult to operate than a garden drill. But drills are mainly used where there is a mechanized drive - when the drill is in a deep well - for water, an underground probe device for a heat pump, etc.
The screw drill looks like this
To perform a hand drill, you need several metal disks. The number of shields is equal to the number of revolutions. The shields are cut in the same way, a hole in the rod is cut in them, as well as the same sector - thanks to which they can be welded.
The sector is marked in rings and cut out.
The discs are welded on one side, and then slightly stretch the resulting harmonic, welded on the other. O-rings are welded to the end discs. Spray discs were applied to the rod and the bottom edge was machined.
A large spring has been formed.
The winch is still needed. The snail element is attached, the winch hook is attached to the ring and stretched to the required length, and then the snail is welded.
Almost.
Drill for TISE piles
In the original version, the drill is a knife with a deeper, flattened wider blade that creates a flare at the bottom of the stack. But working with such a tool is inconvenient, because a folding knife bothers you. Consequently, in some designs it is disabled, and it is generally recommended to drill with a regular garden drill and a folding knife with the receiver removed separately to extend. Thanks to this, the work is easier and faster.
Drilling with your own hands for Pali Wier is one of the options
Here the knife serves as a cut cramp, and the copper is made of conflig. The knife is fixed in order to move, leaving the stack, it is stretched tied to the end of the nylon. After reaching the DNA free cable, the blade begins to cut the bottom of the bottom, creating a significant expansion.
The picture below shows the second version of the home drill for chains. The project is more complex, but also more effective. The lion plow is made of a spring, sharpened and welded to a hinged structure with screw connections.
More complex structure
The earth collector is made from old propane. It collects soil from below, which is why the collector is made with a rounded bottom. There are two holes with pointed edges.
Bottom view
This bullet works well even on hard clay. However, to reduce friction, the opening must be constantly sealed with water.
Blueprints
He made the drill well, that his project is “sharpened” under the owner. During the production process, everyone implements their changes, and then the logies complete the product. But it is difficult to do without basic drawings. There are several drawings in this chapter showing the dimensions of different drill bits. As you understand, dimensions are relative, you can and should be modified by adjusting them to the size of the required well.
Shovel drill
There is no point in making a serious design for planting. In this case, you can make a garden drill from a shovel. Choose a high quality, good steel shovel, use the markings as shown in the picture. According to the note, you will need to cut two small fragments, the smell of the lower part in the middle to a depth of 30 cm (in the picture).
Blade
Then the edges are bent forward, the second back, we will bend the flakes formed at the bottom. The seams formed in this way are welded externally and internally.
Drill for soft soils
If the ground is soft, the conventional design will not work well. For such cases, there is a special drill with an extended cutting part. It's a kind of cup with slits on the sides. The cuts are equipped with cutting edges. It is better to make them from well-hardened steel.
Soft soil
In this picture you can see an interesting design of the handle - it can be changed with an increase in the length of the rod.
Basic drawings of auger and garden auger
Both of these units work well, but the garden unit must be removed frequently and the auger is more difficult to turn. You choose according to your taste.
auger and garden auger for different soil densities
Detailed plan drawing of an auger drilling rig
garden drill drawing
Video materials
Auger drill
Due to the large number of turns, an auger auger creates significant resistance, that is, it is much more difficult to work with it than with a garden auger. But augers are used mainly in the presence of a mechanized drive - when making a drill for deep wells - for water, for installing underground probes for a heat pump, etc.
This is what an auger drill looks like
To make a homemade auger drill, you will need several metal disks. The number of disks is equal to the number of turns. The disks are cut identically, a hole is cut in them in the center for the rod, as well as an identical sector - so that they can be welded.
A sector is marked in the rings and cut out
The discs are welded on one side, then, slightly stretching the resulting accordion, the seam is welded on the other side. Rings are welded on the outer disks. The welded discs are placed on the rod, the lower edge is welded.
It turns out to be such a big spring
Next you will need a winch. The blank for the auger is secured, the winch hook clings to the ring and is stretched to the required length, after which the auger is boiled.
Drill for TISE piles
In the author's version, the TISE drill is a blade with an earth receiver and a folding wider blade, which forms an expansion at the bottom of the pile. But working with such a projectile is inconvenient - the folding knife gets in the way. Therefore, in some designs it is made removable, but in general, it is recommended to drill the holes themselves with an ordinary garden drill, and for expansion, make a separate folding knife with an earth receiver. This makes the work easier and faster.
Do-it-yourself drill for TISE piles - one of the options
A cut-off shovel serves as a knife, and the land receiver is made from a herring can. The knife is fixed movably; when lowered into the pit, it is pulled up by a nylon cable tied to the end. Having reached the bottom, the cable is weakened, the blade begins to trim the sides of the hole, forming the necessary expansion.
The photo below shows the second version of a homemade drill for TISE piles. The design is more complex, but also more effective. The plow blade is made from a piece of spring, sharpened and welded to a folding structure with bolted joints.
More complex design
The dredger is made from an old propane tank. The collection of soil occurs from below, which is why the receiver is made with a rounded bottom. It has two holes, their edges are sharpened.
This projectile works well even on dense clay. True, to reduce friction, the well must be constantly moistened with water.
Blueprints
A self-made drill is good because its design is “tailored” to its owner. During the manufacturing process, everyone makes their own changes, then many more refine the product. But it can be difficult to do without basic drawings. This engraving contains several drawings with the sizes of various drills. As you understand, the dimensions are arbitrary; they can and should be changed, adjusting them to the size of the required wells.
Shovel drill
There is no point in making a serious structure for planting plants. In this case, you can make a garden drill from a shovel. Choose a high-quality shovel made of good steel, apply markings as shown in the drawing. According to the markings, you will need to cut out two small fragments and saw the lower part in the middle to a depth of 30 cm (pictured).
Next, the edges are bent one forward, the other back, and the petals formed in the lower part are folded towards them. The resulting seams are boiled outside and inside.
Drill for soft soils
If the ground is soft, the conventional design does not work very well. For such cases, there is a special drill with an extended cutting part. It is a kind of glass with slits on the sides. The cuts are equipped with cutting edges. They are best made from well-hardened steel.
Drill for soft soils
This drawing shows an interesting handle design - it can be rearranged as the length of the rod increases.
Basic drawings of auger and garden auger
Both of these units work well, but the garden one has to be taken out often, and the auger one is harder to rotate. Choose according to your own preferences.
Auger and garden auger for soil of different densities
Detailed projection drawing of an auger drill
Garden auger drawing
Drilling under fence posts with a mini excavator - advantages + photo report. | Topic author: Viviane
Those who have dealt with the installation of posts (fence or otherwise) know firsthand how labor-intensive this process is.
The most difficult thing is to drill a hole in the ground (hole). You can do it manually, for example with a hand auger (garden), but this is a very tedious and long process. tel.8-905-220-60-90
Another option: a motor drill - also has its advantages and disadvantages: (drilling depth, diameter, productivity). Tel. 8-905-220-60-90
Next, a car-based hole drill... But there are cases when a car with a drilling rig simply cannot enter the site due to uneven road surfaces or there is no access or access, or the soil has a weak bearing capacity and wheeled equipment falls through or gets stuck. It is often impossible for a drilling car to get to the work site due to dense buildings; trees and bushes can also become an obstacle to the movement of large wheeled equipment, or remote areas in the depths of the territory. tel. 8-905-220-60-90
It is for these cases that there is a tracked vehicle based on a mini excavator, which has replaceable equipment in the form of a drilling rig (hydraulic drill). Through simple manipulations, we remove the bucket and install the hydraulic rotator - having previously connected it to the hydraulic line of the mini excavator, then, having decided on the diameter of the hole, we install the drill (auger) we need 200, 250, 300, 350, 400 mm, if necessary - through an extension cord , in order to achieve the required depth of the hole (hole). Auger length 1200 mm. + extension cords from 0.5 meters to 1 meter. tel.8-905-220-60-90
Further along the movement of the mini excavator...: peat, sand, wetlands, soil with low bearing capacity will not become an obstacle for small-sized tracked vehicles. And don’t forget that even though this is a mini technique, it is capable of performing some of the most complex tasks. The mini excavator will be able to pave the way to the place of work itself by replacing the hydraulic drill with a bucket; the mini excavator will, if necessary, plan or level its own path or paths for movement. Ditches, holes, ditches, trenches can all be buried - drive to the place of work - and on the way back, if necessary, plan (level, rake,) the soil (soil) as necessary at the request of the customer. tel. 8-905-220-60-90
Trees and shrubs, plantings, beds and paths will also not be damaged when working with a mini excavator since our equipment has small dimensions, the width for the passage of equipment is 1.45 meters. tel.8-905-220-60-90
The mini excavator deftly maneuvers between poles, trees, buildings, near buildings, and other obstacles. It has a full-rotating tower mechanism, a rotating boom, tracks with rubber linings, plus it has a low-noise engine (which does not disturb the peace and quiet of neighbors). The equipment is provided to the site in good condition with replaceable equipment, fuel, and an intelligent operator of Slavic appearance. Delivery of a mini excavator (jam drill) is negotiated separately depending on the distance of the object. Tel. 8-905-220-60-90
Read also How to make a pond for crafts
Technical characteristics of a mini excavator - hole drill. Weight - about 2.5 tons. Dimensions - width 1.45 meters. Height - 2.3 meters. (it is possible to remove the cabin to reduce the height dimensions) Blade width 1.45 meters Bucket width 45 cm. Caterpillar width 300 mm. The length of the caterpillar is 1.95 meters. tel.8-905-220-60-90
Digging depth up to 2.5 meters. Drilling depth up to 3 meters. Screw diameter 200 mm, 250 mm, 300 mm, 350 mm, 400 mm. For any questions regarding mini-excavator rental (services), please contact tel. +7905-220-60-90 Vasily from 9 to 22 hours. Thank you for your attention.
Pit-drilling, mini-excavator (Asvini) A manual hole-drill could not cope with the clay soil and the builders convinced the customer of the need to order the services of a hole-drill based on a mini-excavator. The mini excavator quickly arrived at the site - in the Vsevolozhsk region, Danube massif. And I quickly drilled everything: 33 holes, 250 mm in diameter. and a depth of about 1.8 - 2 meters, under the foundation of the house. As a result: everyone is satisfied, happy and has no headaches, and all this in the shortest possible time. Tel. for consultations on renting a pit drill based on a mini excavator + Vasily.
Pit drilling, mini excavator (Asvini) Photo of the work of a mini excavator pit drill
Tags: How to properly sharpen an excavation drill
Main types of instruments
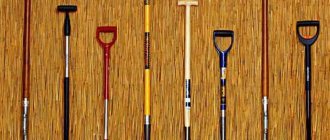
There are several basic types of drilling tools in common use today. The speed of work completion and its final cost directly depend on the choice of a specific option. The simplest tool is an ordinary shovel. This is where we should begin to consider this topic.
The diameter of the garden auger must be selected in strict accordance with the parameters of the concrete pillars.
A shovel, rather, is not intended for drilling holes, but for digging. Here we are talking about the cheapest method, but also the least productive. Digging may take several days. At the same time, it is unlikely that it will be possible to make holes of equal depth. Since the holes must be narrow, you will have to try hard to achieve the desired result.
We can talk about a shovel only if concrete pillars are not installed under the base, but brickwork is carried out. Here it is appropriate to dig deep and wide holes. A regular shovel will do the job perfectly. Of course, this process will take a lot of time and effort, but still, as an option, it can be put into practice.
A garden drill is a complete tool for drilling holes for posts. This device has found its application in private construction. It costs more than a shovel, and weighs significantly more, but at the same time productivity increases several times. Most often, a garden auger consists of three main elements: the auger itself with an auger, a handle and an extension. Such equipment weighs about 10 kg. At the same time, the drill allows you to make holes in the ground, the depth of which can reach 2 meters. The diameter of the tool can also be very diverse. It is necessary to select it in accordance with the parameters of the concrete pillars.
The motor drill has maximum productivity, allowing you to easily make a hole in the ground up to 3 m deep.
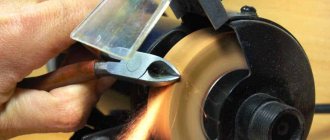
When purchasing a garden auger, you should definitely pay attention to the sharpening of the auger. Many manufacturers skip this process. If the drill is poorly sharpened, then work with its help can only be carried out on sandy and chernozem soils. He will not take limestone or clay. You can sharpen the drill yourself. For this, a grinder or file is used.
In addition, you can use a motor drill to drill holes for poles. Currently, such a unit can be purchased at any specialized store. It costs a lot, of course, but it also has maximum performance. It is suitable for use both in the private sector and in the construction of small apartment buildings. The drilling method using such equipment is the fastest. However, in addition to the cost of the tool itself, you will have to invest money in fuel to run it.
The design of such a tool is as simple as possible. A motor drill consists of a drill with an auger and a motor. The engine in this case can be not only diesel or gasoline, but also electric. Using such a tool, you can easily make a hole in the ground up to three meters deep. In this case, the time spent on this operation will be spent to a minimum. An excellent solution to problems with foundation drilling.
To increase the productivity of the drill, it is necessary to sharpen the edges of the auger using a grinder or a file.
The advantage of using a gasoline engine is the fact that such drills are used in places where there is no access to electricity. Very often construction sites are not connected to a source of electricity. This is, of course, when it comes to private construction. In other cases, it is better to use a power tool. It is more reliable and durable. Any electric motor can be repaired without any problems in private workshops of various kinds.
There are also disadvantages to the motor drill. The most important one is its high noise level. Sometimes this indicator goes beyond all maximum permissible standards. It is also worth noting the high cost of electricity and gasoline, which powers such equipment.
Types of drills
Different types of drills are used for different construction jobs . Each of them has a special design:
- Auger drill. Its peculiarity lies in the elongated cutting part. Used for making holes for posts. Since the structure is longer, it can be removed much less often, so the work is done faster when compared with a garden auger.
- Garden. As a rule, these are 2 blades welded to opposite sides of the pipe. They are placed at different angles. The drill is mainly used to make holes for planting plants. Hence the specific name “garden”. But it can also be used when building gazebos, installing fence posts, etc.
- For TISE piles. It is somewhat reminiscent of a garden one, but additionally has a blade that folds down at the bottom of the hole for expansion.
The easiest to make are garden spindles. The design may have variations, depending on the soil with which this tool will be used. This is the advantage of self-made tools. It can be made for specific needs. The point is not even the diameter of the blades themselves, but the fact that they can be made removable, bolted, etc.
In this video we will look at a homemade earth drill:
Although the price of the simplest drills in stores is low, such tools position themselves as “universal.” For light soil they will be useful, but on harder soil they are ineffective.
Video materials
The foundation is the main foundation of any building. The integrity of the entire structure depends on how well it is installed. Today there are several main types of foundations that are used everywhere in construction. The most widely used columnar base. It requires digging holes. It is better, of course, to drill them under the pillars. In this case, the process speeds up noticeably. It’s worth talking in more detail about how to drill holes for pillars.
The diameter of the hole for the post should be slightly larger than the size of the structural element itself.
Independent production
Even without the practice of making such structures, making a garden and hand drill for the earth with your own hands will not be difficult. This is the simplest, but at the same time effective model.
Garden auger elements:
- Cutting part. As a rule, these are two blades in the shape of a semicircle, which are sharpened along the edges. One blade is fixed at an angle of 20-30 degrees. The second, on the opposite side, also has an inclination angle of 20-30 degrees, but in the other direction. For ease of use, the cutting parts can be bolted rather than welded to the pipe. The structure will also be disassembled. If desired, you can make several pairs of blades with different diameters.
- Rod (pipe). It can be either round or profiled. As an alternative, you can use a crowbar, but it is heavy and difficult to work with. The length of the rod must be 40-50 cm longer than the required depth of the hole. If the length of the pipe is more than one and a half meters, then it will be more convenient to make a collapsible structure. This can be done from two parts of pipe. One part should be slightly smaller in diameter than the second. The design will resemble a fishing spinning rod (telescopic connection).
- Pen. For this element, a transverse pipe is often welded on top of the structure. The length of such a handle is from 40 to 60 cm.
- The tip is a drill. It is located on the pipe and is a continuation of the structure under the blades. Responsible for centering the drill at the initial stages - the first one loosens the ground, which makes the work process easier.
This is the basic configuration of a manual earth drill. You can attach various gadgets to it.
Necessary materials
The base of the structure is a pipe. The diameter should not exceed 5 cm. If you use a profiled pipe, then its cross-section should be 20x20 or 30x30 cm.
Blade knives can be made from various materials using:
- steel sheets 4 mm;
- cutting disc from a saw of the required diameter.
The last option is more convenient and practical for production, since the cutting part is already ready. The disk must be cut in the middle and attached to the pipe. It is also better to sharpen the side parts. So, the disk will cut the ground better when drilling.
The tip can be made in different shapes. You can simply sharpen a metal rod and attach it to a pipe, or make a spear-shaped tip from a strip of steel. Or you can combine both options.
Blade attachment
First you need to decide on the type of fastening of the blades - removable or welded “tightly”. If the drill is dismountable, then small metal shelves are welded on both sides of the pipe from below. They need to drill 2-3 holes for bolts. They should be welded to the pipe at an angle of 20-30 degrees, each in its own direction, just like the cutting blades.
Read also Focacho recipes photo
In addition, the holes made in the shelves need to be duplicated in the blades. Their diameter must be at least 10 mm. You will have to cut holes in the center of the blades for the pipe. This must be done both when fastening with bolts and in the monolithic version. If you use a saw blade, then there is already such a hole there. It only needs to be adjusted to the diameter of the rod.
Use of sheet steel
To make a drill with your own hands using sheet steel, just cut out a template from paper for the blades, and a metal circle along it. A hole is drilled in the center into which the rod is inserted. The two parts are fastened together by welding or bolts, depending on the chosen design.
The diameter of the hole should be slightly larger than the diameter of the pipe. It can be either round or square, if profiled is used. A spiral can be made in two ways - cut a circle from the edge to the center and bend it in different directions (one up and the other down) or make a drill from two halves.
In the latter case, the metal circle is cut in half after making a hole and then fastened to the rod according to the selected design model. In both the first and second options, it is necessary to bend the edges at an angle of 20-30 degrees. The smaller the angle, the easier the work process will be. But with a large inclination angle, the drilling process is much faster.
On hard soils, the blades can become deformed under heavy load. Therefore, to strengthen the tool, supports made of thick steel are welded. The blades bend due to the fact that the steel is not hardened. It is difficult to find a sheet of hardened steel, but even if such material is available, it is unlikely to be able to bend it at the desired angle.
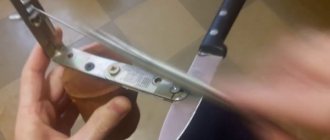
Saw blade construction
Using an old saw blade to make a simple hand-held excavation auger is almost ideal. It is made of hardened steel, and it is strong, sharp and resilient. But it is impossible to bend hardened steel, since it can crack at the slightest deformation. In this case, the disk is cut in half and attached to the rod at the desired angle using welding or bolts. If you use bolts for fastening, you must first weld the shelves for fastening the parts of the saw blade.
Such designs are characterized by high performance and durability. To make the drill even sharper, the edges (cut side) are also sharpened. The semicircular sides already have a good sharpening, which becomes sharper and more effective over time.
Modifications of garden augers
For harder soils, a garden auger is useless. Therefore, the design can be modified. To do this, it is necessary to install several rows of cutting parts on the rod. Immediately after the tip, a blade of the smallest diameter is installed. Stepping a few centimeters to the side, larger blades are mounted. There can be no more than 4 such rows. The diameter of the largest blade should not exceed 50 cm, otherwise it will be very difficult to work.
If you need to make a drill for poles with your own hands, then this is an ideal option. The design is very light and easy to work with.
If you need to make a hole for poles of small diameter, then the work looks something like this: make a few turns with a drill, pull it out and throw away the earth stuck between the blades. But if you need to make deep holes, then the work will be long and hard. Therefore, a container for collecting soil is welded on top of the structure. If you can’t come up with modifications yourself, you can use drawings.
How to make a hand drill with your own hands?
What materials are required Preparing tools Dimensions and drawings How to assemble a worm screw
- Made from a circular saw Made from sheet steel
Welding and finishing Post-operative care
A carefully crafted homemade drilling rig is just as effective as an industrial drilling rig. Everyone can make their own earth drill.
What materials are needed
The main alloy used as the starting material is steel. Round pipes and steel sheets are suitable for this screw. Pipe diameter is from 3/4 to 1.5 inches. If it is currently not possible to obtain a round pipe, you can use a square or polygonal (regular polygon) corrugated pipe. The square pipe has cross-sectional dimensions from 2 * 2 to 3.5 * 3.5 cm.
It is unacceptable to use a rectangular one because the center of gravity is shifted. A rectangular profile is difficult to use.
A steel sheet with a thickness of at least 3 mm is used for the blades that cut the base. Thinner sheets bend, the geometry of the working part is disrupted, the tool is pulled to the sides, which is unfavorable for the operation of the drilling mechanism (drive).
If there is no access to a lathe (milling machine), a wood circular saw used on a milling machine is used as the material for the blades. Cutting drill blades from scratch is more difficult than using a pre-made saw blade. And if the landowner already has a suitable shaped shield as a source centered on the plant, he only needs to cut it in half. It may be necessary to sharpen the side edges to make the drill work more efficiently.
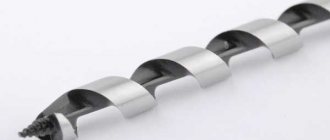
The top drill, which marks the center of the circle through which holes are drilled at the selected location, is made from the end of the shank to which the cutting edges are attached. In the simplest case, the bar is already sharpened and its end has a conical shape. You can use a lathe to cut slots for the drill.
Many craftsmen already weld a finished short drill into concrete, carefully aligning the center so that the tool does not go to the sides.
The drill handle is made of round pipe. The hand tool is T-shaped: with a horizontal beam, the worker rotates the auger with his hands and at the same time presses the product, causing it to enter the ground faster and easier. Then, with the same motion, he pulls out the tool, cutting and breaking part of the earth.
A drill designed for a powerful hammer drill has an adapter for the latter’s handle. In the simplest case, instead of the horizontal bar holder, another concrete drill (for the tip) is welded. The shaft is free - inserted into the hammer. A universal dredger has a shaft for a jackhammer and a small moving device, which is installed on pieces of pipe of the appropriate diameter.
Preparing tools
After identifying the materials, prepare a set of the following tools:
- Welder (use an inverter rationally), electrodes and a protective helmet for the eyes of the master; Grinding and cutting discs for metal, protective cover (prevents metal shavings from leaking towards the worker); a hand or electric drill with a set of metal drills (both high-speed and diamond); hammer, pliers, vice, sharpener (craftsmen buy a round whetstone with a shank for insertion into a punch or drill), construction marker, ruler, compass.
Before starting work, you need to determine the characteristics of the cutter. The following varieties exist:
- Simple (dacha) - in it the cutting part contains two half-plates. They are installed symmetrically, with a slope, on axes opposite to each other.
- Screw. The spiral web is twisted from a steel strip into several turns. It's inseparable. It is extremely important to maintain a constant belt width, slope, bend curvature along the entire length and the same distance between turns. One inaccuracy and the drilling equipment will become unstable, which will lead to it slowing down and running out when drilling into the ground.
- A wedge drill is most often made from the working part of a shovel. Its main principle is not to screw the tool into the ground and then destroy it, but to jam it and immediately throw the cut soil out of the working area. The blades are strictly vertical.
Drawings and dimensions
The product diagram is a template and allows you to visually evaluate how the stages of the production process of the future tool are arranged. The dimensions of the garden auger can be as follows:
- handle (if the product is manual) – crossbar 0.5 m long; rod – about 1 m (without additional sections); diameter of the disc to be cut – 15-25 cm (reference – ready-made bolster blades) tip length – up to 10 cm (shovel or drill) axial distance indicated for attaching the discs (taking into account the slope) to a shovel or auger – up to 15 cm. angle of inclination blades up - up to 30 degrees.
The drilling auger has a “rowing” length (a monoblock of several turns) and can reach half a meter. The inclination of the spiral can reach the same 30 degrees (at any point on the monoplane). Otherwise, the drill bit is the same as a conventional two-blade drill.
An auger drill is more often used with a drilling mechanism because it is much more difficult to make a few turns by hand than with a regular auger drill.
The dimensions of the auger for planting seedlings, such as tomatoes, essentially coincide with the dimensions of the working part of a conventional bayonet shovel. Its cutting edges are trimmed so that the round-bladed bayonet becomes straight and tapers at an obtuse angle. The fold of the sheet is cut off from the opposite (top) edge. A long (more than half a meter) concrete drill (for a universal hammer drill clamp) can be welded to the hole from which the handle is removed. A drill made with a spade bayonet is recommended for use with a drive, since hand drilling requires more effort than an inclined auger or half-top of a conventional garden seeder.
Each type of snail can be equipped with additional sections. Each of them increases the drilling depth by one meter. These sliding sections are used when the owner decides to drill a hole for water himself. One of these areas is used when the ground is soft. These can be posts for fences and other non-permanent structures, dug in at a height of 1.4 - 2 m.
Once you have decided which holes to drill, cut out a sketch of the blade from cardboard. This will make cutting the sheet easier and faster.
Screw designs
Working with an auger is much more difficult than working with a garden auger. This is due to the large number of turns, which provide serious resistance . But, as a rule, augers are used together with electric drives , and there is no need to drill manually. They often make deep wells, etc.
In order to make an auger drill, you need to prepare several disks of the same diameter. The number of disks corresponds to the number of screw turns. You also need to make holes in the disks for the rod.
The disks are cut from the center to the edge, a spiral is made from each part, pulling one end up and the other down. Each part is welded to the pipe one by one. It is also necessary to weld the round parts together.
Drill for making piles
The classic version of a drill for TISE is blades with a container for collecting soil. There is also a wider knife, which is necessary to create an expansion at the bottom of the pile. Using such a homemade drill for personal purposes is not very convenient, since the additional folding knife gets in the way.
In this regard, such structures are often made collapsible, where the folding knife can be dismantled. In general, it is recommended to use a regular garden drill to make a pile for personal purposes, and for expansion, make a separate knife with a container for collecting earth. The work is much easier in this case.
For this design, a scrap from a shovel is used as a knife , and a container for collecting soil can be made from a herring can. The knife is fixed on levers, and when lowered along the pile, it is in the uppermost position, as it is tensioned with a cable. When it reaches the bottom, the cable relaxes and the knife falls onto the walls of the pile, beginning to remove the soil and form an expansion of the desired size.
Alternatively, a dredger can also be made from an old propane tank. To reduce friction, the well is constantly doused with water. This tool can also be used on hard soils.
Maximum effect
So, we found out that the most economical and optimal drilling method is to use a garden auger. However, you should ensure that it is constantly sharpened. When preparing for work, it is better to carry out this procedure yourself to be sure of the high speed of work.
To soften the soil, pour half a bucket of water into the hole.
Now it’s worth talking directly about the technology of digging holes with its help. In fact, drilling with such a tool can be called primitive. The equipment is installed strictly in a vertical position in the place where the future pit should be located. Next, you need to start turning the drill while pressing the handle.
The mass of equipment is not always enough to achieve the required result. When you press the drill, an additional force created by the weight of the human body begins to act.
If drilling is done on clay soil, then after 40 cm problems with turning it may begin.
There is no need to rest excessively and put pressure on the instrument. In this situation, it is better to pull the drill out of the ground, making reverse translational movements, and pour half a bucket of water into the hole. This is required to soften the soil.
In just a few minutes it will become suitable for drilling again. Now you can put the unit back into the ground and continue working.
Alternative brace options
For the purpose of planting vegetation, there is no point in making a complex structure, even the simplest garden drill. To do this, you can use a modernized shovel. It is necessary to prepare a high quality steel shovel and mark it for further modification.
A 5-8 cm slot is made at the bottom and in the center of the shovel. Each edge is bent in the direction opposite to each other. The sides of the shovel also bend slightly, being a logical continuation of the lower blades.
If the soil is soft, then a regular rotator will be ineffective. For this purpose, a mechanism with an extended cutting part is used. It resembles a kind of glass with longitudinal slots in which blades made of hardened steel are fixed.
Making a handheld excavation auger for personal use is not difficult. You just need to be able to use welding, a drill and other everyday construction tools of many summer residents, as well as understand a little of the drawings.