How to make an outdoor fireplace from a gas cylinder without welding
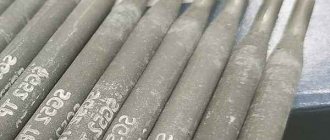
You won’t surprise anyone with a grill or potbelly stove made from a gas cylinder, but the disadvantage of such structures is that their assembly requires welding, which not everyone has, and not everyone knows how to use it. In this instruction, I will show you how you can make a simple outdoor stove with your own hands without using welding. You will only need a tool for cutting metal (a grinder or a Dremel), as well as a drill with drill bits and more. This stove can be used all year round; it is especially pleasant to spend spring and autumn evenings around the fire. Here you can cook or heat up barbecue, fry marshmallows and more, whatever you have the imagination for. It is quite possible that you can bake potatoes here too. Since the stove is made of thin metal, it is quite warm near it. Materials and tools for homemade work: - gas cylinder (for the author it is an empty helium cylinder that is used to fill balloons); — dremel; - hacksaw; — grinder (theoretically, the work can be done with it); — heat-resistant paint; — an angle grinder with a metal brush (if you don’t want to start the balloon manually); — a pair of bolts and nuts; - spanners; — metal brackets with nuts and washers for the tie; - file; - felt-tip pen; - pliers and more.
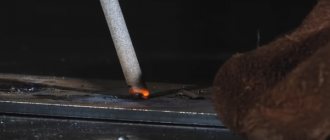
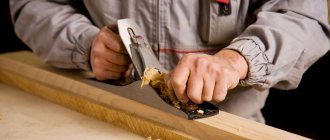
The oven manufacturing process: Step one. Removing gas from the cylinder Danger! It all starts with cutting a gas cylinder, which is always a very dangerous undertaking. Even if the gas in the cylinder is not flammable, this does not mean that you may not get injured. Always use protective gloves, a mask and long sleeves when handling these items.
The first thing you will need to do is remove all the gas from the cylinder.
There are lots of ways to do this. First of all, you will need to first unscrew the tap all the way and release the gas. Next, the tap will need to be completely removed. Now you can pour water into the balloon under the ovary and drain it; it is advisable to carry out this procedure several times. As a result, there should be no flammable gas left there. If you are still afraid, you can take the cylinder to a vacant lot and light a fire under it, which will burn it all out. This procedure is good because the paint burns and is easier to clean off. Step two. Cutting the cylinder Once you are 100% sure that there is no gas in the cylinder, you can start cutting it. The complexity of this procedure will depend on the instrument used. Probably the fastest way to work is with an angle grinder, but a Dremel or other tool will also work. Of course, you can only make such a stove if you have a cylinder like the author’s. If the cylinder is slightly different, you will have to do a little magic here. Armed with a cutting tool, we cut off the bottom of the cylinder. After this you will need a file or coarse sandpaper. Using it, you need to go over the place of the cut, removing any hangnails that could injure your hand. At this step the work is completed. Step three. We fasten the base. The previously cut off part acts as the base, and it is fastened using brackets with threads and nuts. To do this, corresponding holes are drilled in the base. Well, then you insert the brackets, tighten the nuts thoroughly and the installation of the base can be considered complete. When tightening the nuts, you need to turn the stove over and see if it is level. If the stove is misaligned, the brackets can be loosened, the stove adjusted, and then finally tightened. Step four. We grind and drill holes. To burn wood in the stove, there must be an air supply. The author decided not to bother with the blower and simply drilled holes in the cylinder. The author tried to drill holes evenly throughout the entire stove. They are located 4 pieces in each row. In order to drill holes evenly, it is recommended to first mark everything with a felt-tip pen.
After this you can proceed to sanding. You will need to remove all the factory paint from the cylinder, otherwise when you light the stove it will start to smoke and stink. It is better to do this work mechanically, using an angle grinder with a metal brush. If you strain, you can basically rip it off with coarse sandpaper. If you find rust, it is also recommended to remove it. Step five. The final stage. Painting the stove If the stove is not painted, it will very quickly rust from heat and moisture, and over time it will completely burn out. For painting you will need heat-resistant paint. If this is not the case, the metal must be coated with at least a primer. The author paints his stove both outside and inside. It is convenient to do this if the stove is hanging. The drying room must be warm. In order for the coating to be thick and look good, the stove needs to be painted several times. The author covered it with only two layers of paint, but recommends painting in three coats. That's all, the stove is assembled and the decisive step remains - checking and annealing the paint. To test the stove, you need to install it in an open space and throw in some firewood. You need to raise the temperature gradually so that the paint dries evenly. Then you need to gradually add enough wood to the stove so that it begins to hum. When the paint is annealed, an unpleasant gas will be released during the swing, which is not recommended to breathe. Now the stove is completely ready for your service. Become the author of the site, publish your own articles, descriptions of homemade products and pay for the text. .
Brazier from a gas cylinder: photos of product varieties
Using the instructions for making a barbecue with your own hands from a gas cylinder, which you can buy ready-made from experienced craftsmen, it’s easy to make a barbecue. To do this, a corner is welded along the long side of the product body. The result is a shelf on which a grid welded from reinforcement rods will be located. A convenient option would be to separate zones in the barbecue grill with a net and places for skewers. You can also create a stationary roaster. To do this, small tables from corners are welded on the sides and front of the structure.
An alternative to painting - stylizing the barbecue as “antique”
Another design option from a cylinder is to create a barbecue-smokehouse with your own hands. This device contains an additional element in the form of a firebox. To create it, strips are cut from the bottom of the cylinder, then half of the bottom is cut out. Thus, a place is obtained for organizing a firebox, which is made of dense metal sheets 2-3 mm thick and welded to the bottom. The result is a one-piece sealed structure, which is clearly shown in the photo of the smokehouse.
Here it is also necessary to organize a chimney. It can be purchased at a hardware store or made from a gas cylinder of a smaller diameter. It is recommended to improve the design and install a motor that will rotate the spit with meat, which can be seen in the video “Do-it-yourself barbecue-smokehouse from a gas cylinder.” Drawings and photos, of which there are a large number on the Internet, will also help to complete the design and obtain a multifunctional structure.
It is recommended to start the smoking process after calcining the grill and eliminating the smell of gasoline. Otherwise, the finished dishes will acquire an unpleasant odor.
Often, an iron stand from a foot-operated sewing machine is used for the base of the barbecue.
Another unique structure is the grill-steam locomotive. The structure is made of several cylinders of different diameters, barrels and main pipes. This product combines a grill, a smokehouse, a barbecue and a DIY grill. The structure is complemented by forged elements, which give the structure an original and aesthetic appearance.
Using imagination and a creative approach, you can make a barbecue in the shape of a pig, a dog, a house and even a submarine, which is clearly demonstrated by photos of barbecues made from a gas cylinder with your own hands.
What can you make from a gas cylinder with your own hands?
But really, what can you make from a gas cylinder with your own hands? It has so happened since the times of the Soviet Union that many products can be fundamentally recycled and new designs can be obtained from them that will perform completely different functions. As it turns out, you can do a lot from a gas cylinder and, mind you, everything will be done with your own hands.
Stove from a cylinder
The first thing that comes to mind when looking for an answer to the question of what you can make from a gas cylinder with your own hands is a potbelly stove. Such a unit has many advantages, as well as the installation principle itself. Firstly, the thickness of the walls of the gas cylinder is 3 mm and this is quite enough to prevent a potbelly stove from burning out already in the first season of operation. Secondly, you will have to modify the gas cylinder quite a bit - the stove is made in one day with your own hands. The third advantage is the huge choice of designs: you can make a stove from one cylinder or from two, vertical or horizontal. Use your own imagination or tips from the Internet - and you can make a product out of a gas cylinder that will help you out in the cold winter.
There are also disadvantages. Or rather, these are not even shortcomings, but features that must be taken into account so that they do not turn into shortcomings. For example, before burning wood for the first time, it is necessary to remove the paint from the outside of the parts from the cylinder. Otherwise, the paint will begin to fade and fill the room with acrid smoke. It is also MANDATORY to take care of fire safety. The walls of a stove made from a gas cylinder can become red hot and this is fraught with many troubles. It may seem to you that such heating is only a plus, because it will be warm inside the room. But anything that can flare up from such strong heating will certainly flare up if it is too close to the potbelly stove. And you need to take care of the walls of the room itself: our workshop’s cinder block wall cracked vertically along its entire height after just a few evenings of use. What can be done to protect the wall: install the stove at a distance from it, protect it with a galvanized screen mounted on the wall at a short distance from it, or heat the potbelly stove in moderation. The latter, by the way, is not the best - it will be difficult to “guess” the optimal amount of firewood. And most importantly: a stove made from a gas cylinder with your own hands (or even someone else’s) will cool down very quickly. As long as the fire is burning inside, as long as firewood is being added, it will be warm. But as soon as the wood burns out, the stove instantly cools down. Insulating the walls of the room where such a potbelly stove will be used will help, as will the elimination of even minimal cracks in the area of the windows, doors or gates of the room.
Feeders for animals and birds
This is another option that you can make from a gas cylinder with your own hands and still get excellent quality. Such feeders seem to be, if not eternal, then 100% durable. The gas cylinder is cut along its axis and you get two halves, each of which will become an excellent feeder for pigs, sheep or a drinking bowl for poultry. All that remains is to weld the stand, since the lower part of each of the halves will be semicircular and, of course, will not stand on the ground. You can also cut off the top and bottom of the cylinder along the line of the backing rings and get small round feeders. They are suitable for small animals and provided that we are talking about one or two individuals. Or maybe it will be drinking bowls for chickens - it's up to you.
Here you also need to take into account some features so as not to be upset later. Since food will be poured inside such feeders, you should especially carefully clean the inside of gasoline. If the cylinder has been refilled multiple times and has not been cleaned, gasoline will accumulate inside and have a very strong odor. A strong smell plus oiliness over the entire surface - this must be removed so as not to poison poultry and animals. How to do it yourself: a set of actions helps, including washing in boiling water using various cleaning agents, burning with a blowtorch and cleaning using attachments on a drill or angle grinder.
Manual roller for compaction
And also from a gas cylinder, and also with your own hands. A roller is a rarely used thing, but if you really need it, it’s difficult to find. Compact the asphalt surface if you have to do it yourself and don’t have to rely on a roller; compacting the base for paving slabs, compacting the soil - there can be many situations. The main thing is that making a manual roller from a gas cylinder with your own hands is even easier than the previous crafts that we mentioned above. A U-shaped pipe with a diameter of about an inch, the ends of which will be attached to the center of the upper and lower parts of the cylinder by means of bearings and a handle of a shape and length convenient for your hands - that’s the whole structure. Water or sand is used as filler. Water is lighter, sand is heavier, so the choice depends on the purpose of the skating rink.
The main thing is safety. Since parts will be welded to the gas cylinder, you should take care to clean it from gasoline to prevent troubles. At the end of the article we will talk about this in more detail.
Other crafts from balloons
If you thought that a stove, a feeder and a roller are the entire list of what you can make from a gas cylinder with your own hands, then you are mistaken. There is no limit to ingenuity: various containers for storing something, a smokehouse, a grill, a feed cutter, an autoclave, a compressor and even a boiler - this is a relatively complete list of crafts. Another thing is that some of these designs are not always justified and it will be easier to purchase (purchase) a ready-made unit for safety reasons. If the master knows what he is doing with his own hands and it is so safe for use, then the issue is removed. But if you don’t have enough intelligence, then you can either kill yourself or your loved ones. We don’t want to offend anyone, but cases are different.
How to disassemble a gas cylinder
We promised above that we will teach you how to disassemble the cylinder safely and we keep our word. First of all, don’t think that everything is so simple and safe - if you act incorrectly, you can get burned in the literal and figurative sense of the word. Let's give an example from our youth. This is precisely the period when there was little experience, there was no Internet, but there was a burning desire to use the gas cylinder for other purposes. Logic dictated that we should be wary of even that insignificant amount of gasoline inside, but we didn’t want to get too dirty. Therefore, having knocked down the valve with a sledgehammer, we began to fill the container with water, shake it off and drain the liquid. After repeating this five times, we decided that there was no longer a threat. We started sawing the cylinder along the axis with a grinder and were already 90% done with the work. And only then (!) the remains of the gasoline flared up and the master was engulfed in a cloud of flame. Nothing terrible - just burnt eyebrows and hair all over the exposed body - but it’s unpleasant.
The instructions will help you disassemble the cylinder (cut it) without consequences:
- Even if you are sure that the cylinder is empty, you must open the valve. By venting even that small amount of gas, you will once again protect yourself.
- The valve must be removed. Here everyone tries according to their capabilities and imagination. Some knock it down with a sledgehammer, others cut it off with a grinder or a hand hacksaw, and still others twist it out. The last option is the safest, but difficult to do at home. Clamping the cylinder so that it does not rotate under the force of the key is difficult. If you use a hand saw to cut the valve at the very base of the cylinder, ONLY! No cutters or angle grinders!
- The hole that appeared after removing the valve is small in diameter, but it is enough to pour water inside. Why is this necessary? The water will displace the remaining gas and nothing will flare up when cutting. Here there is a slight difficulty, or rather inconvenience: you need to cut the bottle with water inside and water will definitely flow out of the resulting cut. There is nothing you can do about it - this is a feature that you need to be able to adapt to. For example, the area where you will be working with your hands should be such that spilled water does not collect and you will not have to kick the dirt with your feet. Naturally, this operation should take place outdoors and not indoors.
- If an abundance of water cannot be avoided, then you can risk rinsing the cylinder several times, washing off the remaining gasoline. Just note: we specifically wrote the word “risk”, since we cannot give guarantees of safety. in our case, as you remember, there was almost no gasoline, but it flared up at the end of the cutting.
- Cutting with a grinder is the fastest way. Mark the line with a marker (the pencil graphite will quickly fly off the surface due to vibration) and start cutting. Since the gas cylinder is round, it is better to place something under it on the sides so that it does not roll during operation.
- Cleaning the internal surface is necessary even if the cylinder structure will not be used for poultry or animal feed. The smell is strong and persistent, so you need to remove it. To begin with, you can wash it with boiling water using various types of cleaning products. This will help partially, so burning follows. Blowtorch or fire – decide for yourself. Both options will help 100% and all you have to do is complete the cleaning with a metal brush. It is better to use the appropriate attachment on a drill or grinder to make things go faster.
Instead of a conclusion
As you can see, the question “what can you make from a gas cylinder with your own hands” has many possible answers. The main thing is your safety, because you are going to work with your own hands, which means you are risking them. Any design you make from a cylinder will serve you for a long time. Reason: high quality steel, which is rare now. But we also advise you to think through everything thoroughly - is it worth doing the thing yourself if the store-bought option is more reliable. For example, we would not risk working with a homemade compressor from a cylinder or a boiler - life is more expensive.
Good day, dear readers of our magazine.
My name is Rostislav, I am 37 years old and I am a builder with twelve years of experience. Today we’ll talk to you about outdoor recreation. And nature, as you know, is friends, family and barbecue. To cook meat outdoors, you can use all sorts of improvised means - bricks or sticks, or you can make a beautiful barbecue grill with your own hands from a gas cylinder for barbecue and surprise everyone. If such a barbecue stands in the yard, it will immediately attract the attention of your guests and neighbors. Also, this grill is compact enough to take with you in the trunk of a car.
Making a barbecue with your own hands will not take much time and labor, you just need to know how to use a grinder and a welding machine or ask a specialist. All photos and drawings of such a barbecue from a gas cylinder are attached.
So, what do we need for this:
Materials:
- Gas cylinder.
- Pipe, diameter 90mm. Length – 0.7m
- Handles, 3 pcs.
- Profile pipe, 30x30mm. Length – 4m
- Corner, 40mm shelf. Length – 1m
- Sheet metal, 2mm thick, 1m2
- Fungus on the pipe.
- Canopies.
- Priming. Enamel paint for metal.
- The paint is heat-resistant, temperature of use up to 600 degrees.
- Chain, length no more than 0.7m
Tools:
- Welding machine, electrodes.
- Grinder, cutting discs and cleaning disc.
- Roulette
- Pencil.
- Hacksaw for metal.
- Drill, drill bit 4,8,10,12mm.
- Gloves, safety glasses, welding helmet.
- Piece of chalk.
- Clamp clamp.
- Square.
So: let's get down to work.
To start robots, we need an empty gas cylinder with a capacity of 50 liters. Such cylinders were previously used in the private sector. It consists of three parts: a valve, a reservoir tank and a cylindrical stand.
Feeders
If the owners of a country house keep poultry and livestock, an old gas cylinder can make convenient devices for feeding them. In addition, they demonstrate amazing durability. All you need to do is carefully cut the metal container in half lengthwise. To prevent the finished product from turning over, it is equipped with welded stands.
There is also an option with small feeders. They can be obtained by cutting off the upper and lower parts of the cylinder, moving along the backing rings. The resulting containers are also suitable as drinking bowls. Given previous use, the inside of the products needs to be thoroughly cleaned of gasoline. This substance has a characteristic odor and can contaminate food and water. The best way to do this is to heat the internal surfaces with a blowtorch. Afterwards, the feeder is thoroughly washed with boiling water and cleaning agents.
Marking a gas cylinder for barbecue
A gas cylinder, even if it is empty, is VERY DANGEROUS, therefore it is strictly forbidden to use open fire near the cylinder, as well as to cause mechanical damage. This could cost your LIFE!!!
The fact is that so-called gasoline is used as an admixture of natural gas, which is intended to distinguish the smell of gas. Gasoline, in itself, is the same flammable gas that is absorbed into the metal, and even if the cylinder is empty during inspection, gasoline vapors are still present in it. Therefore, I repeat once again, you need to work with a gas cylinder very carefully, without neglecting safety rules.
Let's return to our markup. If you look at the cylinder, you can see that a welding seam runs along its entire height. We take this seam as the first line of the beginning of our marking. If you take a tape measure and measure the circumference of the cylinder (the circumference is the length of the outer or inner line of the circle.) it will be equal to 96 cm. From this line - the seam, use a tape measure to mark 24 cm in each direction. Place marks at the top and bottom of the cylinder and draw a line with chalk. Then we retreat 10 cm from this seam line in each direction. and also draw a line with chalk - this is our line for the air supply holes.
The next stage: we determine where we will have the front side of the grill and add another 10 cm to the back line that we marked, retreating 24 cm. This will be our cutting line. At the bottom and top of the cylinder there are also welding seams that go around the cylinder. The distance between them is standard 61 cm. We retreat 3 cm from these seams, put two points each and draw a line. The fact is that in the middle of the cylinder there is a seam reinforcement tape running along the circumferential seams and we need to not damage it.
Thus, we have drawn the lid of the future barbecue, the width of which will be 38 cm (96-24-24-10), and the length will be 55 cm (61-3-3) as indicated in the drawing.
Grill
The grill is quite an interesting thing. You can talk about it a lot and for a long time, but often the question is the price. Although this product can hardly be called expensive, our soul is focused on saving and thoughts in the style: “But you can find it cheaper,” or “It will be cheaper to do it yourself.” But indeed, the cost of the grill will be several times more than the cost of our homemade product.
And so, let's move on to choosing a base. Barbecue? No, very thin. Bucket? The same problem, in addition – the bucket is not very convenient to use. What then?
Looking into the garage, you can find a lot of interesting things, such as an old gas cylinder, which may be the same age as the person who found it.
There are many types of cylinders and you can even make a barbecue from a small gas cylinder with your own hands, but we will use exclusively propane, it was just that.
Preparing the barbecue cylinder for cutting
Before you make the first cut, you need to protect yourself. To do this, you need to fill the bottle with water. How it's done? Before you start working, you need to make sure that the cylinder is empty. To do this, open the shut-off valve, which is located in the upper part of the cylinder and determine by ear whether there is any hissing of gas. Next, in the same way, with the tap open, turn it down so that all the available liquid flows out from the inside.
The stopcock is made of bronze alloy, and bronze is a very soft metal to work with. Therefore, we take a hand hacksaw for metal and at the bottom of the tap, where it screws into the cylinder, we cut off the tap completely. We now have an inlet hole into which we can insert a watering can or hose to fill it with water. You need to understand that the water that will fill the cylinder will displace the air saturated with gasoline, therefore it is prohibited to smoke or use open or hidden fire during this operation!!!
The container must be completely filled with water. After this we make a cork. A cork stopper from a wine bottle or something like that can help us here. Having trimmed it a little, we hammer it tightly into the hole with a hammer. Then we place the balloon in a horizontal position and make a cut.
Making a grill cover
When starting to cut the cylinder, it is necessary to take into account that when making a through cut, water will flow. Therefore, we remove electrical wires as much as possible and it is better to cut on an inclined base, controlling the flow of water. Yes, I agree that the event is “wet”, but this is the safest method for cutting a gas cylinder.
We make a cut with a grinder along our marked lines. They are marked in red on my diagram. The disc for the grinder needs to be chosen thicker, at least 1.6 mm. The width of the cut is compensated by the expansion of the metal when heated. We must remember that the metal on the cylinder “strains” during welding and when cutting it can wedge the disk a little, so we use wedges. At the same time, we cut off the threaded connection for the shut-off valve cover. It is located on top of the cylinder.
So, when our barbecue lid is cut out of sheet metal, we cut out strips 3 cm wide, one meter long - three pieces, and weld it along the perimeter of the lid so that the edge of the strip protrudes 1.5 cm beyond the edges of the lid. Using clamps, periodically press the strip against the lid. This will prevent the lid from falling into the middle of the grill. We also weld the handle. We clean the welding spots using a grinder and a cleaning disc. Having installed the lid on the cylinder, you need to center it and weld the curtains, having first retreated the same dimensions from the edges of the cylinder.
I recommend welding a locking chain along the edges of the lid, which, when the lid is open, will fix its position and thereby remove all tension from the canopies and not break them.
From the top of the gas cylinder, where we cut off the threaded connection, you can make a valve that will regulate the smoke output, that is, the degree of smokedness of the meat. We cut out three 10cm strips from sheet metal and use pliers or a vice to bend the edge so that it roughly forms a corner and weld it around the perimeter of the hole, keeping the dimensions even. And from the same sheet metal we cut out the valve itself, making an allowance of no more than 1 cm so that there is free movement.
There is a cylindrical stand at the bottom of the gas cylinder, which we also cut off using a grinder. It is welded with a burst seam around the circumference of the cylinder.
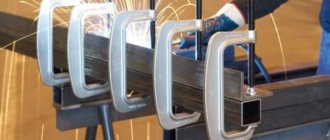
Welding the legs
The legs or stand can be welded from available material, it can be made collapsible or stationary, with or without tables. You can even use a stand from an old sewing machine, but I made do with the most economical option.
We take a corner and cut off two pieces of 14 cm each, find a longitudinal welding seam on the cylinder, which we took as the reference line. We place the cylinder on a horizontal platform or on a table, so that the seam is at the bottom and, placing a corner parallel to the platform, we weld it at a conventional distance from the edge of the cylinder so that the center of the corner flange coincides with the welding seam of the cylinder. We do the same on the second side. This is how we got the base for attaching the legs. Now let’s see if we need to make the legs not separate from the barbecue, then we simply cut a 30x30 pipe or a corner into a length that will be convenient for us for the height of the barbecue - about 50 to 70 centimeters. Next, we weld it to the corner that is on the cylinder.
And if we plan to make a collapsible structure, then we also cut the blanks into legs, just don’t weld them to the corner, but drill holes of about 8 millimeters in the upper part of the leg and in the corner welded to the cylinder. Thus, we get a collapsible design: the cylinder is separated from the legs and can easily fit in the trunk of a car for a barbecue in the countryside. It should be noted that the legs must also be mounted while maintaining the same dimensions and diagonal of the structure. It is advisable to weld support spots at the bottom of the legs, having previously cut them out of sheet metal and placed the grill on the legs on a flat surface. This is necessary so that the grill does not sink into the ground under its own weight and has good resistance to tipping over. For more convenient transportability, small wheels can be mounted on two legs.
Places for skewers and grill grids for barbecue
For a comfortable location of the skewers, we drill holes on the back wall of our barbecue. The skewer has a pointed part at the front, which clearly fits into these holes and holds firmly there. As we can see in the photo above, six skewers can be conveniently placed on the grill. To do this, we make markings, departing from the top edge of our grill cover cutout, 10 cm. down on both sides, put marks and draw a line with chalk. This is the level of the holes. Then retreating from the edge of the radius cut 4 cm. and put a drill mark. And then every 10cm we put the same marks. Using a drill and a drill bit, we drill holes according to the marks. To do this, we first use a thin drill, for example, 4mm, and then drill it out with a 10mm drill, and finally chamfer the hole with a 12mm drill. or a round file. On the front side of the grill we also make markings on the top edge of the grill and use a grinder to cut out grooves for skewers. When this operation is completed, cover the grill with a lid and transfer the marks of the places where the cutting was made to the grill lid. We also do the cutting. This needs to be done so that when the skewers are installed, the grill lid closes more tightly.
You can also make seats for the grill - a grid. To do this, we just need to weld metal shelves between the holes for the skewers. We cut out pieces 3 cm long from the corner and weld them to the walls of the barbecue, having previously marked the welding points so that the mesh has six support points along the perimeter of the barbecue. We clean the welding areas and cut off sharp corners.
To cook meat on a grill grid, you can use a stainless steel grid with a 10x10 or 15x15mm cell, having previously cut the perimeter of the seats to the size as in the photo below.
Optimal grill size: marking
While the water is in the cylinder, markings are made according to a previously developed drawing of a barbecue from a gas cylinder with the specified dimensions. Typically, a product with a volume of 50 liters with an outer diameter of 96 cm is used for a barbecue. Dimensions of a barbecue made from a gas cylinder: length - 98 cm, width - 30 cm, height excluding legs - 30 cm. This design is enough to cook six servings of kebab.
Cutting the cylinder for barbecue is carried out according to pre-made markings
It is convenient to mark from the longitudinal seam. The diameter of the gas cylinder is divided into four equal parts - 24 cm each. This value is deposited from the seam in both directions. To the right and left of the circular seams, 3 cm is indented, and marks are placed every 8 cm. Thus, 6 marks are obtained for the future placement of skewers. Holes with a diameter of 1 cm are drilled into them.
Helpful advice! Despite the fact that a barbecue made from a cylinder is a simple product, at the initial stage you should make a small drawing of a barbecue from a gas cylinder with dimensions and indication of the attachment points of individual elements.
From the line on which the marking was made, 10 cm is laid upward, i.e. from the middle of the seam it turns out to be 34 cm. This is where the grill lid will end, which is marked in the next step. It occupies the distance between the first line drawn and the one just marked. A straight line is drawn between them, 3 cm away from the circular welds. Also, they move 10 cm down from the initial marked strip for future fastening of the legs, which should be placed parallel to each other.
The next stage is drilling holes for skewers in the body
Helpful advice! If there are metal rings inside the product, the cut should be made in such a way as not to damage them. They may become a support for the lid in the future.
Painting the barbecue
Barbecues are used outdoors. Therefore, after installing the device, we immediately decide what paint to paint the grill.
The coating will protect it from precipitation, high humidity and temperature changes. Of course, you should only paint the grill on the outside. Inside it, when in use, the temperature is too high for any type of paint.
The choice of coating must be approached with extreme care.
It must meet the following requirements
- The paint must contain modifiers that protect the metal from rust. The finish should not melt, i.e. have high fire resistance. The instructions on the paint label should indicate its heat resistance of at least +500°. It’s even better if this figure is +800°.
- Please note that barbecues are used for cooking. Based on this, the coating must be environmentally friendly and safe. It should not react with any substances.
There are two types of paints on sale: aerosol and just liquid paint.
Aerosol paint is sold in a can, which contains air pressure, and when painting, simply direct the jet of the can onto the surface to be painted at a distance of 20 - 30 cm. Liquid paint in a can is applied with an ordinary paint brush.
First you need to clean our grill from dirt and dust, check that all welding seams are cleaned, and most importantly: clean the grill and the grill cover from old paint. The fact is that gas cylinders are not painted with heat-resistant paint, and applying heat-resistant paint to non-heat-resistant paint threatens to subsequently melt and burn out the lower layer of paint, which will lead to unpleasant consequences.
You also need to take into account that only the grill itself can be painted with heat-resistant paint, the area of which is no more than 1.5 m2. Therefore, one cylinder will be enough for us. And the legs and existing additional elements can be painted with ordinary metal paint. This will slightly reduce costs, since heat-resistant paint is much higher in price than ordinary enamel for metal.
During and after painting, dust should be avoided on the painted surface and work should be carried out at a temperature of at least 10 degrees Celsius in calm weather.
At this point, our work on making a barbecue from a gas cylinder can be considered completed, but on my own behalf I would like to add that there are a lot of diagrams and examples on the Internet for making this type of barbecue. However, a barbecue made from a gas cylinder can be unique in its own way when you make it yourself and use your imagination to implement projects with additional structural elements. This is how I made a barbecue from a gas cylinder with my own hands:
Write questions and additions below. I will be glad to hear your opinion.
We also recommend:
Types of gas cylinders
There are various types of gas cylinders. They differ in:
- material of manufacture: composite or metal;
- volume: from 100 g to 50 l.;
- filling: propane, butane, hydrogen, nitrogen and other gases;
- purpose: household, automotive, industrial, etc.;
- connection method: threaded, collet, valve, pierced.
To build a homemade product from a gas cylinder, it is better to use a metal container with a maximum volume of 50 liters. This will allow you to get the most out of your device.
Scope of application of oxygen cylinders
For what purpose the cylinder is intended depends on the composition of the gas:
• Technical. May contain minor amounts of impurities. The total proportion of pure oxygen is at least 99.5%. It is obtained by low-temperature rectification and water electrolysis. It is used in welding and metal cutting, soldering, energy, oil industry, chemistry and agriculture.
• Medical. The proportion of oxygen is at least 99.5%. The gas has no odor. May contain trace amounts of water vapor (0.009%) and carbon dioxide (0.01%). Obtained only by low-temperature rectification. It is used in medical, health institutions and at home to compensate for the lack of oxygen in the air.
• High purity oxygen. Maximum purified from impurities, the proportion of the substance is 99.999% of the total volume. Used in the production of electronics and measuring equipment.
The capacity of the cylinders varies: from 1 to 50 liters. The pressure can be 150-200 kgf/cm2. The company supplies oxygen cylinders of various sizes and purposes.