General information
The generic concept in our case will be plane. This invention, which appeared in the distant past, is used for planing wood. Using such a tool, you can level the surface of the material, adjust the shape and size of the workpiece, and, if necessary, make extended recesses. This is what a plane, which is traditionally used in carpentry, looks like:
Plane
But since the tasks involved in processing the material can be different, there are many types of popular devices. They differ in size, device features and additional equipment. Here are a few examples: Sherhebel
, intended for trimming workpieces that have just come out from under a saw or ax; a mole cricket operated by two carpenters; rebate, used for processing recesses. A jointer is also a subtype of a planer. This is the tool:
Jointer
Semi-jointer No. 5
No. 5 is a very interesting tool. Planers do not differ much from each other, nor do semi-jointers. But the difference between semi-jointers No. 5 and No. 6 is very big. They have a big difference in blade width by a whole centimeter. On the one hand, they can be placed side by side, but they can be classified differently. The logic to classify semi-jointer No. 5 as planes is very simple - the width of the piece of iron is the same. The logic for classifying No. 6 as a jointer is also the same - the width of the blade. But nevertheless, it is a semi-jointer.
READ MORE: Should you buy a sheet with an elastic band: advantages and disadvantages
A few words about No. 5. The fact is that if in Russia the most common standard size of four is characteristic, then in the Western tradition, for example, multi-purpose planes No. 5 were no less popular among the British. In the English tradition, a jack of all trades who can do anything was called a Jack. This literary name is associated with the name of plane No. 5 - jack.
What is the difference between a jointer and a plane
A craftsman uses a small but indispensable plane in carpentry mainly only at the early stage of processing wood material. The main goal of this stage of work is to level the tree by removing large bumps, knots and protrusions from its surface. After this, the carpenter usually switches to another tool.
If we are talking about secondary processing of a fairly large part, then a jointer “comes into the picture”, since a classic plane may not cope with the task of high-quality leveling along the entire length of the surface. The second one seems to form a “bridge” over part of the part, gradually removing barely noticeable irregularities from its surface. If you observe the carpenter’s work at this moment, you will notice that at the beginning of the work short chips will appear from under the tool, and then they begin to come out as a “ribbon” or in long curls.
Another purpose of the jointer, as mentioned above, is edge processing. This device becomes indispensable when gluing the edges of two parts, as it allows for the most even processing.
To summarize, we can say that both tools are necessary for quality carpentry work and must be present in the arsenal of any woodworking craftsman.
Drawings and diagrams
Before assembling the benchtop jointer, it is necessary to develop drawings. In the process of creating them, you should take into account the elements that will be part of the diagram. Standard jointers without additional features include:
- bed;
- shaft equipped with blades;
- rotating roller;
- engine;
- three tabletops;
- emphasis
In the process of developing drawings, the master must indicate the main distances between the key elements of the stationary structure. To do this, you will need to take into account the location of the motor, roller and shaft with blades. The circuit will allow you to determine how much the number of output rotor rotations will decrease if there is an increase in power, and vice versa.
Design features of planes
You need to start by considering the purpose of the tool. And it is intended for planing wood, that is, to give the wooden surface the desired shape, while eliminating various irregularities, roughness and other defects. The components of the device are:
- Body made of wood or metal - last with sole
- Steel knife, piece of iron or cutter - the main cutting element
- Wedge
- Lever
A more detailed design of a hand plane for wood is shown in the photo below.
The basis of this tool is a cutter, which looks like a rectangular plate with a pointed end. The plate is placed in the block opening at the appropriate angle. A special adjustment mechanism allows you to set the knife to the required distance. This distance is set in order to adjust the cutting depth and chip removal thickness. According to the standard, the blade has a certain sharpening angle, but if the tool is used by a professional, the master sharpens the cutter himself, depending on what type of wood is to be processed.
An equally important element in the design of the tool is the handle. Moreover, a hand plane consists of two handles, one of which is a guide, and the second is a persistent one. The guide handle has a curved design that allows the tool to be grasped by hand. The thrust handle allows you to create the necessary force when performing work.
The body has a smooth surface from which a sharp cutter protrudes. The main condition for the instrument is a perfectly flat and smooth sole. If the sole is not level, then precise processing will simply not be possible. The body of the instrument is made of wood or metal. Home craftsmen give preference to wooden planes, which are cheaper. Woodworkers prefer to work with metal planes, the base of which is made of gray cast iron.
Don't miss: Wood chisel: purpose, types, selection: types, characteristics, choice
Despite the fact that the hand tool in question has a typical design, today more than 10 varieties of these woodworking devices are known. To begin with, it should be noted that all types of planes are divided into two main groups according to the type of drive - manual and electric.
This is interesting! Electric planers are replacing hand tools, but when it comes to planing wood, home craftsmen prefer the second option.
What is done with a modern plane during carpentry work?
Planer - What a modern plane does for carpentry work
Needless to say, how important a working tool is for any master. The result of all the employee’s efforts depends on its quality, richness and variety of functionality.
One of the most famous and traditionally in demand woodworking tools is the plane. Despite its apparent simplicity, it can do a lot. However, not all home craftsmen know about this property today. Therefore, the answer to the question of how to make a plane the most active means to achieve the highest quality of work should probably be of interest to every potential carpenter.
Plane
A plane is a carpentry tool designed for processing wood parts and consisting of a block, a wedge and a knife. With the help of the latter, layers of material are removed from the part. There are a huge number of types of planes, but they can all be divided into two main types: mechanical and electrical.
Mechanical planes are made of steel, wood or even plastic, and the quality of the tool largely depends on the material of manufacture. Electric planers, compared to their mechanical counterparts, are faster in operation and allow you to process more material per unit of time.
Reference! Although metal and plastic devices, provided they are well assembled, are sometimes not inferior to their wooden counterparts, it is the latter that are considered “classics” in carpentry and are most popular among professionals.
What is the difference between a sherhebel and a planer?
In essence, a sherhebel is the same plane, only intended for rough processing of wood. The sherhebel differs from the plane in the semicircular sharpening of the blade, as well as in its width - the sherhebel has a smaller blade than the plane. At the same time, it protrudes from the block by 2-3mm.
- A jointer is a hand plane with a double cutter. The purpose of the device is the final and precise processing of wood when leveling the plane of a significant volume due to a longer block, as well as for jointing edges. On average, the length of the block can exceed 2-3 times the size of a standard plane. The jointer knife is equipped with a chip breaker and a handle to facilitate operation of the device. The jointer can be produced with either a single or double knife.
Jointer
A jointer is usually called one of the modified versions of a mechanical plane with one or two cutters, intended for finishing parts. The jointer is also used in jointing edges. Due to the elongated block, the jointer is more convenient to work with large volumes. The cutter of the device (there may be two of them) is usually equipped with a chip breaker.
Reference! In carpentry, so-called semi-jointers are also used, the size of which, corresponding to the name of the tool, is approximately half the area of the jointer block.
Features of operation and device
The equipment in question is characterized by certain application features. Among the features we note the following:
- The bottom surface must be level. This can be achieved by pre-jointing.
- Simultaneous processing is only possible when using a machine that has the appropriate properties.
- The machine is ideal for working with previously unprepared workpieces.
- The device is designed as a combination of several parts, all of which are responsible for specific functions.
In general, we can say that such a machine is characterized by high functionality. The design of a jointer of this type may differ significantly.
Recommendations when choosing equipment
When choosing which machine to choose is a very common question, you need to pay attention to several main points. They are as follows:
- Number of knives on the working part.
- Power of the installed engine.
- Dimensions and weight of equipment.
- The speed of movement of the workpiece at the time of processing.
All parameters should be taken into account when considering the most suitable design option.
Types of machines
There are quite a large number of different machines that can be used for working with wood. The asynchronous motor is protected by a special casing. Equipment with simultaneous planing and thicknessing functions has several advantages:
- The switch is made in the form of a rotary block.
- In most cases, the frame is made with powder paint, which significantly increases the protection of the surface from environmental influences.
- Submission of material can be carried out at any time.
- Provides protection from environmental influences.
- Some models come with two blades.
In most cases, classification is carried out according to engine power, functionality and some other characteristics. In addition, the popularity of the brand is important.
Classification and device
There are manual and stationary electric jointers. The first can be used when processing boards that are relatively short in length. Such an electric jointer must be equipped with a mounting unit, thanks to which it can be securely installed on an existing workbench. Stationary versions are typical for carpentry and furniture workshops.
The design of a jointer - manual or stationary - is the same: an electric motor, through a reduction gearbox, transmits torque to the working element - a knife drum, equipped with removable blades. Rotating, the tool head receives a vertical feed. The kit usually includes several types of knives that are designed for processing wood with different hardnesses. Thus, an electric jointer differs from a mechanical one in that surface treatment occurs as a result of rotational rather than reciprocating movement of the working part of the tool. The number of knives in different models can be from one to three.
An important element that guarantees the safety of working on a manual jointer is the unit control system. The housing contains two control buttons: only when they are pressed simultaneously does the electric motor start. There are also:
- A socket for connecting a vacuum cleaner, with which you can remove accumulated chips. For most models, the bell is located on the right side of the body, although there are also versions where the direction of chip ejection can be changed.
- Resistant handle.
- Control buttons.
- The manual screw is a planing depth regulator.
- Side stop, with the help of which the working width of the surface being treated is changed.
- Protective folding cover.
- The sole is made of polished thick sheet aluminum.
- A battery connector where you can connect a regular 18 V battery. Naturally, there is a two-meter long cable to connect the engine to a household network.
Comparative characteristics
- Since a jointer is a type of planer, there are not many differences between them. Both products are used to remove “excess” material from workpieces in order to obtain a perfectly flat surface. The main difference is the degree of processing of the product
. - The plane is used as a tool for primary processing
. The thickness of the removed wood layer is usually set when setting up the equipment. Wood planing is primarily intended to eliminate knots, bumps and other irregularities. The design itself is always simple: 2 elements - a block and a knife. - The jointer, as a rule, has a longer body
, which ensures that the product is pressed very tightly against the wood being processed. Most often, the jointer is equipped with two blades, allowing for finishing.
Types of tools
The classification is very extensive and is associated with various properties. There are two main types:
- A hand jointer can be found in almost any workshop. Its peculiarity lies in the prostate of the device, as well as its low cost.
- Recently, an electric jointer has often been purchased. This is due to ease of operation, as well as fairly high efficiency in use. The only drawback is the fairly high cost.
Don't miss: Electric chisel: types and characteristics of electric chisel
The materials used in the manufacture of the main part may differ significantly. Wooden tools are more common, as they are simple and much cheaper. It is suitable for a home workshop. There are also metal structures designed to work in extremely difficult conditions.
The classification is carried out according to what the task is. Examples include the following devices:
- For working with wooden workpieces that have not been processed in any way before. This variety is called Sherhebel. In most cases, a metal is used that can withstand significant impact.
- If finished parts need to be glued together after processing, then tsinubel is used. This design option is characterized by the fact that the knife has serrations. After planing, small grooves appear on the surface. As practice shows, such a surface is best suited for gluing.
If the resulting products do not need to be glued together in the future, you can use a double or single jointer. The main types of carpentry tools include the following:
- The grinder is represented by a type of design, which is characterized by a shortened body and an increased rake angle, as well as a reduced slot for removing chips. The scope of application is to align the ends and remove various burrs.
- In some cases, a semi-joint is used. It is characterized by a reduced length, but the required width remains. Used when working with large parts.
- The folding belt is used for sampling and quartering. It has a design that has a removable sole. The tool differs from others in width and is a specific design option.
- Zenzubel has a double-sided knife made using high-quality steel. The width of this element is 33 mm.
Mini jointers are also available for sale. It is often used in domestic settings, as it is small in size and has sufficient performance. In addition, all devices can be divided into two main groups:
- Household is characterized by low cost, as well as reduced performance characteristics. It is widespread because it costs less.
- A professional jointer is used for work in industry. Its main qualities include increased productivity, as well as the ability to work for a long period.
The production of the instrument in question is carried out by a variety of companies. There is also an industrial jointer that can be used for a long period.
How to create a planer toolkit for a beginning craftsman?
If you are a master, then start with No. 4, if you are a novice master and while it is difficult for you to cope with work on a plane, or you are a slender young lady, then take No. 3.
And further from the four, it is recommended to take a step to the right or left. Let's start by taking a step to the left. We are not discussing the eight, since it is a very heavy plane (plane), so either the seven or the six is considered. If you are a young lady, then after the three you take the six. This semi-jointer will perform the tasks of a jointer. If you are just a master, then take a seven.
Now step right. We take the most extreme step. A turner, or sander, that is, a plane for very clean planing. They are excellent for processing the ends of products. After this, depending on the specifics of our work, we can fill our row with either No. 4 or six. Everyone has their own preferences for specialization, so they can also influence the choice of tool size and the formation of the plane park. How to set up a plane is another article.
A jointer is a hand-held mechanical or electric tool for leveling the surface of a wood workpiece. Every carpenter has it; processing boards and solid wood is indispensable without the device.
Difference from surface planer
Also, many consider what is the difference from a surface planer. When considering a thicknesser and a jointer, it should be borne in mind that the first option is intended for drawing parallel lines on the surface. Both options can process wood; among the features, the following points should be taken into account:
- Flat surfaces can be obtained with a thicknesser, but the equipment is designed for finishing.
- Both tools work exclusively in conjunction. The jointer is intended for preparation, second final processing.
In general, we can say that there are quite a lot of differences. In this case, the structural elements differ insignificantly, but the thicknesser allows you to reduce the degree of roughness of the surface layer.
Jet, Kraton, Corvette, Scheppach, Metabo
Lately, jointing-thicknessing machines are increasingly being installed at home or in industry. There are a huge number of wood processing methods, but they all have certain similarities. Separate processing methods include jointing and thicknessing, which have a huge number of similarities. That is why, when creating equipment on which the processes in question are carried out, many manufacturers decided to combine a jointer and a surface planer. The result was the emergence of a separate category of equipment. It is somewhat different from the more common jointing models. The main difference is the installation of stops and gauges, which allow cutting layers of wood from the surface with higher precision.
Planer-thicknesser Jet
Features of the jointing and thicknessing processes
Joiners and planers allow you to process wood. Planing is a process of changing the characteristics of wood in which the feed material or tool makes a reciprocating motion to remove the top layer of material during processing. Previously, hand tools were used to perform such work, but in recent decades, a planer-thicknesser or other models have been used to increase productivity. During processing, the equipment used removes the top layer of wood along the entire length of the timber.
Planing tools and planer-thicknessers are used to achieve the following purposes:
- reducing the height of the workpiece by removing several layers of wood;
- to obtain the surface of the required quality. the degree of roughness depends on the type of knives, their number and the diameter of the drum;
- removal of surface defects;
- creating edges of a specific type. a parallel stop allows you to place workpieces at a certain angle to the drum with a blade;
- some models, removing bark by roughing to obtain material that will be passed through a planer-thicknesser.
Connecting aspiration on a Jet machine
A jointer has long been used for finishing. A jointer was used as a hand tool to remove the surface layer. The jointer is used for planing large volumes of wood. By moving the jointer along the entire length of the workpiece, the master removes layers with high frequency; their size can be adjusted based on the force of pressing.
Helical knives on a Jet 54 A planer-thicknesser
At home, you can use hand tools or a planer-thicknesser machine. The following points are worth considering:
- Jointing is a kind of planing. A distinctive feature of this process is the feeding of a workpiece of large length. During the impact of the cutting tool and feed, the workpiece may bend, which significantly reduces the processing accuracy. To prevent deformation of the workpiece during jointing, the bed is large and the device is equipped with a clamping mechanism. Jointing is carried out solely to bring the surface to the desired roughness class; the thickness of the material is maintained with low accuracy.
- Thickening is a slightly different type of processing that allows you to obtain a higher quality surface. Used when the workpiece is relatively small in size. A feature of the machines that belong to this class is the ability to install a caliber. When thicknessing, it is determined what thickness of the resulting part will be maintained. All workpieces can be run using the established caliber.
As a rule, a jointer-thicknesser planer, which is used to produce wood with a high surface quality, combines the functions of jointing and thicknessing. The planer-thicknesser machine has become widespread due to the combination of two operations.
Design Features
Wood planing, when combining the functions of thicknessing and jointing, is carried out using special machines. The planer-thicknesser for wood has the following features:
- such a model combines the two most popular processing technologies at home and in industrial production;
- As a rule, a modern electric motor with high traction force is used when creating. Modern electric motors have low power consumption and high performance, but are very susceptible to overheating. To do this, they are equipped with temperature sensors, which, when triggered, shut down the system;
- The planing table is used for basing. Wood planing is carried out using manual or automatic feeding;
- the device can be equipped with stops for installing the workpiece at a certain angle. As a rule, wood processing can be carried out by setting the angle in the range from 0 to 45°;
- A planer-thicknesser machine for home or industrial use can remove various layers of material, usually no more than 5 millimeters;
- Thickening for wood involves processing according to the established caliber. For this purpose, the design has an automatic feed device. To significantly improve surface quality when machining at home or in an industrial plant, the plunge depth per pass is reduced. Some models can remove about 2 millimeters in one pass.
The above features characterize a planer-thicknesser for wood. The modern household version has small overall dimensions and can be installed on the floor without a foundation slab. Power can be supplied from a standard network with a voltage of 220 V. Other features include an intuitive control unit, as well as a low noise level while planing wood.
Types of tools
The device comes in two types: manual and electric.
Manual jointer
This is a metal or wooden tool, the design of which includes:
- frame;
- handle holder;
- blade (knife).
The length of the block is 90 cm, and the width of the blades is 8 cm. For mini-models, semi-jointers, the length of the sole does not exceed 50 cm. This is convenient for processing large parts.
A type of jointing tool is sherhebel. As standard, it has a 35mm wide blade. The tool is used for primary processing of the workpiece. Scherhebel removes chips 2–3 mm thick.
Another type of jointer is a folding joint. Its narrow, replaceable soleplate is suitable for processing folds, quarters and rebates. Zenzubel is equipped with two knives for cleaner surface grinding of small parts.
Electric
This is not a machine, but a hand-held electrical device.
It takes force to trim the workpiece. Professionals often use an electric jointer. It has:
- Greater mass and clamping force.
- Processes workpieces more precisely.
- The work goes much faster.
- The tool has a set of replaceable attachments.
Don't miss: Thicknesser machine: purpose, device, types, how to choose
A special feature of using an electric jointer is the ability to attach it to a workbench. The result is a machine that replaces special stationary equipment. It is convenient for home or small workshop.
How to use a hand-held electric jointer?
It should be noted that using a handheld electric jointer successfully will require practical skills. The preparatory operations are:
- Adjusting the jointer to the required depth and width. In household models, it is possible to process planes with a width of 50...110 mm. There is a relationship between the power of the unit and the permissible planing width. For example, electric jointers with a power of 450...600 W work well on material up to 80...85 mm wide, 600...1000 W - up to 100...110 mm. The planing depth is set according to the stop, and depends on the parameters of the wood. The blades should protrude from the shaft no more than 2 mm, and during the first experiments with the unit, it is worth setting the depth to no more than 1...1.5 mm, gradually increasing it to the recommended one (usually no higher than 2.5 mm in one pass);
- Checking the engine speed. Manual electric jointers are equipped with a drive from 10,000 min-1. There is an opinion that with an increase in the speed of the electric motor, the functionality of the unit increases. This is wrong. The higher the speed, the lower the torque and force, which can have a negative impact on the processing of particularly strong wood. Another recommendation would be more correct. As the speed increases, the working depth decreases, but the speed of movement of the electric jointer across the workpiece increases;
- Determination of feed rate. As the engine speed increases, the surface finish of homogeneous and relatively soft wood increases. Therefore, practical feed can be up to 25...30 mm per second with a knife penetration depth of up to 1.5 mm, and 10...20 mm - over 1.5 mm.
Before starting work, you should securely and conveniently secure the workpiece on the workbench. It is recommended to start work from the end part of the board, and at a minimum penetration depth. After making sure that the first pass has a positive result (no wood tearing, no jerking of the unit when moving it, etc.), the feed and depth can be increased.
For straightness of movement, it is worth marking the board with a solid line (for example, with colored chalk). In addition to an additional guarantee of straightness of movement of the sole, this determines the uniformity of processing: where the markings were preserved, the depth of penetration of the knives turned out to be less than required.
How to joint boards correctly
Jointing is the treatment of the surface of a wooden workpiece with a jointer of any type.
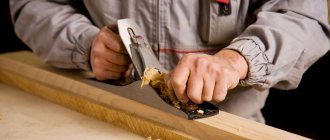
To work with hand tools, the workpiece is fixed on a workbench. The wood fibers should be located in the direction of movement.
You need to take the jointer with both hands: with your left hand by the handle, with your right hand by the block. For left-handed people the order is opposite. The tool is moved along the surface along the fibers, pressing with its own weight on the device, pushing it forward. At first, the chips will be of different sizes; as the product is ready, they will become long and even in thickness.
The surface is processed layer by layer to avoid height differences and the formation of unnecessary holes.
How to joint with an electric jointer:
- Secure the device to a workbench with a board support.
- Turn on the power and place the board on the blade against the stop.
- Repeat as many times as necessary to get results.
When working with equipment, you must observe safety precautions:
- Keep your hands away from the blade.
- Wear protective clothing.
- Use the clamp holders to move the board. They will protect your fingers from the knife.
To avoid cutting off excess, apply a chalk line to the surface to be treated. The smoothness of its disappearance will indicate the uniformity of the cutting. The line has disappeared, which means the surface has become smooth.
Edge processing is performed in the same way as grinding the main plane. It is enough to turn the workpiece over with the desired side facing the blade and repeat the steps.
Selecting the right unit
When choosing a jointing machine, pay attention to the following characteristics:
- Rotation speed of the blade unit.
Surface processing occurs due to the rotation of a cylindrical knife block with cutters (knives) attached to it. The higher the rotation speed of the block, the cleaner the wood surface is processed. - Table length and jointing width.
Both of these characteristics affect the parameters (length and width) of the workpiece that the machine can work with. Therefore, before purchasing a unit, you should determine the average dimensions of the workpiece and select equipment based on the data obtained. - Planing depth.
As a rule, modern planing machines allow you to set different planing depths. This allows, on the one hand, to bring the workpiece to the required thickness in a minimum number of approaches (when setting a large planing depth), and on the other hand, to obtain a perfectly smooth surface (in several approaches with the minimum possible depth). - Security provided.
The planer must have a special guard for the knife block to prevent the operator's hand from getting under the working cutter. Different models have different security systems, differing in their degree of sophistication. - Type of knives.
Most machines have pre-installed knives made of tool steel. This tool allows you to work with different types of wood and wood boards. However, if it is necessary to process a large number of grainy workpieces (for example, teak), it is better to change the knives to harder ones. Also remember that the final result depends on the sharpening of knives, which means they must be sharpened periodically.
Also, when choosing a jointing machine, you need to take into account its dimensions and cost. In this case, you will be able to choose equipment that really suits you and suits you in all respects.
Settings
It is recommended to start setting up the jointing machine by checking the sharpness of the cutting elements. The blades should have a 40° bevel along the edge.
Sharpening of cutting elements is carried out using special sharpening devices. The radius of curvature of the cutting edge should be no more than 8 microns.
If the knives are sharpened, they need to be secured to the planing shaft. Before this, you need to lower the front and rear plates. When installing knives, it is necessary to control the parallelism of the blades. It should not exceed 0.1 mm per 1 m. To facilitate the process of installing knives, it is recommended to purchase an indicator device. After securing the cutting elements, you need to check:
- protrusion beyond the edge of the steel plates – 2 mm;
- protrusion beyond the edge of the planing shaft - no more than 22 mm.
After installing the knives, you need to set the height of the work tables. The distance between the cutting edges and the jaws of the plates should be no more than 3 mm. Otherwise, indentations may form on the part during processing. After setting up the desktops, you need to determine the location of the guide. The distance between the ruler and the left edge of the knife shaft should be greater than the width of the wooden workpiece. The guide is installed using a template and secured with screws.
After setting up the jointer, you need to check its performance by performing a test run. If there are no malfunctions or external defects, the boards can be processed using the jointer. If deviations are detected, it is necessary to re-configure the machine, replace or repair its faulty components.
How to choose a jointer
To choose the right wood jointer, you need to consider the following factors:
- Workspace material. Stationary jointer tables are made of steel, cast iron, aluminum alloys and silumin. Countertops made of cast iron have the highest strength. The cheapest tables are made of silumin. They are easily deformed during use.
- Width and length of the desktop. These indicators determine the dimensions of the processed workpieces. Machines with a width of up to 15 cm and a length of up to 140 cm are used in home workshops. They are capable of processing small workpieces. Devices with a width of up to 63 cm and a length of up to 200 cm are used in large woodworking shops.
- Number of knives. The more cutting elements are attached to the planing shaft, the less frequently they need to be sharpened. For low intensity use of the tool, you can purchase models with 2 knives. For frequent processing of large quantities of bars, devices with 4 knives are required.
- Type and power of the power unit. Planers are equipped with a commutator or asynchronous electric motor. They differ in design and power. Commutator motors are installed in household jointers. They make a lot of noise. Asynchronous motors are installed in industrial tools and are characterized by high performance.
- Speed of rotation of the knife shaft. The faster the cutting elements rotate, the more accurate the cut. The average speed of the knife shaft is 4.7 - 5 thousand rpm.
Jointer knives
When choosing knives for a jointer, you must consider the following features:
- The type of wood determines the material used to make knives. For processing products made of pine and other coniferous trees, it is recommended to use blades made of P6M5 alloy. When planing softwood blocks, knives made from HSS alloy are required.
- For carpentry work, it is necessary to equip the machine with figured or straight knives. They provide high cutting accuracy and allow you to create unique contours on the surface being processed.
- Devices with dull knives will not be able to accurately process a wooden workpiece.
Knife blades wear out during long-term use of the machine and require sharpening. The following factors indicate wear of knives:
- When the jointer is running, the electric motor gets very hot.
- After processing, moss forms on the surface of the bar.
- The processed workpiece turned out to be uneven.
If the blades cannot be sharpened, they must be completely replaced.