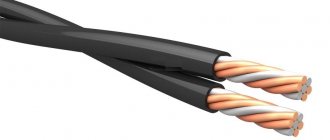
What determines the quality of homemade lining
Working with lumber is much more difficult than working with metal. In nature, no two boards are completely identical, not to mention the different properties of soft and hard woods. Metal does not have knots, does not absorb moisture, does not have developmental defects, etc. And these indicators influence the processing technology. Industrial equipment makes it possible to greatly simplify the process due to the large mass of machines, precision adjustments, stable mechanical feed and strong pressing.
At home, all cutting parameters must be observed independently and quickly changed depending on the characteristics of the board and the capabilities of the machine. What should you keep in mind?
Pay attention to the location of the grain; never process lumber against the grain. Monitor the condition of the bearings. The slightest beating will certainly affect the roughness of the surfaces. As soon as it is discovered that the machine shaft is a little wobbly, the bearing must be urgently changed or, if possible, adjusted. Tenths of a millimeter of vibration significantly degrade the final quality. The serviceability of cutting tools is one of the important components of surface cleanliness. Saws and cutters must be sharp. If you make cutters yourself, then use only durable grades of tool steel. The geometry of all cutters must be the same. Otherwise, some of them will not work, and this is a very undesirable phenomenon. Position the cutters accurately, do not rush. It is very difficult for an inexperienced master to set all the cutters at once, do not be discouraged. Lose more time, but achieve the desired result. The lost time will be more than repaid in the future.
The more cutters, the better. If the head allows you to install four, then do so, do not work with two. Four cutters slightly increase the installation time, but then the machine works longer – they become less dull.
Always use exactly the same wedges to secure the knives. Even small differences in mass cause head vibration. Vibration not only degrades the quality of processing, but also causes rapid wear of bearings and increases the risk of injury. Observe cutting conditions for lumber
This is a very important condition. Cutting modes include the number of shaft revolutions, the number of cutting planes, feed speed and sharpening angle
We can talk about this topic for a very long time; cutting modes have a huge number of options. Beginning craftsmen need to become at least a little familiar with the theory, and in the future everything depends on the ability to learn practically and the desire to work with woodworking machines. Before feeding the board to the machine, inspect it, select the optimal cutting direction, taking into account the characteristics of the surfaces, the presence and type of knots and other defects. Place the finished lining in even stacks, do not place it vertically, and do not scatter it throughout the workshop. Cleanliness and order are evidence of the professionalism of the master.
If you have little experience, then the input/output of the board may be defective due to a slight change in the direction of movement and non-parallelism with the ruler. Keep this in mind when determining the length of the lining, make a reserve in length.
If you follow the above recommendations, there is no need to use sandpaper for final adjustment of surfaces. Remember that only amateurs make lining in such a way that it then has to be sanded by hand for a long time and tediously.
What you need to know about the material
Lining is a solid wooden board intended for cladding various construction projects from the outside and for finishing the premises from the inside.
| Illustrations | Varieties according to the method of fastening |
| Milled board with tongue and groove joint . This is the most common type of material. On one side of the plank there is a milled groove - a longitudinal recess, and on the other side a tenon protrudes. During installation, the tenon slides into the groove, and the mounting brackets also enter there. As a result, the cladding is obtained with minimal gaps. | |
| Tenon-groove connection (where the tenon is a separate element) . When making such lining, a quarter is selected from the boards on both sides. Adjacent boards in the cladding are connected by a separate tenon - a lath, which is inserted into the grooves. |
This profile of the planks is typical for lining made by handicraft.
The board is attached to the sheathing over the mineral wool with nails. Nails are driven into the top of the board, and the next plank is installed on top of it. As a result, the cross section of the finish looks like a herringbone.
A significant advantage of such lining is its low cost due to ease of processing.
| Edged board for overlap laying (American). Essentially, it is a simple board, processed by a circular saw and passed through a jointer. |
| Illustrations | Varieties by profile type (relevant for milled modifications) |
| Standard. The cross section is made in the form of a trapezoid. The angle of the trapezoid edges is 30-40 degrees. A distinctive characteristic is the small depth of the groove. | |
| Europrofile. The Eurolining profile is distinguished by neat processing, an increased tenon size and wide ventilation edges on the reverse side. | |
| Calm. This is the same profile as the “standard” one, but the edges are not beveled, but rounded. | |
| Block house. The board has a rounded surface that imitates a log. This is the most expensive profile of all the previously listed options. |
How lining is made in production
| Illustrations | Industrial production stages |
| Sawing logs into boards . The timber is sorted according to the degree of curvature of the logs. The least crooked logs with a minimum amount of defects are fed to the sawmill, where they are cut longitudinally. | |
| Drying . The lumber is dried. |
There are several drying methods, including autoclave and infrared processing. Regardless of the method of drying the wood, the moisture content of the lumber should ultimately be 12%.
At the same stage, the workpieces can be treated with antiseptic impregnations.
Read also: How to solder contacts correctly
Selection of production materials
In addition to wooden lining, plastic and MDF panels are also available for sale. Considering the specifics of production processes, the only material that can be processed at home is wood.
The following requirements apply to the wood from which the lining is made:
- Humidity within 12-18%. In production, lumber is dried before final processing. This is done so that during operation the finished lining does not dry out or crack;
- Absence of defects that will lead to damage to the wood . The presence of pigment spots on wood indicates the beginning of putrefactive processes, which can negatively affect the service life of the lining;
- High density . The denser the wood, the more resistant to mechanical damage and rotting the finished lining will be.
Which tree species meets these requirements? Taking into account the attractive cost, it is preferable to use coniferous wood for the manufacture of lining. If the facing board is made for rooms with high humidity, then the best option is to use aspen lumber.
Equipment for production in a home workshop
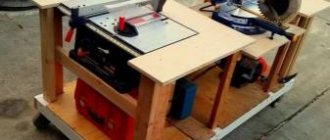
The choice of production tool depends on what exactly you decide to do. If you plan to make a lap board, a circular saw and a jointer will suffice. The same equipment will be enough if you decide to make not grooves and tenons on the boards, but steps cut into half a tree, as shown in the photo.
Homemade wall cladding with wood - a protrusion is made on the longitudinal section of the board, with which one plank rests on another
If you plan to make lining with a tongue-and-groove joint, in addition to a circular saw and a jointer, you will need a milling table with a cutter selected for the thickness of the longitudinal groove. To cut a groove on a standard 20 mm thick lining, select a groove cutter thickness of 10 mm.
Is it possible to make a lining profile using a hand router? Theoretically, this is possible, but working while holding a router in your hands is more difficult than doing the same work on a milling machine.
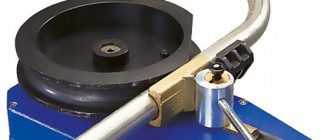
Method 1: production of lining on a band sawmill
Sawing timber on an automated band sawmill
This method is traditional for the USA and Canada, where people who have the opportunity to buy timber inexpensively use a band saw to cut logs into beams, and the timber, in turn, is sawn into boards with a beveled or rectangular profile.
Installation of lining with a beveled profile is carried out in such a way that the narrow part of the plank is located on the outside, while the thicker side will be fastened with nails or using anchor screws
This profile allows you to make wall cladding more neat. However, the task of making lining can be simplified and the profile of the board can be made into a regular rectangular one.
Texture of the finished board before subsequent drying
This technology does not require mandatory sanding, since already in this form the board can be stuffed on top of the mounting frame. However, if you want a neater look on your home's exterior, the finished planks can be run through a jointer to make them smooth.
Method 2: production of lining using a circular saw
Blanks for facing boards
At the initial stage, blanks with a cross section of 202×22 mm are cut from timber or from a ready-made edged board. A margin of 2 mm is left in order to drive the workpieces through the jointer and obtain boards with a cross-section of 200x20 mm. Since the production of the finishing material is done by hand, select the length of the blanks at your discretion.
Longitudinal sawing of the workpiece and production of the groove is performed on the same tool
During the production process, the workpieces are passed lengthwise through the sawmill, so that at each end a step is created that is half the thickness of the workpiece. The protrusions on one and the other side are mirrored, that is, on one edge – at the top, and on the other – at the bottom.
The installation of such planks is carried out so that the board located on top, as a step, overlaps the board located below. As a result, moisture will not get behind the wooden paneling.
Method 3: production of lining using a milling table
The photo shows cutters (knives) - one of them is for forming a tenon, the other is for making a groove
To make lining on a milling table, you will need a planed board prepared in advance on a circular saw and jointer. All the following operations are performed on a milling table with the possibility of rigid fixation of the cutting tool and the workpiece.
| Profiling and trimming . At this stage, the lumber is run through a lining machine, which combines the functions of a router and a jointer. As a result, the board acquires the required profile. The board is also cut to length according to the standard. | |
| Sorting . Finished lumber is sorted by class and type, and then packaged. |
| Illustrations | Step-by-step instruction |
| Adjusting the workpiece pressure . At this stage, adjustment is made in the horizontal plane. The workpiece is moved close to the stopper and fixed with clamps on the reverse side. | |
| Installation and adjustment of the cutter . The cutter is adjustable for installation height on the spindle. |
The installation height for the first and second cutter should be the same. Setting errors will make the lining unsuitable for use.
Read also: Tl5551 datasheet in Russian
Milling cutters for lining and their application
In my spare time I would always like to do something useful for myself, and some spend this time decorating their house or apartment, because creativity always brings joy. One of the options is to independently produce the facing material, for which you will need cutters for lining on a manual router.
Making wooden panels yourself to cover a room with them is very interesting and exciting.
Finger cutters for making lining with a manual router
Making lining by hand
Milling cutters for a manual router for the manufacture of lining and other products. Big set
Hand cutters for wood can be divided into bearing (or edge) and bearingless. The former are used for the manufacture of lining, and the latter are used for one-time processing of any part, but they require auxiliary equipment.
Groove fillet cutters
Cutters for making lining for a manual router can have a ratio of the diameter (D) to the radius (R) of the groove on the panel: 9.5-4.8 mm, 12.7-6.35 mm, 15.8-7.9 mm and 199.5 mm. The diameter of the shank will remain 8 mm. Such cutters can be used for lining, but they are inconvenient.
Universal cutters for making lining
Such a cutter for lining, as in the photo above, can be used both with a manual milling machine and with a milling machine, which is equipped with collets. The diameter of the cutters in this case is 50 mm and 35 mm - respectively, with a shank diameter of 8 mm.
Mounted cutters for the manufacture of lining
Such a cutter for making lining will allow you to make panels with any type of tongue and groove. The most important thing is to set up the machine correctly and select the cutter sizes in terms of depth and diameter.
Manufacturing of lining
Level one side of the board
To make lining with your own hands, you need to make smooth jointed blanks from unedged boards. First of all, make a cut along one side, and then decide on the width of the future panel.
Set the ruler to the desired width
To determine the width, pay attention to all the boards you have so that the panels are the same. Of course, there are no strict instructions with directions here, but the most optimal board size will be from 7 to 10 cm
Be very careful when jointing boards because most carpenter injuries occur during this process. Of course, they won’t cut off a hand or a finger here, but the wounds bleed a lot and take a long time to heal, although at the first moment you don’t even feel pain. To ensure that the thickness of all boards is the same, count the number of passes along the cutter - you, of course, will not achieve millimeter accuracy, but no one will notice the difference.
Advice. For processing, it is better to choose boards no more than 2 m long, since longer ones are difficult to hold and the dimensions are inaccurate. Also, shorter boards will be easier to process with a hand router.
The lining with grooves on both sides is connected by a thin strip
When cutting down a wane, sometimes quite a lot of wood remains and should not be thrown away. From this waste you can cut thin slats for connection, and make the lining with grooves on both sides.
Cutting a groove with a milling cutter
When the board is cut and jointed, all you have to do is make a tongue and groove, that is, tongue and groove it around the perimeter. Place the cutter on the machine and, by lowering or raising the table, adjust the depth of the groove. Move the ruler to the required distance and make sure that during processing the board is always pressed tightly against its edge.
Processing boards on a surface planer
And how to make lining with a manual router, because before that we paid attention to a machine, albeit portable, but still a machine. To do this, you will need a calibrated board, and this cannot be done manually - you just need to pass it through a thicknesser
Working with a hand router
The comb is made with an end mill, and its width is adjusted with washers, but it is very important that the thickness is at least 4 mm, because a thinner one will break off. But when making such shelves, it is advisable that they be captured by a clamper, and it will take no more than 6 mm. Then, using a panel cutter, remove the remainder at the top, but make sure that the straight section is at least 5 mm
Making the lining with a manual milling cutter, or rather, the other side, is done in the same way, only the chamfer is removed with a panel cutter of a smaller size.
How to make a lining from an edged board
Master class from the YouTube channel “ Samodelkin ”.
Choosing edged boards
In a home workshop, it is not possible to make lining from every edged board. For this, as a rule, 1st or 2nd grade lumber with dimensions of 100x25x6000 mm is used. This is a standard board size that is in demand at all stages of home construction.
There are certain requirements for edged boards for lining. The lumber must have natural humidity, but not more than 16%. The boards should not have mechanical damage, signs of rot or wormholes.
The type of wood for the lining is selected depending on what will be sheathed: the outside of the house, the interior, the bathhouse. For homemade lining, inexpensive types of wood are usually used, which are often found in the retail chain:
Making lining with a milling cutter
First of all, the edged board, processed on a jointer, is planed with a thicknesser. With its help, the geometric dimensions of the future lining are formed.
The edged board can be processed in another way. For example, it is enough to go through it with a plane and then sand the surface.
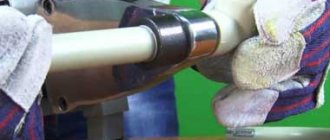
Before milling, the ribs of the workpieces are planed, and the wane is removed with a sharp knife.
Since the surface of the boards is rough after the thicknesser, they have to be sanded.
For milling, a manual milling machine with a power of 2100 W is used.
The profile is milled using combined cutters included in a set of two cutters. If you use separate cutters, the work will take much longer.
The set of cutters is suitable for processing wood of all types. The set contains one large-diameter cutter, which forms a joining tenon, as well as an edging on the front part of the workpiece. A smaller diameter cutter forms the joint groove and edge on the other side of the board.
The cutter for the docking tenon is clamped in the router spindle and the milling depth is selected.
Install the parallel stop included in the router kit.
To facilitate the processing of edged material, the boards are laid on racks with the wane down. A special rail holds the board and prevents it from moving during milling.
The first cut is made using a milling cutter to create a joint tenon. This cutter is used to process all the boards one by one. The back and front sides of the treated boards have different appearances.
On the router, they change the cutter to a docking groove, and make cuts on one board that has a docking tenon.
Check the correct installation height of the cutter for the joining groove by checking the presence of a gap between the two joined linings.
If the cutter is installed incorrectly, there will be a gap after joining. It is enough to recess the cutter and the gap will disappear.
After adjusting the installation height of the cutter, all remaining boards with tenons are milled into the joint groove.
The quality of the lining made by a milling machine is assessed by the assembled panel.
Before installation, the lining is stored indoors. If you leave the material outside, it will move and the slats will be unsuitable for cladding.
The lining, made by a milling cutter, is distinguished by a reliable lock.
This material is used for cladding not only indoors, but also for cladding the exterior of the house.
Tools for stone work
Tools for hand milling, intended for working on stone, are distinguished by the variety of their design. The choice depends not only on what kind of stone needs to be processed, but also on the nature of the upcoming technological operation. Thus, depending on the design, there are radius, profile and overrunning cutters for working on stone, as well as for performing inlay work.
Depending on the material used to make the cutting part, cutters for stone work can be:
- equipped with carbide plates that are soldered onto the cutting part;
- with carbide elements fixed on the cutting part mechanically;
- with diamond coating.
The most effective for stone processing are cutters made using diamond chips. They can be produced by sintering such crumbs or by galvanizing them onto the working surface. More wear-resistant are tools obtained by sintering, the working part of which consists of several layers of diamond chips. The wear resistance of such cutters is explained by the fact that when grinding off the top layer of their working part, the next layer is exposed, the diamond grains of which have not yet been worn out.
List of the minimum set of tools and equipment
First of all, you must have a special separate room for work; woodworking machines create a lot of noise and dust. You will have to comply with the requirements of sanitary authorities. Another condition is that the electrical wiring must withstand additional loads, and they, depending on the brand of machines and their number, can increase significantly.
On a note! You can make both the simplest and quite complex lining with your own hands; we will consider both manufacturing options. But for all options there are several preconditions.
Making lining with your own hands
Wood cutter sets
Buying cutters individually is expensive; it’s easier to buy a whole set. Of course, it is more expensive than one cutter, but if you buy the same cutters separately, it is much cheaper to buy a whole set. We will talk about such sets today.
What sets of wood cutters exist and how much do they cost - video
offers a variety of carbide cutter sets. We'll talk about five.
- Includes six edge cutters with radii of 3, 4, 5, 6, 8 and 10 mm, which are equipped with a lower support bearing. Shank - 8 mm.
- This set includes 12 cutters:
- two edges with radii 6.35 and 9.5 mm and with a support bearing; one figured with two radii 4 mm and with a support bearing;
- three end diameters of 6, 12 and 16 mm; one end with a diameter of 12.7 mm; one angled (90 degrees) with an outer diameter of 12.7 mm;
- one groove with a radius of 6.35 mm;
- one end radius with a radius of 6.35 mm and a support bearing;
- one end angular (45 degrees) with support bearing;
- one grooved (dovetailed) with an end diameter of 12.7 mm and an angle of 14 degrees. This set of cutters will be useful for a novice carpenter, as they can perform many jobs on the manufacture of simple pieces of furniture.
- The third set consists of 16 items and is similar to the reinforced second one. Added end mills with a diameter of 3 and 12.7 mm; groove with a radius of 3.2 mm and a special drill with a diameter of 6.3 mm.
- The set is aimed at professionals - it consists of 12 cutters of a reinforced design with all the functions of the second set.
- Finally, the fifth set is similar to the fourth, but consists of 20 cutters of a reinforced design with a greater variety of parameters and the addition of a 9.5 mm wide and 32 mm diameter groove end mill. It is also aimed at the “pros”. In addition to those indicated, Diold has 10 more sets, which are equipped with cutters in various combinations.
Details of working with panel cutters.
Figurine cutters
Using cutters for paneling (or figurine), thin planks of a certain configuration are made, which are used to frame various decorative elements. Panels are most often used for the manufacture of decorative frames, as well as for the design of furniture facades. A paneled element used exclusively for decorative purposes can be cut along the contour of the product. Using milling cutters for panels, it is possible to produce products that simultaneously perform two functions: they act as a decorative element and fix the connected elements together using the “tenon and groove” principle.
On the modern market, various cutters for infill are offered, which involve the production of such a decorative element in one or several passes. When making a panel in several passes, at each stage of the technological process, a layer of material is removed for which the tool used is designed. As a rule, in such cases, not one paneling tool is used, but a whole set of them.
Panel cutters can work in vertical and horizontal planes. Vertical cutters for infill are used to process baseboards and the edges of cornices, which involves processing to a greater depth. Horizontal cutters for infill are distinguished by a larger diameter of the cutting part. They are used to process furniture facades, shelves and door panels. Although cutters of this type can improve processing productivity, they are significantly inferior to vertical cutters in terms of cutting depth. It should be noted that almost no production can do without panel-type cutters.
Milling cutters suitable for making lining using a hand router
Regardless of the class of the tool, that is, professional or amateur hand tools, it uses exclusively end-face cutters. At one of its ends there is a collet (shank) with a diameter of 8 or 12 mm for rigid grip by the chuck, and at the other there is a directly profile cutter up to 50 mm wide. The manufacturing quality of the cutters themselves and the service life of the cutting tool depend primarily on the grade of cutter steel and the manufacturer. Models from well-known brands are always equipped with only durable grades of tool steel.
All cutters for sampling wood are usually divided into two main groups: edge and groove. They are sold both individually and as part of sets. Edge cutters can be easily distinguished from others by a characteristic feature - the presence of a bearing in front of the cutter. There are universal cutters - this is useful to keep in mind for similar operations - for example, in the case of making lining. They cost a little more than single models, but will allow you to save more time on production by reducing the number of passes.
Edge cutters
Designed for processing the edges of the product. All edge cutters are characterized by the presence of a bearing, which during operation rolls around the edge of the part. In this case, the working (cutting) part is located above or below the bearing.
Straight edge cutters
Straight edge cutters are most in demand when working with templates, and they have an upper or lower bearing. The latter are cheaper, but when they are used, the workpiece is located between the template and the router, which does not allow processing in two passes in depth (with an upper bearing this is possible).
Techniques for working with edge cutters - video
Such cutters are characterized by a working length, a working diameter, and also a bearing diameter (it is not always equal to the working one). For most cases, it is more convenient to choose cutters in which these diameters coincide, which makes it easier to manufacture and attach the template to the workpiece.
Shaped, or molding, edge cutters
They have a great variety. The choice of such cutters is dictated only by the desired edge profile, which is chosen based on the appearance of the product.
Their size, as a rule, is determined by the height of the working part, as well as the largest diameter and radius of curvature that they make. If there are several curves in a profile, then the profile of the largest of them is usually indicated. It is extremely rare, but there are adjustable molding edge cutters. They can adjust the distance between working parts.
Disc edge cutters
They are intended for making a rebate, but unlike straight groove ones, they are based on the edge with a bearing, which is why the groove they select is more accurately located relative to the edge of the workpiece. True, they are also more expensive than straight grooved ones. Often, such cutters are made adjustable to select grooves of different depths or widths. In this case, the set includes bearings of different diameters or a stack of thin cutters on an axis, so that the height is changed by disassembling the cutter and removing excess disks.
How to choose the right cutter. Tips for beginner millers in this video
Shaped edge cutters
They may have a bearing at the end, but the shape of their edges is much more complex than that of shaped edges, and the height is greater. Suitable for making baguettes and processing the edges of panels, skirting boards, and façade frames. Such cutters are also produced without bearings. In this case, they must be worked using a rip fence or a copying sleeve and a template.
Combined frame, or counter-profile, cutters. They are used when processing adjacent edges to create frame joining parts. Such cutters can also be assembled.
Horizontal figurine cutters
Designed for decorative milling of panel edges. Due to their large diameter, weight and cutting force, they are produced exclusively with a 12 mm shank and can only be used on a table, that is, with a stationary mounting of the router. Sometimes such equipment consists of two cutting discs and is capable of processing both sides of the panel in one pass. Such cutters have the largest diameter of all, so when choosing a milling machine you should immediately think about whether you will be making panels. This consideration directly affects the choice of tool based on the diameter of the hole in its base.
Spiral cutters
Spiral cutters are also actively used in furniture production. In appearance and design they are very similar to drills. Like spiral drills, their working part contains grooves, with the help of which chips of waste material are removed from the processing zone. Spiral cutters are divided into the following categories:
- with a downward cut;
- with an upward cut;
- combining both mentioned types.
The main areas of application of spiral-type cutters, which are presented in a wide range on the modern market, are:
- cutting of material;
- formation of elements of various configurations on the surface of solid wood products;
- creating grooves and recesses of various configurations on the surface of wood products.
Among the advantages of using spiral cutters for wood processing are the following:
- formation of a cut characterized by high purity and precision of processing;
- significantly less sawdust emissions than when using other tools;
- low level of noise and vibration during operation;
- high precision and processing performance when performing plunge milling.
Thus, the variety of cutters that can be equipped with both stationary and manual electrical equipment allows you to successfully perform various technological operations. With the help of such tools, you can not only make lining with your own hands, but also perform many other technological operations to improve your home interior.
Let's sum it up
It’s not difficult to make clapboard for cladding your house; the main thing is to have the necessary tools and follow the suggested instructions. If you have any questions while making the lining yourself, ask them in the comments to the article.
In the industrial production of lining, powerful woodworking machines are used to produce products of excellent quality, but not all users can afford it. Is it possible to make lining yourself and what is needed for this? We will talk about this in this article.
Do-it-yourself lining
Industrial production technology
You will need this knowledge in order to independently make the best decisions when making lining at home. The process of industrial production of lining consists of several stages.
- Making boards. The logs are sawn on band or disk sawmills into edged boards of specified parameters. The thickness of the board is in the range of 15-25 mm, width 100-150 mm. Specific dimensions depend on the type of lining.
- Drying lumber. The process takes place in chamber drying, which reduces the amount of waste and minimizes the risks of torsion and cracking of boards.
- Sorting. Lumber is sorted depending on quality. For the manufacture of lining, boards of at least second grade are selected.
- Manufacturing of lining. The process takes place on a powerful four-sided planer. By selecting various cutters and knives, four planes are processed in one pass, and the desired profile is immediately created on them.
- Quality control and product storage.
That’s all the technology is, there is nothing complicated, modern equipment allows you to automate production to the maximum. It is impossible to achieve this at home; you will have to waste much more time making the forcing.
Table. Classes of lining and their description.
| Class or variety | Description |
| Free from cracks, knots and other defects. The surface is perfectly smooth and even. | |
| The surface is smooth or slightly rough. There is 1 healthy knot per 1 linear meter (knot diameter no more than 1.5 cm). There may be cracks: hairline cracks - no more than ½ of the panel in length, non-through cracks - less than 9.5 cm in length (the exit of the cracks is directed towards the end of the panel), which appeared during drying - no more than the width of the panel. There may be tars and resin pockets of 2 pcs. at 1 m p. | |
| There are many knots, of which no more than 2 can fall out. per 1 m p. There may be through cracks up to 1 mm wide and up to 15-30 cm long, hairline cracks are allowed along the entire length of the board. The presence of wormholes (3 pieces per 1 square meter) and rot (no more than 1/10 of the panel) is allowed. Grade B lining is suitable for painting. | |
| The quality is low. Many different defects. This lining is suitable for upholstery of technical rooms or rough work. |
Manufacturing eurolining on a milling machine
This is more complex work; you will need solid experience working with woodworking machines. We will tell you about the technology, and select the dimensions of the lining and the profiles of the front surfaces yourself, taking into account the availability of tools and personal preferences.
How does eurolining differ from regular lining?
- The tongue/groove connection is deeper. Due to this, the risk of seams showing through during a significant reduction in the width of the boards is eliminated, and installation of the sheathing is simplified. It is easier to insert hardware for fastening into a deep groove.
- The reverse side has one or two slots - the wall surfaces can breathe, static forces are reduced when changing the linear dimensions of the lining. It is as a result of strong static forces that the cladding of a house can warp.
As the initial data, we assume that the boards of the required sizes have already been prepared, the material is sorted and folded in the proper place.
Step 1. Install a cutter on the machine to make a groove and a side decorative chamfer, adjust the depth. To do this, release the ruler, place the end of the board against the knife and, moving the ruler closer or further, find the desired position. Fasten the milling head and ruler with great force.
In order to correctly align all the knives on the head, you need to plan a section of the board as a test. Next, place it again on the cutter and, slowly rotating the head in the opposite direction, check that all the knives are working. You can recognize this by the sound; if everything is normal, then the number of minor touches on the board should correspond to the number of cutters. For example, if the head has four knives, but you only felt three touches, then this means that one knife is not working. Find which one and adjust its position. This is quite difficult to do and will take several attempts. Make sure that the spacer wedges of the knives are pressed firmly against the head.
Step 2. Attach the top and side clamps, set the desired distance. Such stops greatly facilitate the milling process, improve quality and increase labor safety. Pass all the boards on one side.
Step 3. Replace the cutter with a new one; it should cut the groove and remove the decorative chamfer. There is no need to re-adjust the clamps; the width of all boards is the same and did not change during the first pass.
Step 4. Remove the side cutter and release the ruler and clamps. Install a cutter to make recesses on the inside of the lining. The size and number of grooves do not matter; select them at your discretion.
General requirements
On what machines and no matter what complexity you try to make lining, you must comply with the following requirements.
- Quality of lumber . Boards should only be edged, with the same thickness and width. Wide planes must be passed through a surface planer on at least one, and preferably on both, sides. For these purposes, it is better to have a double-sided surface planer at home, and if you don’t have one, then at least a basic jointer.
If there are no such machines, then you can work with a manual electric plane. This work is quite difficult and long, and the quality will always be much lower than when processing lumber on machines.
Practical advice! We strongly recommend that you do not plan boards with a hand-held electric planer. It is much more profitable to take the lumber to a friend who has a double-sided planer; in an hour or two of work you will pass 1-2 m 3 of boards - this amount is enough to decorate a small country house. You will have to plan them manually for more than one day, and, as we have already mentioned, the quality will be poor. Such lining can only be used for finishing auxiliary premises.
- Drying. You can only work with lumber that has no more than 24% relative humidity. If the indicators are higher, then dry the boards under a canopy or in a ventilated area. The larger the gap between the stacks, the faster the lumber will get rid of excess moisture. Fold them carefully, do not allow any distortions to appear, place the spacers correctly, and be sure to press the top tier with a weight.
Read also: Powder steels for knives characteristics
Machine for making lining
We will tell you what machines and equipment you need to make lining with your own hands as the article progresses. The fact is that there are a large number of technologies, taking into account existing machines, it is impossible to describe everything in one article. Let's start with making the simplest lining - such work is accessible to most inexperienced craftsmen.
Machine
Milling is used primarily for the production of wood products, but if you purchase additional special knives, you can even process plastic and metal.
The good thing about this tool is that, despite its compact size, you can use it to perform numerous jobs.
The machine is used for making panels and for milling small holes for door handles and hinges. It can be used on door edges, window frames, chairs and other wooden objects.
Manual is available in three main types:
- Lamellar;
- Edge;
- Upper.
The cutters for the lining are installed under the casing of a powerful engine equipped with handles. The struts, fixed to the base plate and support plate, allow the motor to move up and down.
Its weight is compensated by return springs. Therefore, the knife is in a raised position on the frame even before the workpiece is taken out of use. The shank is secured using a lock nut into a collet clamp.
Manufacturing on a machine
- Milling cutters for the production of lining will be needed after work with jointed boards begins. An even cut is made on one side, after which it is necessary to determine the future width of the product.
- Before doing this, it is advisable to inspect all the boards so that they do not turn out to be of the already chosen width. Usually the size of the board is medium - from 7 to 10 cm.
- If you count the number of passes over the knives, you can achieve equal thickness on all boards.
- When the wane is removed, wood remains, which can then be used as slats.
- The next step is to tongue and groove the board around the perimeter. The tenon and groove are cut out. When raising and lowering the table, you can adjust the groove depth. The ruler must always be pressed against the edge of the panel.
Video - production line:
Expenses
Don’t be afraid to experiment, because what you make with your own hands is much more expensive and better than what you buy at the best prices in the store.
Panels made by yourself will not only decorate the house, but will also “nourish” it with the energy of a person who strives to turn his home into a cozy hearth. You just need to prepare the necessary materials and tools - and the new business will definitely be mastered.
List of sources
- luchiefasady.ru
- kubvagonki.ru
- www.novaso.ru
- obinstrumente.ru
What is needed to make panels manually?
The production process is not as complicated as it initially seems. What is needed for this?
- Manual frezer;
- Mills;
- Boards.
The boards must be processed on a jointer to remove all unevenness, roughness and cracks from them. If such equipment is not available, planed boards can be purchased ready-made in the store.
A hand router is a tool with which you can easily chamfer a board, mill holes and grooves. With its help, the lining takes on a finished look.
Hand-made panels look no worse than those that are sold, and the feeling of pride from the fact that everything was done by hand will only add positive emotions from the completed repair.