Are you here
How to change a button on your jeans yourself.
A typical case. A button on a pair of jeans broke on a broken leg. The property of this type of button is to jump off the shaft under increased load. Removing button remnants. Remove with a side cutter in one motion. Then the process of installing the button according to your wishes.
Remove the unnecessary denim button.
A) On a broken leg:
If you disassemble the button from the wrong side of the product, you can damage the fabric, so we bite the button from the front side.
B) On a stable stem: First we bite the stem of the button, then what is left. With this method, the fabric is not damaged at all.
Hammer rivets: what are they for and how to use them?
Hammer rivets have been an integral part of every builder's kit for quite some time. At their core, they are a kind of rod, on top of which there is a special head, which can be made in the form of various shapes (the most common are round).
Peculiarities
Riveting is one of the options for permanent installation of parts. The advantage of this method is its low cost. Consumables - rivets - are relatively inexpensive. You can purchase them at any store that sells fastening materials.
Modern materials are divided into two main types: threaded and exhaust. Both are essentially hollow tubes with a cap at one end. In the first case, a thread is cut inside the tube, and in the second, a rod with a thickening at the end is inserted into it.
Typically, installing a large number of standard rivets requires a special tool - a riveter. It can be electric, pneumatic or manual. The use of this equipment allows you to reduce the physical effort associated with crushing a metal rivet. These tools are not cheap at all, this is the main reason for refusing to use rivets in everyday life or for minor repairs. Indeed, purchasing an expensive tool for the sake of one or two rivets is hardly justified.
Below we will look at ways to install a rivet without special equipment.
What will you need?
So let's get started!
Given: parts that need to be connected, but cannot be welded, for example, so as not to spoil the paint.
Goal: install no more than 4 rivets.
Task: to rivet without a rivet gun, since it is not available, but it is quite expensive, and purchasing it for the sake of 4 rivets is completely unjustified.
Given: threaded rivets and... what you can find in the garage, plus the notorious ingenuity, without which in this case it’s absolutely impossible.
Having rummaged through deposits of all sorts of iron rubbish accumulated over centuries, you need to find a long bolt that matches the diameter and thread pitch of the existing rivets, or, conversely, purchase rivets of the appropriate parameters if such a bolt already exists.
Next, you need to build a simple rivet maker, with which you can roll the rivet. To do this you should select:
- a steel bushing, for example, from a nut with a slightly larger diameter than the already mentioned bolt;
- at least 2 washers with a hole diameter corresponding to the bolt diameter;
- a small bearing (some craftsmen consider the bearing to be superfluous);
- a nut that matches the thread size of the already specified bolt.
A homemade riveter is mounted as follows:
- screw a nut onto the bolt;
- install the washer;
- install the bearing;
- put the washer back on;
- put on the bushing, which can be covered with another washer.
To make a homemade device for installing blind rivets, you will need the following materials and tools:
- steel pipe with a diameter of 5 cm;
- long bolt with a diameter of 8 mm;
- nut for the previously mentioned bolt;
- welding machine;
- grinder, drilling machine, drills.
In addition to the need to install a threaded or blind rivet fastening metal or other parts and structural elements, there may be a need to install a rivet as an accessory on clothing or shoes. Tools for such an operation do not have to be made from scrap materials; they may come in handy:
- screwdrivers: Phillips and slotted;
- pliers;
- hammer;
- a bolt or piece of steel bar with a flat ground end;
- a piece of steel tubing similar in diameter to a rivet.
A variety of accessories used for clothing are made of relatively soft metal and have a small thickness; riveting them does not require much effort.
How to make rivets on metal
In industry, one of the main operations is the connection of structural elements and parts.
One way is to connect using rivets. It is used when it is not possible to weld structural elements, and has many advantages over it. To perform this technology, there is a special tool for riveting rivets.
What is a riveter and its types
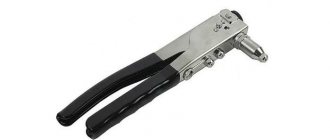
A riveter is a special tool (pliers) that works on the principle of a gun, which is designed to connect structural elements and their individual parts when their thickness during connection does not exceed 10 mm.
Basically, with the help of such a mechanical gun, parts are fixed from the inside. The manual riveter is a lever tool in the form of a pistol, consisting of 2 parts:
- a spring mechanism designed to pull the rivet inward;
- lever system used to create force.
There are two types of rivet tools on the market today: threaded and pull-out.
Pull tool
Threading tool
A manual pull-type riveter works by using a pulling force to secure the rivet. Under the action of the lever force, the rivet rod is drawn into its tubular part and is pushed apart by the head of the rod. On the outside, the rivet head is also flattened and creates a strong fixation of the parts.
The principle of operation of a manual threaded riveter is the same, only the retraction of the ball in the working part occurs not due to force, but by rotating the thread in the tubular part of the rivet. That is, it uses a method of fixing the head by twisting the handle. This method is not used often and is mainly necessary for fixing parts that have a small thickness.
Nozzles of different diameters and tail lengths are usually sold complete with the gun.
:
Types of drive for riveters and their cost
Based on the type of drive device, riveters are divided into:
- pneumatic;
- mechanical (manual);
- electrical;
- battery;
- pneumohydraulic.
The most popular devices in everyday life are those with a mechanical drive. Such instruments have two modifications. One involves working with one hand, and the other with the power of using two hands.
“One-armed” devices also include a model of an instrument called an “accordion.”
The cost of riveters depends on the manufacturer, connection method, model, and drive device. Promoted brands of tools are more expensive than products from unknown manufacturers.
Also, pneumatic, electric, pneumohydraulic and battery devices are much more expensive than manual ones, because they have a more complex design. They are mainly used on an industrial scale.
:
Blind rivet device
To understand how to use a manual pull-type riveter, you need to know the structure of fasteners, which are rivets specially designed for this method of fastening.
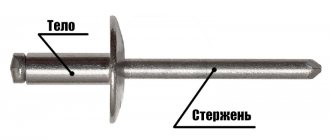
Such a rivet is a fastener consisting of two elements: a hollow cylindrical tube with a head at the end and a metal rod. The hollow cylinder is called a rivet body (bushing). The diameter of this cylinder indicates the size of the rivet hardware.
The hollow hole inside the cylinder extends through the entire body, including its head. The metal rod looks like a nail with a rounded head. It is inserted into a cylindrical hole and retracted until the head stops using a latch.
Threaded rivets , intended for a manual pull riveter, have a thread inside a cylindrical body. The rod is also threaded and is inserted into the cylinder by screwing.
To create a strong connection, a bolt or screw is most often screwed inside. Sometimes such a rivet is called a blind rivet. It is considered more durable than just exhaust.
Blind rivets are made from different materials. Steel, aluminum or copper alloys are used for the sleeve. It is very important that the sleeve material does not cause corrosion of the metal from which the parts being connected are made. This means that when they come into contact, they should not form a cathode-anode pair.
The rod must be made of steel, the strength of which far exceeds the strength of the body. The rivet body cylinder can have different diameters and lengths. These dimensions are the main characteristics of such products. They are paid attention to first of all when choosing. The diameter of the cylindrical body must correspond to the holes for fasteners.
In order for the cylinder to fit freely into the hole, it must be slightly larger than the diameter of the rivet body. Typically the error is 0.1 – 0.2 mm. The length of the body should consist of the total thickness of the parts being connected and an allowance for the amount of riveting. An allowance of up to 1 mm must be provided for this.
Connection stages using a riveter
How to use a riveter can be seen using the example of manual fastening of parts. The connection process must be carried out in the following order:
- surface preparation;
- marking and drilling holes;
- installation of fasteners.
Preparation of surfaces includes their careful leveling so that the parts rub together as much as possible.
In order to accurately drill holes without displacement, they need to be placed on a flat plane, it is better to take a piece of wood, and securely fix it on it. Then mark the locations of the holes. After this, they are drilled using a drill, maintaining maximum positional accuracy on all connected parts.
To ensure that the hole size meets the required parameters, you need to take a drill with a slightly larger diameter. For example, to produce a hole with a diameter of 3.8 mm, the drill must have a diameter of 4 mm.
After drilling the holes, you need to “try on” the selected fasteners. The head of the rivet should fit snugly against the surface around the edge of the hole and completely cover it.
Installation of rivets
Installation of rivets is carried out as follows:
- the cylindrical body of the rivet is inserted into the drilled holes of the parts being connected;
- the rod passing through the entire body is grasped by the lips or the riveting head of the rivet tool at the base of the cylinder head;
- with the help of force, the rod is gradually pulled through the body of the rivet, expanding it with its cap (head) and deforming the end of the cylinder. In this way, the reverse wide part of the rivet is formed on the inner surface of the connected parts.
- When the force of the riveter reaches a certain value and the connection of the parts is strong enough, the remains of the elongated rod are broken off.
When working with a manual riveter, as a rule, several pressings of the lever are required to achieve the desired result. After the process is completed, one side of the joint will have the head of the rivet body, and the other will have the flattened end of the cylinder in the form of petals.
:
PS Now you can easily connect workpieces using mechanical pliers.
Using a Chisel
The method described above is good in cases where the work needs to be done as carefully as possible, and you have a drill and a set of drills at hand. But sometimes, if the aesthetic component is not too important or when there are no power tools at hand, you can use another method, for example, knocking down the rivet head with a chisel.
Blind rivets are made from alloys of non-ferrous metals or mild steel, so “cutting off” its head with a chisel is not at all difficult. To remove the fastener, the cutting edge of the tool is inserted under the edge of the head, and then struck with a hammer until the top of the hardware is removed. The remains of the rivet can be knocked out with a punch of the appropriate size. It is worth saying that this method is not gentle on the elements being connected and, if the metal around the rivet has been painted, the coating will inevitably be damaged.
Application of a riveter
- The blind riveter is used for joining any materials that do not require high reliability;
- When connecting soft workpieces - for example plastic, metal washers are placed under the bushing;
- If the connection is hinged, a bushing is installed in the hole, washers are placed on both sides, then a rivet is attached;
- It is possible to carry out work in cases where the back side of the connection is inaccessible in principle. For example, if you need to rivet a part to a profiled pipe.
Procedure
Cylinder mechanism
As already noted, there is no need to remove this lock from the door. Only a few simple manipulations are performed:
- Removing the armor plate (not always installed).
- Turn the key until it stops (the tongue must be completely recessed).
- Removing the protective trim (attached to the end of the door leaf).
- Unscrewing the locking screw.
- Removing the larva. If it does not pull out, you should turn it slightly with the key so that the tongue coincides with the slot of the well.
- After installing a new larva, all actions are performed in reverse order.
Level mechanism
Here we are no longer talking about partial repair of the constipation, but about its complete replacement. Although there are options. If the product is imported, then it is quite possible to change the core with recoding of the levers (internal pins that ensure the level of secrecy). Some manufacturers supply the market with spare parts with a set of keys “for them”.
The algorithm of actions is the same, but there are some differences:
- the locking mechanism will have to be removed completely. The procedure for disassembling it is indicated in the attached instructions;
- In order to remove the lock, you must first remove the handles.
Crossbar mechanisms
In this case, knowledge of how to change the lock on a metal door of a simpler design is clearly not enough. Depending on the model, there are several stops, and they can come out of the canvas in different places - both on the side, at the bottom, at the top. It is their presence that significantly complicates the work; if possible, it is better to remove the sash.
- The canvas is laid on the floor.
- It is partially disassembled to provide access to the internal mechanisms. By the way, it is not always possible to do this on your own with Chinese doors, and therefore you will have to contact a specialist.
- The thrust of the crossbars is weakened.
- They are disconnected from the locking device.
Further, everything is similar to the procedure for dismantling/installing a lever or cylinder mechanism.
Countersunk rivets
Similar elements have other names - impact, driving. Riveting with this part is carried out in several cases:
Rivets can be riveted overlapping, end-to-end, as well as using the chain and staggered method.
For more information on hammer rivets, watch the video below.
Source
Brief description of the riveter
Many experts remember that until quite recently the principle of joining metal with rivets was characterized by many disadvantages and technical nuances. That is why it was almost impossible to perform this procedure at home. Initially, it is worth noting that the riveting process itself was accompanied by a huge number of different technological difficulties, which made it very difficult to make a high-quality connection.
To install the rivet in the right place, the craftsmen had to make titanic efforts. In addition, it was not always possible to securely fasten on both sides of the material being processed. That is why specialists were often interested in the question of how to fasten a rivet without a riveter, having only improvised devices at hand. But in practice, this procedure was particularly difficult, since flaring takes a lot of time and effort.
Against the backdrop of these disadvantages, numerous specialists from different countries worked to create a high-quality and easy-to-use tool for solving such problems. Thanks to this, a manual type of riveter has appeared on the mass market, which is distinguished by its compactness and versatility. The main advantage of this tool is that it guarantees reliable connection of metal workpieces with minimal effort on the part of the master.
A high-quality rivet tool is distinguished by its versatility and simplicity; it is very easy to use. It allows for unobstructed access to the connection, without any auxiliary devices. Separately, it is worth considering that to work with a rivet device, it is necessary to pre-drill a small hole in a metal workpiece to install the rivet. The fixation will be performed by the main tool.
Experts say that the specifics of this work are distinguished by their simplicity, thanks to which even a beginner can now cope with it. It is also important that you can buy a tool for riveting rivets at a very affordable price.
Selection of rivet sizes
Rivets are selected based on the thickness of the metals being connected. The following are important: the parameters of the embedded head and the diameter of the rod. The diameter of the rod determines the diameter of the drill, which is used to prepare a hole in the parts to be joined. You can approximately determine the diameter of the rivet by doubling the thickness of the parts being connected. The length of the rod is at least 2 times the diameter of the rivet, and the protruding part must be at least 1.25-1.5 times the diameter.
| Rivet diameter | 2.0 mm | 2.3 mm | 2.6 mm | 3.0 mm | 3.5 mm | 4.0 mm | 5.0 mm | 6.0 mm | 7.0 mm | 8.0 mm |
| Hole diameter for precision assembly | 2.1 mm | 2.4 mm | 2.7 mm | 3.1 mm | 3.6 mm | 4.1 mm | 5.2 mm | 6.2 mm | 7.2 mm | 8.2 mm |
| Rough hole diameter | 2.3 mm | 2.6 mm | 3.1 mm | 3.5 mm | 4.0 mm | 4.5 mm | 5.7 mm | 6.7 mm | 7.7 mm | 8.7 mm |
In general, the diameter of the rivet rod can be from 1 mm to 36 mm, and its length can be from 2 mm to 180 mm. Moreover, a larger diameter does not equate to greater joint strength. Here, both the material from which it is made and its type (hollow or solid) play a role. How to choose? According to the characteristics of the rivets. After all, you choose them to connect certain materials of a certain thickness. You know approximately the load that will be applied to the connection
Therefore, when selecting, pay attention to what the manufacturer recommends
How to select a rivet according to the thickness of the material being fastened? According to the manufacturer's instructions, but in general, the diameter of the rod should be at least twice the thickness of the materials
Recommended diameter for connection. All you have to do is select a drill and make a smooth hole without burrs. Minimum and maximum thickness of the connected package
It is important that your connection is within the specified range. Shear force. This is the load applied perpendicular to the connection that the rivet can withstand without destruction. Breaking force
Under what load along the rivet will it fail?
It is the tensile and shear forces that determine the strength of the future seam. The higher these values, the greater the load it will withstand.
Removing a construction rivet
It is difficult to call this action dismantling as such. This is removal. To remove the rivet, you will need the regular rivet gun that was used to install it. But since you don’t have one at hand, it’s worth figuring out how to rivet a rivet without a riveter.
You can try to remove rivets in which the head or bent part protrudes above the plane of the riveted parts with a sharp chisel and hammer:
- Place the cutting part of the chisel exactly under the head (or bent part).
- Hit the chisel with a hammer. Some large rivets may take several hits to break off.
- Once the head (or bent part) is torn off, all that remains is to remove the rivet from the hole. This can be done by pushing it out with a nail or other thin object (for example, a screwdriver).
But more often you cannot get to the caps and curved parts, since they are, as it were, in the body of the parts being fastened. At the factory, special grooves are drilled for the caps and expanding parts in the parts, and then the rivets fit into the metal like a glove. How to rivet rivets in such a “tricky” case?
Here a screwdriver (or drill) with a metal drill selected for the diameter of the rivet will come to the rescue. Proceed as follows:
- Using a core, make a notch on the head of the rivet so that the drill does not wander, although some are accustomed to doing without serifs.
- Place the screwdriver bit on the head and drill out the inside of the rivet.
- When the drill goes through, the remains of the head and widened part fall out on their own.
Dimensions
The size, type of head and even strength are influenced by various factors. Among them, we can note the type of loads acting directly on the rivet, the thickness of the material with which the work is carried out, and its type. The location of the product also plays a role. For example, if we are talking about rivets with a countersunk head, it is advisable to use them in cases where it is necessary to ensure aerodynamic smoothness of the surface. Universal ones can be used in various situations.
Do not use too thick products when riveting thin sheets. This may cause the surface around the head to swell. If, on the contrary, you take a rivet that is too small, the fastening will not be strong enough, due to which it may not withstand the imposed loads.
When choosing the size of the rivet, it is recommended to follow the main general rule. It states that the diameter of the product must be at least 2.5 - 3 times the thickness of the most voluminous of the sheets with which the work is being carried out. For example, in the aviation industry, rivets with sizes of 2.5 - 9.5 millimeters are most often used. If the diameter is smaller, such products are prohibited from being used for load-bearing structures.
However, this is not the only possibility for determining dimensions. Another way looks like this.
For example, when covering 1 millimeter, the unit is multiplied by 3, the result is 3.0. That is, the further diameter of the rivet has a size of 3.2 millimeters.
If we talk about standard sizes, they will depend on the type of rivet. Hammer products have a diameter of 1 - 10 millimeters and a length of 5 to 20 millimeters. Exhaust ones with a diameter of 2.4 - 8 can be significantly longer, 6 - 45 millimeters. Threaded rivets have indicators of 3 - 10 and 8.8 - 22 millimeters, respectively. They can have either a countersunk or a universal head.
The video below shows several methods of fastening using aluminum rivets.
How to remove a rivet
Rivets are one of the most primitive types of fasteners. They are used to join sheet steel and tin, as well as plastic and even leather. The connections made using rivets are very strong and removing the rivet is an extremely difficult task. In fact, in order to remove the rivet you need to cut off its head, otherwise nothing will work. And it certainly won’t be possible to use this rivet again later. It will only be allowed to throw it away.
You will need
file, chisel, pliers
Instructions
1. The difficulty in removing rivets also lies in the fact that you need to be extremely careful and tidy so as not to damage the surface from which you are removing it. Rivets are made from various materials with different properties and varying strengths. Therefore, choose the removal method primarily depending on the material.
2. Most likely, you will need a lot of time to work, so be patient and have the necessary tools. For tools, prepare a file, chisel, pliers, perhaps even a drill with a thin drill bit. In short, get virtually every choice of tools, since you may need any of these tools.
3. If you are removing a rivet from a metal or similar surface, first use a file. This will be acceptable as long as the head of your rivet itself is above the surface it is joining. If the file does not give the expected results, use a chisel. But be careful, try to scratch the surface as little as possible and not hurt your fingers.
4. Because rivets are not only made of different materials, but also come in different types, the approach to removing different types will also be different. So, if the head is not located naturally above the surface for which it serves to connect, but has a countersunk head, use a drill instead of a file and chisel.
5. The drill must be thin, but it must be strictly selected in diameter. First, carefully drill out the countersunk head of the rivet, and then select a rod or similar tool, most importantly, so that it fits correctly in diameter, and try to knock out the head.
6. Once you have mastered the head, carefully use pliers to bend the teeth and pull out the rivet shank. Process the edges of the hole that remain after the rivet using a method appropriate to the material.
7. If the rivet needs to be removed from a leather product, everything will be more difficult if it is important to you how to damage the surface of the material as little as possible. In this case, only pliers will do. Carefully squeeze the head in several places, and then try to loosen it.
8. If possible, carefully bend the teeth of the rivet and pull out the rod. If the rivet does not give in, pull its head slightly upward from the material with pliers and file it with a file. And then proceed according to the same scheme.
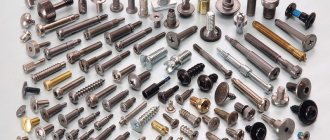
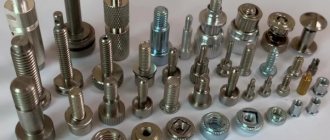
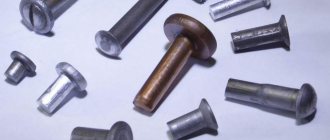
Types of rivets
What is a rivet? It is a cylindrical rod of ductile metal (may or may not be hollow) with a shaped head at one end. This head is called a mortgage. During the installation process, due to the flattening of the metal of the rod on the second side, a second head is formed. It is called closing (closing).
There may be composite rivets (such as the popular blind or screw rivets), which consist of a body and a shank. But this does not change the essence: the embedded head rests on the material, and at the other end, due to the plasticity of the metal, a second head is formed. It is simply formed due to the fact that the rod is extended and the expanded part crushes the second part.
Types of cores and embedded heads
Rivets differ in the shape of the head and the shank. According to the type of rod they are:
- with a solid rod (high load capacity, but difficult to install);
- semi-hollow (part of the rod near the embedded head is solid, part is hollow);
- hollow (the head and rod have a cylindrical solid hole, they are easily riveted, but cannot withstand high loads).
Types of rivets by type of rod and head
Rivets have the following types of heads (pictured above):
- Semicircular (high and low). Sometimes also called spherical. The most reliable, create a strong seam.
- Cylindrical and conical (flat). Used if the connection is in an aggressive environment.
- Secret and semi-secret. Installed when fasteners should not protrude above the surface. The most unreliable connection, used only when necessary.
Different rivets can be installed nearby
Each type of embedded head is found with each type of core. They are selected depending on the planned load. For maximum loads, hardware with a solid rod and a semicircular head is needed. Hollow seams can also be used for seams that are not too loaded, but they do not provide tightness. If such a characteristic is important, then semi-hollow ones are installed.
Types of rivets
Despite the fact that welding has become accessible even to a layman, riveting does not lose popularity. After all, not all metals can be welded, and the welded seam is susceptible to corrosion. Therefore, new varieties of rivets are constantly appearing, so there is definitely no complete list. Let's look at the main and more popular ones.
- Classic or ordinary. Universal, used for all types of seams. They can be distinguished externally - they resemble fungi.
- Semi-tubular (the rod is half hollow). They require less effort during installation, but their strength is low. Used in connections with low mechanical load.
Classic and threaded rivets
Nut and rivet rivets
These are the main types of rivets that are used in construction, mechanical engineering and other fields. Each species has its own subspecies that differ in nuances.
Blind rivets
Let's say a few words separately about blind rivets. They are used for fastening corrugated sheets and metal tiles. These are the ones you most often encounter when arranging a site. The blind rivet consists of a tubular body and a solid rod inserted inside. They are called composite because they have two independent parts. Also, this fastener is reinforced - after installation, part of the rod remains inside, which increases the strength of the connection.
How does a blind rivet work?
The length of the blind rivet body must be greater than the thickness of the parts being connected. It is inserted into a hole made in advance, after which the riveter grabs the rod and pulls it through the hollow body. At the far end of the rod there is a ball that forms the closing head from the flared edge of the body. The excess rod is removed with a tool, but some of it remains inside, which makes this connection quite strong.
As is clear from the description, it is important to choose the correct rivet size. Too short will not allow a normal bead to form, which will weaken the connection. A body that is too long will give a lot of play, which is also not good. So when selecting this type of fastener, carefully look at the recommended thickness. Ideally, your connection is in the middle of the range.
Read also: Synthetic oil for 2-stroke engines
Rivets for joining loose and soft materials
The hardware listed above is not suitable for joining soft and plastic materials - plastic, chipboard. There is another type of similar fastener for them. It is not as large in size and less durable. But, during installation, less force is created so as not to destroy the materials.
There are the following types of rivets for joining plastic or soft materials:
- Petalaceae. When installed, the rivet body opens into several petals. The large contact area of such a closing head allows the load to be redistributed.
Such rivets can be placed on plastic, fiberboard and other “non-metals”
There are also plastic rivets. They are usually made for furniture, sometimes for fixing decorative panels. These rivets are more like screw rivets. The lower part is cut into several petals; inside there is a thread through which the rod is screwed. As it twists, the rod pushes the body apart, which is held in place by friction.
Types of hand tools
Today there are two types of manual riveters: pull-out and threaded, the difference in price is not big.
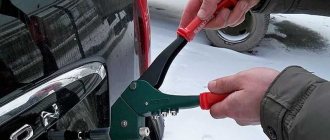
To answer the questions: how to choose a manual, pull-out or threaded riveter, which tool is better, you need to understand their operating principles.
When using a blind rivet gun to fasten a rivet, a certain traction force is created.
In metal blanks that will subsequently be connected to each other, you need to drill a hole whose diameter is equal to the diameter of the rivet. After this, fix the rivet on the device, insert it into the hole and squeeze the tool handle.
During operation of the blind riveter, the rivet is expanded by a special ball, which, when the handle is pressed, enters the tube.
Thus, the outer side of the rivet is flattened, which allows the parts to be connected to be firmly fixed to each other.
A manual thread riveter is also suitable for home work. Its operating principle is almost the same as that of the previous mechanism. The only difference is that in a threaded riveter the ball is retracted due to the fact that the cut thread rotates.
This type of connection is more optimal for thin-walled parts, where it is quite difficult to cut threads, but this type of connection is needed.
When a threaded manual riveter is used, it is possible to screw a screw or bolt into the rivet.
In most cases, manual riveters are purchased for home use; they are still more functional and versatile, and at the same time they cost a little less than threaded tools.
How to make rivets on metal?
In industry, one of the main operations is the connection of structural elements and parts.
One way is to connect using rivets. It is used when it is not possible to weld structural elements, and has many advantages over it. To perform this technology, there is a special tool for riveting rivets.
Manual riveter, how to use it and how it works
Many have seen this device in stores selling tools, but not everyone knows how to use it. Those who have never held a blind riveter in their hands simply will not be able to appreciate the convenience and versatility of its use.
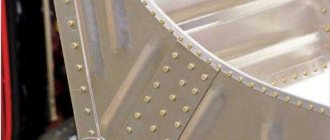
Rivet joints have been and remain a universal and inexpensive way to join various parts. In shipbuilding and aircraft construction, this is generally the only way to attach the skin to the frame.
A classic riveting looks like this:
This is exactly how they riveted the hull of the Titanic and the handle to your frying pan.
Modern technologies have also touched upon this ancient method. In everyday life, few people use a hammer and a crimping attachment. There are semi-automatic tools that allow you to rivet parts to each other almost with one hand. True, the rivets look a little different.
Removing the rivet using improvised tools
As we have already said, the basis for dismantling any POP rivet is to machine the hollow section of its head until it comes off the shank. This simple but very precise operation can be performed using a thin chisel or flathead screwdriver, as well as a hammer. The sequence of performing this work is as follows:
- First of all, it is necessary to determine the thickness and material properties of the sheets connected by blind rivets. Knowing the parameters of the metal, you can accurately select tools and approximately calculate the maximum permissible force during dismantling. When working with very thin sheet material, our method can hardly be called optimal and can only be used at your own peril and risk.
- To remove the rivet, place a chisel or the tip of a screwdriver between the side of its head and the sheet and, gently tapping it with a hammer, bend it. The thinner the material connected with fasteners, the more delicately you need to treat the work. You should also carefully consider the choice of tool - it should be thin enough so that it can be carefully driven under the side.
- If the removal of the fixing part of the hardware was successful, you need to carefully remove the fastener from the through hole. For this purpose, it is best to use a thin screwdriver or a thin metal rod of suitable diameter. Your task in this case is simply to push the tail of the rivet out of the hole. Most often, this is possible without much effort, but sometimes you may need a hammer again - one or two blows on a screwdriver or rod aimed at the leg of the rivet will help push it out of its “home” place.
This method is good because it can be used even where connecting electrical tools is impossible - it is often used when performing work in the field.
Rivet strength
When repairing structural elements of an aircraft or boat, the strength of the rivets installed is of primary importance. If during repairs rivets are used that have lower strength than the original, “original” rivets, then they must be larger in diameter to compensate for this “lack” of strength
For example, 2024-T4 alloy rivets can be replaced with 2117-T4 or 2017-T4 alloy rivets only if the rivets are used in a larger size.
Rivets made of alloy 2117-T4 are used for general aircraft repair work, since they do not require preliminary heat treatment, are very ductile and at the same time quite durable. In addition, these rivets have high corrosion resistance when used with most types of aluminum alloys.
Where to start
Going straight to the store, as they say now, is counterproductive. First of all, you need to figure out what is really necessary - to change the lock on the iron door or its cylinder. In the latter case, everything will come down to small costs, both in money and time.
Steel doors are usually equipped with lever or cylinder locks. The keys to the first ones are a rod, at the end of which there is a plate with cutouts. Here you will have to think about how to replace the lock on a metal door, since it does not have the usual security insert.
If the model is cylinder, then in most cases it is enough to install a new cylinder. Locking devices of this type are supplied with a flat key with teeth along the entire length of the working part. This is a simpler repair option.
Semi-hollow rivet how to rivet
The invention relates to metal forming and can be used in the manufacture of semi-hollow rivets on cold heading machines. After cutting the rod blank to a measured length, it is deformed in several transitions. In this case, calibration with basting extrusion, direct extrusion with obtaining a blind cavity at one end of the rod, reduction in the matrix and final design of the rivet head are sequentially carried out. Reduction is carried out in a matrix with a conical deforming part. In this case, a stepped semi-finished product with a conical transition surface between the steps is obtained. There is a blind cavity at the end of the smaller step. 1 ill.
Removing the blind rivet
Everyone knows that a rivet is a disposable fastener that is used to securely fasten two or more elements. For a number of reasons, situations may arise when it is necessary to rivet a rivet. In this case, only available tools will come to the rescue, since there is no specialized device.
You need to start riveting by removing the ring that formed when the fastener was fixed. If the craftsman has such an opportunity, at the moment of compression of the material of the structure, it is necessary to insert a metal saw blade. In this case, the fasteners can be cut off and the spire removed by pulling it out by the rod. If you can’t cut or saw down, then you can use a method that has been proven over the years - a drill.
As practice shows, the countersunk ring can only be removed by drilling, and the heads can be carefully knocked off with a hammer. It is worth considering that this method is applicable only if the strength of the fastened material is greater than that of the fastenings themselves. In addition, the procedure itself is considered traumatic, since there is a high risk of damaging fingers.
Originally posted 2018-04-18 12:28:24.
Hammer rivets in a wide range in our company
A special place in our company’s assortment is occupied by rivets of various types and modifications. We have hollow, copper, brass, aluminum, steel, and hammer rivets at the most affordable prices. The latter type is widely used in mechanical engineering. Experts and practitioners also call it “impact”, since the formation of fasteners when using it occurs from impact.
The best domestic and foreign manufacturers today provide us with products of any modification. Hammer rivets are made not only from pure metals, but also from alloys. The combination of different materials improves the characteristics of the product.
There are a wide variety of such products available. They differ in the method of installation and purpose. A product such as a hammer rivet is widely used in the automotive industry, and pull-out models are mounted using riveters, and are most often used for fastening sheet metals and products made from them.
A wide variety of hammer rivets are used in construction for fastening facing materials to frames and load-bearing joints, in mechanical engineering - in various units and elements of machines, in aircraft construction, in the production of various household appliances and electronics - from washing machines to computer cases.
They are used for permanent connections, and a product such as a hammer rivet is used in connections that must be highly resistant to mechanical loads. Products made of non-ferrous metals are resistant to corrosion, so they are used in connections of structures, structures, instruments and mechanisms that can be used in various aggressive environments.
Hammer rivets are produced in different strength classes, types of heads, and their model ranges also vary in diameter and length. There are various types of fasteners on the market, only a very small part of them are listed here.
works with the best domestic and foreign manufacturers of fasteners, and in the company’s catalog you can find products of any modification. And the hammer rivet is represented in one of the widest model ranges. We offer an individual approach to each client. Also at your service is prompt delivery of the ordered goods not only in St. Petersburg, but also in other regions of the Russian Federation. The highest quality of fasteners from leading manufacturers is guaranteed. For more information, use contact numbers, 8 (812) 600-40-71 or.
Watch the video
Power supply for a beginner radio amateur
Site headings
- Aviation
- Auto and motorcycle
- Army and Navy
- Archeology
- Animals
- Health
- Celebrities
- Games
- Interesting
- Internet and computers
- Story
- Space
- Crime
- Cooking
- Culture and art
- Fashion & Style
- Music
- Science and technology
- News
- Society
- Hunting and fishing
- Policy
- Nature
- Psychology
- Travel and leisure
- Entertainment
- Religion
- Rodnoverie
- Needlework
- Garden
- Homemade products
- Sport
- Construction and design
- Secrets and myths
- Economy
- Humor, jokes
- Sandbox
When I play Topigr, I would like us to be completely free of problems, and not bess.
Now there is so much that is inexplicable in the world that mom, don’t worry.
Pindos, admit that you have not been to the moon and we will leave you behind.
Basque is the same banderlog as Rotaru! Basques, why aren’t you going to perform in Crimea and Donbass?
The so-called “truly great star” sponsored the genocide of Donbass! Let him speak.
Another pig returned to his pigsty. Donbass has become cleaner.
I agree 90% with the author’s opinion. Here is the opinion of a.filipovic. I still don’t understand who it is.
This is not a sandstorm. The sea receded with the wind and the wind raised the sand.
DIY chaise lounge chair made from planks
The information and entertainment site “Labuda” is daily, operational, relevant, interesting news and useful information from different spheres of life.
Full or partial copying of labuda.blog site materials is permitted only if an active and indexable hyperlink to the publication source is indicated.
legal information
Dear authors, remember that the publications you post must not violate the laws of the Russian Federation and the copyrights of third-party resources.
*Extremist and terrorist organizations banned in the Russian Federation and the Republics of Novorossiya: Right Sector, Ukrainian Insurgent Army (UPA), ISIS, Jabhat Fatah al-Sham (formerly Jabhat al-Nusra, Jabhat al-Nusra"), National Bolshevik Party (NBP), Al-Qaeda, UNA-UNSO, Taliban, Majlis of the Crimean Tatar People, Jehovah's Witnesses, Misanthropic Division, Brotherhood "Korchinsky, "Art preparation", "Trident named after. Stepan Bandera", "NSO", "Slavic Union", "Format-18", "Hizb ut-Tahrir".
How to install a hammer rivet correctly
Solid rivets are an excellent way to join two sheets of metal without welding. Due to its numerous advantages, this type of fastener is widely used both in production and at home. Rivets are often used when performing roofing work, repairing household utensils or car bodies. Externally, a solid rivet resembles a screw without threads and a slot on the head. The material for its manufacture can be either steel or non-ferrous metals and their alloys, such as aluminum, copper or brass. Manufacturers produce this type of hardware with hemispherical, flat and cylindrical heads. There are many ways to install rivets, but, regardless of the technology used, they all pursue the same goal - deformation of the lower part of the working rod, creating a thickening on it that holds the fastener in the material. We have selected the most effective ways to work with rivet joints, which will allow you to get the job done quickly and efficiently.
READ How to install touchwiz skin on Android
Manual riveter: how to use
Using hand tools is easy and does not require any special skills. A properly purchased mechanism will do this job efficiently and quickly. The price when buying a tool should not play a big role, the main thing is to choose a good quality model. This will allow you not to worry about the tightness of the connection and the failure of the tool.
You just need to drill the holes correctly so that the diameter exactly matches the diameter of the rivet itself. We have already described the work of the riveter in detail above. After work, all that remains is to process the reverse flattened side of the rivet, that is, remove the resulting excess with pliers.
What material should the rivet be made of?
Rivets are usually taken from the same material as the parts being connected - this avoids electrochemical corrosion. Pay attention to strength characteristics. But, as a rule, when connecting aluminum parts, the strength of aluminum hardware is sufficient.
In general, rivets are made from the following metals:
When connecting copper parts, it is permissible to install brass and copper. Aluminum is joined with aluminum alloys. Steel sheets - corresponding grades of steel rivets. There are also mixed hardware - from two different metals (chemically non-conflicting). The most common are aluminum-steel.
To install facade elements, slopes, ebbs, metal tiles and corrugated sheets, rivets made of galvanized painted steel are usually used. Painting - matching with details.
Source
What to focus on
Rivet material
If it is aluminum, then it is easy to work with, so it does not matter which “riveter” you choose. It is more difficult with steel, so the device should be selected more powerful
Ease of use
Firstly, the instrument can be one- or two-handed. Naturally, the latter can create greater pressure, so it allows you to work with fasteners made of any material, of different sizes. Although in some cases (for example, limited space) you can only use one-handed.
Secondly, the head design. If it is rotatable, then this creates additional convenience. Sometimes you have to rivet in difficult areas (in “inconvenient” places), and this feature of the tool is very helpful.
Third, are there interchangeable attachments for different sizes of fasteners? There is no need to comment on this.
Adaptations
Some models have a special “container” where “waste” is dumped. For example, when you have to rivet a roof or build a fence from corrugated sheets, small pieces of metal scatter to the sides. If they find themselves in the grass (sand, on the ground) around the place of work, then problems cannot be avoided, especially with children - they like to run around barefoot in the summer.
Some “home craftsmen” prefer not to think twice about which tool to buy. If the amount of work is insignificant, buy a couple of cheap models at once. If one breaks, there is always a spare at hand. And 150-200 rubles is not that much money to go around and ask the price. Although this point of view does not suit everyone, it also has a right to exist.
There is another opinion. It’s better to buy a professional model for 700 rubles, and this will guarantee that it will last long enough. Moreover, perhaps the riveter will be needed more than once.
It is also necessary to take into account such a factor as the owner’s accuracy. We do not claim to be the author of the thought, but, nevertheless, let’s say that anything can be broken, no matter how much “it” costs. Therefore, you should not trust too much people’s reviews about a particular model, especially strangers.
Considering the above, one should not be surprised at the opinion of professionals that choosing a manual “riveter” is akin to a lottery - you cannot guess whether you will be lucky or not.
Many industrial products use rivets as a way to securely and quickly fasten an assembly that will not be disassembled in the future. Thin sheet metals are often joined this way. If you have a need to remove the rivet without damaging the surface of the product, then I will offer three accessible methods to achieve the desired result.
It's simple - How to install rivets yourself || STROIM-GRAMOTNO.RU
I hope it will help you understand how and what to do.
What types of riveters are there:
Regular inexpensive model
Take, for example, the cheapest option from Stayer - the very first photo.
Its cost is 300 rubles.
It supports all rivet diameters (2.4 mm, 3.2, 4 and 4.8 mm), so you can select the most suitable rivet diameter for the materials being fastened.
For example, thin rivets with a diameter of 2.4 mm are intended for fastening sheet material with a total thickness of up to 5 mm. Of course, there is also such a parameter for blind rivets as length. The longer the rivet, the thicker the material that can be fastened.
I bring to your attention a table of the relationship between the size of the rivets and the thickness of the material.
Riveters with a rotating “head”
It differs from the usual one in that the “head” of the riveter can be rotated 360 degrees. This is very helpful when working in hard-to-reach places, where ordinary people cannot reach. True, it costs more, about 350 rubles. We are also considering the Steyer model.
Reinforced models (two-handed)
For people who work as riveters all the time, they produce power versions.
They differ from ordinary ones in that they squeeze it with both hands, which saves significant effort. Imagine that you need to rivet 500 rivets. It will be difficult to complete such a volume of work with a regular riveter, but with a reinforced one you can rivet everything much faster and without strain. What a reinforced one looks like is in the photo below.
Professional models with extended service life
In addition to household models for home work, there are also professional ones on sale. They differ from household ones in better quality and longer service life. For example, a model from kraftool. A regular, non-rotating model, but costs significantly more. In the photo below, the Kraftul riveter - price 400 rubles.
All riveters come with 4 interchangeable fittings for different rivet diameters. They are changed using a special key, which is also included in the kit.
Rivets are usually sold in small packages of 50 pieces. Rivets vary in diameter and length; the thicker and longer the rivet, the more expensive the packaging. For example:
- 3.2*6 mm - price 26 rubles
- 4*12 - cost 35 rubles
- 4.8*16 — 50 rubles
When purchasing consumables, do not forget that rivets are needed for the rivet maker, pull rivets. Otherwise, stores also sell regular ones that are riveted with a hammer.
Main Applications
Many will agree that no repair work is complete without a riveter. The versatility of this hand tool is considered most in demand in cases where it is necessary to connect several workpieces, and the use of other fastening methods is impractical. As practice shows, this device is most often used to connect various fasteners.
As for the lever riveter, the working mechanism itself is presented in the form of a pistol and consists of two parts. The main work is performed by a spring mechanism that pulls the rivet into the inside of the tool. Then the lever system flattens it evenly. The unique structure of the manual lever riveter allows you to connect together those parts whose thickness may exceed 10 mm.
Fixing various workpieces using rivets is of high quality due to the fact that this tool contains the following technical characteristics:
- High degree of reliability. Under the action of a manual riveter, a permanent connection is created, due to which the highest degree of strength is achieved. It is worth noting that the versatility of the rivet connection was used in the construction of the well-known Shukhov Tower in Moscow, as well as the Eiffel Tower in Paris. But these architectural beauties have existed for decades. This once again proves the effectiveness and reliability of using rivets.
- Good resistance to vibrations.
- Preparation for installation of rivets is carried out as quickly as possible. The operation of the hand tool lasts only a few seconds, which significantly speeds up the pace of riveting work.
- Unlike welding seams, rivets do not burst or crack. When the connecting element is exposed to an unfavorable factor, it begins to stretch, so that existing faults can be seen in a timely manner and quickly eliminated.
- Unlike screw connections, rivets are much cheaper because they are small cylindrical pieces of metal.
It is worth noting that today several types of rivet mechanisms are produced, which can have both simple and complex shapes. For example, on sale you can find universal rotary heads that can be used in the most difficult to reach places. As for installing rivets, this process only takes a few seconds.
Metal riveting
The process of riveting metals consists of two stages: preparatory and the actual installation of hardware. Preparation - drilling holes, countersinking for countersunk heads if necessary. Please note that countersunk heads can be on one (either) side or on both.
The riveting process itself is as follows:
- insert the rivet;
- tighten the parts to be connected;
- form a closing head using a tool;
- check and clean the connection.
This is how blind rivets are installed
With a good tool, work goes quickly. For private use and one-time work, manual riveters are usually used. And even with them, the process itself (without drilling holes) takes a matter of seconds. If we talk about installing corrugated sheets or metal tiles, it is recommended to coat each hole made with paint to prevent corrosion. It is these processes - drilling and painting - that take a lot of time.
In general, there are two ways to install rivets: cold and hot. When hot, the joint is preheated to a certain temperature (determined by the metal and the thickness of the parts). In practice, it is used when installing rivets of large diameter - 12 mm or more.
The rivets are placed in rows. The minimum distance between adjacent ones is 4 diameters; from the edge of the sheet to the center of the hardware is no less than 1.5 times the diameter of the rivet. When attaching a profiled sheet, place it in a recess, not in a wave.