How to do it?
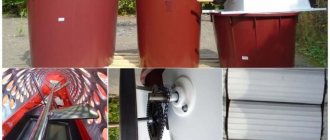
Modern models of walk-behind tractors can be equipped with a reliable plow made by yourself. Varieties of this element: double-turn, reversible, two-body, rotary or Zykov’s product. There are quite a lot of design options. There are even options in which the body is made of a gas cylinder. It’s not difficult to make a high-quality plow for motorcycles yourself if you follow certain rules.
Rotary
The manufacturing of the structure can be divided into several main stages.
Prepare a good dump in the shape of a cylinder. This must be done exclusively in accordance with the drawing. The part is made of alloy metal
It is important to follow the drawing when making the structure yourself. They put out the ploughshare. The wedges are inserted into the iron sheet (3 mm) at an angle of 45 degrees. Connect the ploughshare to the shield on the side
Be sure to ensure that the blade of the ploughshare is located just below the shield itself (1 cm, no more). Attach the blade to the ploughshare. The working half with the ploughshare is welded to the metal tube, which serves as the base, using a welding machine. On the opposite side - fasteners for motorcycles. When the plow is ready, you can weld an axle with wheels in its lower half.
Turning
The rotating type of plow is rightfully recognized as one of the most functional and practical. This design is an excellent assistant for plowing land on a site, because it can cover a fairly large area. The plow is also good because you don’t have to waste time with it after each approach. You will only need to turn the plow and move in the opposite direction. The productivity of equipment will increase significantly. The main actions are performed in the same way as in the case of a rotary mechanism, but in this case the cutting elements must be below the skid (at least 2 cm).
Disk
It is possible to assemble a disc plow for machinery with your own hands. A similar model is assembled from the following parts:
- disks;
- fist;
- axles;
- bracket;
- scraper;
- drive beam;
- pens;
- screeds.
The disks for the device can be taken from an old “seeder”, if you have one in your arsenal. These elements are installed at an angle to increase work productivity. The hiller is hung on the equipment through the coupling bracket. The T-shaped leash from the plow is screwed to it using bolts and a stopper. At impressive speeds, the hiller may begin to slip, so you will have to work exclusively at low speeds or with twin wheels.
Which design should you choose?
Do-it-yourself moldboard plow.
Plow designs are varied and depend on the types of soil being cultivated and the types of work being performed. The following modifications are distinguished:
- Ploughshares - have a working tool in the form of wedges, with the help of which the soil layer is cut, moved and painted. Used on mini tractors and walk-behind tractors in small farms.
- Disc - used on hard and heavy soils for preliminary plowing. Freely rotating knives in the form of metal disks cut the top layer, and the dump elements located further down turn the layer over.
- Rotary - a modern model of a plow, where several working knives are mounted on a movable shaft. This design provides high performance, but is difficult to manufacture independently.
The most common option is a homemade double-furrow plow with working tools in the form of ploughshares and moldboards. This model has been tested by time and the experience of numerous farmers. Such structures are often complemented by skimmers that cut off the top turf layer of soil.
Description of frame assembly work
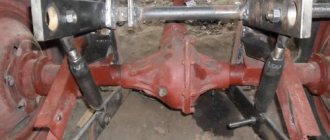
The frame is taken as the base - the guild, the drawing can be viewed below. You can make it from a piece of metal rectangular pipe with thick walls 52x40x7 mm. A fork is made for the support wheel. To do this, two wider walls are cut off on opposite sides.
The middle of the frame is marked; this is where the cross beam will be welded. In the same place, the rack-springs are attached using welding. The drawbar will be attached to them. There is a hole left on the front of the frame, the beginning of the fork. It should be welded tightly, otherwise during operation soil and debris will get into the hole and clog it. This will make it rust quickly.
There is also a hole at the back of the frame, which is welded with a rivet. A round hole of 11 m is drilled in the rivet. An M10 nut is first welded onto the rivet.
Plow shank attachment
Next, the plow stand is attached. To do this, a hole is drilled in the wide walls at the end of the pipe on both sides. It is made rectangular and has dimensions of 31x16 mm. The plow stand is attached here. The side walls (narrow) are also drilled through to a diameter of 10.2 mm. The handles will be attached here using M10 bolts.
Handles are made separately. To do this you will need a half-inch metal pipe. You can take it from an old plumbing system. The size and bend of the handles depends on the height of the person who will work with the plow.
The handles need to be made as follows. The pipe is flattened at both ends with a hammer. 10.2 mm holes are drilled into them and attached to the frame using bolts. For convenience, a waterproofing tape or rubber strip is wound on top. This will make it easier to hold the element with your hand when working.
It is necessary to give the structure additional rigidity. To do this, take the same half-inch pipe. It is welded as a cross member.
Making a drawbar and fastening a wheel
In order to make the drawbar, they also take an iron pipe.
To do this, take a piece and cut a thread on both sides. Using hinges, the pipe is attached to the springs of the frame strut. The connection is made through a special plug on the axle with welded nuts. The fork is also made from the same rectangular pipe, but they take a small piece and cut a channel out of it. A half-inch coupling should be secured to the channel walls. A long M10 bolt is used as an axis for the hinge. A tee with a hole through ? is mounted at the end of the drawbar. The thread in the tee is ground off and a piece of pipe is inserted, which is selected according to diameter and length. The wheel can be used from an old bicycle, but it will not withstand the load, so they only take rubber from it. The disc according to the diameter of the wheel is cut from a sheet of getinax with a thickness of 25 mm. A hole is drilled in the center of the wheel where a nylon hub-bearing will be inserted. A groove is machined along the edge for the tire. For the wheel axle, a long bolt with a diameter of M10 is also used.
Most common varieties
The plow can be of different types:
- 2-hull – characterized by maneuverability and ease of use (a double-hull plow can serve for a long time and provide large volumes of work);
- disk - will provide reliability and withstand heavy loads;
- single-hull – very light, ideal for seasonal work;
- reversible - “active” plow, the parts in which rotate - a little heavy, but convenient and efficient in operation;
- horse (or equestrian) – produced for working with “human” force, that is, with horses, but it is also easy to make yourself (for example, from a bicycle frame);
- changeover plows provide not only stable operation, but also save fuel.
As you can see, the design thought does not dry out, and the variety of plows makes it possible to cover any needs of both the area and the workers. In addition, if you ask yourself how to properly adjust and how to set it up, devote some time to them, then you can get the ideal option for a particular case. Let us add that sometimes it is advisable to use a rotary option.
Various plow designs
First you need to decide on the design of the device, because there are several different types.
Cylindrical
The cylindrical type of the plow is distinguished by its excellent versatility, because it is suitable for almost any type of soil and field size. This shape allows you to cope well with crushing soil. In addition, making such a unit yourself will not be a problem.
Cylindrical
The only drawback of this design is its shallow penetration into the ground.
Half-screw
If you do not need to loosen the soil, but only need to raise layers of soil, then the semi-helical shape of the working part of the plow would be an excellent option. It penetrates deeply into the ground, but at the same time practically does not create a loosening effect. It is usually used for heavy soil.
Lemeshny
There are also plowshare plows, but they are quite difficult to make with your own hands, so they are not worth considering.
Types and purpose of a plow for a mini tractor
Tilling the soil is the most complex and time-consuming procedure in growing fruits and vegetables.
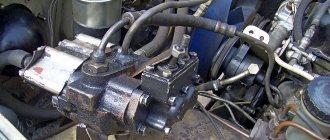
The soil needs to be cultivated before sowing and after harvesting. A plow can make this work easier. This attachment for a mini tractor has a metal plowshare with which it turns the ground. A long time ago, a person himself had to drag a ploughshare behind him, a little later, this work was performed by animals, and today - by technology. The main task of a plow for a motor tractor is to turn over the top layer of soil. This way all weeds are destroyed. The ploughshare cuts off already established plants, destroying their root system, and also weed seeds, when turning over the earth, end up deep enough, due to which they also die and do not germinate. During the plowing process, the soil loosens, becomes more crumbly, and is saturated with oxygen.
Plows for motor tractors and mini tractors come in the following types:
- Disk. The device is in the form of spherical disks that circulate on a bearing. The edges of the discs are sharp, so they cut the ground very easily. Most often, such a tool is used on very hardened or very wet soils;
- Reversible or flip-over. The design looks like wedges located at a slight angle. As a result, you will get a curved dump of crushed soil;
- Rotary. This is a more modern tool, which is a movable shaft on which a number of shares are mounted. It is much easier and faster for a minitractor to work with such a device, since it does not need to follow a strict straight line of movement.
The most optimal solution would be a double-furrow plow for a mini tractor - one with two shares. Although single-hull models are also in demand among owners of small plots.
Plows for mini tractors are also divided into the following types according to different criteria:
- According to the method of plowing. They are divided into the following subspecies:
- furrow;
- for the formation of dump ridges;
- smoothly ploughing;
- By type of fastening. In turn, this type is divided into the following subspecies:
- mounted Such a tool can only be lifted thanks to a special attachment. The number of bodies depends only on the model of the tractor itself. There are quite a lot of advantages here: low weight of the structure, small turning radius, few parts. The only disadvantages include the fact that the tractor will not be able to work with a plow with a large number of bodies;
- semi-mounted. This type is brought into working condition thanks to a special hitch and wheels, which are located on the plow itself. The number of bodies depends on the type of tractor - with a draft of up to 3 tons, a plow can have up to 6 bodies, up to 5 tons - no more than 12 bodies. Of course, working with so many cases is much more convenient, but the turning radius increases significantly and a huge number of structural parts appear;
- trailed It is brought into working condition only with the help of wheels. Modern farmers use it extremely rarely, since today the equipment is equipped with a mounted system with a built-in hydraulic cylinder. Users note that the land plowed with such a plow is more uniform and level, but at the same time the turning radius increases significantly, which is not always appropriate or possible;
- equine. Today, horse-drawn plows are used extremely rarely, but this type of land cultivation can still be found. It is advisable to use it in places where technology simply cannot reach.
- By appointment. The plow is widely used by consumers directly for cultivating the soil. But it is also used for underwater work, for laying cables, and during oil production.
How to make a plow for a walk-behind tractor and a walk-behind tractor with your own hands
First, let's look at a plow for a walk-behind tractor or a mini tractor, which you can make with your own hands according to the drawings. For visual analysis of the device, we recommend it free of charge.
This plow is aggregated with agricultural machinery of traction class 0.2. These can be heavy walk-behind tractors or mini tractors:
- Belarus-082;
- Belarus-112;
- Belarus-132N;
- Belarus-08K;
- KMZ-012, T-0.2 (Uralets);
- HTZ-8 (Prykarpatets).
Brief technical characteristics of the PN-2-20 plow:
- working width – 0.4 m;
- tillage depth – up to 25cm;
- productivity – up to 0.05 ha/hour;
- weight of the structure – 67 kg.
Cultivating a large plot of land is a labor-intensive and energy-consuming process, which cannot be done without the use of technical devices. Thanks to the plow, the soil can be properly prepared for sowing, as well as processed to get rid of weeds and dead wood after harvesting.
The plow is attached to mechanized equipment, which, through high draft force, sets the unit in motion. While working with the plow, the top layer of soil is lifted by the ploughshare, and then simply turned over. This allows you not only to loosen the soil, but also to improve its aeration. Moreover, tillage with a plow destroys up to 90% of the weeds growing on the site!
How to make this useful unit, which is necessary in every household? First you need to take care of purchasing the necessary high-quality materials. For the plow blades you will need steel about 5 millimeters thick. The plowshare itself should be made removable so that it can be periodically taken out and sharpened. For the body, use hardened steel, which can be treated with anti-corrosion solutions before welding.
To make a special functional plow blade, be sure to adhere to the following recommendations:
- Cut a cylindrical working surface of the dump from a metal sheet.
- Using a sheet bender, the cut parts are bent by 22-23 degrees, while the latter are strictly adjusted to the required shape and size.
- Please note that the size of the hollow metal pipe for the dump is about 55-59 centimeters in length. The wall thickness should not exceed 5 millimeters.
- The blade blank itself must be preheated in order to then perform matrix bending.
The body for the circle itself can be made from a metal sheet with a thickness of at least 3-4 millimeters. A square with sides of 50 by 50 centimeters is cut out of it, to which you need to successively attach a ploughshare, side shields and a blade. At the same time, ensure strict adherence to the required angles between the plow components. The presence of gaps or inaccuracies during installation can have a detrimental effect on the durability of the unit. Having welded all the parts together, you need to clean the seams, and it is advisable to sand the plowshare with the blade to avoid rust.
When you have mastered all the intricacies of making a plow for walk-behind tractors and mini tractors, you can move on to more complex tasks.
Reversible plow 5 body on T-150 (PLP-5-35):
This is a 3D model of a 5-hull reversible trailed plow PLP-5-35 for the T-150 tractor or other tractors with traction class 3 and higher. Using this 3D model of a plow for production, you will not need drawings. The structure was disassembled into more than 100 parts down to the smallest detail. The project was created in 3D CAD file format *.STEP. This format is supported by many CAD editors, including the free FreeCAD.
Note. Working with the STEP format in FreeCAD is not very convenient. The program requires a lot of computer resources to load all the details of the device. Just opening a file on an average laptop takes about 10 minutes. If possible, use the paid professional AutoCAD program.
How to set up a plow on a mini tractor
After the unit is installed, we begin to configure it. Adjustment of the plow on a mini tractor must be done. Each element should be checked and lubricated with oil. Carefully inspect the wheels on the plow, tighten the screws on all structural elements.
You can set up the plow yourself. It is necessary to check each fastening and adjust the angle of rotation. If the unit will be used on heavy soils, it must be weighted. This is done by installing a metal disk, it is mounted on the frame. In order to properly adjust the product, do the following:
- Adjust the depth. There is a bolt on the outer part of the pipe that allows you to adjust the wheels. If you turn it clockwise, the depth of tillage will be increased.
- Adjust the width of the land.
- Adjust the frame level. To do this, tighten the front bar or stretch it.
Read also: DIY spring hammer
Additional equipment can be attached to the plow. Mounting devices used for cultivating land can be done on your own. If the elements are installed incorrectly, the plow will not work well on the ground.
Drawings of a plow for a walk-behind tractor
Using the experience of craftsmen who made a plow for a walk-behind tractor with their own hands and left drawings, the ploughshare should be made in such a way that it can be removed, this will make it easier to sharpen it before plowing.
Alloy steel 9ХС, from which I make blades for hand saws, is considered an ideal material for the cutting part of a plow.
Suitable steel grade 45, when hardened, brought to a hardness of HRC 50-55. If you only have ordinary steel on hand, say carbon St5ps, which is not subject to heat treatment, then by beating the cutting edge on an anvil and sharpening it, it is quite suitable for cultivating the soil.
Plow blade for walk-behind tractor
The moldboard of the plow is the part that takes the earth to the side.
The first method of making a blade:
The working surface of the blade must be given a curved shape. If you have a metal bending machine or sheet bending rollers, then giving the workpiece the desired shape will not be difficult.
A metal blank with a thickness of 3-5 mm is required, the rollers are directed at an angle of 20-22 degrees, as shown in the drawing, and the desired bend is given.
Second way:
Here, prepared. A pipe with a diameter of 600-650 mm can serve (this is the diameter that will require less labor, since the bend of the pipe will maximally repeat the desired bend of the future dump) and a thickness of 3-5 mm. We make a template from cardboard and apply it to the pipe, not forgetting the angle of 20-22 degrees, as shown in the drawing below.
We outline the template with a pencil or chalk and cut it out using gas. welding, if necessary, grind the workpiece and bring it to the desired condition.
Third way:
Probably the most difficult method of making a moldboard is when the workpiece is heated and, using a matrix, given the desired shape, which can be a moldboard from another plow.
The material of the plow body is steel sheet grade St3 - St10 with a thickness of 3 mm.
Drawing of plow parts for walk-behind tractor
a — ploughshare made of alloy steel;
b — side shield of the rack, St3;
c — spacer plate, St3;
g — plow base plate, St3;
d - field board, corner 30x30 mm;
e - stand, pipe with a diameter of 42 mm
We advise you to first make the plow parts from cardboard and attach them to each other at the required angles. Thus, the values of the angle α on different parts of the plow body will be from 25° to 130°, the values of the angle γ - from 42° to 50°. If the homemade model of a cardboard plow suits you in all respects, you can move on to working with metal.
When the metal parts of the plow are ready, you need to find an additional sheet of steel 3 mm thick, 600x600 mm in size, it will be needed to assemble the plow, and a welding machine (preferably an inverter). On this sheet we retreat 40 mm from the edges and measure the angle γ0.
Plow assembly
1 - ploughshare;
2 — side shield of the rack;
3 - additional sheet 2-3 mm
Using wedges with an angle α0=25 degrees and an angle γ0=42 degrees, a ploughshare is installed on the additional sheet and tacked to the sheet by welding, pointwise on both sides.
The side shield of the rack is connected to the ploughshare vertically so that its edge extends beyond the ploughshare by 4-7 mm, while the raised shield should be higher than the blade of the ploughshare (that is, higher than the additional sheet) by 6-8 mm, so as not to interfere with the ploughshare, cut the ground. The shield is also attached to the ploughshare and to the additional sheet.
Next, the blade is attached to the ploughshare very tightly, without leaving a gap, so that their surfaces are one whole. The angle between the upper edge of the blade and the ploughshare blade is equal to (γmax − γ0) = 6-8°.
Mounting the plow share
- ploughshare;
— countersunk head screw M8;
- dump;
— base plate;
— corner 30x30x90 mm;
- M8 nut
If it is found that the corners and/or surfaces do not correspond, the blade is adjusted using a hammer. After fitting the blade to the ploughshare, it is welded from the back to the ploughshare and to the side shield. Then the side shield is welded to the spacer bar and the base plate; the thrust corners for the ploughshare are attached to the latter by welding.
Followed by. Inspect the finished plow again, and if everything is clearly welded completely. Add. the sheet is separated from the body with a chisel or LNA. All welds are ground.
Reversible plow
The reversible plow has a difference - the presence of a turning mechanism that turns the ploughshare when passing the adjacent furrow in the opposite direction. By turning the plowshare over, the layers of soil will turn over in the same direction as the previous ones. The rotating mechanism allows plowing to be done faster than with a conventional design.
The reversible design has three specific planes: the horizontal skid plane at the bottom, the vertical side plane and the front dump plane. We remove the plowshare and blade, install them on the floor and lean them against the wall, the lower horizontal plane of the skid should coincide with the horizontal line of the floor, and the wall with the side vertical plane of the skid.
To adjust the plow, it is necessary to lower the bottom edge of the share 1.0–4.0 cm below the plane of the skid. The side cutting edges of the plowshare and blade should lie on the same line and protrude 1 cm from the vertical line of the skid.
The working surface of the share must be aligned with the blade without any gaps, there cannot be any protruding fasteners on them and they must be thoroughly polished.
After finishing plowing, all working parts must be cleaned and lubricated with technical lubricant to prevent corrosion during storage until the next season.
How to make a plow for a mini tractor with your own hands
know some nuances
Raising a layer of earth to a height of up to 30 cm, the body receives heavy loads, and its surface is subject to abrasive wear. Therefore, for the working parts of a homemade plow, it is advisable to use metal 4-6 mm thick.
It is advisable to make the ploughshare removable (it will be easier to sharpen before use). The best materials are 9xC steel (disks for circular saws are made) or 45 steel.
Considering everything described above, you can start making a dump. It is done in three ways.
- The working part of the blade is in the shape of a cylinder. If you have some kind of sheet-bending tool (for example, rollers), then it won’t take much labor to make a workpiece of the required shape. The metal blank of the dump (can be cut by gas electric welding or metal shears) is fed at an angle of 21-24° onto rollers or a sheet bender, bent and straightened according to the template.
- A pipe (wall thickness about 6 mm) with a cross-section of 50-65 cm is suitable as a dump. A template is made from cardboard, applied to the pipe, traced with chalk and cut off using gas welding. If necessary, finish it with a hammer.
- The most labor-intensive option is when the workpiece is preheated in a forge and bent along a matrix.
The plow body is made of metal sheet (Art. 3 - Art. 10) at least 4 mm thick.
Experts advise first making all the parts out of cardboard and gluing them together, maintaining the required angles. If this cardboard model meets your requirements, then you can begin making a metal plow with your own hands.
Assembly
If the angles do not match
Afterwards, a base plate is welded onto the shield (thrust corners are welded here for the ploughshare) and a spacer bar. This structure is carefully inspected and, if there are no errors, the plow is completely welded. The steel sheet on which welding and assembly was done is disconnected from the finished plow using a grinder or a chisel. Welding seams must be cleaned, the plowshare and blade are sanded with sandpaper.
To make a homemade plow self-propelled, a two-wheeled walk-behind tractor is installed on it. Having made a plow with your own hands, you can buy a strong and reliable assistant in the form of a mini-tractor for little money, for cultivating the land in a field, in a vegetable garden or on a personal plot.
Rotary plow
The mechanism has several curved shares; manufacturers fix these parts on one axis. After turning on the mini tractor, the axle starts to move, it rotates and turns the soil. The unit can move not only in a straight line, but also in different directions. It plows the soil to a depth of 25-30 cm.