Knives for cutting in scrapbooking
Thin metal knives are made from metal with the centers cut out. They are flat on one side and have a thin raised section on the other that highlights the design and serves as a cutting edge.
Digital cutting plotters use special thin knives to cut out images.
Both hand-held machines and digital cutting plotters can be used for scrap.
Necessary materials for making cuttings
Cuttings for scrapbooking are made from various materials: fabric, various papers (texture, thickness and texture), leather, thin metal.
Beautiful, varied cuttings are obtained thanks to a special machine. There is a fairly wide selection of these devices, it’s a matter of choice. The main thing is to provide the following components: knives (it is better if the knife is universal, since it works with any material), plates (thanks to them, the impact of the device’s knives on matter (supporting and magnetic) is evenly distributed). Some devices have an application and templates intended for beginning needlewomen. Templates will help you master the tool without much expense, because... the raw materials are quite expensive.
Cuttings for scrapbooking can be made manually. You will need: paper cutting, self-healing mat, stationery or breadboard knife, marker, acrylic-based paints, stencils.
The template can be printed using a printer. You can immediately use the paper that you will use to prepare the workpiece. If this option does not suit you, you can print the stencil on plain paper, then attach it to the base material. It is also possible to draw a stencil yourself.
Manual cutting machine for scrapbooking
To work with a cutting machine, we will need various knives, with which we will do the cutting.
Advice! Cheap knives for scrapbooking die cutting with free shipping can be purchased here.
The process itself goes as follows:
- A sandwich of a plate, paper (this can be scrap paper, tracing paper, craft paper, etc.), a knife with the blade down, and a second plate is placed on the platform.
- Then turn the handle of the machine and make a roll between the shafts of the machine and under the pressure of the shafts the knife cuts through the paper and a cutting is obtained. If one roll is not enough, then you can make two or more, it all depends on the complexity of the cutting (the more openwork the knife, the more rolls you need).
Advantages:
- take up less desk space than digital ones;
- do not require connection to a computer or power supply;
- rapid creation of cuttings;
- ease of learning and operation
Flaws:
- not as many designs as in a digital plotter;
- costs for new knives;
- limited thickness of paper from which it is cut
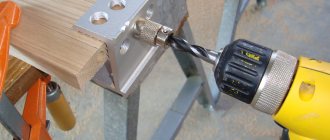
How to use the device
The easiest way is to install the knife in a specialized cutting machine. The cutting machine is purchased separately. Having bought it, you can forever forget about the problems with using knives for cutting. After the knife is installed in the machine, you need to place the paper in a special compartment and secure it. Next, you need to turn the handle to get the cut out part. Using this method you can obtain the following products:
- flowers;
- letters;
- patterns;
- leaves.
The final result will depend on which knife was installed. With the help of a specialized machine you can achieve better results. Using knives by hand will not produce the same quality product. Manually you will need to spend more time on the procedure itself.
Many scrapbooking lovers are concerned about the question of how to use knives without a machine. This is possible, but it will require certain skills and patience from a person. To cut something, you will need to do the following:
- Place the paper on a solid platform.
- Place a cutting knife on the paper.
- Secure the knife using available tools.
- Push the knife from the reverse side. You can use a nail file or any similar object.
- After the work is done, you must carefully remove the knife.
Using a knife without a specialized machine is problematic. It is advisable to purchase various knives after purchasing a special device.
What to do if the felling is poorly cut?
Complex knives (particularly very openwork ones) often require a little more effort to get them to cut correctly. Here are some tips to help you get better results when using them.
- First, try to do rentals more than 1 time (two or more)
- If this doesn't work, you can add a sheet of cardboard as a spacer under the "sandwich" and pass it between the shafts of the machine. This will add a little more pressure and help in those hard to reach places where the knife didn't cut well.
- If this does not help, then you can buy a thin metal spacer to place it under the “sandwich” and pass it between the shafts of the machine.
- If the tips listed above do not resolve the problem, then you may have a faulty blade and need to call the manufacturer for a replacement.
In one of the articles, I already reviewed one of these manual machines, which I use myself - Spellbinders Platinum 6.
There are also analogues: Sizzix Big Shot or We R Memory Keepers Evolution. However, these products are quite expensive and not every beginning scraper can afford them at first. There is an option to buy a cheap analogue scrapbooking machine for cutting, for example, here.
What else can you do
Using the same knife you can perform different jobs. In addition to simple cutting, you can do so-called embossing. It consists of pressed paper and an imprint left in it. This way you can leave any imprint on the sheet without cutting it out. To create embossing, you must use a special gasket. You will also need to use a punching machine.
Embossing is a rather original and beautiful way to decorate a photo album. Absolutely any knife is suitable for embossing. To understand how to carry out this procedure, you need to watch a training video.
To get the answer to the question of how to use knives in scrapbooking, you need to study as many different materials as possible. It also requires constant practice. Not all people are able to cut something or do embossing the first time. The problem may be poor quality knives or lack of skills. With determination, anyone can master the art of scrapbooking.
Scrapbooking Decorations
Today I want to tell you about the main decorative elements in scrapbooking - decorations.
Chipboard
(chipboard) is a dense double-sided cellulose cardboard with a thickness of 0.9 mm to 4 mm. It comes with a pattern, foil, craft. It can be painted with acrylic paint, coated with liquid ink or glitter, applied with powder using the embossing technique, or added volume with Ranger's 3D Glossy Accent clear varnish.
Cutting, die-cutting - figures from thick designer paper.
You can do the cutting yourself using a cutting machine and special knives, or you can buy a ready-made one.
Die-cuts are printed in a printing house on designer paper; as a rule, manufacturers try to include them in their collections. They may come as part of a paper set, where the die cuts are printed on a sheet of paper and must be cut out by hand. Or they can be sold as a separate set for a specific collection. Such die-cuts are printed separately and cut on a plotter in a printing house.
Flowers and leaves are widely used in works and add volume. Many scrapbookers create flowers at home using knives and a die-cutting machine, shaped hole punches, or make impressions on paper using floral stamps. In scrap shops you can find a large selection of ready-made flowers and leaves made from mulberry paper, fabric or foamiran. Paper flowers come in different sizes and shades and completely replicate real flowers. Often in your work you can find a composition of beautiful roses, on a spring card there are bright tulips, in children’s albums there are curly gardenias, and on boxes there is a composition of roses, chrysanthemums and cherry flowers.
Stickers (stickers) are a design printed on paper with an adhesive layer. Stickers for scrapbooking come in different sizes and with different effects - fabric, gold-plated, filled with epoxy resin (epoxy stickers), with a die-cut pattern, with a glitter effect on paper, stickers with a chipboard pattern, and a chalk effect. Stickers are widely used in albums, postcards, and notebooks.
Rubs are decals (transfers) applied to film. They can be applied to paper, glass, plastic, wood. Sold in sets and individually. The kit includes a stick for transferring the drawing. You can read more about rubbing with a detailed master class here.
Chips (tops) - a picture glued to a metal base, somewhat reminiscent of a badge without a fastener. With the help of chips, you can highlight the main idea of the work, and the chip will also add volume. They come with inscriptions, pictures, and beautiful expressions. Manufacturers are trying to include chips in their collections.
Metal decorations - pendants, decorative frames and pins, openwork corners - all these decorations complement your work. Pendants can be glued to the canvas when creating a composition or hung on a waxed cord and glued to a postcard, decorative frames can be used on the cover of an album, and openwork corners will become a beautiful addition when decorating a canvas or page.
Laser cutting of wood - this cutting is cut out of plywood on a laser machine. The figures can be left as is, painted with acrylic paint, covered with glitter, embossing powder or glossy accent. Cutting can act as the main or additional element in the work, for example, in an album about a trip you can glue a map of Italy and paint it in the color of the Italian flag. To express the main idea in a children's album, different inscriptions are suitable, for example, “Have fun swimming,” “First walk,” or “I’m 1 year old.” To add volume to the work, a background cutting will help; it must be glued under additional layers of paper, for example, a background cutting with bubbles can be cut into several parts, painted with acrylic paint and glued under an additional background in a sea page.
Brads are decorative carnations with legs. They come in the form of different figures and with different textures (fabric, velvet, with epoxy stickers). They are used for fastening elements on a page, fixing spreads with photographs using an anchor or as additional decor. You can read more details here.
Plastic (polymer) and plaster figurines act as an additional or main decorative element in the design of works. Plastic figurines are made from liquid plastic or polymer clay, plaster figurines are made from high-quality plaster.
Feathers - there are two types: short (soft, fluffy and airy) feathers from the bird’s body and long (hard) feathers from the wings and tail. Feathers come from goose, duck, ostrich, peacock, rooster, chicken, and pheasant feathers. They are painted and covered with glitter. Most often used as an accent in work, but sometimes it can act as the main element.
Buttons - come in different shapes and sizes. In scrapbooking, small round buttons or buttons in the form of figures on a specific theme are most often used. They complement the overall composition of the entire work.
Halves of pearls, acrylic drops, drops, dots - create accents in the work, most often adding 2-4 of them. Glue to work using glossy accent or Tacky Glue.
Overlay (decorative film) is an acrylic film with a printed pattern. It is used to highlight the desired element in a photograph or use it as an additional decoration, for example, soaring butterflies. Overlays add layering, lightness and airiness to the work. Overlays are sold in sheets of 30x30 cm or in ready-made sets.
Knitted elements are miniature crocheted elements (flowers, leaves, napkins, booties, hats, children's dresses and suits and much more). They fill the page with tenderness, airiness and add volume, for example, when decorating a floral card under a composition with flowers or under an additional background on the card, you can glue a knitted flower or a napkin, it will peek out from under the flower and add additional volume to the work.
How does the cutting process work?
Decorations made by machine are the most diverse. Not every needlewoman has a special device, but there is an irresistible desire to create. Then other handmade tools are used, thanks to which the workpiece is no worse than one made by machine. Let's look at both creative processes.
- Scrap machine workflow. A plate is laid out on the platform of the device, the material is placed on top, a knife is laid on top of it with the cutting elements down, the plate is covered on top, and the laid out layers are rolled with a scrap machine. After this, you can take out the product to check the result.
- Manual workflow. For manual work, you need to print it out, maybe even draw a stencil yourself, then attach it to the worksheet. We begin to work with a knife, cutting out the necessary parts. If openwork elements are needed, then we start cutting from the internal elements, then you can cut along the contour.
When working with simple die-cutting without openwork elements, it is possible to use scissors with figured or simple blades. Then you will need templates, along the contour of which decorations are cut out. Also, a figured hole punch and stamps are used even more simply.
Scrapbooking Decorations
Today I want to tell you about the main decorative elements in scrapbooking - decorations.
Chipboard
(chipboard) is a dense double-sided cellulose cardboard with a thickness of 0.9 mm to 4 mm.
It comes with a pattern, foil, craft. It can be painted with acrylic paint, coated with liquid ink or glitter, applied with powder using the embossing technique, or added volume with Ranger's 3D Glossy Accent clear varnish. Cutting, die-cutting - figures from thick designer paper.
You can do the cutting yourself using a cutting machine and special knives, or you can buy a ready-made one.
Die-cuts are printed in a printing house on designer paper; as a rule, manufacturers try to include them in their collections. They may come as part of a paper set, where the die cuts are printed on a sheet of paper and must be cut out by hand. Or they can be sold as a separate set for a specific collection. Such die-cuts are printed separately and cut on a plotter in a printing house.
Flowers and leaves are widely used in works and add volume. Many scrapbookers create flowers at home using knives and a die-cutting machine, shaped hole punches, or make impressions on paper using floral stamps. In scrap shops you can find a large selection of ready-made flowers and leaves made from mulberry paper, fabric or foamiran. Paper flowers come in different sizes and shades and completely replicate real flowers. Often in your work you can find a composition of beautiful roses, on a spring card there are bright tulips, in children’s albums there are curly gardenias, and on boxes there is a composition of roses, chrysanthemums and cherry flowers.
Stickers (stickers) are a design printed on paper with an adhesive layer. Stickers for scrapbooking come in different sizes and with different effects - fabric, gold-plated, filled with epoxy resin (epoxy stickers), with a die-cut pattern, with a glitter effect on paper, stickers with a chipboard pattern, and a chalk effect. Stickers are widely used in albums, postcards, and notebooks.
Rubs are decals (transfers) applied to film. They can be applied to paper, glass, plastic, wood. Sold in sets and individually. The kit includes a stick for transferring the drawing. You can read more about rubbing with a detailed master class here.
Chips (tops) - a picture glued to a metal base, somewhat reminiscent of a badge without a fastener. With the help of chips, you can highlight the main idea of the work, and the chip will also add volume. They come with inscriptions, pictures, and beautiful expressions. Manufacturers are trying to include chips in their collections.
Metal decorations - pendants, decorative frames and pins, openwork corners - all these decorations complement your work. Pendants can be glued to the canvas when creating a composition or hung on a waxed cord and glued to a postcard, decorative frames can be used on the cover of an album, and openwork corners will become a beautiful addition when decorating a canvas or page.
Laser cutting of wood - this cutting is cut out of plywood on a laser machine. The figures can be left as is, painted with acrylic paint, covered with glitter, embossing powder or glossy accent. Cutting can act as the main or additional element in the work, for example, in an album about a trip you can glue a map of Italy and paint it in the color of the Italian flag. To express the main idea in a children's album, different inscriptions are suitable, for example, “Have fun swimming,” “First walk,” or “I’m 1 year old.” To add volume to the work, a background cutting will help; it must be glued under additional layers of paper, for example, a background cutting with bubbles can be cut into several parts, painted with acrylic paint and glued under an additional background in a sea page.
Brads are decorative carnations with legs. They come in the form of different figures and with different textures (fabric, velvet, with epoxy stickers). They are used for fastening elements on a page, fixing spreads with photographs using an anchor or as additional decor. You can read more details here.
Plastic (polymer) and plaster figurines act as an additional or main decorative element in the design of works.
Plastic figurines are made from liquid plastic or polymer clay, plaster figurines are made from high-quality plaster. Feathers - there are two types: short (soft, fluffy and airy) feathers from the bird’s body and long (hard) feathers from the wings and tail. Feathers come from goose, duck, ostrich, peacock, rooster, chicken, and pheasant feathers. They are painted and covered with glitter. Most often used as an accent in work, but sometimes it can act as the main element.
Buttons - come in different shapes and sizes. In scrapbooking, small round buttons or buttons in the form of figures on a specific theme are most often used. They complement the overall composition of the entire work.
Halves of pearls, acrylic drops, drops, dots - create accents in the work, most often adding 2-4 of them. Glue to work using glossy accent or Tacky Glue.
Overlay (decorative film) is an acrylic film with a printed pattern. It is used to highlight the desired element in a photograph or use it as an additional decoration, for example, soaring butterflies. Overlays add layering, lightness and airiness to the work. Overlays are sold in sheets of 30x30 cm or in ready-made sets.
Knitted elements are miniature crocheted elements (flowers, leaves, napkins, booties, hats, children's dresses and suits and much more). They fill the page with tenderness, airiness and add volume, for example, when decorating a floral card under a composition with flowers or under an additional background on the card, you can glue a knitted flower or a napkin, it will peek out from under the flower and add additional volume to the work.
Washi Tape is a decorative tape with an adhesive layer on one side and a printed pattern on the other. To create such adhesive tapes, very thin paper is used. Used for decoration on pages, travel books and diaries.
Cover pendants - they are added to covers made of leatherette to add chic and elegance.
Lace - will add lightness, elegance and volume to the work. Lace can be cotton or synthetic. In the “Shabby Chic” style, lace is one of the main decorative elements, and when creating mixed media works, lace is often glued for texture. It can be aged or painted with sprays and paints, or individual elements can be cut out, for example, an embroidered design.
I only talked about the basic and frequently used decor, do you want to continue? - write in the comments. Thanks to all! Experiment and get inspired!
Scissors
Scissors are an indispensable item in scrapbooking. Scrapbooking for beginners allows the use of only one comfortable and sharp scissors that will cope with the task of cutting out paper.
Cutting tools
But for experienced craftswomen today, scissors for needlework are presented in a huge assortment:
- Scissors with curved blades, or manicure scissors. They cope best with cutting out small paper parts and are optimal for working in hard-to-reach parts of figures.
- Making paper frames is rarely complete without scissors for scrapbooking. The decoration of the composition can be carved edges, which are obtained only with the use of curly scissors. The greater the choice of such tools, the greater the variety of design options.
- Special scissors for precise cutting of tape.
- Layout scissors (and cutters) are designed for confident cutting of thick cardboard.
Scissors in scrapbooking have a wide range of functionality, but, for example, it is better to make holes for eyelets using a hole punch or other special tool.
Variety of curly scissors
Creative secrets for making cuttings
It happens that when making a workpiece, a less than expected result is obtained. To ensure your workflow matches your desires, you need to know some tricks. Experienced scrap lovers use them, easily avoiding difficulties.
- An insufficiently smooth cut can be seen along the edges of the die cut. You can get rid of this problem with the help of masking tape, as well as sticky film, which is used to clean clothes. All small unprocessed particles will disappear.
- To ensure good cutting of fabric jewelry, it should first be ironed.
- Thin fabric must be laid in several layers.
- For clearer cutting from thin paper, you can lay an additional layer of thicker paper.
- If the shape is not completely cut through, it is possible to lay a shima, finding the correct place for the knife inside the device.
- Periodically align the plates during use by turning them over.
- In some cases, it is permissible to use the negative from die cutting. Take a closer look, your imagination will allow you to save some money.
- In the absence of a device or knives, shaped parts can be made with a shaped hole punch or scissors with shaped blades. With the tools listed above, you can make flowers, butterflies, twigs, snowflakes, and many other interesting figures.
- If there are no special devices for removing the die-cut, you can use a large needle or awl.
- To ensure that the knife makes cuts well, thoroughly clean it of any remaining material.
The above tricks will help you simplify your creative process. Happy creativity!
Main technical characteristics
Processed workpiece
The operational and technical parameters of a particular model are the determining factors for choice. They affect the functionality of the equipment. Therefore, before purchasing, it is recommended to conduct a detailed analysis of the parameters of several models in order to choose the best option.
All devices of this type are desktop. Dimensions and weight in this case are not significant. It is important to take into account the ergonomics of the location of the main components - the pressure table, the handle for rotating the roller. They must be convenient for use in specific conditions. You should also pay attention to the material used to make the moving mechanisms. Plastic gears will not be able to perform their functions for a long time.
Main technical characteristics of cutting and embossing machines:
- dimensions of the working platform. For the vast majority of models it is 1.6*1.5*36 cm. Additional devices to increase this parameter are impractical;
- dimensions of the support plates. They determine the maximum allowable size of the workpiece being processed;
- set of knives. They have different shapes. To increase the capabilities of the device, you can purchase additional kits. It is important to take into account the requirements of the machine manufacturer for the material used to make the knives and their thickness.
In addition, the package includes an introductory booklet that shows the procedure for proper operation of the device. It also indicates the most common examples of using the machine for processing various materials.
The average cost of such a machine is 14,000 rubles. The price may vary depending on the configuration and brand of the manufacturer.
LiveInternetLiveInternet
Braided Dorset buttons. Master class The so-called Dorset button was invented in Dorset (England) in the 18th century. Initially, the base for the button was made from the horns of a Dorset sheep, later metal rings were used.
We suggest making a simple Dorset button using weave yarn. Such buttons look very unusual and can be used not only as buttons on clothes, but also as a hairpin, brooch, decoration for sofa cushions, wall collages, sofa or bed covers, etc.
Materials and tools:
- plastic rings (can be purchased at a handicraft, fabric, curtain store) - it is desirable that the diameter of the ring is large enough for ease of operation;
- scissors;
- a blunt needle with a large eye;
- yarn (any other thread will do - wool, silk, cotton - to your taste);
- You can also use pearls and beads for decoration.
So. Thread a needle into the selected thread. Take one end of the thread and secure it with your finger.
We thread the needle and thread into the ring, wrapping the thread around the ring a second time to make a knot.
We begin to wind the yarn around the ring with a needle as shown in the figure. Finish each turn with an overlock stitch and tighten slightly to form a small knot. Thus, the entire ring is tied with yarn. At the same time, the tighter each turn fits to each other, the neater and more beautiful the button will turn out.
The free end of the yarn is placed along the ring. Periodically move the yarn rings together so that they are pressed tightly together and the plastic ring is not visible.
We press the short end of the yarn obtained at the beginning to the ring and hide it under the new turns.
After the entire ring is closed with yarn, use a needle to make a knot and turn the entire buckle over so that the seam that was formed along the upper edge remains in the inside of the ring.
Now you need to form a “snowflake” using strands of yarn. To do this, wrap the yarn four times around the ring towards the top.
We wrap at a different angle each time, so we will end up with eight “spokes” in the center of the button.
If desired, the number of “spokes” can be increased, then the pattern of the button in the center will be different.
Pass the needle through the center of the yarn to secure the resulting snowflake.
The next step is the interlocking stitch. We will weave the yarn through the resulting “knitting needles”, covering the entire center of the button. If desired, you can use yarn of a different color.
When the center of the button is completely closed, turn the button over, pass the needle at the bottom and make an invisible fastening.
You can add your own elements when making a Dorset button - beads, embroidery, pearls, multi-colored yarn. In general, anything!
Source: https://masterjournal.ru/blog/interest/1402.html