Rust effect on wood
You can imitate traces of corrosion on wood. This effect is especially often used on pieces of furniture.
You will need the following components:
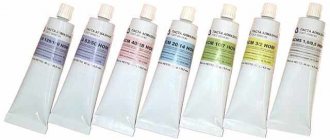
- paint (two varieties);
varnish;
One type of paint should have a rusty color (ocher based). Another paint is basic, since its color should be combined with the general background of the room.
Before painting begins, we clean the surface from defects and traces of paint. After cleaning, you can apply a layer of varnish (optional). After this, apply a layer of “rusty” paint and wait for the surface to dry. While the coating has not hardened, treat it with salt.
Next, apply the base paint and varnish material and wait again for the surface to dry. Remove the salt using fine-grain sandpaper. We complete the work by applying a protective layer of varnish.
So, you can give the surface a rusty look in a variety of ways. Which one to choose depends on the task at hand, the type of material and the means at hand.
Imitation rust
In order to get the rust effect, it is not necessary to spoil the material. You can simulate rusting. Moreover, you can give a rusty look to both metal and other materials, in particular wood.
Rust paint
The rusty shade is formed by mixing red, yellow and brown pigments. You can also add a little blue - this will add brightness and depth to the coating.
There is a natural pigment that, without any mixing of different colors, makes it possible to obtain a rusty tint. This pigment is called ocher (another name is red lead), which is a mixture of clay and iron oxide hydrate.
Natural ocher is not an independent type of paint. This is just a component that is added in varying quantities to paints and varnishes (paints, enamels) and primers. In addition to this component, paints also contain other substances.
The pigment has the following characteristics:
- hiding power - from 60 to 80 grams per square meter;
- oil absorption - from 25 to 35 grams per 100 grams of substance;
- The pH of the water extract is from 7 to 8.
Ocher is characterized by resistance to aggressive chemicals (organic solvents, acids, alkalis), as well as resistance to light and humidity.
Simulating film
You can give metal a rusty look using a special film. Below are instructions for its use:
- Degrease the surface with alcohol.
- We try on the film elements to the surface.
- We moisten the metal with a special spray bottle. The film will adhere better to a damp surface.
- We tear off the film from the backing.
- First glue the middle part of the canvas, and then level the edges along the surface.
- Dry the glued film with a hairdryer.
Rust effect on wooden furniture
Imitation of rust can be done not only on metal, but also on wood.
One of the paints should have a color as close as possible to rust. The second paint acts as the main one; it should match the furniture and other accessories in the room.
Before applying rust-colored paint, we clean the surface of the wood from all defects. You can also varnish the wood. Next, we paint the furniture with rust paint and wait until the surface dries slightly. Apply a layer of table salt to the still wet surface.
When the surface with the salt applied to it is dry, apply the base paint. We wait for the surface to dry. After this, remove the salt with fine-grained sandpaper. If you fail to remove all the salt, a slight roughness effect will be created, which will further emphasize the rusty color. The last step is to treat the wood with a protective layer of varnish.
The rust effect will give any product a completely unique, inimitable look. Moreover, you can do all this with your own hands. The main thing in the work process is to follow the technological process and adhere to protective measures, since in many cases you will have to work with chemicals that are unsafe for health.
Rusting technique
Natural rust
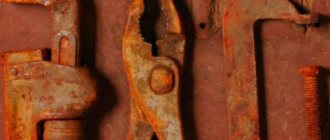
Please note that first of all you should make sure that the metal that is to be rusted is susceptible to corrosion. Metals that contain iron are susceptible to rust. But many materials are resistant to rust, for example, chrome alloys or stainless steel. Cast iron and wrought iron will corrode well.
Copper acid solution
The instructions are:
Pour 60 ml of hydrochloric acid (also called hydrochloric acid) into a container. Be sure to use safety glasses and gloves during the process.- Dissolve just a little copper in acid (use coins or copper wire for this). The container should not be closed very tightly, since gases will form inside as a result of the reaction. Thus, after about a week we will obtain a solution that will provoke corrosive processes.
- Remove any remaining copper from the acid. Dilute the copper-acid solution with water in this proportion - for 1 measure of acid, add 50 measures of water.
- Strip the metal that you will rust from the paint and varnish material, and then wash the surface with a soapy solution.
- Apply a thin layer of acid to the metal surface. This can be done with a spray bottle or brush. Allow the material to dry in fresh air. At the same time, as before, one should not forget about safety measures (goggles and gloves), as well as good ventilation of the room.
- After an hour, noticeable rust will begin to appear on the metal surface. It is not so important to wash off the solution, because it will gradually evaporate naturally. If the resulting rust is not sufficient, the surface can be treated again.
Let's consider another method.
Vinegar solution and bleach
This method is best suited for metals based on tin or iron. A prerequisite is that the surface should not be primed or even coated with sealants.
The instructions are:
- Mix one measure of vinegar and two measures of bleach in a container.
- Stir the metal in the container so that it is completely damaged. Wait about ½ hour, and after this period, rust will begin to appear on the surface.
- Wipe the material with a rag.
- Until the item is completely dry, you should avoid direct contact with it to avoid damaging your skin with chlorine.
- Fix the rust with primer. The easiest way is to use a primer in an aerosol can.
What other ways are there?
Other methods
In addition to paint with a rust effect on metal, there are other very popular methods for accelerating corrosion processes. But there are other methods. Rusting with hydrogen peroxide + salt:
- Pour the peroxide into a container - it is advisable to use a spray bottle, because this method will be the easiest to apply the liquid to the surface of the material.
- Spray metals well.
- Sprinkle the wet surface with salt. The metal will begin to rust almost immediately, and the intensity of the rusting will depend on the amount of salt.
- Let the metal dry in the fresh air. The surface cannot be wiped until it dries, as rusting will be very uneven. You can wipe the surface only after it has completely dried.
Another rusting method using vinegar and hydrogen peroxide:
- Clean the surface (if necessary).
- Spray peroxide over the surface from a spray bottle.
- Spray vinegar over the surface of the metal.
- Wait a few hours for rust to begin to appear.
Rusting with salt and lemon juice:
- Mix four measures of lemon juice and one measure of table salt.
- Treat the cleaned surface with the solution, and soon traces of rust will begin to appear.
Now a little about artificial methods.
Imitation rust
In order to achieve the rust effect, the material must be damaged. You can imitate rust, and at the same time you can give a rusty look to metal and other types of material, in particular wood.
Rust paint
A rusty tint will appear when yellow, red and brown pigments are mixed. You can also add a little blue color - this will give the coating depth and brightness. There is a natural pigment that, without mixing different colors, will make it possible to obtain a rusty tint. This pigment is called ocher (another name would be red lead), which is a mixture of iron oxide hydrate and clay. Natural ocher will not be an independent type of paint, and it is only a component that is added in varying quantities to paints and varnishes (enamels and paints) and primers.
In addition to this component, paints also contain other substances. The pigment has the following characteristics:
- The coverage rate is 60-80 grams per square meter.
- The oil capacity will be 25-35 grams per 0.1 kg of substance.
- The pH of the water extract is from 7 to 8.
Ocher has excellent resistance to aggressive chemical substances (acids, organic solvents and alkalis), as well as resistance to moisture and light.
Imitation film
It is not necessary to buy paint with a rust effect if you can give the metal a rusty look using a special film. Below are instructions for use:
degrease the surface with alcohol.- Try the film elements onto the treatment surface.
- Moisten the metal with a special spray bottle, and the film should be glued to the wet surface better.
- Tear off the film from the backing.
- First glue the middle part of the canvas, and then smooth the edges over the surface.
- Dry the glued film with a hairdryer.
There is one more interesting method left.
Rust imitation technique (using MIG pigments)
This time we will talk about the effect of rust on scale models. We invite you to get acquainted with the technique of simulating rust using pigments and some oil paints.
Rust is an important part of a model built to withstand the weather, but as with other weather techniques, it can be easy to overdo it. When applying this effect, you must always be very careful and careful, work with an understanding of the reasons for the appearance and development of corrosion, under what conditions it occurs. And you should always check the compliance of the work with the standard.
In real conditions, rust appears as a result of the reaction of metal elements of a car (for example) with oxygen. This reaction intensifies when exposed to water (especially salty water) or high humidity. It should be borne in mind that a car abandoned on the coast will corrode differently than a car fighting in the desert. The use of this weather equipment must always be consistent with the conditions of the environment where the machine is intended to be present.
We will try to briefly simulate the four types of rust. In our examples, the application of corrosion will be very quick and easy, so the results obtained are not difficult to beat. But the purpose of the lesson is to learn some simple techniques that produce good rust with minimal effort.
Moderate rust over painted surface. There will be some slight rust marks on the paint. This happens when water gets into the scratch, causing rust to appear.
Severe rust over painted surface. The rust marks had been developing unchecked for some time, resulting in what appeared to be pits and craters in the surface of the paint. This type of corrosion is typical for vehicles left unattended in very humid conditions (or for vehicles belonging to a disorderly army, of course...).
Rusted metal. A bare metal surface with a serious coating of rust.
Extremely rusty surface. This only happens if the car has been rusting for years in the open air in very high humidity (say, in a swamp or coast).
Enough theory for now! Let's get to work.
I came across a rubber blank that perfectly suits our purposes:
I quickly primed the surface with Vallejo gray paints and divided it into four areas. Since we are doing really quick painting, we can do without an airbrush. To make the paint dry faster, I use a hairdryer.
Effects 2 and 4 will need some texture base, so I prepared some thinned PVA glue.
Let's apply it over area No. 4.
And then we'll sprinkle some bicarbonate over this surface, cleaning off the excess.
I also apply PVA glue in area #2, where we will need rust “craters” penetrating the paint. I pour more bicarbonate into these depressions.
Now let's move on to painting. Let's start with the corrosion craters in area No. 2, and cover the entire areas No. 3 and No. 4. In these cases, dark rust paint will come in handy. In our example, I use the product Vallejo Panzer Aces302 “Dark Rust”. Once it dries, the primer is ready.
Now I protect rust spots with a wet mask. I used Vallejo Liquid Mask for this, but you can use Maskol or any similar product.
It is better to apply the mask with a toothpick because this product literally sticks to the brushes, rendering them useless. I also apply a few drops of a moisturizing mask throughout to further simulate erosion.
Now let's apply the paint coatings. I mixed acrylic paint and gloss varnish in a 50/50 ratio. For our example, I used Tamiya X22 clear paint, as well as tan XF55.
Why do you need glossy varnish? It grips the paint better after it dries, and at the same time it also gives the surface a gloss, which is ideal for further simulating atmospheric effects. The only drawback is that the paint will cover a smaller area, but since we usually use an airbrush to apply it, this is not that important. We will also need a thicker top layer to cover the craters in area #2.
Since in the above example we are not using an airbrush, I applied a thin layer of paint and dried it with a hairdryer. This produced an unexpected and interesting effect: when the paint and varnish mixture dried at a fast pace, it expanded some of the scratches (exposing the primer and texture). This effect suits our purposes perfectly! Although you should be very careful with this when working with a plastic model - the plastic can literally melt!
Now carefully remove the layer of wet mask using a cutting tool and tweezers. Don't worry if parts of the wet mask remain around the edges - this is exactly the effect we are trying to achieve.
The result is in front of you.
Let's start working on the bare metal in area No. 3. To do this, sharpen the pencil lead over the primer and polish the graphite with your finger. You can also add a little silver, but this is not seriously necessary.
Now let's get down to some good old fashioned pigments. I prefer MIG products for many reasons. The colors are correct, the bubbles are small (takes years to be used up under normal use), and the price/quality ratio is the best on the market. MIG currently produces three types of fluids to simulate corrosion (as well as copper rust), but others can be used to achieve the desired shade. I usually use P230 OldRust, P025 Standard Rust, P024 Light Rust, P033 Dark Mud, and P031 Vietnamese Soil. Vietnam earth). However, you can play with other shades... You never know what exactly will happen: what if something new and interesting, as was the case with paint and a hairdryer.
Let's apply a remover by mixing it with odorless turpentine (Talens 089) and a little “dark rust” P230. Instead of turpentine, you can mix alcohol, but since I don’t intend to let the mixture dry overnight, I use whatever can save us at least a couple of seconds. Therefore, in our example it is better to limit ourselves to using turpentine.
I apply the remover to rusted surfaces, diluting it further to create an uneven glaze around the painted areas.
Let the surface dry and repeat the procedure using “common rust” P025, drying the surface again. Then we apply “light rust” P024. With each step I diluted the wash a little more. The photo shows the result after this stage and final drying.
Now take some dark brown oil paint (Dark Umber). I use Van Gogh oil paints, but you can use any other brand. You should not replace oil paint with acrylic or gouache. Water-based mixtures don't work well with the mineral spirits we're going to use. Also, water does not provide the necessary surface tension to create the effects we are interested in (once we have applied a turpentine-based remover, there is no turning back!).
I applied dark brown umber to the painted surfaces.
In theory, you should use an airbrush at low psi to spray turpentine over an oily surface. The rusted dots will turn out less bright and more natural. But this time I'm not going to use a sprayer, but just spray a little turpentine over the painted areas using a pipette, and then very carefully stir the drops using a dotting brush.
Here is the result of the work after the paint has dried. There's a lack of shadows and variety - just a rusty effect everywhere. The light rust turned out to be a little excessive, so it would be worth darkening it a little with a dark wash. Lastly, if the rust stains were on a vertical surface, I would add drips to them instead of letting the stains concentrate in one spot.
Area of exposed metal. I can’t add anything, although in the example given it looks a bit boring. Here I would add a little dust and more shades of corrosion.
An extremely heavily rusted surface is the easiest to model. It turned out a little monochromatic... Probably, you need to add a little light wash, then other colors will be added.
Last but not least... My favorite technique. You could darken the rust a little more, add shadows and dust, but if you zoom in on the image, you can see that this technique gives a very realistic textured effect of chipped paint. What's missing here is the more natural placement of rusty dents. A little more work and the look would undoubtedly be much more realistic.
How to speed up metal corrosion
1. Make sure the metal you are working with is rustproof. Only metals containing iron rust, and some iron alloys rust slowly or do not rust at all. Stainless steel, an alloy of iron and chromium, is very difficult to rust. Cast iron or wrought iron rust better.
2. Pour some hydrochloric acid into a plastic bottle. A solution of hydrochloric acid in low concentrations is widely available in hardware stores and is commonly called hydrochloric acid. Carefully pour about 60 ml of acid into a strong plastic bottle. In this case, it is necessary to use rubber gloves and safety glasses.
3. Dissolve a small amount of copper in hydrochloric acid. By dissolving copper in acid, you get a solution that will speed up the rusting process. The easiest way to dissolve copper in acid is to roll a short piece of copper wire into a coil and immerse it in the acid for about one week.
When you have immersed the copper in the acid, do not close the bottle tightly. The gases released during the chemical reaction create pressure inside the bottle. Also, make sure to clearly label the bottle and keep it out of the reach of children and pets.
You can also use copper coins. Make sure the coin contains sufficient copper. For example, US coins issued after 1982 contain only 2.5 percent copper. However, pennies made before 1982 are 95 percent copper.
4. Dilute the acid and copper solution with water. Once some of the copper has dissolved in the acid, using protective gloves, carefully remove the copper from the solution. Once you have removed the copper from the solution, you can throw it away. Dilute the acid with water in a ratio of approximately 1 part acid to 50 parts water. If you used 60 ml of hydrochloric acid, you should dilute it with 3.8 liters of water.
5. Clean the steel or iron thoroughly. A solution of acid and copper works best if the metal is very clean. There are products available on the market designed to remove scale or corrosion from metal, but generally washing the metal with soap and water is sufficient.
6. Apply acid solution. Apply a thin layer of solution to the metal surface and allow it to air dry. The acid can be applied by spray or paint brush, but it will quickly corrode any metal parts of the sprayer. Wear protective gloves and safety glasses when applying the acid solution and work in a well-ventilated area, preferably outdoors.
7. Let the metal rust. Within an hour you should see noticeable rust on the metal. There is no need to wipe or rinse off the acid solution; it will evaporate naturally. If you want a thicker layer of rust, apply the acid solution one more time.
Method 2 of 4: Vinegar and Bleach
1. Make sure your metal is not coated with primer or sealant. This method works best for pewter or iron items. After you have inspected the product, mix one part vinegar with two parts bleach in a large plastic container. The amount of ingredients you use depends on the size of the item you are rusting.
2. Place the metal in the container. Make sure it is completely submerged if you don't want only part of the metal to rust. Keep it in the solution for about thirty minutes. During this time, a cracked layer of rust should appear on the metal.
3. Dry the item with a paper towel. You can also use a regular towel if you are not afraid of staining it. By the way, if you use paper towels for drying, you will end up with very nice towels with a rusty tint. Dispose of the vinegar and bleach solution by pouring it down the drain.
4. Wait until the item is completely dry before doing anything with it. Make sure the metal is completely dry before touching it to avoid exposing your skin to large amounts of bleach. Once the item is dry, remove any rust as needed. Some people prefer a thick layer of rust, while others like light corrosion on the metal.
5. Use an aerosol primer to seal the rust into the item. A matte spray sealant usually works well for this. You can purchase these sprays at your local hardware store.
Method 3 of 4: Peroxide and salt
1. Choose a well-ventilated area to work in. Using peroxide can be dangerous if you inhale too much of it. Select metal. This method works for both iron and tin.
2. Pour peroxide into a spray bottle. Using a spray bottle makes it much easier to apply peroxide to metal. Spray the metal with a generous amount of peroxide. Using more peroxide will speed up the rusting process.
3. Sprinkle the metal with salt. You need to do this while the peroxide is still wet. The rusting process will begin almost immediately and will be easily noticeable. You can use more or less salt depending on how thick a layer of rust you want.
4. Let the metal dry in fresh air. Unlike using a bleach and vinegar solution, the metal should be allowed to air dry naturally. If you rub the salt while the peroxide is still wet, you will disrupt the rusting process and the rust will form uneven spots on the metal. Once dry, wipe off the salt and admire your work.
5. Experiment with this method. You've just read the basics of how to use peroxide and salt to rust metal, but the sky's the limit with this method. Wipe off the salt and then spray the peroxide on the metal again. Try applying different amounts of salt or dipping the metal in water once it's dry. Water will give the rust a smoother texture.
Method 4 of 4: Vinegar and Peroxide
1 Protect the work surface if necessary. 2 Lay out metal objects. 3 Spray hydrogen peroxide onto the metal. 4 Immediately spray white vinegar onto metal objects. 5 Let the metal rust for the rest of the day.
Always use caution when working with hydrochloric acid, bleach, or peroxide. Even in low concentrations, these chemicals can cause irritation to the skin or mucous membranes.
What you will need
Acid and copper solution
Iron or iron alloy Rubber gloves Safety glasses Hydrochloric acid Measuring spoon Plastic bottle Copper wire Canister Water Soap Cloth Spray bottle or brush
Bleach and vinegar solution
Household bleach Vinegar Plastic mixing bowl Paper towels
Peroxide and salt solution
Hydrogen peroxide Table salt Spray bottle
I would place a piece of iron in a solution of an alkali metal salt and an oxygen-containing acid, blow oxygen through it, and put a potential on this piece of iron above the passivation potential. And next to it is a carbon counter electrode - the cathode. You will get cathodic “anti-protection” ;))
Today, the rust effect is one of the most popular finishing options for metal and other surfaces. There are two simple ways to give a coating a hint of rust: imitation rusting and natural rusting of metal using special chemical reagents. In this article we will look at the most effective ways to rust metal at home and during industrial processing.
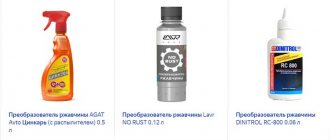
Coating system for natural rust effect
METAL EFFECTS® RUST FINISH
Metal Effects Iron Metallic Paint is a modified water-based acrylic paint with a high concentration of real metal particles . Finishes naturally rust over time, but Metal Effects Rust Activator accelerates the oxidation process and creates a beautiful, authentic rust finish in minutes.
MATERIAL CHARACTERISTICS:
applied to surfaces primed with Metal Effects Primer; creates a decorative rust effect; the top is coated with Metal Effects Permacoat Xtreme™ protective varnish; quick-drying; For interior and exterior use. ADHESION: Excellent adhesion to primed surfaces (Metal Effects Primer is used as a primer), such as wood, metal, drywall, plaster, wall coverings, canvas, canvas, PVC pipes, etc.
Note: Metal Effects Primer helps prevent rust and other oxidation products from forming under the paint film and protects the substrate from exposure to the activator. It also blocks the “bleeding through” of salts, tannins and other contaminants from the substrate to the paint film, which can cause unwanted reactions and discoloration of the oxidized finish coat.
For better adhesion to difficult surfaces such as plastic, enamel or glass, galvanized metals, copper, aluminum, etc. additional surface preparation will be required with Zinsser® Bulls Eye 1-2-3® adhesive primer. The use of other primers for these purposes is not recommended, because this may result in an unwanted chemical reaction.
POSSIBLE APPLICATION
: an excellent solution for creating accents indoors and outdoors, on walls, columns, doors, trim, stucco molding, railings, fences, decorative panels, art objects, lamps, vases, etc.
VISUAL EFFECT
: attractive decorative authentic coating with rust effect. The fine-grained texture of the coating is due to the presence of real metal particles in the composition.
COMPOUND
Base coat: modified acrylic, metal particles, water-based. VOC: less than 190 g/l.
PACKAGE
Base coat: 177 ml or 473 ml can. Activator: 118 ml or 473 ml can.
CONSUMPTION:
1.25-1.4 m2/177 ml or 3.2-3.6 m2/473 ml.
TOOLS: high-quality brush for water-based paints, high-quality roller with 1-1.2 cm bristles, HVLP spray gun.
SURFACE PREPARATION
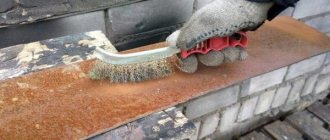
Remove all dust, dirt, grease, oil, wax, salt and chemical stains by washing the surface with soap and water or other suitable cleaning methods. Rinse with clean water and dry the surface thoroughly.
Remove loose paint and rust with a stiff brush or 80-150 sandpaper. Fill and repair any surface imperfections before applying Metal Effects Primer.
Previously coated surfaces must be intact and in good condition.
Smooth, hard or glossy coatings should be lightly sanded (matted) with sandpaper or an abrasive sponge with a grit size of 180-220 to improve the adhesion of the subsequent coating.
Remove all sanding dust with a vacuum cleaner, then wipe with a damp, lint-free cloth and dry the surface thoroughly.
Primer: Mix Metal Effects Primer thoroughly. Do not dilute. If there is any doubt about compatibility with the substrate, test by applying the primer to a sample of the substrate material to ensure the desired results.
Apply at least 2 coats of primer to completely seal and block the surface.
Some metal surfaces, such as bare aluminum, galvanized metals, rusty or scaled metals, need to be pre-primed with Zinsser® Bulls Eye 1-2-3® All-Purpose Adhesion Primer. Then it is recommended to dry the surface completely - preferably leaving it overnight. Next, follow the instructions for applying Metal Effects Primer.
Note: low temperatures and high humidity increase the drying time of soils.
APPLICATION
Apply at temperatures between 13°C and 29°C and relative humidity less than 85%. Always test the product on small, inconspicuous areas before starting a project to ensure the desired results. It is recommended to prepare a sample of the material for testing before painting to check the color and application technique.
Note: Use high quality masking tape or masking tape to demarcate areas not to be painted. Once the paint has dried to a tack-free finish, remove the tape using a paint knife, cutting along the edge of the tape to avoid peeling the fresh paint from the backing.
Stir the paint (base coat) thoroughly before applying!
Step 1: Apply a minimum of 2 coats of Metal Effects Iron Paint basecoat, allowing 30 minutes of drying between coats and a minimum of 1 hour of drying before applying activator.
Application by brush or roller: Apply with light, even strokes, avoiding applying too much pressure to the brush or roller to avoid runs or drips.
Spray Application: Protect surrounding objects from paint mist. If necessary, dilute the base coat with no more than 10% volume of clean water. Dilute carefully, because... Excessive dilution will reduce coverage and deteriorate the appearance of the coating.
Use a gun with a 0.7-1 mm nozzle, the pressure should not exceed 2-3 atm. When using a gun with a large nozzle diameter, there is a risk of uneven (clumped) distribution of the metal pigment over the surface!
Apply the paint in a continuous stripe, holding the gun at a distance of 30-45 cm from the surface. Each subsequent pass should be one third similar to the previous one. Step by step, in sections of no more than 1x1m, paint the surface:
- first with even movements up and down,
- then left and right, and complete the coloring until the coating looks uniform,
- diagonal movements.
Do not use turbine compressors or airless spray systems.
Apply the final coat slowly to cover the entire surface evenly, without any unpainted areas. Having worked one area in this way, proceed to the next one, repeating the same application pattern.
Remove drips and drips immediately with a brush or roller.
The recommended thickness of the paint film is 38 microns in one layer. The minimum thickness for complete coverage and full development of color effects is 76 microns.
Step 2: Apply Rust Activator with a brush or plastic pump sprayer (you can use a household trigger sprayer). After 5 minutes, apply the activator again. When the activated surface dries (after about 30-40 minutes), the rust effect will begin to appear. The more intense the layer of applied activator, the brighter the decorative effect. Low temperatures and high humidity can prolong oxidation processes and drying time.
Allow the coated surface to dry for 24 hours before applying Permacoat Xtreme Clear Protective Varnish.
Application of Protective Clear Coat: Painted surfaces should be coated with Permacoat Xtreme Protective Coat.
Do not use other protective coatings or varnishes!
Permacoat Xtreme Protective Clearcoat can be applied by brush, roller or spray (follow application instructions). Painted surfaces must be completely dry before applying protective varnish (minimum 24 hours).
First coat: Mix equal parts water and varnish and mix thoroughly before applying.
Second coat: Apply varnish without thinning.
DRYING TIME (at 21°C and 50% relative humidity). At lower temperatures and/or high humidity, drying time will increase.
Metal Effects Primer:
re-application – after 30 minutes; complete drying - 12 hours; application of base coat – after 12 hours; Basecoat Metal Effects Iron Paint:
re-application – after 30 minutes; touch-free – 1 hour; application of the activator – after 1 hour; Rust Activator:
re-application – after 5 minutes; manifestation of the rust effect – 30-40 minutes; application of Permacoat Xtreme protective varnish – after 24 hours. Protective varnish Permacoat Xtreme:
until sticky – 30 minutes; re-application – after 1 hour; complete drying - from 7 to 10 days. Cleaning: Clean tools with warm water and soap immediately after use.
Precautions: May cause dizziness, headaches, nausea, and irritation to the eyes, skin, nose and throat. Wear eye protection, chemical resistant gloves, protective clothing and a respirator.
Avoid contact with eyes. If contact occurs, rinse eyes with plenty of water for at least 15 minutes. Do not take orally. If swallowed, consult a physician. Avoid getting vapors into the respiratory tract. Ensure good ventilation during application and drying. If you experience difficulty breathing, watery eyes, or headaches, increase the flow of fresh air. Wash your hands thoroughly after work.
Keep away from children!
Protect from freezing!
Note: If the product freezes, allow it to thaw and come to room temperature. Mix thoroughly before use.
SHELF LIFE: 5 years. Date of manufacture on the packaging.
Manufacturer: Rust-Oleum, USA, 11HAWTHORN Pkwy, Vernon Hills, IL 60061.
Natural rust
As you know, any metal surface loses its original appearance over time, losing not only technical, but also external properties. Metals are characterized by natural rusting, which occurs due to the negative impact of environmental factors. If it is necessary to create natural rust on metal, you can simply speed up this process by using chemical reagents - their action is aimed at forming a layer of metal corrosion.
Before carrying out a chemical reaction, you need to make sure that the metal used is susceptible to corrosion. Rust appears only on metal surfaces that contain iron. Some metals are more resistant to corrosion - often these are chrome compounds or so-called stainless steel. Cast iron and wrought iron are also suitable for chemical rusting.
First method: cupric acid solution
One of the easiest ways to create natural rust is to use a copper-acid solution. Its manufacture does not require the presence of any specific reagents; the most important thing is to strictly follow the technical conditions and procedure for performing the operation:
- About sixty milliliters of hydrochloric acid is poured into a prepared (pre-cleaned) container. A prerequisite is the use of protective glasses and gloves made of thick rubber.
- Next, a small amount of copper (copper wire or coins) must be dissolved in hydrochloric acid, after which the solution must infuse for seven days to accelerate corrosion processes on the metal.
- Residues of copper should be removed from the resulting composition. Dilute the prepared copper-acid solution with water in the proportion: one part acid to fifty parts water.
- Next, the metal is cleaned (removal of the paint layer, plaster and other finishing materials), after which the surface is thoroughly washed with a soap solution.
- The copper-acid solution must be applied using a special spray gun or a regular construction brush. At the same time, follow all safety rules and pay special attention to room ventilation.
Approximately two hours after application, a rusty effect will appear on the surface. There is no need to wash off the mixture, since the composition will evaporate on its own after some time. If there is not enough rust formed, the procedure can be repeated in order to achieve the desired result.
Method Two: Vinegar and Bleach
There is another way to make rust easily and quickly at home - using vinegar and bleach. This method is suitable only for surfaces that were not finished with a primer or various sealing compounds. The combination of vinegar and bleach gives the maximum effect of natural rusting if the metal products contain tin or iron.
Let's look at the instructions for coating a metal product with rust:
- At the first stage, carefully inspect the object for the presence of extraneous traces of old coatings, clean if necessary.
- Next, mix one part vinegar and two parts bleach in a prepared container. The volume of the mixture may vary depending on the size of the item you are going to rust.
- Place the metal product in the solution for thirty minutes - during this period of time, a cracked layer of rust will form on the surface of the object.
- Wipe up any remaining mixture with a regular paper towel, and discard any remaining vinegar and bleach.
- Once the product is completely dry, remove as much rust as necessary (depending on the desired result). Some people prefer a thick layer of rusty coating, while others prefer superficial corrosion on metal and other surfaces.
To fix the resulting effect on the object, use a special primer in an aerosol or a matte sealant in the form of a spray.
On video: three simple ways to create noble rust.
How to make rust on metal (How to create a rust effect on metal)
Recently, rust on metal has become fashionable. You can do it yourself. There are many ways, but below are those that can be done at home.
Metals are characterized by natural rusting, which occurs due to the negative impact of environmental factors. If it is necessary to create natural rust on metal, you can simply speed up this process by using chemical reagents - their action is aimed at forming a layer of metal corrosion.
Rust appears only on metal surfaces that contain iron. Some metals are more resistant to corrosion - often these are chrome compounds or so-called stainless steel. Cast iron and wrought iron are also suitable for chemical rusting.
To produce a copper-acid solution, the presence of any specific reagents is not required; the most important thing is to strictly follow the technical conditions and procedure for performing the operation:
- About sixty milliliters of hydrochloric acid is poured into a prepared (pre-cleaned) container. A prerequisite is the use of protective glasses and gloves made of thick rubber.
- Next, a small amount of copper (copper wire or coins) must be dissolved in hydrochloric acid, after which the solution must infuse for seven days to accelerate corrosion processes on the metal.
- Residues of copper should be removed from the resulting composition.
Dilute the prepared copper-acid solution with water in the proportion: one part acid to fifty parts water. - Next, the metal is cleaned (removal of the paint layer, plaster and other finishing materials), after which the surface is thoroughly washed with a soap solution.
- The copper-acid solution must be applied using a spray bottle or a regular construction brush. At the same time, follow all safety rules and pay special attention to room ventilation.
Approximately two hours after application, a rusty effect will appear on the surface. There is no need to wash off the mixture, since the composition will evaporate on its own after some time. If there is not enough rust formed, the procedure can be repeated in order to achieve the desired result.
Vinegar and bleach solution to speed up natural rust
This method is suitable only for surfaces that were not finished with a primer or various sealing compounds. The combination of vinegar and bleach gives the maximum effect of natural rusting if the metal products contain tin or iron.
The procedure for covering a metal product with rust:
- At the first stage, carefully inspect the object for the presence of extraneous traces of old coatings, clean if necessary.
- Next, mix one part vinegar and two parts bleach in a prepared container. The volume of the mixture may vary depending on the size of the item you are going to rust.
- Place the metal product in the solution for thirty minutes - during this period of time, a cracked layer of rust will form on the surface of the object.
- Wipe up any remaining mixture with a regular paper towel, and discard any remaining vinegar and bleach.
- Once the product is completely dry, remove as much rust as necessary (depending on the desired result). Some people prefer a thick layer of rusty coating, while others prefer superficial corrosion on metal and other surfaces.
- To fix the resulting effect on the object, use a special primer in an aerosol or a matte sealant in the form of a spray
A solution of salt and hydrogen peroxide to speed up natural rust
- Pour the peroxide into a container - it is advisable to use a spray bottle, because this method will be the easiest to apply the liquid to the surface of the material.
- Spray metals well.
- Sprinkle the wet surface with salt.
The metal will begin to rust almost immediately, and the intensity of the rusting will depend on the amount of salt. - Let the metal dry in the fresh air.
The surface cannot be wiped until it dries, as rusting will be very uneven. You can wipe the surface only after it has completely dried.
A solution of salt and lemon juice to speed up natural rust
This is a pretty simple way:
- Mix 4 parts lemon juice with 1 part table salt.
- Treat the cleaned surface with the solution. Signs of rust will soon appear.
If you do not want or cannot (for example, on a stainless steel or non-metal surface) make natural rust, then you can make an imitation of it. There are several ways:
- Paints and pigments. To make a product rusty, acrylic-based rust paint is most often used. Rusty shades are formed through the interaction of brown, yellow and red pigments. Blue pigment can also be added to give the coating greater depth and richness of color. The mixture should be applied to a clean and degreased surface. To create a realistic rust texture, paint can be applied using a porous sponge or dry brush (to simulate streaks).
- Imitating film. In stores you can find self-adhesive film with the image of rust. This option will allow you to quickly and without any problems get the desired effect. However, it is recommended to glue such a film onto a perfectly flat surface, otherwise air bubbles may appear, or in some places the film will simply peel off. The surface that needs to be decorated must be degreased (with alcohol or a special degreaser).
“,”author”:””,”date_published”:”2020-01-30T00:00:00.000Z”,”lead_image_url”:NULL,”dek”:NULL,”next_page_url”:NULL,”url”:”https ://lik-o-dil-es.blogspot.com/2020/12/kak-zashit-igolkoj-dyrku.html”,”domain”:”lik-o-dil-es.blogspot.com”,”excerpt ":" е ржавление, ÐºÐ¾Ñ › RESULTS ‚оров окружающей Ñ Ñ€ÐµÐ´Ñ‹. “Rendered_count”:665,”direction”:”ltr”,”total_pages”:1,”rendered_pages”:1}
Imitation of natural rust on metal
Is it possible to rust metal without distorting the natural structure of the material? In such cases, imitation of rusting is used using a special coloring composition or rust film. Please note that you can give the rust effect to both metal and other materials, such as wood.
Paints and pigments
To make a product rusty, acrylic-based rust paint is most often used. Now such a mixture can be purchased at any hardware store. How is rust paint created? Rusty shades are formed through the interaction of brown, yellow and red pigments. Blue pigment can also be added to give the coating greater depth and color saturation.
There is also a natural pigment, which, when used alone, gives the appearance that the surface has rusted over time, and not as a result of decorative finishing work - this is iron lead or ocher (a mixture of iron oxide hydrate and clay).
Natural ocher is not used for painting metal objects. It is only a fundamental component and is added to paints and varnishes (paints, primers, enamels).
Regardless of what kind of paint you are going to use - purchased or prepared yourself based on red lead, the mixture should be applied to a cleaned and degreased surface. To create a realistic rust texture, paint can be applied using a porous sponge or dry brush (to simulate streaks).
Simulating film
In building and finishing materials stores you can find self-adhesive film with a picture of rust. This is also a good option that will allow you to quickly and without any problems get the desired effect. However, it is recommended to glue such a film on a perfectly flat surface, otherwise air bubbles may appear, or in some places the film will simply peel off.
Most often, rust imitation film is used by car owners who want to tune their car.
How to use the film:
- The surface that needs to be decorated must be degreased (with alcohol or a special degreaser).
- Attach the film to the base and mark the areas or contours that need to be cut out.
- Detach the film from the backing and begin gluing the piece in the middle, gradually leveling it towards the edges.
Decorative painting to look like rust (2 videos)
The effect of rust in interior decoration
The effect of artificial rust is not just a scattering of red spots on the wall. The attractiveness of the effect lies in the incredible combination of colors and textures. The variety of natural shades allows you to decorate the interior harmoniously and stylishly. “Rust” is great for creating design solutions in loft, high-tech, kitsch, art deco, and modern styles. This is a godsend for those who are not afraid to experiment and express individuality in small things.
Key advantages: • exclusive decorative effect (combination of metallic shine with an original unique texture); • ease of application; • good adhesion to the surface; • no unpleasant odor.
Preparing the work surface The surface must be clean, sound and dry. Remains of dust, dirt, grease stains, and fragments of old finishing must be removed. The working surface is primed using deep penetration soils.
Painting work begins only after the wall is completely dry. It is important to follow the key recommendations. The ambient temperature must not be lower than +10ºC, and also not exceed +25ºC. During the process of applying the coloring composition, care must be taken to ensure that direct sunlight does not fall on the working surface.
Features of the formation of a coating with a rust effect A coating with a decorative rust effect consists of two main layers: • Texture. It gives the working surface a special appearance and differs in varying degrees and intensity of corrosion. On the wall you can see both very deep relief, textured “defects”, and completely invisible patterns. • Dye. On a pre-prepared textured base, a second layer is formed - a paint and varnish material with the effect of decorative rust. The paint is applied with different densities and patterns. This affects the decorative effect that they are trying to imitate.
As a rule, they take a sample with a good “rusty ornament” and, being guided by it, process the working surface. To give the wall an even more unusual appearance, special glazing compounds are used. They allow you to enhance the effect of natural rust, complementing the decorative coating with spectacular notes of bronze or blackening. After all chemical reactions have completed on the working surface, the canvas is covered with a thick layer of protective varnish. As soon as the “protection” has dried, the wall is considered completely ready.
Here you can choose all the necessary materials to create a fashionable and extraordinary rust effect. It is convenient to work with high-quality products from the best manufacturers even for beginners without special skills.
To create a decorative coating with a rust effect you will need: • Fine-textured paint • Decorative plaster type DALI texture • Alpina effect Accept paint, impression effekt • VGT acrylic universal enamel 0.25 kg PATINA matt rust, copper (1, 2, 3) • Glaze composition to create decorative rust with the effect of drawing PATINA VGT with a matte texture • Glaze composition Gallery VGT with a translucent bronze effect
The estimated cost of 1m2 is about 200 rubles. Contact the Remonstr online store and we will calculate in detail the cost of decorative finishing just for you. You can always count on qualified assistance and support in choosing the highest quality materials for repairs.