Difference between wet and dry cyclone
To create a swirling flow, the main requirement is that the air entering the container does not follow the shortest path to the exhaust hole.
To do this, the inlet pipe must have a special shape and be directed either to the bottom of the container or tangentially to the walls. Using a similar principle, it is recommended to make the exhaust duct rotary, optimally if it is directed towards the lid of the device. The increase in aerodynamic drag due to pipe bends can be neglected. As already mentioned, a cyclone filter has the potential to remove liquid waste as well. With liquid, everything is somewhat more complicated: the air in the pipe and cyclone is partially rarefied, which promotes the evaporation of moisture and its breaking into very small droplets. Therefore, the inlet pipe must be located as close as possible to the surface of the water or even lowered under it.
Most washing vacuum cleaners introduce air into the water through a diffuser, so any moisture contained in it is effectively dissolved. However, for greater versatility with a minimum number of alterations, it is not recommended to use such a scheme.
Design and operating principle
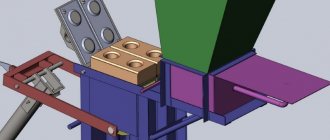
The appearance of the cyclone filter is a cylindrical container with a cone-shaped part at the bottom. On top of the homemade product there are two holes - inlet and outlet, designed for the passage of air. There is also a hole at the bottom of the structure through which filtered debris comes out. The inlet at the top is equipped with a channel, thanks to which the incoming air flow is supplied tangentially to the Cyclone.
Since the system is cylindrical, the incoming flow moves in a circle, causing vortices. Due to centrifugal force, heavy particles contained in the flow are thrown to the periphery. The second hole, which is the outlet, is located perpendicular to the inlet. This arrangement leads to a change in the vortex flow to a vertical one, eliminating the pickup of screened particles. The garbage moves down the walls of the cylinder and falls into the cone, from which it enters the garbage container through the outlet hole.
However, the cyclone filter has one drawback - it can only be used to remove dry construction waste. If there is water in it, then problems will arise during the absorption process. In addition, the vacuum cleaner used must have sufficient power, since the air passes through an additional filter, and the design itself has a long air duct.
The finished equipment turns out to be bulky, so it is better to use a longer suction air duct for ease of use.
What is a cyclone for a vacuum cleaner
The dust collector or container for collecting dust and dirt is an important part of any vacuum cleaner. They come in several types: a fabric or paper bag (disposable or reusable), an aqua filter or a cyclone. The latter is most often installed in models intended for dry cleaning.
The cyclone filter for a vacuum cleaner is an air purifier. The system filters air using inertia or centrifugal force. Its operating principle is simple:
- Air is sucked in.
- A cyclone forms a spiral-shaped air vortex.
- Under the influence of centrifugal force, all dirt and debris are first pressed into the walls, and then settle as sediment on the filter. On average, a cyclone purifies the air by 97%.
Important! Such vacuum cleaners have more than one filter.
First, the air flow passes through the primary cleaning (plastic mesh), after the cyclone - through the HEPA system (high-performance filter that traps the smallest dust particles and allergens). Due to their high efficiency, vacuum cleaners with a cyclone filter are used in various areas: at home, in construction, when refilling cartridges, in wood processing and paint shops, etc. The cyclone is used wherever it is necessary to quickly and thoroughly remove fine dust and there is no possibility of frequently changing bags or water from an aquafilter.
Advantages and disadvantages
The advantages of cyclone filters include:
- Extended operating time: equipment can operate much longer thanks to multi-stage cleaning.
- Cost-effective: no need to buy bags or wash them, just wash the container regularly.
- Hygienic: no need to come into contact with dirt.
- Convenient maintenance: the container can be easily and quickly removed, cleaned and inserted back. The container itself is made of durable plastic that does not break if a foreign object gets inside. Most often it is transparent, which allows you to monitor occupancy.
- Compact: cyclones are small in size and conveniently located in the vacuum cleaner.
Important! The container does not need to be washed with water every time - just shake out the dust.
Vacuum cleaners also have disadvantages:
- When clogged, the suction power of the cyclone itself quickly decreases, which increases the cleaning time.
- The cyclone allows the smallest dust particles and allergens to pass through. However, they are stopped by the HEPA filter.
- Typically, models differ in their noise level. If a foreign object gets into the dust collector, it will easily create additional noise.
Chip extraction from the sewer riser
To make a chip extractor from plastic sewer fittings, you will need the following tools and materials.
Materials
- PVC Sewer pipe ø 100 mm;
- PVC pipe ø 40 mm;
- hose;
- rivets;
- glue stick;
- fixing rings - clamps;
- two 2-liter bottles;
- 5 liter eggplant.
Step-by-step instructions for assembling a chip ejector
- The neck of the sewer riser is cut off, leaving a section 1 m long.
- The plastic bottle is cut, leaving a part of the cylinder with a cone, neck and stopper.
- Holes are drilled in both plugs. The plugs are glued together with a gun and tightened with a clamp.
- The cut bottle is inserted into the lower hole of the riser. The connection is sealed with hot glue and tightened with a clamp.
- A hole ø 40 mm is cut into the side of the PVC pipe. A pipe 70 mm long is inserted into it. The joints are sealed.
- 3 circles ø 100 mm are cut out of tin using a jigsaw.
- A hole ø 40 mm is cut in the center of each circle.
- The resulting disks are cut in half.
- The halves are sequentially connected to each other with rivets, resulting in a screw.
- A PVC pipe ø 40 mm is threaded inside the spiral. The pipe is connected to the screw with hot melt adhesive.
- The entire structure is pulled into the riser so that the upper part of the pipe protrudes 100 mm above the riser opening. In this case, the auger must remain inside the cyclone body.
- The neck and bottom of a 5-liter eggplant are cut off so that the lower part of the cone fits tightly onto the upper end of the sewer pipe. The outer diameter of the connection is glued with a gun.
- The upper hole of the neck is glued to the outlet of the inner pipe.
- A storage bottle is screwed into the bottom cap.
- Hoses are inserted into a horizontal pipe, the second end of which is connected to the nozzle of the shavings and sawdust collector of a woodworking machine (circuit saw, router or other equipment).
- The vertical outlet is connected to the branch pipe by the hoses of the vacuum cleaner. The chip ejector is ready for use.
Making a “Cyclone” from buckets: step-by-step instructions
Having prepared the materials and tools, then you need to proceed directly to creating the product. To make a homemade “Cyclone” from buckets, you need to complete the following steps:
- Make a cylindrical part. To do this, you need to cut off the top part of a five-liter bucket with metal scissors. The result should be a container in the form of a small cone.
- Turn the resulting part over and place it on plywood.
- Circle the container with a marker.
- Mark an additional circle with a compass, the radius of which should be 3 cm larger than the previous one.
- Use a 50mm crown to cut two holes inside the ring.
- Draw the outline of the figured element (insert) and cut it out with a jigsaw. The result of the work is two parts of the future filter made of plywood. The role of the insert is to shape the direction of air flow inside the device.
- Place the ring on the back of the lid of a 10-liter bucket and trace it with a marker.
- Cut out the middle along the marked lines.
- Drill holes in the top of the small bucket.
- Place the plywood ring on the container. To secure it, you need to tighten the screws through the holes of the bucket with a screwdriver.
- Place a lid from a 10 liter container with the side up on the fixing belt and secure it.
- Make two holes with a diameter of 50 mm in the side and top of the cyclone body.
- Cut out a square from sheet plywood in which you need to make a similar opening.
- Place the frame on the filter housing cover, aligning the holes. The specified part is secured with screws.
- Place the shaped insert slightly below the ring. From the outside of the container you need to tighten the screws that should go into the body of the element.
- Insert a plastic pipe into the frame. The main thing is that the bottom ring does not reach the shaped insert by 50 mm.
- Enlarge the side hole made in the cyclone body to create a teardrop shape.
- Glue a PVC elbow into the resulting opening. A heat gun will come in handy at this stage.
- Place the Cyclone body on a large bucket, which serves as a waste bin.
- Insert a hose from a vacuum cleaner into the top outlet, and a corrugated pipe into the side outlet to collect dust, sawdust, etc.
- Treat all joints with silicone sealant.
A homemade “Cyclone” must be cleaned regularly. A toothbrush will come in handy for this.
The nuances of such a device
In order to assemble your construction vacuum cleaner, you need to have a power unit on hand, the revolutions of which must be at least 6,000. As for the materials at hand, it can almost always be found at home. As a donor for the engine, you can use not only an old vacuum cleaner, but also a washing machine.
If the power unit is found, then you need to take care of its tightness. You will also need a fan. Very often, an ordinary bucket is used as a body for a vacuum cleaner, in which a hole is made. Naturally, you need both a container for garbage and a filter, which you can make yourself.
The presented videos show several variations of assembling a construction vacuum cleaner. It is recommended to study them if you decide to create a homemade model.
Cyclone vacuum cleaner for the workshop: photos, videos, drawings
If a person has his own workshop, then one of the most important issues is cleaning the premises. But unlike cleaning dust in an apartment, an ordinary household vacuum cleaner will not help here, since it is not designed for construction waste and sawdust - its garbage container (dust container or bag) will very quickly become clogged and become unusable. Therefore, they often use a homemade cyclone filter, which, together with a household vacuum cleaner, will help clean the workshop.
Stages of work completion
This method allows you to make a cyclone from an old vacuum cleaner. To do this, take a plastic container, for example, a bucket - you need to make a filter from it. To do this, a lid is made from tin for the top of the container. There you also need to cut a hole for plastic pipes. They are inserted into the grooves at an angle. The direction of the tubes must match - either both clockwise, or both counterclockwise. The tightness is created by gluing the place where the tubes enter the container.
A tin circle with a long threaded rod sticking out in the middle is attached to the bottom of the bucket using bolts. A regular filter from a minibus is put on it. This is necessary to clean the air. When the top lid of the container is closed, there should be a hole in the center for this pin, which will ensure that the bucket is closed tightly using the nut.
A motor from a vacuum cleaner with a pump and a switch is installed on the lid of the container. One of the holes is connected to the pump via a corrugated hose.
The motor must be firmly bolted to the cover so that it does not tip over during operation. All grooves for fastenings on the bottom and lid of the container are treated with silicone or a glue gun to ensure sealing.
Principle of operation
There are a great many different designs of cyclones, but they all share the same operating principle. All designs of cyclone chip suckers consist of three main parts:
- Household vacuum cleaner
- Cyclone filter
- Waste collection container
Its design is such that the flow of intake air is directed in a circle and its rotational movement is obtained. Accordingly, the construction waste contained in this air flow (these are large and heavy fractions) is acted upon by a centrifugal force, which presses it against the walls of the cyclone chamber and, under the influence of gravity, it gradually settles in the tank.
The disadvantage of a cyclone vacuum cleaner is that in this way you can only collect dry garbage, but if there is water in the garbage, then there will be problems when sucking up such a substance.
The vacuum cleaner must be powerful enough, since in its normal mode of operation it is assumed that air is sucked through a standard hose. If an additional cyclone filter is used, an additional filter appears in the air path, and the total length of the air duct is more than doubled due to the additional air duct. Since the design is as maneuverable as a separate vacuum cleaner, the length of the last hose should be sufficient for comfortable work.
Operating principle
Many people know what construction debris is and how difficult it is to remove it, especially on an industrial scale. There are special construction vacuum cleaners on the market that have high power compared to household ones, but at the same time they have large dimensions and a considerable price . Therefore, masters of their craft create cyclone-type chip extractors with their own hands, thereby improving their household vacuum cleaners and making their work easier. The filter is a structure of two compartments: external and internal. Under the influence of centrifugal force, all debris entering the dust collector is sorted into large and small particles based on the cyclone principle .
Large ones settle in the outer chamber, and small ones - in the inner chamber. It is because of this principle of operation of the filter that it was called cyclonic.
A simple “Cyclone” from a bucket
In this case, you will need a 20 liter capacity. To make a homemade “Cyclone” for a vacuum cleaner from a metal bucket, you need to follow these instructions:
- Using a grinder or scissors, cut a hole in the center of the galvanized lid.
- Seal the cracks with sealant.
- Make a hole with a diameter of 40 mm in the side of the bucket.
- Insert a plastic elbow into it at 45°.
- Connect the corrugated hose to the installed pipe element. It is advisable to tilt the corrugation towards the bottom, since this will direct the air along the desired path.
- Place nylon fabric or other permeable material over the filter. Thanks to this, large particles of debris will not get into the homemade “Cyclone”.
- Connect the filter outlet to the elbow on the lid.
- Treat all joints with sealant or glue.
If you cannot insert the pipe, then you will have to make an adapter from a rubber hose.
DIY making
Before starting work, you need to remember that building such a simple device will not be difficult, so after mastering the principles, you can immediately make your own masterful modifications to the mechanism.
When making a cyclone with your own hands from scrap materials, you need:
Capacity 10−25 liters (tank, plastic can, bucket, barrel, etc.)
It is important to take a base that does not have internal ribs, otherwise the air flow will be interrupted due to obstruction. Some experts cut out a wooden frame for the container and combine it with plexiglass, however, this wastes time on woodworking. Polypropylene elbow with 30 and 90 degree angles
An elbow with an angle of 30 degrees will create a vortex flow (centrifuge). The pipe is about 1.5 m long, depending on the volume of the container. Corrugated hose two meters long. It can be immediately divided into two identical hoses, one is designed to collect dust, the other is attached directly to the vacuum cleaner itself. Oil filter or any alternative (rubber plug with numerous small holes or breathable fabric material).
To make a vacuum cleaner with your own hands, you need:
- In the lid of the container it is necessary to make a hole for the polypropylene elbow at 90 degrees and in the side of the container itself the same hole for the elbow at 30 degrees.
- A filter is placed inside the container, already connected to a polypropylene elbow.
- All holes should be sealed tightly with sealant.
Subtleties of connecting a homemade cyclone
A self-assembled cyclone (filter for construction purposes) is connected for operation in a simple way.
The input (side) channel is connected by a corrugated flexible hose or other similar accessory to a working tool, for example, to the channel of an electric jigsaw.
The output channel (upper pipe) is connected directly to the input socket of the vacuum cleaner instead of the working nozzle.
Connection diagram - connecting a cyclone in pairs to a household vacuum cleaner and construction tools, the design of which supports the function of garbage suction
First, a vacuum cleaner is put into operation, then a construction tool is used for the necessary purposes. As a result, the action being performed, say, cutting a board with an electric jigsaw, takes place without releasing chips and fine dust into the environment.
The by-product of the operation is completely sent to the cyclone separator where it is properly filtered.
DIY enthusiasts can try to assemble a complete vacuum cleaner that can be used in the workshop or at home. Step-by-step instructions for making a practical unit are presented in this article.
Pros and cons of a construction vacuum cleaner
High power allows professional equipment to work without interruption for quite a long time, and a long hose provides access to remote areas without the need to carry the vacuum cleaner or interrupt work.
But it also has disadvantages:
- High price. If periodic or one-time work is required, purchasing a new expensive tool is not practical.
- Large size and weight.
Some craftsmen have come up with a way out of the situation in the form of an additional option to the existing technology. At fairly low costs, you can assemble a cyclone filter for a vacuum cleaner with your own hands. This design will increase the capabilities of an existing conventional household vacuum cleaner.
Traffic cone cyclone
A simple and quick way to build a cyclone for a vacuum cleaner directly with your own hands is to make it from a traffic cone.
What is needed for the job?
Since you will be making the cyclone yourself, you need to prepare the necessary tools and consumables. So we prepare:
- Traffic cone;
- Plastic pipes (approximately 40 mm)
- Angle 45 degrees;
- Plywood;
- Pieces of laminated chipboard;
- Glue gun and sticks;
- A container with a lid, possibly for paint.
Let's start making
First, we take plywood to make a lid to cover the cone. We cut out a circle of the required diameter and cut two holes in it. One will be in the middle, the second parallel to the edge, as in Figure 6.
Circle made of plywood with holes for air inlet and outlet
Next, you need to insert the tube with its extension upward into the center of the circle as shown in Figure 7. Glue the joint between the product and the tube.
A pipe inserted into one of the holes
A pipe must also be inserted into the second hole, but a 45-degree angle is placed on top of it. It is as the air moves through it that it will spin into a vortex. The angle is located inside the cone.
Angle position for proper air circulation in the cyclone
Afterwards the pipe is glued as in the case of the first one. The lid is ready. Next it is glued into the cone.
The tip of the cone must be cut off. Afterwards, it is inserted into the lid of the bucket in the center into a pre-prepared hole. The attachment point is glued. The inside of the lid must be reinforced with pieces of chipboard. Afterwards they are tightened together with self-tapping screws.
The result is a product like in Figure 9.
Ready product
When should you use a construction vacuum cleaner?
Those who are constantly faced with construction, repair and carpentry work know about the need for timely cleaning of the workplace at the end of the stage.
Cleaning can be done multiple times in one day, so it’s reasonable to want to make the process easier for yourself. Pieces of polystyrene foam and polyethylene film , scraps of gypsum board, chipped plaster, dust from cutting aerated concrete - all this debris settles not only on horizontal surfaces, but is also electrified and attached to vertical walls.
Cleaning with a mop and dustpan is not always appropriate due to large areas, and washing will only turn dry dirt into wet slurry, especially in unfinished rooms.
Due to the small size of the dust container, a regular household appliance will quickly become clogged and will have to be continuously cleaned. If large particles get in, there is a high risk of breaking the equipment.
It is in such conditions that the best solution would be to use a construction vacuum cleaner.
Making a cyclone filter
Creating a homemade chip sucker consists of a number of stages:
- Creating a retaining ring and a shaped insert
- Installing the Retaining Ring
- Installing the side pipe
- Top entry installation
- Installing a shaped insert
- Cyclone filter assembly
Creating a retaining ring and a shaped insert
It is necessary to cut off the side of a small bucket, which is used to attach the lid. The result should be a cylinder like this (well, slightly conical).
We make markings - place a small bucket on the plywood and draw a line along the edge - we get a circle.
Then we determine the center of this circle (see school geometry course) and mark another circle, the radius of which is 30 mm larger than the existing one. Then we mark the ring and the shaped insert, as shown in the figure.
It is better to do the markings precisely or, in the worst case, “by eye”.
We cut out the resulting parts with a jigsaw.
As a result, you should get two blanks - a fixing ring and a shaped insert.
Installing the Retaining Ring
We fix the ring on the edge of a small bucket so that we get a side. We fasten using self-tapping screws. It is advisable to pre-drill the holes to avoid splitting the plywood.
We mark the roof of a large bucket. To mark, you need to place the bucket itself on the lid of a large bucket and trace its outline. It is better to make markings with a felt-tip pen, as the mark is clearly visible.
And cut it out with a knife.
We install the cut out lid on the side of the small bucket and fix it with self-tapping screws.
It is important to note that all connections must be airtight; therefore, before installing the cover, the connection area must be coated with sealant. You also need to coat the joint between the wooden ring and the small bucket.
Installing the side pipe
The side pipe is made from a sewer outlet of 30 degrees (or 45 degrees). To install it, you need to drill a hole in the top of the small bucket with a crown.
Please note that the top of the small bucket has now become its bottom
After the hole is drilled, you need to use a knife to give it a teardrop shape for a tighter fit of the pipe.
We place the pipe on the sealant and fix it with a self-tapping screw.
Top entry installation
To make the upper input, you need to drill a hole in the upper part of the chip sucker (small bucket), that is, in the center of the former bottom.
To firmly fix the inlet pipe, you need to use an additional element of strength in the form of a square piece of plywood 20 mm thick with a central hole for the pipe of 50 mm.
This workpiece is fastened from below with four self-tapping screws. Before installation, the joint must be coated with sealant to ensure a tight seal.
We install the upper pipe without additional fastening - simply with sealant.
Installing a shaped insert
The shaped insert is a very important component of a homemade chip cleaner; it must be secured inside the cyclone filter, as shown in the photo.
Fastening is done using self-tapping screws through the outer wall of the cyclone.
Cyclone filter assembly
Assembly is extremely simple - the resulting structure just needs to be placed on a large bucket. The final height of the product is 520 mm.
Then you need to connect the air ducts correctly:
- Upper pipe – to a household vacuum cleaner
- An angled outlet that enters from the side at an angle to the hose.
The homemade cyclone vacuum cleaner (chip cleaner) is ready.
Do-it-yourself snail for chip removal
The power of a household vacuum cleaner for some types of processing of wooden workpieces may be insufficient. To clean large volumes of air, they make a snail-type chip extractor with their own hands. The body of the device resembles a snail shell in its shape.
Craftsmen make the snail body from two types of materials - metal and wood. Creating a metal body will require the use of a welding machine and the ability to handle this equipment. There is another way - making a snail from construction plywood.
To work with plywood in a home workshop, you need to have a jigsaw, drill and other woodworking tools. The most important part of an exhaust fan is the air intake wheel. It is made from lightweight materials such as wood, plastic and the like. The impeller is assembled in such a way that the blades are curved or rotated with the inner edge relative to the wheel radius line by 450.
The outlet hole is connected to the cyclone filter using adapter couplings and hoses. The axis of the air intake wheel is connected directly to the electric motor shaft or a belt drive is installed, which is preferable to coaxial joining. Firstly, the pulley on the wheel axle is easier to isolate from the side opening of the volute, which increases the performance of the device. Secondly, the removal of the electric motor contributes to its necessary cooling.