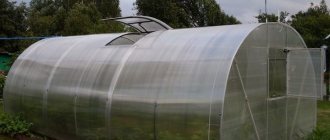
Every gardener dreams that working at their summer cottage will be not only pleasant, but also easy. Various automatic sprinklers and pumps make work easier; all sorts of means appear that make it possible not only to protect the crop from pests, but also to significantly increase its volume. And many also dream of modernizing their greenhouse, which should not only retain heat well, but also be ventilated in a timely manner.
How great it would be to automate ventilation - it’s not always possible to visit a summer cottage every day, you have to ask your neighbors to open the greenhouse, who have enough troubles of their own. But there is a way out - you can purchase a compact but functional thermal drive for the greenhouse, with which you can easily automate this process.
Thermal actuator for greenhouses
Why is greenhouse ventilation needed?
A greenhouse always poses several tasks for a summer resident - how to save heat, protect plantings from unfavorable climatic conditions and weather, and ventilate this structure in time to get rid of excess moisture and slightly reduce the air temperature in it. But few people think about why it is necessary to closely monitor the microclimate in the greenhouse and ventilate this structure in a timely manner.
Thermal drive-DV with bracket and closer (gas lift)
The main reasons for the need to ventilate greenhouses.
- In greenhouses where ventilation is poorly organized, there is a high level of humidity, which is why pathogenic microorganisms actively multiply.
- Not only bacteria, but also various pests love humid and stuffy conditions.
- Plants need fresh air to “breathe,” or rather, for the process of photosynthesis.
- For plant organisms, excessively high temperatures are very harmful - they begin to dry out, “burn” and eventually die.
- Properly organized ventilation will provide an excellent microclimate, which will have a positive effect on the well-being of plants and the quality of the harvest.
- Good ventilation allows you to harden plants and improve their immunity.
- Ventilation will help harden the seedlings standing in the greenhouse and accustom them to independent life in the ground.
- Air exchange and ventilation are necessary for the process of pollination of plants.
Attention! Air temperatures above +40 degrees and the scorching sun are very harmful to plants. Some crops even die from excess heat. Remember that the air temperature in a closed greenhouse can rise very quickly. A thermometer installed inside the structure will help monitor its (temperature) level.
To make plants and flowers grow quickly, take care of ventilation
It is important not just the presence of ventilation, but also its proper organization. Any haphazardly installed vents will clearly not be enough - as a rule, a primitive ventilation system that is convenient for humans is not suitable for plants.
Ventilation is especially important for polycarbonate greenhouses. In a conventional greenhouse, plants have at least a small chance that fresh air will penetrate through the cracks in the structure. From the same point of view, polycarbonate greenhouses can be called practically airtight.
Ceiling automatic ventilation
However, you need to be very careful with ventilation - heat-loving greenhouse crops may die due to drafts and cold air. That is why the greenhouse must be closed at night even in warm weather - frost can strike without warning and ruin all your work.
In order to properly ensure ventilation and air circulation in the greenhouse, gardeners need to closely monitor weather conditions, and also constantly be at their summer cottage in order to be able to open and close the doors and windows in the greenhouse structure. And this is not always convenient, for example, for a working person. But even this difficult situation now has a solution. You can purchase a thermal drive for a greenhouse, which will provide autonomous ventilation of the structure, doing this troublesome work for you.
Universal automatic greenhouse ventilator for side and dome vents
Types and principle of operation of automatic ventilation of greenhouses
The operating principle of any automatic ventilation of greenhouses with a thermal drive is based on the opening and closing of the window as a result of temperature readings in the room. There are several types of devices for ventilating greenhouses. Each of them differs in the physical principle underlying the operation of the device, and has its own advantages and disadvantages.
Electronic thermal drive
The system consists of fans located in the upper part of the greenhouse and a thermal relay with sensors that control their operation. This is one of the most convenient and effective ways to regulate temperature.
The advantages of using an electronic thermal drive are:
- rationality;
- precise temperature control, which does not have inertia;
- wide power range that fits any size of greenhouse;
- ability to use in greenhouses of any design.
The disadvantages of an electric ventilator for greenhouses is its complete dependence on electricity and its uninterrupted supply. To eliminate this drawback, you can install a backup power source in the form of a battery, generator or solar battery storage.
Did you know? The first greenhouses appeared in Ancient Rome. The Romans planted plants in carts on wheels. During the day they were placed in the sun, and at night they were hidden in warm rooms.
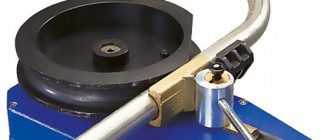
The principle of operation of a plate made of different metals
Much less commonly used is an auto-ventilator for a greenhouse, the operating principle of which is based on the ability of different metals to react differently to temperature changes. This device is called a bimetallic system. It consists of two plates consisting of metals with different coefficients of linear expansion. When heated, the plates bend in one direction and open the window; when cooled, they bend in the other direction, closing it.
Advantages of this system:
- complete autonomy and independence from power sources;
- ease of installation;
- can be used for a long time;
- cheapness.
Disadvantage of the system:
- inertia. If the heating is insufficient, the window will not open;
- low power. Suitable for light frames only;
- the difficulty of selecting metals that can expand at the temperature required for plants.
Did you know? Greenhouses, similar in appearance to those of today, appeared in the 13th century in Germany. Their creator is considered to be Albert Magnus, whom the Catholic Church recognized as a sorcerer. And the construction of greenhouses was prohibited by the Inquisition.
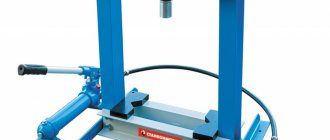
Features of the design based on hydraulics or pneumatics
The thermal drive system for an automatic greenhouse is based on a hydraulic or pneumatic operating principle. The difference between these principles is in the working fluid: liquid or air. You can make the system yourself or buy it in a store.
The device consists of a cylinder filled with a special liquid and a rod that moves under the force of expansion or compression of this liquid. At a temperature of 23 degrees, the liquid begins to expand and pushes the rod with a force of more than 20 kg, opening the window. The system should close under its own weight as the rod retracts. If the window has a structure that needs to be closed, then either a spring or a similar reverse action mechanism is offered for this.
Such a system has a number of advantages:
- reliability and durability;
- independence from power source;
- easy to attach to the frame. All you need is a screwdriver or screwdriver;
- sufficient power for any type of frame.
Disadvantages of a hydraulic ventilation system:
- inertia of the process. When the temperature drops sharply, closing is slow;
- the temperature is monitored only at the location where the system is mounted;
- high cost, therefore not economically viable for small greenhouses.
What is a thermal drive?
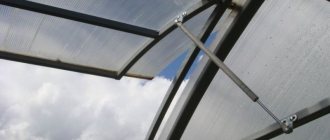
A greenhouse thermal actuator is a small device that allows you to automatically close and open doors, transoms, and vents when a certain level of air temperature is reached. A person will not have to control this process after installing this simple mechanism. By the way, the device works “by itself” - you do not need to supply electricity to the greenhouse or purchase batteries. Simply put, a greenhouse thermal drive is an automatic ventilator.
Thermal actuator - greenhouse automation system - capable of opening both a ceiling window (ideal for ventilation) and a hinged window and door to the greenhouse
How does it work? It's simple: at an air temperature of more than +23 degrees, a liquid that has the ability to melt (cyclohexanol) begins to expand, fill a special chamber, thereby moving the rod, which forces the door or window to open. If the air temperature decreases, this same liquid begins to decrease in volume, compressing and drawing the rod back. Accordingly, the sash also closes next.
Thermal drive for automatic opening of windows
Attention! In order for the device to control casement windows, it is also necessary to additionally use counterweights and springs.
The main advantages of a thermal drive.
- Reliability – throughout the entire warranty period, the thermal drive will definitely not let the gardener down.
- The warranty period is 10 years of continuous operation, but in reality it is not limited.
- The device does not require any additional adjustments.
- The package includes all the necessary fasteners and the thermal drive itself.
- The thermal actuator is easy and quick to install. Anyone can cope with this task.
- The thermal actuator can close/open not only doors and vents, but also a raised frame on the ceiling or a swinging window.
Table. Greenhouse thermal drive delivery set.
| Detail | Quantity/Description |
| Thermal drive | 1 PC. |
| Closer (gas spring) | Prevents doors from slamming and closing abruptly, 1 pc. |
| bracket | Using it, the device is attached, 2 pcs. A bracket is also required to be able to open the sash, 1 pc. |
| Fixing elements or fasteners | 4 things. |
| Self-tapping screws 4.2x16 | 6 pcs. |
Diagram of a thermal drive for greenhouses
Note that the mechanism includes all the necessary parts for opening and closing any sash.
Automatic greenhouse ventilation
The technical features of the thermal drive are as follows:
- the length of the device itself between the supports easily changes from 44 to 33 cm;
- rod stroke – up to 10 cm;
- the nominal force, which is sufficient to open and close any leaf, is 10 kgf;
- the hydraulic cylinder, which is part of the thermal drive, is able to withstand pressure on the rod up to 200 kg - thanks to this, the device is very durable and does not allow the door or window to close even in strong gusts of wind;
- temperature of use ranges from -40 to +60 degrees;
- the temperature when the door begins to close is +22 degrees;
- the temperature when active door opening begins is + 24 degrees.
Thermal drive Vent - chain against wind loads
Prices for heat drives for greenhouses
heat drive for greenhouses
Automatic ventilation of greenhouses: how it works, or What is a thermal drive for greenhouses
In order for the plants in the greenhouse to feel good, it is necessary to maintain the correct temperature, humidity and fresh air flow. To solve these problems, you should install vents with closers for greenhouses. With their help, you can regulate the microclimate in an indoor garden. With proper ventilation, harmful insects and microorganisms will not multiply in the greenhouse, and the temperature will be maintained at optimal levels for the plant.
In order for this system to work smoothly and without delay, the windows must also be equipped with automatic machines for ventilating greenhouses. Due to the ability of warm air to rise, vents should be placed at the top of the greenhouse. Their number on average is 2-3 per structure 6 m long. It should be remembered that they must be placed approximately evenly over the entire area in order to ensure equal movement of air flows, prevent drafts and slamming of frames when there is a gust of wind.
You can do without an automatic ventilation system for greenhouses, but its presence will greatly facilitate the gardener’s work and allow him to do other work.
Device classification
According to their mechanism of action, thermal actuators come in several types:
Electrical
In such systems, the actuator is driven by an electric motor. The signal to turn on the motor is supplied by the controller, which receives information from the temperature sensor.
The main advantages of electric drives include sufficiently high power and the ability to create intelligent systems that include a wide variety of sensors that make it possible to correctly determine the ventilation mode.
The disadvantages of electric drives are the dependence on power supply and the relatively high cost.
In addition, the humid atmosphere of the greenhouse does not have a favorable effect on the operation of any electrical appliances.
Pneumatic
Pneumatic systems work by supplying heated air from a container to the actuator piston. When the sealed container heats up, expanded air is supplied to the piston, it begins to move and this helps to open the window.
If the temperature drops, the air inside the system is compressed and the piston pulls in the opposite direction, closing the window. Despite the simplicity of this type of thermal drive, it is quite difficult to make it yourself.
To do this, you will need to ensure complete sealing of the container and inside the piston, which is not easy.
Moreover, the ability of air to be easily compressed greatly complicates the task, which can lead to loss of system efficiency.
Bimetallic
The operating principle of such devices is based on different coefficients of thermal expansion for different metals.
If metal plates are fastened together, then when heated, one of them will become larger in size than the other.
As a result, the resulting distortion is used as a source for mechanically opening the window.
The advantage of this drive is its autonomy and simplicity, the disadvantage is that the required power is not always required.
Hydraulic
The hydraulic thermal drive mechanism operates by changing the balance in the weight of a pair of containers, between which the liquid moves.
Accordingly, liquid moves between vessels due to changes in air pressure during heating and cooling.
The advantage of such a system is its high power in the complete absence of electricity. It is much easier and cheaper to assemble such a design with your own hands than other drives.
Installing a thermal drive
How to install this simple but really useful device in your greenhouse? It's very simple - just follow the step-by-step instructions.
Methods for installing a greenhouse thermal drive
Step 1. Check how a door, window or window opens and closes. The sashes should turn easily on their hinges; you should not use much effort.
First, check the functionality of windows, vents and doors
Step 2. Using a marker, mark the place on the sash where part of the mechanism will be installed - the bracket, which is located in a single number. It should be fastened in such a way that the rod in one of the parts of the device can move 8-10 cm. Drill holes and secure it with two self-tapping screws.
Bracket Attachment
Step 3. Take other brackets (2 pieces in a set) and install them using self-tapping screws on the wall of the greenhouse and the doorway so that when the sash is fully opened, the distance between the support centers of the device is 44 cm. One of the brackets (for the gas spring) is attached on the frame, the second (for the thermal drive) - on the wall.
The other 2 brackets are attached to the greenhouse wall and doorway
Attention! During installation, be careful that none of the thermal drive elements rub against the window frame or door frame.
Step 4. Place special clips on the gas spring and the thermal actuator itself.
This is how special clamps should be attached
Step 5. Take the thermal actuator and begin to mount it on the side of the greenhouse that is opposite to the opening to be opened. The thermal drive is the part that is longer than the others.
Step 6. The brackets have special ball bearings onto which the clamps located at the ends of the thermal actuator and gas spring are placed. Secure these parts, installed on the other edges of the device parts, to the first bracket installed on the sash earlier.
Step 7. Check the functionality of the device, after which you can start using the thermal drive.
Attention! Install both the spring and the thermal actuator so that the chrome rod faces down. And without going too far, one more tip - before installation, place the gas spring in the refrigerator so that it contracts.
Automatic window opener "Volya"
By the way, if you need to dismantle the device (it is recommended to do this for the winter), then raise the special locking spring on the latch by only 2-3 mm.
Installation instructions for greenhouse thermal drive Vent-L. Downloadable file (click the link to open the PDF in a new window).
Instructions
A device such as a thermal drive for a greenhouse can be bought in gardening stores or ordered online. You can also do it yourself.
What a homemade thermal drive for a greenhouse looks like
What is a thermostat and why is it needed?
The essence of the thermostat is clear from the name; it is designed to regulate the temperature in the room. Thermostats (thermal actuators) are indispensable for a busy summer resident who cannot devote much time to his greenhouse.
Automatic thermostat
In winter, devices installed on heating systems monitor air and soil temperatures using special sensors. And in the summer, thermal actuators regulate ventilation in the greenhouse. Some (single-channel, dual-channel and triple-channel) deal with turning on and off several fans. And others open and close the windows themselves, depending on the heating or cooling of the air. Let's look at three simple options for thermostats for ventilation, which you can easily make with your own hands. More reliable - from a gas shock absorber (two types), and very simple - from plastic bottles and from an inflatable ball.
Do-it-yourself thermal actuator for a greenhouse
You can make a thermal actuator from parts of an old office chair. Actually, from the latter you only need one part - the cylinder, which is responsible for raising and lowering the seat. It consists of two rods - steel and plastic. So, let's begin.
Office chair cylinder
Step 1: Using a vice, remove the plastic rod. Inside you will find a pin made of strong steel.
Example of a cylinder (gas lift) device
Step 2. Take a metal rod, preferably steel, 8 mm in diameter, and clamp it with a reliable vice so that it protrudes about 6 cm.
Step 3. Place the cylinder on the rod, press firmly and completely remove the air from it.
Step 4. Cut off the cylinder that has a taper using a regular grinder and press out the metal rod from it. At the same time, do not spoil the smooth surface and the rubber element present on the rod.
Step 5. Make an M8 thread on the edge of the rod, and return the sleeve that was inside the cylinder to its place.
Step 6. Remove the rubber rings from the aluminum piston.
Step 7. Insert the piston into the sleeve that is inside the cylinder part and remove it from the cylinder. Try not to damage the oil seal with your actions. Screw on the M8 nut - it is necessary so that the piston does not accidentally fall inside the structure.
Nut M8 galvanized
Step 8. Insert the aluminum piston into the valve seat. Weld a metal pipe to the edge of the cylinder on the cut side as tightly as possible. Screw an extended M8 nut onto the thread on the rod.
Step 9. Connect the mechanism to the sash control levers and fill with regular motor oil. When doing this, do not forget to remove the air. To make this process more convenient, install a plug on one side of the pipe and a ball valve on the other.
A simple option - a thermal drive circuit for automatic ventilation of glass jars
Homemade bellows-based ventilation device
Creating a thermal drive from a cylinder from a chair
Many computer chairs have a special lift cylinder. This mechanism allows you to automatically adjust the height of the chair and seating position at the computer. If you remove this part from the chair, it can become the basis for a thermal drive. This idea and material are an excellent choice for making a mechanism with your own hands.
Creation instructions:
Initially, you need to remove the mechanism from the chair, and then get rid of the plastic rod that blocks access to the valve pin. It is made of metal. Next, you should clamp the 8 mm rod in a vice and place the cylinder in it. This action will allow you to get rid of the pressure that is in it. Next, you will need to use a grinder and cut off the cylinder along with the conical part. Now you can squeeze out the metal rod
It is very important not to damage the rubber gaskets and cuffs. The resulting rod must be placed in a vice, having first wrapped it in a tarpaulin so as not to damage its base.
Having inserted the rod, you should make a thread on it with an M8 thread. Only then can you get rid of the cuff. You should insert the inner sleeve back, but there is no need to throw away the aluminum piston; it will still be useful. The remaining parts can be discarded. It is necessary to remove the rubber rings that are on the mechanism. Next, you will need to wash all the parts with gasoline. This will clean the parts from possible metal shavings. Now you need to insert the rod inside the sleeve and remove its end from the cylinder itself. The procedure should be performed carefully so as not to damage the oil seal. To prevent the rod from falling into the cylinder during automatic operation, it is recommended to place a nut of the appropriate size on the thread. You will need to use the previously set aside aluminum piston. It must be installed in the valve seat. Taking a small piece of pipe with a thread on one side, you should install it to the side of the cylinder that was previously cut. It must be secured by welding; it is better to make the seam as tight as possible; if necessary, it can be additionally sealed with a special compound. Next, you will need to screw the nut onto the threaded rod, then unscrew the plug so that you can connect it to the window control handle. At this point the manufacturing process is almost complete. Now you need to squeeze the air out of the system and fill it with oil. A liter plastic bottle is perfect for this stage.
Greenhouse thermal drive made from a gas shock absorber
The thermal drive mechanism can be made in another way - from a car shock absorber.
Automotive gas shock absorbers
Piston in front
Step 1. Take two pieces of metal pipe, each 1 m long, and make threads on them. Connect them with a tee in the middle, and install plugs (standard plumbing) at the ends.
Cylinder mounting
Step 2. For a car shock absorber, remove the pin at the bottom and drill a hole in the bottom (diameter 8.5 mm). Cut the thread M10Z1.23 there too.
Stem fastening
Step 3: Take a 10x1.25 nut and also a bolt for the brake hose. The bolt has a small hole in the middle. Drill right through it.
Piston in profile
Step 4. Drill a 10 mm hole in the plug, then insert a bolt into it from the inside, screw on the nut, and screw the rest of the bolt into the thread you made on the shock absorber. Connect all this through paronite gaskets.
Rod and cylinder interface
Step 5. Attach the plug with the previously made thread to the tee.
Step 6. The system is almost ready. Unscrew the plug from one end of the metal pipe and pour oil into it. Slide and lock the rod in the lower position, release the air mass from the shock absorber.
Hydraulic cylinder for a greenhouse from an automobile gas piston
Step 7: Screw on the plug. Install the finished mechanism in the greenhouse structure. By the way, pipes can be installed above the beds and plant garters can be attached to them (pipes).
One of the homemade options
Specifications:
The minimum length of the thermal drive (between supports) is 340 mm.
The maximum length of the thermal drive (between supports) is 440 mm.
Temperature of the beginning of opening (complete closing) + 22 C
Temperature of the beginning of closing (full opening) + 26 C
Operating temperature from -40 to +60 C
Service:
annual lubrication of the rod with any engine oil
ATTENTION! IMPACT ON THE DRIVE WITH A FORCE OF MORE THAN 100 KGS, LOCKING THE STRUCTURE IN A CLOSED CONDITION (LOCKING) WILL RESULT IN THE DESTRUCTION OF THE PRODUCT. The operation of the thermal drive (1) is based on a change in the volume of cyclohexanol during melting (crystallization)
The operation of the thermal drive (1) is based on a change in the volume of cyclohexanol during melting (crystallization).
At temperatures above plus 24 C, the melting liquid increases the filled volume of the chamber, pushing out the rod, opening a window or door.
At temperatures below plus 24 C, the crystallizing liquid reduces the occupied volume of the chamber, allowing the rod to move into the working chamber, closing the window or door.
The lifting window can be closed using its own weight, without exceeding the load on the drive of 10 kgf (100N)
To close hinged windows or doors, it is necessary to use an additional weight, spring, or counterweight.
The set of the “Thermodrive-DV” product additionally includes a closing closer (gas spring) (2) with a force of 60N, eliminating “flapping” by the wind, and a bracket (3), which allows you to easily install the thermal drive and closer on any door, window, frame.
Installing a thermal drive at the top of a door or window allows you to use it without restrictions, eliminating locking when closed.
To protect against the product being torn out by neighbors or gusts of wind, we recommend limiting the maximum tearing of the door with a restrictive chain or cable.
Installation of the “Thermoprivod-DV” product:
- Before installing the thermal drive, make sure that the door, window, frame opens easily with a force on the bracket of less than 3 kgf (30 N).
- Determine in the upper part of the structure to be opened the installation location of the bracket (3), which ensures the movement of the support (respectively the rod) by 80-100 mm when the window or door is fully opened.
- In any position of the window or door, the thermal drive elements should not come into contact with the frame.
- Secure the bracket (3) with the two supplied screws.
- Secure the bracket (4) of the thermal drive (1) with two self-tapping screws on the frame or wall, ensuring that when the door or window is fully opened, there is a distance of 440 mm between the centers of the thermal drive supports. The thermal drive is located on the side opposite the window or door and its force is aimed at opening the door.
- Fix the bracket (4) of the closing spring (2) to the frame or wall, ensuring a distance of 160 mm when the door or window is fully open. between the centers of the closing spring supports. The closing spring is located on the side of the window and door and its force is aimed at closing the door.
- Attach the clamps (5) to the thermal actuator and to the closing spring.
- The thermal actuator and return spring must be installed with the rod “lower” to prevent condensate accumulation.
- Firmly press the clamps (5) of the thermal actuator and the closing spring onto the brackets.
- If it is necessary to remove the clamp from the support, it is necessary to raise the locking spring on the plastic clamp by 2-3 mm.
- The state of the thermal drive is determined by the temperature inside the room or greenhouse and does not take into account the external temperature, which can cause periodic opening and closing of the thermal drive.
Completeness:
Thermal actuator (1) – 1 pc., Closer (Closing spring) (2) – 1 pc., Bracket (3) – 1 pc., Bracket (4) – 2 pcs., Latch (5) – 4 pcs. Self-tapping screw with drill 4.2x16 – 6 pcs.
The manufacturer guarantees 10 years of trouble-free operation of the product, subject to operating conditions.
Exceeding the rated load on the rod reduces the service life of the product.
The product cannot be repaired; in case of warranty cases, the product is replaced.
Manufactured by: Sibavtomatika LLC, November 26, 2014.
A comfortable microclimate for plants in a greenhouse can be controlled using a thermostat. This device can fully provide ventilation of the greenhouse in your absence. To make a thermal drive from other available materials and shock absorber materials with your own hands, no special knowledge is required.
And it’s impossible to do without the drawings and videos published here.
- What is a thermostat and why is it needed?
- Thermal drive from a gas shock absorber - option 1
- Thermal drive from shock absorber - option 2
- Do-it-yourself thermal actuator from a plastic bottle
- Thermal drive made of a rubber ball and cylinders
- Thermal drive for a greenhouse - video
Greenhouse thermal drive from a hydraulic cylinder
You can also create a thermal drive yourself from a car hydraulic cylinder.
The thermal actuator can be made with your own hands and from a hydraulic cylinder from a car
Step 1: Take the hydraulic cylinder and make a hole in its body to release the gas. Make a 10x1.25 thread in the hole.
Step 2. Attach the brake hose from the Niva to the hole using an M6 bolt and the same pin that was present at the bottom of the cylinder.
Step 3. Make a receiver or order it from a turner.
Step 4: Remove air from the system. As a rule, this happens while filling it with oil. Make sure that the cylinder rod is completely recessed and do not forget to test the system for leaks.
Heating a polycarbonate greenhouse in winter
In this article you will find the best ways to arrange heating in a polycarbonate greenhouse, as well as detailed step-by-step instructions! We also recommend reading the material about do-it-yourself drip irrigation from PVC pipes.
Thermal drive from cylinders and a rubber ball
This original ventilation device is very easy to make with your own hands. And for this you will need:
- wooden box with lid;
- regular inflatable ball;
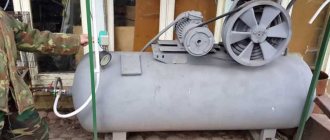
- two cylinders;
- hose;
- board.
Stages of work:
- Attach a hose with a length equal to the height of the greenhouse to the communicating metal cylinders.
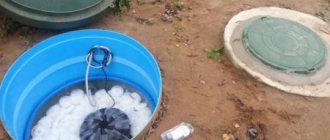
- Place the other end of the hose onto the nipple of the inflatable ball.
- Place the deflated ball in the box so that when it inflates, it pushes out the lid.
- Nail a board to the lid of the box and connect it to the window.
- You need to install the cylinders under the ceiling of the greenhouse, and the ball in the box below, under the transom. As soon as the cylinders heat up, the ball will inflate and open the window.
The principle of operation of a thermal drive made of a rubber ball
In order to choose one or another device, you need to take into account its pros and cons. Thermal actuators made from bottles and balls are less reliable, because everything depends on tightness.
Devices made from shock absorbers are more durable, but they are also more difficult to make. All of the described DIY thermostats will help you ventilate the greenhouse in your absence.
Care and use
In order for the thermal drive to serve for many years, it requires appropriate care. The basic principles of servicing the mechanism are given below.
- Do not forget to lubricate the structure with oil every year.
- Do not disassemble the device yourself, otherwise it may become unusable.
- It is advisable to remove the thermal drive in winter so that it does not become unusable during severe cold weather.
- Remember that nothing should interfere with the operation of the mechanism. Do not lock it in the closed position under any circumstances.
- There should be no latches, latches or locks on doors and windows that could interfere with the operation of the thermal drive.
- Do not open the thermal door with force.
There is no need to use too much force when opening the door.
Now you know how to simplify your work at your summer cottage. Even if it’s just automatic ventilation of the greenhouse using a thermal drive. It’s one thing if you have only one small greenhouse structure on your site, but imagine if there are several of them? In addition, thanks to the thermal drive, you do not have to go to the dacha every day.
Video - Thermal drive
Why is a thermal drive better than electronics?
But some summer residents are not satisfied with the sensitivity of the thermal drive running on oil. That’s why they use a homemade electric drive - it can open the transom in 20 seconds after changing the temperature. But this method is only suitable for those who are really familiar with electrics. In addition, many craftsmen are confident that the technological level of hydraulics is much higher than that of electronics.
Of course, inertia in the operation of a thermal drive is a completely natural thing. But if the oil heats up for too long, this can have fatal consequences for the crop. Therefore, the smaller the thickness of the liquid, the better.
Remember just one thing: do not settle for cheap models or too primitive devices. If one day they simply do not work and the window does not open in the heat, your plants may burn out and months of work will be in vain.
There is also another insidious disadvantage to using unverified openers. Have you noticed that it takes some time for the oil in the thermal drive to heat up? But this is a few valuable minutes, while the heat has already begun in the greenhouse, the plants are suffering, but the window is not yet slightly open.
So, if you purchased a high-quality device or made it competently with your own hands, it will really cost a few minutes, otherwise everything may not end well. So let's learn how to make such amazing devices correctly and “for centuries.”
Expert recommendations
If you decide to make a thermal drive for greenhouses with your own hands, then you should install a rod in the inner sleeve and remove the end from the cylinder to prevent damage to the seal. Now you should screw a nut onto the thread, which is required so that the rod does not fall into the cylinder.
The aluminum piston is inserted into the valve seat. Next comes a piece of pipe, at one end of which there should be a thread. The element must be welded to the cut side of the cylinder. The extended nut should now be screwed onto the threads of the stem. It can be purchased at the market where they sell pipe clamps. To strengthen the lever, the fork is screwed into the transom or attached to the window. Once the system has been filled with oil, the air should be removed. At this point, we can assume that you have managed to make a thermal drive for a greenhouse with your own hands.
Caring for the thermal drive
In order for the thermal drive to work for a long time, it is recommended to follow a few simple recommendations:
- the structure requires regular lubrication, since metal components come into contact with moist air;
- It is not recommended to disassemble the device;
- in the cold season, it is advisable to remove the thermal drive;
- nothing should interfere with the functioning of the structure; for this reason, its fixation is prohibited;
- When opening a window or door with a built-in device, you should not apply significant force.
How and from what to make it yourself: options
The advantage of creating a thermal drive with your own hands is the possibility of using available materials. It is enough just to prepare all the necessary details for this.
A very convenient and simple means for making an automatic thermal drive is an office chair. How often have you raised or lowered your seat to the required level while working at the computer? This was possible thanks to gas lift. Sometimes it is also called a lift cylinder.
To make a thermal drive for a greenhouse with your own hands from this part of an office chair, perform the following manipulations with it.
- The cylinder consists of two elements: plastic and steel rods. The first stage of work is to get rid of the plastic body, leaving only the second, more durable one.
- Having put the spare part from the main piece of office furniture aside, pick up a metal rod with a diameter of 8 mm. Fix the part in a vice so that there is a section of about 6 cm on top.
- Pull the prepared cylinder onto this rod and press as hard as possible so that all the air comes out of the latter.
- Cut off the tapered end portion of the cylinder and push the steel rod through the hole. Be careful not to damage the smooth surface and rubber clamp.
At the end of the rod it is necessary to make a thread that will fit the M8 nut. Now the extruded liner can be returned to its place, being careful and protecting the aluminum piston. We insert the steel rod into the inner sleeve and pull it out from the back of the cylinder. To prevent the piston from moving out or falling inside the cylinder during operation, screw an M8 nut onto the prepared thread. Insert the aluminum piston into the valve seat. Weld a steel tube to the cut end of the cylinder. Attach the resulting mechanism to the window control unit. Bleed all the air from the system and fill it with oil (can be machine oil). Thermal actuator for a greenhouse made from office chair parts is ready for use
All that remains is to test the device in practice and use it
Thermal actuator for a greenhouse made from office chair parts is ready for use. All that remains is to test the device in practice and use it.
Of course, making such structures with your own hands is a very labor-intensive process. But the result of painstaking work and care will exceed all expectations.
Another handy tool for creating an automatic greenhouse ventilation system is a regular car shock absorber. The main active ingredient here will also be motor oil, which reacts very subtly to minor temperature changes, which powers the entire mechanism.
The thermal drive for the greenhouse from the shock absorber is performed in a certain sequence.
- Prepare the necessary materials: a car shock absorber gas spring, two taps, a metal tube.
- Near the window, the opening and closing of which is planned to be automated, install a shock absorber rod.
- The third stage will be preparing the pipe for machine oil. At one end of the pipe, attach a tap for the supply of engine fluid, and at the other end, the same structure, but for draining it and changing the pressure in the system.
- Cut the bottom of the gas spring and connect it to the oil pipe.
The thermal drive from parts of a car shock absorber is ready for use. Monitor the oil level in the tube to avoid incorrect operation of the system.
After talking with professionals, rummaging through your unnecessary spare parts in the garage or shed, you will find a large number of necessary parts to create your own thermal actuator design. If the installation of finished products is carried out as quickly and simply as possible, then even making your own mechanism with a closer or a lock will not be difficult for you.
After putting the system into operation, it is necessary to take care of it so that it also justifies its peculiarity in terms of the durability of the mechanism.
Work methodology
The end of the plastic rod must be clamped in a vice and pulled out. In the depths you will be able to see a metal pin. In the next step, in a vice, you need to clamp the 8 mm rod so that it protrudes 6 cm. A cylinder should be installed on it, relieving it of pressure when pressed. The cylinder should be cut using an angle grinder, pushing out the steel rod. It is important not to damage the ground surface and the collar on the cylinder itself.
If you decide to make a thermal actuator for greenhouses with your own hands, then at the next stage, through a couple of layers of a tarpaulin mitten, you need to clamp the rod and cut a thread into its ends. The cuffs are carefully removed using an angle grinder. There will be a liner inside the cylinder that needs to be replaced. The remaining components should be discarded, but the exception is the aluminum piston. The rings are removed from it. All parts are washed in gasoline, this will remove metal shavings.
Classification of thermal actuators
Based on the mechanisms of action, the following types of devices are distinguished:
- Electric – the drive is driven by an electric motor. The signal is supplied by the controller, which interacts with the temperature sensor. They are characterized by high power, as well as the ability to form intelligent systems that control automatic ventilation. At the same time, they are vulnerable to high humidity. The relative high cost and the need for power supply are factors limiting their use.
- Pneumatic - the working element is heated air, which drives the piston. For the drive to work, it is necessary to recreate the complete tightness of the container. Achieving this in artisanal conditions is not easy.
- Bimetallic - different expansion coefficients when heating the metals used are the basis of their functioning. The models are simple and convenient, but limited in power.
- Hydraulic - operation is carried out as a result of fluctuations in the weight of two containers with moving liquid due to changes in the pressure of the air mixture with temperature fluctuations. The drives are characterized by significant power and ease of assembly.
Thermal drive for a greenhouse: review of 3 homemade options for auto-ventilation
Only the lazy have never heard of how the windows into a greenhouse can open on their own in hot weather. An excellent device - a thermal drive for greenhouses - allows you to leave everything for a week with peace of mind and not worry on hot days: who in the house will take care of emergency ventilation of delicate seedlings. But why is it so rare to hear about the use or independent production of thermal actuators for greenhouses? Everything is extremely simple - it’s a kind of paradox: once you tinker with them and make a more or less normal design, you can forget about ventilation altogether. Because a thermal drive is an incredibly reliable and functional device; once it’s manufactured, installed, they don’t think about it anymore!
Hydraulic cylinder manufacturing options
When thinking about how to make a hydraulic cylinder for ventilating a greenhouse with your own hands, you can easily find a drawing of such a device on the Internet and even watch a video describing in detail the manufacturing process of such a device. To create a hydraulic cylinder, you can use parts from technical devices that are no longer working. Thus, by spending a minimum of financial resources, you can equip your greenhouse with automatic window openers, which will allow you not to worry about the fact that the greenhouse plants are not provided with the proper temperature conditions.
We list the most popular options for self-manufacturing a hydraulic cylinder for ventilating a greenhouse:
Homemade greenhouse ventilator from car gas lift
From old car parts
An automatic ventilator for a greenhouse, as mentioned above, can be made from unused automobile spare parts. For such purposes, in particular, a pneumatic cylinder is used, installed in the rear door retention mechanisms of cars of many brands (Niva, Moskvich, VAZ-2108, etc.).
Before you start making such a device, which is used to lift window frames that rotate on a horizontal axis, you need to find its drawing on the Internet, which will not be a big problem.
Scheme of an automatic ventilator from a car pneumatic cylinder
To make a greenhouse hydraulic cylinder from the shock absorber of the rear doors of cars, capable of opening even fairly heavy window frames, prepare:
The procedure for performing work on the manufacture of a greenhouse hydraulic cylinder is as follows.
The video below clearly shows the operation of a homemade hydraulic cylinder in a private greenhouse.
In order for a hydraulic cylinder made according to the above-described scheme to automatically open the vents in the greenhouse, it must be equipped with a reservoir for the working fluid, in which it will expand and, entering under the piston of the device, push it upward along with the rod. To make such a tank, you can also use a car part - a universal joint, from which its eyes must be cut off. This element must be cut to a length that is calculated for each specific greenhouse. A plug is installed on one end of the cut cardan, in which two holes are drilled.
How does a thermal drive work?
In the greenhouse, the air must be constantly renewed, but at the same time the temperature in it should not drop.
Some owners of protected structures simply open the doors and windows of the greenhouse for a while. This causes drafts to appear that harm plants, sometimes leading to the death of capricious crops.
Constantly opening and closing windows for ventilation requires the constant presence of the greenhouse owner on the site. But working people cannot do this. In this case, a thermal drive comes to the rescue - a small automatic device that, if necessary, regulates the position of the vents.
The liquid inside the cylinder of the device is cyclohexanol. When the air is heated to a certain temperature, this liquid expands greatly, and when it gets colder it contracts. It fills the cylinder and acts on the piston, which presses on the rod, which moves the door or window.
Features of using a thermal drive:
- often forgetful gardeners, out of habit, lock the greenhouses . And with a thermal drive installed, this is categorically not recommended , because the force of most thermal drives is quite enough to break or bend the frame of a locked window or door.
- When the thermal actuator is running and open, it will not be possible to quickly close it at will - the temperature that pushed the rod out must drop so that the rod goes back and does not open. Some models do not allow you to unfasten (quickly remove) the thermal drive , so you need to take this point into account when using them