What kind of equipment is this?
A gas torch is an indispensable hand tool for performing work on installing soft roof coverings using modern weld-on materials. The flame generated by the operating burner allows you to create local heating of the surface to perform the following operations on the roof:
- drying wet areas of the underlying surface;
- heating and melting of the lower bitumen layer of the welded roll material.
In addition to performing work on the roof, the roofing gas burner is used:
- for heating various products and materials to the required temperatures;
- when soldering metals with light alloy solders;
- for burning old paintwork.
Roof burner models
There are a wide variety of gas burners for roofing on the market. They all have their own specific characteristics. Classification can be carried out according to the following criteria:
- Purpose. All tools are classified by purpose: professional and budget. The first option is suitable for those who often carry out roof repairs and provide services of this type. The second is characterized by a relatively low cost, but less attractive performance characteristics.
- Dimensions. There are compact and dimensional models. It is worth considering that as the size increases, the power of the device increases significantly. Compact models are suitable for work in cramped conditions where larger ones are not suitable.
- Type of fuel used. Various gases can be used to create a flame. The most widely used burner is the propane gas burner. This gas is highly flammable and has a relatively low cost. Various mechanisms are installed on the cylinder that allow you to regulate the gas supply.
There are quite a large number of different models of roofing gas burners that are designed for roof repairs. Some are suitable for soft roofing materials, others for metal repairs. In addition, there are separate universal models suitable for working with almost any roofing material.
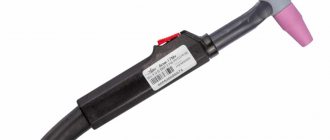
What is a gas burner
This is a hand tool connected to a gas cylinder. It includes:
- An injector, inside of which a nozzle with a through hole of small diameter is installed. Through it, gas in the form of a flame is supplied to the place of surfacing or drying.
- Cup. This is a device within which flammable gas is mixed with air (oxygen). The glass has many holes through which air is sucked into the flame zone. In addition, this device protects the fire flame from the effects of wind.
- A valve that opens the gas supply and regulates its pressure, and accordingly the length of the torch.
- The main pipe that separates the torch from the handle that the welder holds.
- Handle made of plastic or wood.
Of course, to operate a gas burner, you need a hose connected to the cylinder and a reducer that reduces the gas pressure in the line. The gas pressure at the burner outlet is 0.1-0.15 MPa. A propane gas burner for roofing weighs a little, in the range of 1.0-1.5 kg. So it is convenient and easy to work with it.
DIY gas burner: manufacturing instructions
In this article we will look at how to make a gas torch for soldering with your own hands. This device is often in demand both in private households and for commercial purposes - for individual technical creativity and various types of construction tasks. In particular, gas burners are used for soldering, metalsmithing, forging, roofing, jewelry work, and for other purposes they produce flames whose temperature exceeds 1500°C.
Operating principle of the burner
Regardless of the specific type, all burners operate on the same principle. Gas is supplied from the cylinder through an oil-resistant reinforced rubber hose. Constant pressure values are provided by a reducer; if desired, the parameters can be adjusted with a special bolt on the top cover of the device. The volume of fuel is regulated by a tap. The rubber hose is placed on the metal tube of the burner and screwed tightly with a clamp. The burner has special holes around the entire perimeter, through which air enters to mix with gas.
Gas burner for roofing work
The flame is ignited and directed by a metal nozzle to the desired area. Older models of heating pads are manually ignited with matches or lighters; modern models have piezoelectric elements for remote and safe ignition.
The design of the burner ensures a stable flow of flame; it is not blown out even by very strong gusts of wind. Such burners are used not only during roofing work. Sealing of metal pipelines, some road works, etc. cannot be done without them.
Roof burner application
What are the advantages of a modern industrial burner?
- Small mass. The weight of the device does not exceed 1.5 kg, which greatly facilitates the work. The roofer's hand does not get tired; he has the ability to heat up the bitumen at the same speed. The optimal temperature of the entire area is achieved, the quality of the roof covering is improved, and productivity increases.
- The gas supply valve and reducer allow you to smoothly regulate the intensity of the flame. The torch changes without stopping the operation of the device; the master makes a decision during installation, taking into account the actual state of the old flat roof surface.
- The most modern models have special devices that prevent direct contact of the heated burner with rolled materials or the base. Touching a very hot burner to the membranes can cause a complete breakdown of their tightness, which is considered a defect. Such areas need to be repaired, and this takes time and money.
Types of industrial gas burners
The technical parameters of devices depend on their purpose; you need to choose the one that is best suited for a specific job.
| Type of gas burner | Purpose and brief description |
| GG-2 | It belongs to the small class, has a small length and nozzle diameter. It is used to facilitate the fusing of flexible roofing in hard-to-reach places. Consumes a small amount of gas. |
| GG-2S | An upgraded device with improved combustion parameters. To expand the scope of use, it is equipped with spare burners of various diameters and lengths. The master has the ability to change them as necessary to achieve the required bitumen heating temperatures. |
| GGK1 | Durable housing, used by professionals. Can withstand long cycles and is not afraid of overheating. A reinforced burner has increased weight - this is one of the disadvantages of the device. |
| GGS1-1.7 | The nozzle is located at a great distance from the control handle - making work easier, you can take the most comfortable body position. The gas supply control valve is made of wear-resistant materials, the seals completely eliminate gas leaks, which significantly increases the safety of roofing work. |
| GW | Models GV-900 and GV-550 are produced. They differ in length, the first model has dimensions of 90 cm, the second 55 cm. During fusing of the roof, you can change the units taking into account the distance to the base. |
Gas-air injection burner GG-2u
If a gas burner is manufactured by a licensed company, then it fully complies with existing safety regulations. It is strongly recommended not to purchase cheap fakes; ignition of the units during work causes very severe burns.
Gas trigger burner GGK1 ULTRATurbo
Prices for various types of gas burners and blowtorches
Gas burners and blowtorches
Roof burner models
Roofing burner GGS.1-1.0
There are a large number of gas burners for roofing work. It is necessary to consider some of them. The most widely applicable devices that are used in roofing work are presented.
- GG-2.
Propane is used as fuel in this burner. It has high quality and low price. This is an excellent model for home scale roofing. Ideal for garage roofing work. - GG-2u.
This is almost the same model as the first one. The only difference is the length of the tube. This design of the device is convenient for working in hard-to-reach places for heating seams. - GG-2S.
This model is considered professional roofing equipment. The strongest wind will not be a problem for this gas burner. The burner has two bodies and two valves. With such equipment, you can quite accurately regulate the desired operating mode. - GGK-1.
This burner model uses a large beaker. - GRG-1.
This burner is used for roofing work when using diesel fuel or fuel oil as fuel. - GGS1-1.7.
With this universal model you can quickly and efficiently carry out all work. The burner weighs little. - GV-500, GV-900.
These are almost identical models. The difference lies in the length of the torch. GV-900 has a torch 90 centimeters long. It is convenient to work with it on the roof itself, as you can stand at full height. GV-500 is used a little less frequently, mainly for adjacent surfaces.
Most gas (or diesel) burners can be purchased at building supply stores. A special feature of this tool is its ease of maintenance and operation. In order to work with this equipment you do not need to have special knowledge. It is important to carefully read the operating instructions and strictly follow all safety rules, which will be discussed further.
Which is better quality: professional or budget?
So, professional contractors purchase usually expensive professional gas burners that are reliable and safe to use. But for a home craftsman, a small, convenient tool without any additional pretensions will be suitable for equipping and repairing the roof of your own home. Will the quality of work be worse? Not at all! It’s just that such a gas burner is not suitable for industrial work, where it is used almost every day and where uninterrupted processes and absolute safety come first.
It is also not acceptable to have a situation where a team goes to a new facility (and, of course, deadlines are definitely running out), and the burner is defective. There is neither time nor reserve to stop everything and go out to purchase new equipment. Whereas, with careful handling in the hands of a home craftsman, even the most Chinese unit will serve faithfully for decades. Especially if you use it no more than once a season.
And in the end, when working with a massive professional burner or with a regular one, you will get the same result. But no matter how expensive and professional the gas burner is, before each use, be sure to check its connecting hose, the tightness of the connections and the clogging of the mouthpiece. Such problems do not occur often, but if you miss a defect, there is a risk of serious consequences.
Although, if you have an idea to buy the cheapest “lighter” (how much does it cost to cover a garage roof?), then we will hasten to dissuade you. The fact is that if a gas burner has a weak gearbox, then the fire will be no more useful than the same blowtorch. The work will proceed extremely slowly - while you heat one part of the sheet, the second will already have time to cool down. As a result, you will simply have to remove the gearbox and work without it at your own peril and risk.
Types of gas burners
Of course, there are not only propane burners. There is also a whole classification based on various criteria. Let's look at this in a little more detail.
- In addition to gas burners, there are also liquid burners. They run on diesel fuel. They are used much less frequently than propane ones, since their effectiveness can only be seen in the ambient temperature range from +10 to +15 degrees Celsius.
GV-103-R
If we continue to classify by type of fuel, then the list can include models operating on combustible mixtures. In this case, in addition to gas (propane or acetylene), oxygen or air is supplied to the working area.
Burner GV-131 for two nozzles
Burners are also divided by the number of working nozzles - there are models in which there can be 4 nozzles. This allows you to expand the technical capabilities of the device - to simultaneously heat a larger area of material, which allows you to significantly speed up your work. However, it is worth remembering that fuel consumption also increases. That is, the use of such models will be justified over large areas.
GV-111
A tool can also be classified by the absence or presence of a gearbox - a device that allows you to change the intensity of fuel supply to the work area, and therefore regulate the power of the flame. Gearless burners have the simplest structure and are cheaper.
Gas blowtorch KEMPER
There are models with different ignition options. Modern devices have a piezo ignition function, which is much more convenient and safer than using a lighter or match for these purposes.
The ignition option for the burner can also be different.
Burners are also distinguished by the shape and length of the gas supply tube. They come in straight, curved, shortened and standard lengths. This parameter is selected for specific tasks, allowing you to work comfortably in certain situations.
Injector burner
Safety rules when working with burners
Making a gas burner from scrap materials: step by step
List of materials and tools:
• drill; • Bulgarian; • hammer; • sandpaper; • brass blanks for the divider nozzle; • thin brass tube with a diameter of 15 mm; • wooden blocks; • vice; • silicone seal or FUM tape; • hoses for connection; • valve for adjustment.
How to make a nozzle and handle
First of all, we take a brass tube and attach a handle to it - for example, from an old burner, or from a wooden block, having processed it beforehand. We drill a hole in the block for a brass tube with the appropriate diameter. Having inserted the tube into the timber, we secure it with silicone or epoxy resin.
Next, we proceed to a more labor-intensive and time-consuming stage of work - manufacturing the nozzle. The hole size should preferably be 0.1 mm.
You can use a drill to make a slightly larger hole, and then adjust the edges to 0.1 mm. The hole must have the correct shape so that the flame is even.
After this, we fix the workpiece in a vice, take a hammer and carefully, in a vertical plane with a “pull” towards the middle of the workpiece, strike the future nozzle. We rotate the product evenly to form an ideal hole.
Then we take fine-grit sandpaper and sand the nozzle head. To connect to the tube, a thread is applied to the back of the product; the elements can also be simply soldered - but in the future, repairing the parts will be more difficult.
Now we connect the device to the gas cylinder and set it on fire - the do-it-yourself burner is ready for use. However, here you can see that to regulate the gas flow, you can only open and close the valve of the gas cylinder, and thus it is very difficult to obtain the desired flame. What we can do?
How to improve flame control
For the normal operation of our homemade unit, we will install a divider and a tap on it. It is better to mount the tap near the handle, at a distance of about 2–4 cm, but it can also be attached to the supply pipe. As an option, take a burner tap from an old autogen or another similar tap that is attached with a thread. To seal the connection, take FUM tape.
The divider is installed on a pipe with a nozzle; it is made of brass, diameter 15 mm. The best option is a cylindrical part with a hole for a tube with a nozzle. If there is none, we do this:
1. Take a brass pipe with a diameter of 35 mm and cut a piece of 100–150 mm. 2. Take a marker, step back from the end and mark 3-5 points, with an equal distance between them. 3. Drill 8–10 mm holes in the pipe, take a grinder and make straight cuts to them. 4. We bend everything to the center and weld it to the burner pipe.
Requirements for using the burner
Working with an open flame is considered hazardous to health and only adults are allowed to do it.
- Always place the gas cylinder vertically on a hard, flat surface, the roof, if possible in the shade. In strong sun it is better to cover it. If fusing is done in enclosed spaces, then effective ventilation must be ensured. Cylinders should be protected from impacts.
Always place the gas cylinder vertically
All devices that are connected to the cylinder must be periodically checked for mechanical strength and tightness. Do not work with faulty equipment. Before each connection, the burner and hoses must be cleaned of dirt. The length of the rubber hose must exceed 8 m.
The equipment must be in good working order
If there is a break in work, the flame must be extinguished. A worker should walk with a burning torch outside the roofing work area. Do not carry hoses under your arm or wrap them around your waist. If possible, work from the windward side.
If you need to take a break from work, the flame must be extinguished
While working with a burner, a worker may be affected by the following unfavorable factors: fire or ignition of roofing material, cylinder explosion, thermal injuries, bitumen vapor poisoning, excessive fatigue due to an uncomfortable position. To protect against these risks, special measures must be taken; each employee must undergo training and instruction at the workplace. It is strictly forbidden to work with a gas burner while intoxicated; any violation of safety rules must be stopped as soon as possible by management.
Work must be carried out in accordance with safety regulations
Before starting fusing, you need to clear the workplace and provide a specific location for the cylinder and flammable roofing materials. Nothing should interfere with free movement; accidental falls should be avoided as much as possible. If there are doubts about compliance with safety requirements, work should not begin until the problems are completely eliminated.
In the event of an emergency, you should call a doctor as soon as possible and provide first aid. In case of burns, the damaged areas should be watered with clean water. It is strictly forbidden to lubricate them with fat, oil, petroleum jelly and other folk remedies. Do not touch such places with your hands, and do not open bubbles with liquid. After an emergency occurs, all work on the roof is stopped completely until the relevant services arrive.
After sealing the roof is completed, everything must be put in order: remove construction debris, pieces of roofing, etc. The burner must be checked and cleaned; if there is damage, repair or replacement is carried out immediately. If it is not possible to repair the device, then you must remember this. Equipment and equipment must be stored in special places, access to them by third parties is limited.
After sealing the roof is completed, everything must be put in order; you cannot leave the burner and cylinder outside
Prices for various roofing roll materials
Roofing roll materials
Video - Do-it-yourself welded roofing
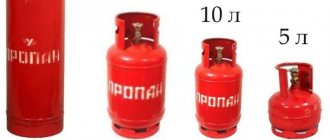
Which is safer: compact or large?
At first glance, it seems that hauling a gas cylinder onto the roof is the most dangerous undertaking. Moreover, today you can purchase more compact versions of gas burners:
But in fact, it is precisely these cans that can cause burns and even fire. We are talking about counterfeit Chinese products, which are abundant in the construction market. A large cylinder is still located far from the operating burner, while a small cylinder is constantly in the high temperature zone, which is not at all safe. Decide for yourself!
One more point about safety. When choosing a gas burner for your roof, try to avoid counterfeits and overly cheap products - this is simply unsafe. So, the most common problem with such burners is that the operating pressure may be indicated in the technical data sheet as 0.05-0.08 MPa, but in reality it turns out to be up to 1.6 MPa, as in any propane burner. But the supplied gearbox is not at all designed for such parameters, and a closed valve may not withstand the pressure directly on the roof. Such a burner requires a gearbox, but an inexperienced user may simply not know about it.
Overview of market offers
Gas-air burners are the safest of their kind. Easy to use, lightweight and creates a flame of sufficiently high power. But the modern market also offers more standard options that work without oxygen. Choose the one you feel most comfortable working with:
GG-2U: comfortable and light
GG-2S: against strong winds
And this is already professional equipment. This burner runs on propane and differs from previous models in that it works great in strong winds. The whole secret is in its structure - two valves and two housings, with which it is easy to precisely regulate the operating mode.
GGS1-1.7: universal option
This model is considered universal in the construction world due to its light weight, size and high level of performance. It is convenient for drying roofs and fusing soft materials. If necessary, it is easy to create an intense flame of up to 400°C, which is especially valuable in repair work. But such a burner can only be used on horizontal sections of the roof.
GGK-1: for precision repairs
This model features a heavier and more durable glass for burning old paint and waterproofing the roof. Perhaps this is the most convenient model for roof repair, especially since gas is supplied to it using a lever.
GGS 1-1.0 burners are well suited for minor work, especially repairing junctions, but can also be used for laying waterproofing. But the GGS-1-0.5 series pleases with economical fuel consumption.
GGS-4-1.0: four bells
And for professional installation of roofing materials, the GGS-4-1.0 model is used, which is equipped with four sockets at once and can heat the entire roll at once - all that remains is to quickly roll it out. Significant savings of time and effort! Moreover, it is easy for even one person to cope with such work, but for the repair of just one or two roofs of private houses there is no point in purchasing such equipment.
GV-3: for repairing metal roofing
This propane torch is specially designed for heating metals and manually soldering them, its glass is only 50 mm in diameter.
GV-111R: for stripping
Another popular gas burner is GV-111R. It is especially convenient for repairing roofs with old paint that needs to be removed, and for melting rolled bitumen materials.
GV-550: for junctions
This model is more suitable than any other for repairing roof junction points. The maximum heating of bitumen using this tool is 300°C.
GV-900: heavy fire
The most convenient sample, which gives a maximum flame length of up to 900 mm. You can work while standing, at full height, which is comfortable for daily tasks.
GV-850: fine adjustment
This propane torch is equipped with a special valve, which makes it possible to precisely regulate the amount of gas and the length of the flame using a lever. But such a burner does not operate on gas alone—technical oxygen is necessarily used here.
GGS2-1.5: parallel sockets
This burner is equipped with two parallel high-output sockets.
And finally, let's talk separately about homemade burners, which today are also often used in roof repairs.
SIEVERT: modern version
Tools
For soft roofs, the optimal hydro- and heat-insulating materials are those that are fused using a roofing torch. This is labor-intensive and complex work, which, moreover, is performed at height. The result of high-quality installation will be a long service life of the roof. Therefore, only high-quality equipment is selected for work. In the article we will look at the existing types and advantages of various roofing burners.
Content:
What is a roof burner?
This is special equipment for heating the fused roof. In addition, a burner is used to dry the surface, heat workpieces for construction work, burn construction paint and use it for all work where it is necessary to heat elements or surfaces.
The gas burner for the roof consists of:
- metal cup made of heat-resistant material;
- gas supply hose;
- nozzles for igniting the burner with wind protection.
The roofing burner is a mobile design with convenient handles for carrying it. It is lightweight, up to 1.5 kg, and is equipped with a comfortable handle made of wood or plastic up to 1 m long.
The gas most often used is propane. It enters the housing through a gas hose. Its supply and flame length are regulated using a special valve on the burner. To save gas consumption, roofing burners are equipped with a gearbox that controls fuel consumption.
All designs of gas burners are equipped with an atmospheric air suction system. This is a mandatory function, but there are additional ones that make work more comfortable. First of all, the ability to regulate operating modes. For example, when there is a break in work, the standby mode is activated and fuel is saved. Any gas burner can be lit with regular matches or a lighter.
Less popular, but also used for roofing work, are burners that run on diesel fuel.
Application of gas burners
They are used in most branches of construction and industry.
The design of gas burners depends on the fuel they burn and the application. But overall they are identical. The burner, consisting of a housing, a flame adjustment lever and a fuel supply valve, is connected to a gas cylinder through a reducer. Some manufacturers supplement the designs of gas burners with additional wind protection of the flame and piezo ignition.
Types of gas burners
Hand torches are used to lay roofs made of bituminous materials. Most often these are propane torches for lever roofing. They are convenient to use - the flame length is easily adjusted by simply pressing the lever mechanism, switching to an economical gas consumption mode.
During operation, the gas burner consumes a mixture of propane with air or with the addition of technical oxygen. Gas-air burners are the safest to operate. They provide sufficient temperature for roofing work, heating metal parts, annealing paint and for soldering cables.
Valve-type gas burners are easy to use, light weight and do not cause difficulties during repair. By creating a high flame with great power, they make it possible to carry out work even in windy weather.
There are also acetylene torches that operate on a mixture of acetylene and oxygen. Most often they are used for welding work. They are designed in such a way that oxygen in injection acetylene burners is needed not only to maintain combustion, but also to supply acetylene.
In addition, the burners differ in functionality and have different abbreviations:
GV 500
Used for roofing work. It is capable of creating a heating temperature of up to three hundred degrees, which is quite sufficient for fusing all bituminous materials;
GV 850
More advanced model. It has a valve for precise adjustment of the supply of technical gas from the cylinder. And thanks to the lever, the flame length can be easily adjusted during work. Its power is enough to melt metal-plastic pipes and refractory cables.
Powered by propane. Used for heating and welding metal and manual soldering. The diameter of the glass is 5 cm.
GGS1-1.7
The most versatile and most popular burner. Heats the surface up to four hundred degrees. It is used for laying soft roofing materials, road and waterproofing works. The power is 115 kW with a fuel consumption of 9 kg/h.
GGS1-1.0
Indispensable for working in confined spaces and on roofs with a large angle of inclination. It is a good replacement for a regular blowtorch. Despite its small size (length 50cm), it has great power, is safe, economical and easy to use. Its power is 40 kW, and gas consumption is 3 kg/h.
GGS1-0.5
Used for minor roofing repairs, soldering, cable welding. Due to its economical fuel consumption, it can work with a five-liter gas cylinder. Power is 10 kW, consumption is 0.7 kg/h.
Is it possible to make a gas burner yourself?
Now let's discuss the possibility of making a propane torch yourself. Of course, this is all possible, but due to the requirements for sealing all parts, as well as the high precision of their manufacture, doing this in practice becomes very difficult . And if you take into account the low cost of factory-made devices, then this makes no sense. The most important part of the assembly work is the manufacture of the fuel supply and mixing unit, so spare parts from other devices are often used for such work. Let's try to describe the self-assembly process.
Scheme of the structure of a propane burner
The diagram above shows the approximate structure of a propane burner - we have already discussed the main structural elements. When assembling, we will not make everything, and we will use spare parts from other equipment that you may have in stock. We will need:
- valve made of steel - you can take it from any cylinder designed for storing liquefied gas;
- plug - it is usually used when transporting gas cylinders;
- We will borrow a jet from a blowtorch, the nozzle of which should be 0.8 mm;
- You will also need a metal pipe - its internal diameter should be 10 mm, and the wall thickness should be at least 2 mm;
- wooden handle – you can make this part yourself.
The second most important is the glass
Do-it-yourself propane burner
Now let's look at our steps in the work:
- We fix the steel pipe, which we will use as a supply tube, in the handle. This can be done using glue;
- We make the body and divider from a brass rod with a diameter of 20 mm. In the body you need to drill two radial holes with a diameter of 5 mm, 4 holes are made in the divider rod (diameter - 1 mm);
- assembly is carried out - the divider is pressed into the body with great interference. A flange is installed inside the housing with a gap so that the internal diameter of the housing is 0.6 mm larger. The gap thus obtained will inhibit the gas flow supplied to the igniter holes;
- a nozzle must be machined from a steel rod;
Advice! In order to make a thin hole in the metal, take a 2 mm drill and make a blind hole so that the tip does not reach the end of the metal 1.5 mm. A 0.4mm drill bit is then used to make the bridge. Next, the resulting hole is caulked with a hammer, after which the end is sharpened with sanding paper. This is done until a hole of the required cross-section is obtained, that is, until the nozzle can be placed on the tip of a threaded tube.
DIY compact gas burner
- a supply hose is put on the rear end of the tube and secured with a metal clamp;
- the operating pressure is set on the reducer and gas is supplied;
- wait until all the air comes out of the hose, then ignite the gas, bringing it into the flame of the gas burner;
- After this you need to sand the end. The flame on the burner should be 5 cm long;
- the housing with the divider is put on the external thread of the nozzle. The burner should produce an even flame without soot - to achieve this effect, you need to slowly rotate the body along the threads on the nozzle;
- the loose threaded connection is sealed with FUM tape.
Regardless of whether a factory gas burner is used or a homemade one, you must strictly comply with fire safety requirements.
That's all. We hope the material was clear and useful for you.
How to make a burner yourself
Let's take a closer look at the nuances that you should pay attention to when making a burner.
- First of all, it is necessary to use refractory metals. A properly configured burner can produce up to 1000 ° C, so the nozzle must match the flame temperature;
- It is important to choose a reliable working crane. If something goes wrong, the gas supply is first cut off and the danger is eliminated. If the tap leaks, you will not be able to quickly extinguish the flame;
- The connection point to the gas source (a bottle with a valve or a 5 liter propane bottle with a reducer) must be reliable. It is when operating low-quality shut-off valves that most accidents occur.
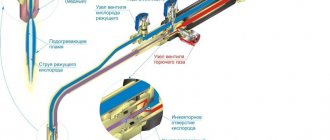
Let's consider a typical diagram and principle of operation of an injection burner:
Gas is supplied under pressure through the hose (1). Typically propane. The pressure is formed due to the evaporation of liquefied gas in the cylinder, and it is sufficient to organize a stable and directed flame. A reducer is not required, the amount of gas is regulated by the operating valve (2).
The shut-off valve is located on the cylinder valve. Its function is only to open/close the fuel supply; other adjustments are made using a working tap.
The gas supply tube (3) leads the jet into the nozzle and ends with a nipple (6), which sets the direction of the flame. The nipple with the tube, in turn, is located in the so-called insert (5). It organizes the mixing of gas with atmospheric air.
The insert with a tube and nipple is fixed in the nozzle with a screw. As a rule, the burner is dismountable for cleaning and maintenance of the nipple.
The formed air-gas mixture is directed to the nozzle of the nozzle (8), where the mixture is additionally saturated with oxygen from the air. For combustion stability, ventilation holes (7) are provided.
The burner is made by hand according to the drawing.
Dimensions are designed to work with cylinders up to 5 liters.
We will tell you about the structure of the liner separately; the dimensions are shown in the drawing:
The outer diameter of the liner tube (1) should be half a millimeter smaller than the inner diameter of the nozzle. A washer (2) with holes for air supply is welded inside. The sleeve (3) is designed to fix the tube with the nipple.
The peculiarity of the design is that by moving the tab inside the nozzle, you can regulate the air leak through the ventilation holes. This allows you to regulate the flame temperature over a wide range. The nozzle can be made from a steel pipe, but it would be better to turn it from a steel blank on a lathe. The shape of the nozzle should be somewhat narrowed at the outlet, then the flame will be forced and the temperature in the combustion zone will be higher. Alloy steel grade 45 is used.
There are two ways to make an insert: You can assemble it from two tubes and a steel washer with holes. The structure is soldered with refractory solder, with abundant fluxing. Or you can grind it entirely from a steel blank. The second option is preferable.
The supply tube is copper or brass. On the side of the hose connection, a flange is made (concentric grooves can be made for better fixation). A suitable nipple is screwed into the working end. You can take it from a primus stove, or a gas burner from a household stove.
Important! When using a stove nipple, remember that the kit comes with different nozzles. For natural or liquefied gas.
The second option will suit us. When the burner is ready with your own hands, it is necessary to carry out initial debugging.
The burner is set to use the gas that will subsequently be used. The insert is lightly secured with a screw so that the ventilation holes are blocked by half.
By slightly opening the operating valve and moving the insert, we achieve an even, powerful flame. Then we finally fix it in the nozzle.
If you did everything correctly, the temperature at the outlet of the nozzle will reach 1100° C.
Let's move from theory to practice. How to make a gas burner using available materials:
The nozzle is made from a classic car pump design. Such items often lie idle in the garage. The steel used is excellent and the size is suitable for a gas burner.
We cut a “rose” in the back part, bringing the ends to the center. A feed tube will be inserted into this bundle.
The part came from a construction foam gun. This is a device for reusable use, so the steel is strong and coated with refractory chromium.
The thickness of the tube is almost 1 millimeter, which is quite enough for rigidity.
At the end of the gun tube there is a nozzle with a ball valve to form foam. The ball is knocked out with a thin awl or gypsy needle. The resulting hole is sufficient to supply gas to the nozzle. The tube with the nozzle is connected using semi-automatic welding.
- To connect the structure to the working faucet, conventional plumbing fittings with threads were used. This is a simple water pipe; no special steel is needed. The part of the burner where the tap is located does not heat up to critical temperatures. I had to buy a ball gas valve;
- The holder is literally made from scrap metal. Handle from a motorcycle footrest. By lightly processing it with a grinder, we get the optimal shape. The clamp for attaching to the burner pipe is from the handlebars of the same motorcycle.
Finally the holder fits on a motorcycle handle. The thermal insulation is good, and the burner fits snugly in the hand.
It took one weekend to make and 100-120 rubles to buy a tap and a fitting for connecting to a hose.
As a bonus, look at the drawing of the tested miniature device:
A gas burner for soldering is made from a needle from a dropper. Connects to a lighter refill bottle.
Conclusion! A homemade gas burner is a reality. Just be careful when operating!
A simple and effective way to make a gas burner with your own hands - video