- Do-it-yourself cold forging as a separate art form
- History of the forge: description of cold forging
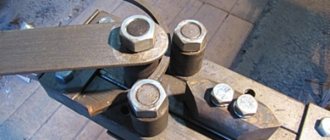
- Basic tools for cold forging at home
- Equipment for rolling at home
- Gnutik: what products can be created with its help
- Snail: a simple tool for creating curls
- Wave: how to create and use this tool
- Flashlight and twister: features of these machines
- Do-it-yourself cold forging under pressure: creating blanks for forming products
- Styles and elements of patterns: photos of artistic forging
- Fastening the pattern elements: final metal processing
- Video: DIY cold forging machine
Cold deformation techniques
In this type of craft, several techniques are used to change the shape of metal products:
- Flexible. This is a very simple way. First, the end of the workpiece is securely fixed, then it is bent around a mandrel of the desired shape using a tool. In this case, curls and monograms of different shapes and sizes come out from under the hands of the master.
- Torsion along the axis. To perform the operation, the simplest vice is sufficient, but it requires maximum effort. Rolled products with ribs are used as blanks. The result will not be visible on a product with a round cross-section.
- Broach. This technique allows you to change the cross-section of the rod. The broach is used to decorate the edges of the product. When winding onto a mandrel, the rod is simply pulled back. Peaks are made for the upper edge of fences: the product is first flattened, then sharpened.
- Coinage. It is produced from sheet metal. By hitting it from the reverse side, they create a three-dimensional pattern or a separate element for a large product.
In addition to basic technological techniques, cutting, welding, and grinding are used. In industry, cold forging includes a larger number of operations - cutting, bending, sizing, coiling, piercing, and stamping. The tools are stamps, which are used to produce large batches of identical products. Powerful presses are used as the main equipment.
Grilles, garden furniture, and gates are made from strips and rods with a cross-section from 8 to 14 mm. Products made from a template are assembled by hand. Forged elements of fences or balcony railings are welded together, then placed in a frame or attached to a solid base. Designs can be different: both flat and volumetric.
Styles and elements of patterns: photos of artistic forging
Creating a beautiful pattern begins with a forging sketch. The master must have a clear idea of the picture he wants to make. Initially, a drawing is drawn, materials and the number of necessary elements are calculated, machines and equipment are selected. In order for the product to look beautiful, it is better to immediately choose the style in which it will be made. Looking through photos of cold forged products, you can easily notice which direction the pattern belongs to.
Beautiful forged products can be made in various styles.
There are several styles of forming a forged pattern.
The Romanesque style is characterized by severity and symmetry. On the fences you can see a dense arrangement of spirals in the same order, the details are often repeated and of the same type. This is a monumental pattern using the volute element (C-shaped twisted one-sided curls).
Gothic ornament . Few people know that modern fencing and fences are most often made in this style. A characteristic feature is upward striving. The rods are pointed and end with tops in the form of arrows, spears or sharp spikes. The spiral elements used in this style are called perforations, and they look like a stem branched in different directions. For variety, lanterns or voluminous spirals are added between the straight rods.
Products in the Baroque style are the most common.
Renaissance is very rare. In this style, pointed charcoal elements are practically not used. The basis is round arcs, spirals and waves. The branching metal rods are decorated with leaves or flowers; graceful curves take the shape of a figure eight. Characteristic elements are notch, spiral, volute and figure eight. The style is very harmonious, the details are installed symmetrically in the form of intertwined lines.
Baroque is the complete opposite of Renaissance. The style is openwork and very lush. C-shaped spirals, volutes, curls, curved lines and intricate patterns are used. Three-dimensional leaves and flowers are added to the weaving, creating a dynamic shape.
Rococo . This direction is characterized by the use of thin rods and double-sided curls. The rocaille ornament creates constant movement and is distinguished by filigree and three-dimensional patterns. In the photo of cold forging, asymmetry and fractional patterns are noticeable. The use of straight rods and flat gratings is unacceptable.
The classic style allows you to combine various forged elements.
Classicism . A beautiful, albeit simple style that brought symmetry back into fashion. To create an ornament, curls, perforations, spirals and straight rods are used. Another element is introduced into use - a meander (broken lines or rods bent at right angles). Vertical architectonics are always strictly maintained in fences.
Empire style is characterized by the presence of geometric patterns and long smooth rods. The main element (volute) is modified: an elongated straight line with one-sided curls at the ends. The main thing for this style is strict simplicity, symmetrical geometry combined with spiral elements.
Art Nouveau , or Art Nouveau , added biological motifs to artistic forging with one's own hands. The style does not use straight lines, only various bends, meanders, curls and spirals. Symmetry fades into the background. The ornament repeats the silhouette of a person or animal, leaves and flowers are added. The pattern is constructed in such a way that the curls evenly flow into each other throughout the entire ornament.
It is difficult to create a beautiful forged pattern without a drawing.
If a person starts work without a preliminary drawing, he will quickly get confused in creating a cold forged product. Each pattern should be thought out as much as possible, and it is better to immediately transfer edits that are made during work to the sketch in order to clearly understand what the result should be.
On a note! Even if you have photos of forged patterns, you need to make drawings and markings to accurately place all the parts.
Furniture filling for the living room
Before purchasing furniture for the living room, you should determine for what purpose it is needed:
- For placing and storing things.
- For receiving guests.
The standard option for the living room interior is the presence of:
- Wardrobe.
- Armchairs.
- Sofa or sofa.
- Coffee table.
- Showcases.
- Dining table (if space allows).
The most important attribute of the living room is a place to relax - a sofa. Many people are concerned with the question: “How to choose a sofa for the living room so that it is beautiful, comfortable and functional.”
First of all, you need to decide on the size of this piece of furniture, because if the area of the room is limited, a large product will not be appropriate
When choosing a sofa you should pay attention to several details:
- Shape (straight, angular, U-shaped).
- Degree of hardness (soft, medium hard, hard).
- Quality frame and upholstery.
- Manufacturing materials.
- Execution style.
For small-sized apartments, designers advise choosing a classic or corner shape of a sofa, since this way you can significantly save space. You need to choose the degree of rigidity yourself, as you like.
Natural materials are preferable because they are more durable and safer for health. The execution style is selected in accordance with the main style of the living room.
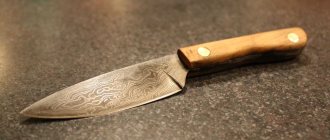
How to choose the right material for making a knife?
Figure 1. Design of a forged knife.
To make a high-quality blade, you need to choose the right steel for it. The cutting characteristics of the knife and its strength will depend on the choice of material.
To select the correct metal, it is important to know what properties such a material has. You will need to focus on 5 main properties of steel:
- Wear Resistance - Steel's resistance to wear and tear through use. This property will depend on the hardness of the material.
- Hardness is a property of a material that indicates its ability to resist the penetration of solid materials into it. It is worth knowing that solid material is less subject to deformation. Strength can be measured using the Rockwell scale.
- Strength - the ability to maintain integrity when exposed to atmospheric forces.
- Plasticity is the ability of a material to absorb and distribute kinetic energy upon impact and deformation.
- Red resistance is the resistance of a metal to high temperatures and the ability to retain its properties during heating. The minimum temperature for forging steel will depend on the material's resistance to heat treatment. It is recommended to choose hard grades for which the operating forging temperature is greater than 900°C. It is worth knowing that the melting point of this material is approximately 1500°C.
All these characteristics are interconnected. The predominance of one of them leads to the deterioration of the others. Each property of a material will depend on the content of alloying elements and additives, which include silicon, tungsten, molybdenum and others.
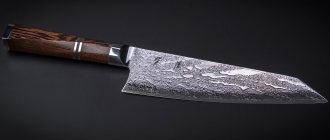
Figure 2. Types of knife profiles.
The presence of all alloying elements and their use in the required proportions in the steel manufacturing process, as well as knowledge of their properties, allows us to create steel for the required purposes. Each of these steels has its own marking. It is worth noting that Russian and European brands have different designations.
Russian manufacturers, which are often used in the process of forging blades with their own hands, include steels marked U7-U16, R6M5, X12MF and others. European grades include steel 1095, M-2, A-2 and others.
A detailed description of the metal grade can be found in the “Brand of Steel and Alloys”.
Selection of forged products to suit the interior style
Products for different styles:
- Provence. It is better to decorate walls and furniture with floral designs and individual metal branches.
- Scandinavian style. The geometry should not have smooth corners or smooth bends. All decorative elements must be strict, consisting of straight lines connected at sharp angles.
- Rococo. The lines should be refined, gradually moving towards massive objects.
- East style. Includes ornate intertwining lines, leaves, branches. There should be no sharp corners or a large number of straight lines.
- Loft. Sharpness should prevail in the design. It is necessary to make more sharp corners, objects, and rough-shaped decorations.
Attention should also be paid to the color scheme. For example, for the Scandinavian style and loft, dark shades and natural metallic colors are suitable
Rococo style design (Photo: Instagram / n_hramcova)
Where can forged products be used?
Forging and design are compatible concepts. With the help of forged products you can decorate a room, the facade of a building, a private area, or make a massive fence. Forged items perform a decorative and practical function.
Products for interior decoration (Photo: Instagram / superkovka.by)
Outside the building
For private homes and gardens you can make:
- bars on windows, doors;
- railings for stairs on the porch;
- terrace fencing;
- barbecues, garden furniture;
- fencing - sections of fences, wickets, gates;
- lanterns, decorative figures;
- flower beds, canopies.
Forged lantern (Photo: Instagram / metallokovka)
Furniture cladding
Forged products are suitable for cladding furniture
Metal objects attract attention. Furniture made from other materials remains a common background
For sale you can find forged:
- tables;
- chairs;
- stands;
- shelves;
- cabinets;
- beds;
- benches;
- mirrors
Forged table and chairs (Photo: Instagram / blacksmith_moscow_kovka)
Functional items
Kinds:
- sconces, chandeliers;
- stair railings for stairs inside or outside the house;
- partitions, screens;
- stands, hangers;
- frames for mirrors or pictures;
- door fittings;
- bars on windows;
- door panels;
- flower beds, fireplace grates.
Decorative inserts
Such elements include decorative elements for interior and exterior decoration of the house - branches, candlesticks, vases, wall panels.
Forged vases (Photo: Instagram / nikitademm)
Purpose of forged products
Do-it-yourself artistic forging has firmly taken a leading position in the modern market. These products can be found not only on fences and gates, but also on beds in ordinary apartments. There are several types of products where forging is used most often:
- Gates.
- Fences.
- Lattices.
- Stairs.
- Gazebos, barbecues.
- Furniture and its accessories.
Due to such a great demand for forged products, one can’t help but wonder why people like elements of artistic forging so much. After all, metal is a cold, heavy material that is susceptible to corrosion in the environment. In contrast to these negative factors, there are many favorable ones:
- Durability.
- Exquisite beauty.
- Increased protective functions.
- Possibility of production according to any dimensions and sizes.
- Full possibility of imagination in manufacturing.
- Forged products combine well with other materials.
And this is not the entire list of advantages of forged elements. If we combine all the above expressions, then metal objects are durable, strong and very beautiful products.
Necessary equipment for creating products at home
Over time, new technologies allowed the first invention and then creation of a set of specialized tools to expand the capabilities of blacksmiths. Even inexperienced craftsmen can work with such tools; working with them is not very difficult.
One of the main items in the work is a bender; it is always available in any workshop that works with metal. With its help, you can bend the workpiece at the desired angle or an arc of the required radius.
The snail creates spirals from selected blanks; spirals are often found in blacksmiths' workshops. You can buy a snail or make it yourself, and you can also make a spiral with any radius that the master thinks of.
A flashlight is the most complex tool; having such a device, you can not work with a separate part, but immediately create a whole complex from single rods. The tool helps to create types of baskets from metal rods of various diameters and cross-sections.
Curved metal objects can be made with a wave; the craftsman just needs to select rods of different sizes and profiles and create smooth elements for decoration.
A twister is also a complex tool, somewhat similar to a flashlight; it can be used to weave rods around a longitudinal axis. To create braiding or volumetric details for decoration, use this tool.
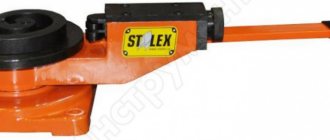
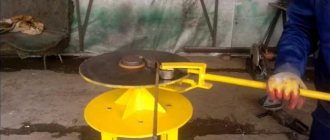
Twisters or snails?
Description of forging machines.
Both of them are one and the same. The most popular cold forging machine among the general forging community. Indeed: at first glance, the machine seems too primitive.
But in it simplicity is combined in half with genius:
- it’s easy to make it yourself;
- it's cheap;
- it is extremely easy to use;
- with its help you can make entire arrays of beautiful metal lace.
According to the principle of operation, twisters are a type of bending machines, see below about them, with some improvements, beginners can easily work on them. In a word, a snail or twister is an amazing machine in terms of all possible criteria: ease of manufacture, wide artistic possibilities, low cost and ease of use; there are simply no others like it.
Twisters are found in two engineering versions:
With a collar and a rotating plowshare with the principle of rigidly fixing the product on the surface and turning the scroll clockwise. The rotation is made by a lever, most often manual. This is the most democratic machine for cold forging of profiles: you can work on it alone, even in an apartment. It is not without reason that the largest number of links in RuNet related to cold welding are filled with pictures, drawings and videos with the action of rotary volutes. Everyone who starts with them feels like a master and is in a hurry to share their own finds in twisting flat curls
So this machine can add a few more points for increasing the master’s self-esteem - this is always important, and especially at the beginning of work. The maximum number of possible curls is 5
This snail has weaknesses, what would we do without it. It's all about the folding share: both the correct material from which it needs to be made and the complexity of making the joints of the share links are important. These joints must be extremely precise - they are the ones that create the shape of the curl. The design and material of the joints must take into account multiple repetitions of turns with severe workloads. The second and final weak point is the eccentric clamp of the part.
Champion in popularity and positive aspects of work! Lever volute with a fixed template and a deflection roller. At its core, it is a pipe bender. It should be immediately noted that this option is inferior in labor productivity to a twister with a collar and a plowshare. Secondly, no tabletop is suitable for it; here you will need a real steel frame with fastenings on the supporting surface. You can’t install a bed at home: you can only work on a lever volute in a workshop.
Machine for giving a relief surface.
Another feature of the lever volute is the slow pace of work. You can curl 3 – 4 curls, a little less than with a collar snail. However, the advantages of the lever snail outweigh all its disadvantages:
- All elements of the machine can be made of ordinary steel.
- Instead of a pressure roller, which is not made of ordinary steel, you can use a bearing.
- The material of the bed and other parts allows you to count on long-term use of the machine.
- Greater variety of curls - you can change their shapes with bends in both directions (in the first version of the snail this is impossible).
- It is more convenient to work with the ends of parts that can be fastened.
In this champion subsection, you can make a small champion summary in the form of advice for beginners: in debut artistic work in cold forging, it is better to start with a lever twister - a snail with a fixed template and a deflection roller.
Fastening the pattern elements: final metal processing
After all the necessary elements of the ornament have been created, its formation begins. The appearance of the pattern may differ slightly from the sketch. To identify possible errors, you need to conduct a preview. Initially, the pattern can be laid out on a flat surface without fastening its parts together. In this way, you can evaluate how successful you were in bringing your idea to life, as well as correct shortcomings in your work. You should not start forming a pattern without first viewing the result.
Products look more complete if the elements are connected by welding.
There are two main types of connections:
- Weld;
- rivets (or artistic clamps).
It is useful to use a welding machine in places where the joint seam can be easily cleaned or will be invisible. To preserve the aesthetics of the ornament of a cold forged product, you can put figured rivets. They will reliably hold the components together and complement the decor.
The ornament is connected gradually, depending on the number of parts. Initially, small elements are held together, notches, twisted lines and monograms are formed. Welding is used. The seam is smoothed with a grinder using a 0.6 cm thick sanding wheel. It easily goes around bends and irregularities. Large parts are connected with curly clamps. The rivets are placed symmetrically to each other to complement the pattern. At the end of the work, the ornament is passed around with a cleaning or polishing wheel.
Cold forging allows you to create beautiful and original products with your own hands.
Artistic forging is not only a business or a job, but can also be an entertaining hobby. Even a novice craftsman can make cold forging equipment with his own hands from scrap materials. Cold forging specialists can easily be called artists, as they create beautiful ornaments from rough rods, pipes and sheets. Such hobbies require full dedication and considerable expenses. However, all the invested funds and efforts will bear fruit if they are supported by the desire to create beauty.
Types of modern forging equipment
Modern blacksmith equipment for artistic forging is practically no different in form and purpose from ancient or medieval ones. The materials have changed - hammers and anvils, hammers and punches, vices and clamps are made from modern high-strength alloys, which significantly increases their durability and efficiency.
Another important change is the heating method. The traditional forge with hand or foot bellows is giving way to muffle furnaces for small workpieces and induction heating systems
This significantly reduces labor intensity, harmfulness and danger to health and property.
Forging machines
Forging machines are used for cold forging - changing the shape of a bar or profile workpiece under mechanical influence. These include:
- Bends are the general name for machines for bending a workpiece in one or several directions along a given radius.
- Waves for performing wavy bending of the workpiece, with a given pitch and wave radius
- Twisters, or torsion bars - for twisting a workpiece (or group of workpieces) along the longitudinal axis
- Snails - for forming spiral curls at the end of the rod.
Cold forging is perfect for making elements of fences and trellises, balusters, scrollwork, interior decor items and landscape design. A machine for cold artistic forging is easy to make with your own hands if the master has the skills of metalworking and welding.
Induction heaters
The induction heater is designed to heat the blank to the plasticity temperature. Heating occurs due to the fact that eddy currents, or Foucault currents, are induced in the surface layer of a metal placed in a strong alternating magnetic field. With their help, you can heat the blank much more evenly, faster and safer than using a traditional forge.
An industrial induction heater, even of low power, costs tens or even hundreds of thousands of rubles. Therefore, many diagrams like “How to make an induction heater with your own hands” are published on the Internet.
It is important to understand that the design of the device uses high voltage and high power. For self-production, you will need engineering knowledge in the field of high-frequency currents and the skills of an electrician
Flashlight and twister: features of these machines
A flashlight is a cold forging equipment for working with several rods and creating three-dimensional baskets. To avoid constructing a frame, you can use a regular vice to secure the tool. The tool consists of three parts: two dies and a roller. The matrix can be made of strong, preferably hardened metal 4-5 cm wide.
In each matrix, a central hole is machined into which the roller is mounted. Grooves are made on the sides for installing rods. The second matrix must move freely along the lever, since during deformation the distance between the working surfaces decreases. When the lever is rotated, the rods bend in a spiral, forming a structure similar to a flashlight. Do-it-yourself metal products, which consist of several rods, are secured by welding.
The twister machine has a similar design. However, instead of a shaft, a rod is inserted into the matrix, which is pressed with a plate or bolts. Between them you need to install a movable element that moves forward when the shaft rotates. The rod twists along the longitudinal axis, forming a symmetrical spiral.
You can create forged elements using the flashlight and twister tools.
Note! The running matrix should approach static with each rotation. If it is fixed in one position, the master will have to make more efforts to bend the rods.
Features of cold forging
The method of artistic metal processing is the most popular - it is a fast and high-tech process. The beauty of the finished products can be assessed in catalogs where photos of the best works are presented. Using this method, you can create products that are much stronger than those made using stamping or casting. This is explained by the fact that the metal, passing through the equipment, can be bent and pressed at the same time.
During forging, pressure is applied to the metal and it strengthens it, resulting in a part that is subsequently almost indestructible. The cold forging method can be done by experienced craftsmen, since if it is processed incorrectly, it will be very difficult to repeat the actions with the workpiece again. The properties of cold forging make it possible to create various products used in houses and apartments, in courtyards and streets, since forged products are very popular:
- fences and railings;
- window grilles;
- fences and stairs;
- gazebos, lanterns and barbecues;
- elements for decorating fireplaces;
- furniture and interior items.
And this is still an incomplete list of items that can be made using the cold forging method. Items obtained in this way, as can be seen in the photo, can decorate any interior with their own shapes and style.
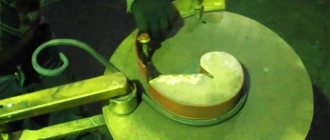
Do-it-yourself cold forging under pressure: creating blanks for forming products
On wrought-iron fences you can often notice not only geometric patterns, but also flowers, butterflies, leaves and other decorative elements. They are also made using cold forging techniques, but by rolling rather than stamping.
Do-it-yourself volumetric forged products are made from sheet metal. Working with a press at home is less common than rolling. Extrusion of sheets under a press can be either manual (knocking and pressing) or automatic. At home, it is cheaper to use hand stamping. To do this, the master needs to make several blanks that will be printed on a metal sheet under pressure.
A drawing of the future forged product will greatly facilitate the work of the craftsman.
Metal forging equipment:
- Punch (press stamp or cotter pin) is the upper part of the press, it pushes the sheet inward. The pressing side of the stamp can be drawing or smooth.
- Matrix is an element that is made in the shape of the required object. The applied relief deforms the plate under pressure, giving it the required shape.
- Press lever - a handle or relay for bringing the dies closer together and adjusting the force of the press.
Before starting work, you need to create a drawing of the future product. Sketches of artistic forging are transferred to the workpiece, it is cut and ground along the edges. You can use a regular vice as a workbench for pressing. It is most convenient to place them in a vertical position so that the plate lies horizontally to the plane. This way, the plate will be positioned exactly between the dies and will not slip out when the lever is rotated.
Different types of workbenches allow you to create unique forged elements.
Simple forging of metal at home can be done with a chisel and hammer. In this case, the chisel acts as a punch, the anvil as a matrix, and the hammer as a lever. To better print the design, you can put a plate with notches under the sheet. This way the relief will be clearer and more beautiful.
Note! The metal used for stamping must be softer than the punch and die. Otherwise, the tools will quickly break.
To make the “sheet” element, a blank of the desired shape is cut out of a metal plate 20-30 mm thick. A longitudinal line is drawn on it with a pencil in the center. The chisel striker is placed at an angle to this straight line. After hitting the handle, a line is imprinted on the plate, similar to the veins of leaves.
The cold forging method can be used to create three-dimensional elements.
You can use pliers to form the required volume of a cold forged product. The part is clamped between a vice and bent into the desired shape. This type of work is well suited for completing a small number of items for personal use. The process of beating a pattern by hand takes a lot of time, it is quite monotonous and requires great precision.
It is more profitable to purchase stamps for permanent work (in the form of leaves, petals, flowers, etc.), since accurately turning two identical elements is a very complex process. The main parts are machined from a blank or cast by hot forging. This type of work requires a lot of experience and high precision. The punch and die must match. With strong pressure, irregularities will be imprinted on the product. If the discrepancy is very large, then the press will crush the workpieces - and you will have to start work from scratch.
Techniques and methods of technology
In cold forging, simple methods of metal deformation are used:
- flexible;
- torsion;
- broach;
- coinage.
The manufacturing technology is simple. It is necessary to firmly secure the end of the workpiece and bend it using a tool around a mandrel of a certain shape and size. Depending on the diameter of the selected mandrel, bending allows you to create monograms and curls of different sizes and directions.
Torsion along the axis requires a lot of effort and the simplest yews for twisting the rolled product. It looks like a twisted rod only if the rolled rod is ribbed. You can't see anything on the round one.
Broaching changes the cross-section of the workpiece. It is most often used for the pointed edges of the rod. When winding, they simply pull it back so that the element looks beautiful. The top edge of the fences is flattened and sharpened, making peaks and increasing the inaccessibility of their site.
Embossing is done on a sheet. By striking from the reverse side, the shape of the material gradually changes, creating a three-dimensional pattern or element for a large canvas.
Basic tools for cold forging at home
The creation of a unique product always begins with material calculations and the development of a detailed work plan. The easiest way to think through the moves is to create scale sketches of forged products, write down the dimensions and select the necessary tools. The choice of material deserves special attention. The metal should be strong, but bend easily.
Note! Hardened sheets or rods cannot be used. Under the influence of temperature changes, the structure of the metal changes, it becomes brittle and can break under pressure.
There are two types of do-it-yourself metal forging - rolling (working with rods) and stamping (extruding sheets under a press). At home, the first option is more often used. To press sheets, you need to make a special blank for deformation. Common rolling tools: bender, snail, twister, wave and flashlight.
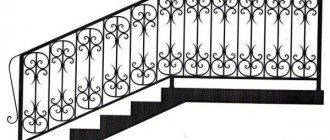
Cold forged elements can be used to decorate stairs.
A bender is a basic tool used for bending rods at different angles. The spiral elements of cold forging are twisted using a snail. For shaping, it is best to choose rods with a diameter of 10-12 mm. Choosing a material that is too thick can significantly complicate the work of the master.
A twister machine is used to twist rods along the longitudinal axis. The wave, accordingly, is intended to create wave-like elements. The flashlight tool is used to work with several rods at once. They are installed on the equipment and bent by rotating the lever.
How to make decorative elements with your own hands?
Figure 2. Table for determining temperature by the color of a hot workpiece.
During hot forging, the temperature of the metal for processing should reach approximately 800-1200°C. It can only be determined by the color of the hot workpiece according to the table in Fig. 2. At a lower temperature, the metal will not be sufficiently ductile, and at a higher temperature it will lose strength and the workpiece may break.
- Drawing is the elongation of a part while reducing its thickness. The element is pulled out by striking with a sledgehammer or hammer evenly over the entire surface of the area that needs to be pulled out. In a similar way, you can form a forged element that gradually sharpens towards the end - a peak.
- Acceleration is performed by hitting both sides of the workpiece. With this technique, a needle-shaped peak can be flattened and given a leaf-like shape.
- Radially curved elements (volutes, spirals) are forged on the horn of an anvil, on shperaks, using a bending plate. Angle bending is performed on the edge of the anvil. When you need to make many identical curved elements, use a template.
You can bend a forged element by performing the following steps:
- draw a sketch of a volute, bend a piece of wire according to the drawing;
- straighten the wire and cut off the workpiece rod according to this measurement;
- heat its end to a temperature of 900°C, complete the ending, i.e. bend the edge of the rod;
- make the first curl at the end of the horn or on the edge of the anvil;
- Heat the workpiece along its length and bend it using a spiral mandrel.
Anvil: a – horn; b – shank; in face; d – recess for punching holes; d – hole for installing a backing tool; e – platform for cutting metal; g – shoe.
- The spiral mandrel is a self-made template from a curved rod welded to the base. When making an element, the heated workpiece is driven between the turns of the template using a hammer.
- Torsional (twisted) parts are made by clamping the end of the workpiece in a vice, and placing the other end in a crank and turning it several times around the longitudinal axis. To prevent the workpiece from bending during twisting, it can be placed in a piece of pipe of a suitable diameter.
A driver is a strip of metal with a square or slot-like hole into which the end of the strip or a rod forged into a square is placed for torsion.
- The “bump” or “flashlight” is formed from 2-4 thin rods. Their ends are welded together, forged into a square and clamped in a vice, the other end is turned with a crank until a tourniquet is formed. It is untwisted a little, separating the rods, and several blows are applied to the end, expanding the element.
Cold forging involves using the same techniques, but without heating the workpiece. To facilitate the processing of cold metal, various mechanisms are used, as discussed above. Torsion and bending of the rod, drawing and straightening (rolling) are carried out on appropriate machines. When using mechanisms with an electric motor, the participation of the master is reduced to pressing a button and regulating the process.
The finished elements are placed on a plane according to the sketch of the forged pattern and welded in the right places. Welding areas are cleaned with a file. You can additionally decorate them with clamps made of steel strips. The assembled product is primed and painted to protect against corrosion.
gallery
When artistic forging, it is very important to determine which part of the product will be forged as a whole, and which elements will be made separately and then connected. The success of the work largely depends on the correct technological process. In turn, to develop technology it is necessary...When artistic forging, it is very important to determine which part of the product will be forged as a whole, and which elements will be made separately and then connected. The success of the work largely depends on the correct technological process. In turn, to develop the technology, it is necessary to have, in addition to a drawing of the product, an accurate drawing drawn up by the designer, taking into account allowances for mechanical (turning, milling) processing, if such is provided. Having a drawing of a forging, you can calculate the mass of the necessary material for its manufacture by adding to the mass of the forging the waste of metal for cutting (depending on the complexity of the forging) up to 20? 30%, for waste at the rate of 2? 3% for each heating and 1.5? 2% for each heating.
When developing a structural drawing of parts for forging, you should take into account the specifics of this technique and avoid shapes and configurations that are uncharacteristic for it. For example, the intersection of cylindrical surfaces with each other, as well as avoiding ribbed sections, since ribs in some cases (for example, along the contour of a cylinder) are extremely difficult to make, and sometimes impossible using the free forging technique. It is better to make parts with a sharp difference in size welded or assembled with threads.
The process of working on a product begins with a clear idea of it not only as a whole, but also in detail (the nature of their connection). This also determines the order of technological operations. Particular attention should be paid to connection methods.
In materials that are used in products of decorative and applied art: glass, ceramics, wood, iron, the connection method performs not only a connecting function, but also affects the silhouette and character of the product, emphasizing its figurative structure. This unity of functional and architectural is one of the main properties of forged metal. In a product based on a single plant motif, it is advisable to connect the parts by welding or blind riveting, or a combination of both methods. In this case, the connections perform only a functional role. The joints in such products are covered with adjacent decorative elements, leaves, flowers. This technique is characteristic of the Baroque (Fig. 1). In other cases, when products are assembled from repeating elements, the connection is a clamp (bracket) (Fig. 1) - a rivet with a clearly defined head, which is sometimes made in the shape of a flower. All structural connections are clearly expressed, in this case they also have an architectural function.
A similar technique and others are typical for products of many styles and modern works (Fig. 2). Blacksmiths from all countries use plant elements for decoration: stems, leaves, flowers, fruits, etc.
Rice. 2
The technique of forging jewelry has achieved high results. If in the lattices of classicism the plant ornament and its elements are generalized, then in the baroque specific plants are already depicted, and in modernity this leads to naturalism. With a change in style comes a change in technology. If in the works of the Romanesque period the blacksmith used 2-3 universal tools - a chisel, a handbrake and the work was directly related to the forge and anvil, then in the works of the Baroque numerous stamps, punches, mandrels appear and the work is carried out on sheet metal and on spraks.
Making leaves from strips. A strip 30 mm wide and 10 mm thick is interrupted and the end is pulled onto the stem. The workpiece is placed in the bottom and forged: the contours of the sheet are cut out with a semicircular chisel and the veins are cut with a chisel; the sheet is shaped on the shperak (Fig. 3).
Making sheets from rods. At the end of the workpiece, upsetting is done and the upsetting end is given a shape. The workpiece is heated, placed in the bottom and forged; the last blows can be made through a trowel (Fig. 4).
Making a sheet without a bottom. The workpiece is upset and given shape. The part that was besieged is forged with strong blows, and at the same time it is given the correct silhouette of the sheet. Using the back of the handbrake or a tamper, indentations are made and the stem is marked with a cleaver. With organized work, this sheet is made with one heating (Fig. 5).
Rice. 3 Making a sheet from a strip (operation sequence)
Fig 5. Riveting In the practice of artistic forging, one of the means of connecting forged elements is riveting. For example, in the manufacture of metal doors during restoration work, about 200 rivets are consumed per door. Rivets are made from low-carbon steels from a rod of a larger cross-section than the rod of the future riveting. The tool is a nail iron. The heated end of the steel is pulled out with several blows. They cut it on the notch and insert it into a hole equal to the elongated end. When installing a workpiece into a hole, you need to remember that the front side of the nailer is the one with the smaller diameter of the holes. The rest of the workpiece is broken off, the remaining end is riveted. The result is a riveting head, the shape of which can be very diverse. After removing the stave from the nail house, it is cut to the required size. The same process is used when forging a forged nail, the only difference being that the end is pulled out to the point. Forging nails and rivets is done with one heat. Forge welding One of the most difficult operations is forge welding, which requires a lot of experience and knowledge. When producing products by forging, the use of forge welding facilitates and speeds up the work, and in some cases it is decisive. Forge welding allows you to connect separately manufactured parts into one whole, and in this case they can be performed with greater accuracy and perfection. Forge welding easily welds mild steel with a carbon content of 0.15 - 0.25%. The forge welding process consists of the following operations: preparing the forge; preparation of the ends of the parts to be welded; welding; forging. The preparation of the forge for forge welding must be carried out with great care: the forge is cleaned of ash and slag, and the forge hole is blown out. The forge is cleaned especially carefully after soldering with copper solder. In this case, it is recommended to ignite the forge with table salt.
Coal prepared for forge welding must be carefully inspected. Depending on the thickness of the forgings to be welded, they are prepared in different ways. In Fig. 6 a-f shows various methods of preparing the ends of the parts to be welded. The most common seam is an overlap. The ends are upset and pulled out (the overlap should be one and a half times the thickness of the workpiece).
When welding splits (in a lock), the ends are upset and one end is cut. Split welding is used for welding spring and tool steel. Welding can be done in a forge by striking the end of the workpiece; it is used when welding harder steel into soft steel. When butt welding, the ends are upset and rounded so that the slag is squeezed out during welding.
Preparation of the ends of forgings for welding: a - lap:
b - split (into the lock): c - end-to-end; g - with riveting; d - end to end; e - cut
It is used in cases where it is impossible to use the first two (lap and split).
Overlap welding with and without riveting is used when welding rings. Butt welding is used for welding T-shaped products. The ends are settled so that when finishing the weld there is a reserve of metal thickness. A supply of metal is necessary so that it is possible to forge the workpiece not only at the welding seam, but also in those places where the metal was heated to the welding temperature. Welding can be dry and juicy.
In dry welding, the prepared ends of the workpiece are heated to welding temperature. Using a metal brush, a handbrake, or just a light blow on an anvil, knock off the scale and quickly weld the product with light blows of a hammer. A more reliable welding method is juicy, using flux.
Different fluxes are used for welding different grades of steel. When welding, welding powders consisting of borax, table salt, boric acid, and rosin are used. Low-carbon steel (iron) is welded using flux, which consists of pure river sand with a small addition of borax. To weld steel with a high carbon content, fluxes with the addition of metal filings, for example, sand, borax, and sawdust, are used.
The strength of the weld depends on the cleanliness of the parts being welded. Contamination of the ends at high temperatures can be due to scale and foreign inclusions: slag, coke, ash, brick, etc. Flux, falling on the heated ends, melts and dissolves the scale. The melted flux protects the metal from burning out. Therefore, when forge welding, it is very important to sprinkle the pieces to be welded with flux before the product heats up to the welding heat temperature, and in some cases, before putting the workpiece into the forge, the ends are immersed in a liquid solution of clay with table salt. Before heating for welding, it is necessary to pour a sufficient amount of coal into the forge so that it is not added during welding, and to give an even blast.
Before the metal has heated up to the welding temperature, but has not yet begun to throw sparks, it needs to be sprinkled with flux and the blast added. When the ends of the parts to be welded are covered with an even layer of mucus, you can check them with a sharpened metal rod: if the end of the rod sticks, it means the metal is heated up enough. The ends are again sprinkled with flux, preventing the metal from throwing sparks and the blowing is increased, allowing the ends of the metal to evenly warm up to welding heat. Then the workpiece is taken out onto the anvil and the scale is knocked off with a light blow on the anvil chair.
Operations such as feeding from the forge to the anvil and welding must be done as quickly as possible so that the joining process occurs at the highest temperatures, and therefore forging is often done with two or three hands with rapidly alternating blows.
The frequency of blows during welding should be such that the blacksmith has time to inflict a sufficient number of blows, turning the product over, before the ability of the metal to weld is lost due to a decrease in temperature. It is very important that the heating of the metal to welding temperatures be local (local), i.e., only the part that is forged during the welding process, otherwise the growth of crystals in adjacent areas will reduce the quality of forging. This defect is corrected by upsetting the ends of the metal, which allows forging not only at the weld site, but also in the heating zone.
Soldering is not a forging operation, since this operation does not involve an anvil. This is a means of joining parts or decorative elements made by free forging.
Russian masters used this operation very widely. Using this method, products were produced that were distinguished by high craftsmanship and great artistic merit.
Brass soldering allows you to join small parts. The technology is similar to filigree soldering in jewelry.
In Fig. 7 shows a cut. Decorative elements running along the rod to which the handle is attached are soldered with brass.
In the manufacture of some products, soldering is a critical operation. For example, when forging keys to large ax locks, etc. When making a product, a full-size sketch of the product is made. The sketch provides for the connection points of the elements, taking into account the technological feasibility of their manufacture. For products to be soldered with brass, low carbon steel (strip or square) is used. Round material is not suitable for these purposes, since parts made of this material have a small contact plane. The metal is heated, and the elements are made according to the template on the shperaks. The fitting of the elements to each other and to the main rod must be done with great care. For these purposes, metalworking tools are used: a hacksaw, various files.
All parts are assembled and attached to the main product using steel wire (bindra). Since borax is used as a flux when soldering with brass, before placing it in the forge, the product is sprinkled with moistened borax so that the borax sticks to the product. Then the product is placed in the forge. Bookmarking must be done carefully. You cannot push the coals apart with the product itself. Using a poker in the forge, a bed of coal is prepared so that there should be enough of it between the forge hole and the product. Coal is raked from the sides (do not allow lumps of coal to get on the product - this can lead to the elements shifting) and the blast is turned on. The blowing should be weak. This is necessary so that parts of different weights and sizes can heat up evenly and the flux spreads evenly.
When soldering simple products with a small number of connections, you can use a brass rod. When the metal reaches red heat, touch the joints with the end of the brass. The smelting of la-tuni is accompanied by the green color of the forge flame. At this time, under no circumstances should the product be moved. You need to turn off the forge and let the product cool. After soldering, the product is cleaned of flux with metal brushes or bleached in weak solutions of sulfuric acid. Products of great complexity, such as chaff, are soldered onto a metal sheet (or strip), on which they are assembled, tied with bindra, and then sprinkled with borax. Solder (pieces of brass) is placed at the joints and soldering is performed. Instead of pieces of brass, it is convenient to use brass filings, which should be clean and free of impurities. To clean brass filings, simply pass a magnet over them to remove iron inclusions. When making smaller products with a thin section of elements, clay with a small addition of salt is used. The product is assembled and, as in the first two cases, fastened with wire, but not steel, but brass. The wet product is sprinkled with borax, covered with clay and salt and placed in a furnace. In this case, the blast should also be weak in order to evenly dry and heat the clay. When the clay is dry, you can gradually increase the blast until molten brass appears in small cracks in the clay. While the clay was damp, the brass wire acted as a binder. When the clay dried and began to hold the elements together, the wire melted and acted as solder. After the solder has melted, you need to turn off the forge. After some time, the product with clay can be immersed in water so that the clay falls off. After soldering, the product is cleaned of flux and processed with a file. After soldering, the irregularities are processed with a file and oxidized.
The production of various artistic and household items from sheet metal by forging is one of the most ancient industries, which was widely used long before our era among the Scythians, peoples of the Caucasus and the Southern Urals. Sheet metal in blacksmithing is usually...
More details in the article “Technology for the manufacture of sheet metal products” Navrotsky A.G. "Artistic forging"
History of artistic forging
The history of artistic forging begins in several points of the ancient world - in China and Mesopotamia, in Egypt and in Europe, in the area inhabited by Celtic tribes. It was there that forged products were first discovered, which, in addition to utilitarian, also had artistic significance.
History of artistic forging
Ancient craftsmen decorated their products with images and ornaments. Artistic forging was noted in all sectors of the economy - they decorated weapons and household utensils, grilles and fences, parts of mechanisms and objects of worship. After the flourishing of the art of artistic forging in the ancient world, medieval craftsmen largely lost the achievements of the times of the Roman Empire. The patterns have become much simpler, twisted rods have practically disappeared. The Renaissance was also a renaissance for the art of artistic forging. Ancient secrets were rediscovered, new methods and artistic techniques were developed. Italian craftsmen from the principalities in the regions of Milan and Turin were especially famous for creating magnificent armor and weapons.
The beginning of the widespread use of water and steam energy to mechanize the work of forges and hammers led to the beginning of a technical revolution - it became possible to produce forged products in large quantities. However, artistic forging has not lost its special position and continues to be valued today precisely for its uniqueness.
Related Posts
- File knife
- How to cut metal using a grinder
- How to make a garden swing from wood?
- Which galvanized sheet to choose
- Calculation of well volume
- How to make a dollhouse with your own hands
- When health is in your hands: a bathhouse that will be the envy of your neighbors
- Disadvantages of polypropylene pipes in home heating
- Options for making shelves for the garage with your own hands
- Making a stand for a drill with your own hands: instructions, drawings, video
- How to properly weld swing gates onto a fence from a profile pipe with your own hands
- Manufacturing and connecting a sauna stove with a water heat exchanger
- Alabaster: what is it? how to divorce? where to apply?
- House carving in decorating buildings with your own hands
- Choosing dowels for drywall
- How to independently secure a cable to a wall or ceiling using dowel clamps
- DIY bailer drawings and photographs: general principle of bailer operation
- Clinker tiles for facades: a universal facing material
- Do-it-yourself vibrating table: design drawing for the production of paving slabs, step-by-step assembly
- Homemade Russian stove on the street under a canopy
- How to drill stainless steel at home: video, photos, tips
- Types of tools for working with wood, specific application
- What are window tides, what types are there? how to install it yourself?
- How and with what help to fasten stair balusters?
- Ventilation grilles for window sills
Read with this
- File knife
- How to cut metal using a grinder
- How to make a garden swing from wood?
- Which galvanized sheet to choose
- Calculation of well volume
- How to make a dollhouse with your own hands
- When health is in your hands: a bathhouse that will be the envy of your neighbors
- Disadvantages of polypropylene pipes in home heating
- Options for making shelves for the garage with your own hands
- Making a stand for a drill with your own hands: instructions, drawings, video
History of the forge: description of cold forging
Forging is a process of processing metal to give it the desired shape, turning a blank (blank) into a product. For people who are unfamiliar with the peculiarities of metal work, the word “forged” is associated with a forge, where a blank is heated from 800 to 1000 ° C and processed with a hammer to give shape. But in everyday life, items made by cold forging are more often used. Pots, teapots, patterns on gates and doors, metal stands are made by deforming metal under pressure without preheating.
Beautiful forged elements can be created even at home without the presence of special expensive equipment.
Cold forging is an easier, safer and more ergonomic processing method than hot forging. Main advantages:
- equipment for cold metal forging is cheap and ergonomic;
- low labor intensity;
- quick job training, low qualification requirements;
- the ability to create a unique ornament from basic elements.
The downside is the limited working surfaces and materials: rods, sheets and plates.
Cold forging is one of the ancient methods of metal processing.
Hand-made cold forging is historically older than hot forging. The first products were discovered in Egypt and Mesopotamia and date back to the 4th-3rd millennium BC. Initially, ore was used, which was deformable after being hit by a stone. Cold forging was used to make gold jewelry. Soft metal was easy to process with stone hammers. The oldest product was found in Egypt, it was made 8 thousand years ago.
Several centuries later, by observing volcanoes, people learned that high temperatures made it much easier to shape metals. They began to build blast furnaces and the profession of a blacksmith appeared. The Stone Age gave way to the Iron Age, and not only jewelry, but also dishes, weapons, and garden tools entered people’s lives. The principle of operation of the forge is still preserved, but the equipment for cold forging has been modernized.
Using modern equipment it is possible to create products with a large number of forged elements.