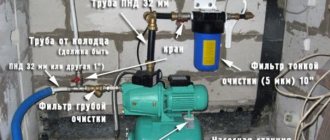
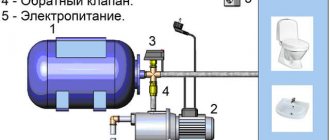
A pumping station with an ejector is the basis of any autonomous water supply system. After all, it is this unit that “generates” the water supply pressure, “transporting” liquid from a deep well to the surface – to the consumer.
Moreover, the effective operation of the station is equally guaranteed by all components of its design, but only one element is responsible for the ability to transport water from a significant depth (more than 10 meters) - the ejector. Without it, the station would pump water only from a 7-meter well.
Ejector for pumping station
Therefore, in this article we will look at the design and manufacturing process of a homemade ejector. This information will help you increase the efficiency of your unit.
Principle of operation
The ejector works on a fairly simple principle. The water is recirculated at the bottom of the pipeline, thereby filling the lack of pressure in the suction pipeline. The ejector pushes the water to the height from which the engine can draw it.
The water coming out of the tapering T-shaped pipe is poured into the mixer at high speed from the suction chamber. In the diffuser, the normal flow of water is mixed with the accelerated one and enters the pipeline.
The ejector solves the problem of low pressure
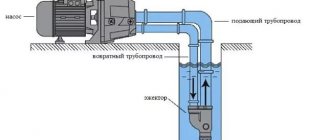
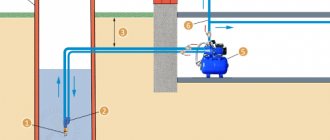
An ejector is installed in the part of the pipeline located between the well and the pump. Part of the water flow that rises returns back to the well, and forms a constant recirculation on the way to the ejector. Additional vacuum occurs in the pipeline, and less pump energy is spent on lifting the liquid.
The operation of the system is adjusted using a valve. Part of the water is supplied to the house, the rest continues to be recirculated in the ejector. The pumping station starts up faster, energy consumption is reduced, and the installation of lower power equipment is required.
The package includes: diffuser, mixer, suction chamber, nozzle.
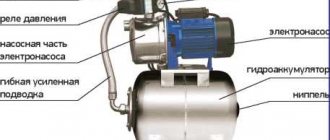
Water supply station with ejector
Device. Operating principle
An ejector is essentially a device that transfers energy from one more mobile medium to another, which is less mobile. In the tapering sections of the unit, a special zone of lower pressure is formed, which thus provokes the suction of additional medium. Thus, it is possible to move and move away from suction points, due to the interaction of the original environment.
Units equipped with an internal format ejector are intended directly for specialized pumping of liquids from relatively shallow wells, the depth of which does not exceed eight meters, as well as various specialized storage tanks or reservoirs.
The immediate distinctive feature of this interaction is precisely the capture of liquid, which is located at a lower level from the pipe. Based on this, preliminary filling of the unit with water will be required. The working wheel will pump liquid, which will redirect it to the ejector, resulting in the formation of an ejection jet.
It will move through a specialized tube and accelerate. Naturally, the pressure will decrease. Thanks to this effect, it will also decrease inside the suction chamber.
One of the varieties of such surface installation units is a pumping station with an ejector. They differ in that the external element is immersed in the water supply source. As a rule, the scope of application of such devices is similar to their analogues. The definite difference lies in the different depths of use and application.
Types of ejectors
Water supply pumping stations for a private house or cottage are manufactured with an ejector built-in or separately mounted into the pipeline.
Stations with a built-in ejector are used for pumping water from shallow wells, storage tanks and other water sources. They are distinguished by their ability to capture water located below the pipe.
The built-in ejector is installed inside the pump. This solution makes it possible to significantly reduce the size of the station. In this case, installation of a filter is not required; the pump with a built-in ejector is not sensitive to sand particles suspended in the water. Such stations are primarily used for irrigation systems and with wells up to ten meters deep; it is not recommended to install them for water supply to residential buildings - they operate very noisily.
Pumping station with built-in ejector
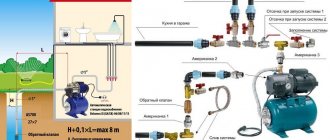
When installing the ejector as a separate unit, an additional water tank is required to remove the load from the engine. The ejector is connected between the well and the engine to the part of the pipeline located in the water. For trouble-free operation of the device, two pipes are laid, as well as a pipe with a coarse filter and a check valve. To prevent airing of the system, pipes are installed strictly in a vertical position.
A station of this type operates almost silently and supplies water from wells up to fifty meters deep (optimal depth is from 15 to 20 meters). Pumping stations require the installation of filters to protect against the ingress of sand, silt, and clay impurities in the water.
The efficiency of stations with a remote ejector is low compared to a built-in one, but this disadvantage is compensated by the ability to supply water from considerable depths. Stations can be located several tens of meters from the source.
Choice of built-in or external
Depending on the installation location, there are remote and built-in ejectors. There is no big difference in the design features of these devices, but the location of the ejector still affects in some way both the installation of the pumping station and its operation.
So, built-in ejectors are usually placed inside the pump housing or in close proximity to it. As a result, the ejector takes up minimal space and does not have to be installed separately; it is enough to carry out the usual installation of the pumping station or the pump itself.
In addition, the ejector located in the housing is reliably protected from contamination. Vacuum and reverse water intake are carried out directly in the pump housing. There is no need to install additional filters to protect the ejector from clogging with sludge particles or sand.
However, it should be remembered that this model demonstrates maximum efficiency at shallow depths, up to 10 meters. Pumps with a built-in ejector are designed for such relatively shallow sources; their advantage is that they provide excellent incoming water pressure.
As a result, these characteristics are sufficient to use water not only for domestic needs, but also for irrigation or other economic operations. Another problem is the increased noise level, since the vibration of the operating pump is added to the sound effect of water passing through the ejector.
If you decide to install a pump with a built-in ejector, you will have to take special care of sound insulation. It is recommended to install pumps or pumping stations with a built-in ejector outside the house, for example, in a separate building or in a well caisson.
The electric motor for a pump with an ejector must be more powerful than for a similar model without an ejector.
An external or external ejector is installed at a certain distance from the pump, and this distance can be quite significant: 20-40 meters, some experts even consider 50 meters acceptable. Thus, a remote ejector can be placed directly in a water source, for example, in a well.
The external ejector does not so much increase the pump’s performance as it is designed to increase the depth of water intake from the source, which can reach 20-45 m
Of course, the noise from the operation of an ejector installed deep underground will no longer disturb the residents of the house. However, this type of device must be connected to the system using a recirculation pipe through which the water will return to the ejector.
The greater the installation depth of the device, the longer the pipe will have to be lowered into the well or well.
It is better to provide for the presence of another pipe in the well at the design stage of the device. Connecting a remote ejector also involves installing a separate storage tank from which water will be drawn for recirculation.
Such a tank allows you to reduce the load on the surface pump, saving some energy. It is worth noting that the operating efficiency of the external ejector is somewhat lower than that of models built into the pump, however, the ability to significantly increase the intake depth makes one come to terms with this drawback.
When using an external ejector there is no need to place it directly near a water source. It can be installed in the basement of a residential building. The distance to the source can vary within 20-40 meters; this will not affect the performance of the pumping equipment.
Self-production of an ejector
The cost of the ejector is quite high, and they are not always on sale. It is not difficult to make an ejector for a pumping station with your own hands.
Let's look at step-by-step instructions for self-manufacturing a conventional ejector, which can facilitate the lifting of water from wells up to 10 m deep, and is used for drawing water from greater depths.
Making an ejector is not a difficult task!
The following materials and tools will be required:
- A half-inch tee with internal thread is the main part;
- A half-inch fitting with a 12 mm or three-quarters 8-10 mm outlet, we will insert it inside the tee. Serves as a conductor of water under high pressure. To extend the fitting, you can use a vinyl chloride tube of the same diameter as the fitting;
- Adapter 20x25 mm with the necessary angles for further fastening to a pipe or three-quarters with an external thread at one end, and at the other end with a thread for a metal-plastic pipe with a diameter of 16 mm;
- Fitting;
- 90 degree corners for metal-plastic pipes:
- ¾ with external thread x ½ with internal thread;
- ¾ with external thread x 26 mm with internal thread for a metal-plastic pipe;
- ½ with external thread x 16 mm with internal thread for a metal-plastic pipe;
- Grinder, plumbing wrenches, adjustable wrench, sandpaper;
- A coupling with a three-quarter diameter (or clamp, screw) for straightening the threads on the fitting;
- A vice, but you can do without them.
If the well depth exceeds 10 m, it will be necessary to install an ejector of a more complex design, used in pumps with a power of more than 1 kW.
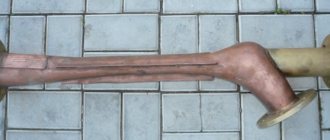
Diagram of elements of a homemade ejector
To manufacture such an ejector you will need the following parts:
- threaded pipe with a diameter of half an inch;
- ten-millimeter nozzle;
- tee E40;
- half-inch and three-quarter locknuts;
- check valve with coarse filter;
- plugs with holes and threads for fittings;
- half inch and three quarters cut;
- 90 degree bend half inch;
- nozzle or compressed copper tube with longitudinal holes and sealed seams.
First of all, it is necessary to grind off the hexagon of the fitting until it is shaped like a cone. The outer diameter of the fitting thread should be 2-3 mm larger than the lower base of the resulting cone. The length of the thread should be four turns. We cut off the excess length.
Then you need to align the threads, which will be disrupted when turning the part. We cut the thread longer so that it fits onto the cone and you can later screw it from any edge into the coupling or tee.
Screw the fitting into the tee until it stops. It should fit 2 mm upward into the tee outlet from the side.
There should be four or more turns left on the internal thread of the tee for attaching the outlet to them. If there are fewer turns left, grind the threads on the fitting until the required parameters are achieved. If the thread is short, you can add it to the required size using a vinyl chloride tube. The fitting should not protrude from the tee by more than 3 mm.
Pumping station with remote ejector
Manufacturing
It is quite possible to produce a fairly simple device-unit independently. This will require some parts, such as a tee of a specialized diameter and a fitting that will be located inside it. The correct length ratio must be observed, which should not be more or less, which will not allow such a device to function normally. For fastening you will need a special adapter equipped with corners, which will allow you to create the desired rotation.
The creation process involves several specific points, which includes the process of preparing the required fitting itself. Part of a special 6-sided sample should be ground, which will allow it to be made into a special cone, having a base smaller than the external thread in diameter. After which the deformed part should be corrected with a specialized thread-cutting tool.
The fitting must be screwed all the way into the tee piece. When connecting, be very careful about the length ratio, which is a fairly important factor. Be sure to seal the connection with any available sealant.
Check the ratio of the parts being manufactured, and then from pre-prepared samples you should organize a specialized adapter, which is designed for installation on the pipe.
A well-assembled station will ensure fairly long and trouble-free operation due to its simple design, but, naturally, you must be extremely precise in manufacturing. If you don’t really want to engage in such production, then you can simply purchase it in specialized stores, where a pumping station is always available for free sale.
Ejector installation
If the device is installed in close proximity to the pump, then a pumping station with a built-in ejector is obtained.
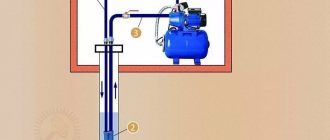
In order for the system to work on the principle of a water supply pumping station for a private house with a remote ejector, you need to place it directly into a well or other source of water supply.
In this case, several pipes will be needed for installation:
- a pipe with an installed coarse filter is connected to the tee on the side and lowered to the very bottom;
- a pipe connected from below through which the emerging high-speed flow of water passes;
- a third pipe that connects to the tee from above and is discharged into the water supply system, through which an accelerated flow of water passes under high pressure.
Ejector connection diagram
We screw an adapter with an external thread onto the tee from above. It should be located above the fitting. The second edge will serve as a connection to the pipe supplying water to the water supply. It will be secured with a fitting.
From below, we screw the corner elbow to the tee (into which the fitting was previously inserted) for further connection with the recirculation pipe. Fastening is done with a crimp nut.
We screw a corner into the tee on the side to connect it to the water supply pipe. We secure the pipe with a collet clamp.
We check the quality of fastenings and waterproofing.
All joints are sealed with tow or sealant.
We must install a check valve at the outlet. It will prevent liquid from flowing out of the suction pipe. If the water leaves, the system will not be able to work.
Choice of built-in or external
Depending on the installation location, there are remote and built-in ejectors. There is no big difference in the design features of these devices, but the location of the ejector still affects in some way both the installation of the pumping station and its operation.
So, built-in ejectors are usually placed inside the pump housing or in close proximity to it. As a result, the ejector takes up minimal space and does not have to be installed separately; it is enough to carry out the usual installation of the pumping station or the pump itself.
In addition, the ejector located in the housing is reliably protected from contamination. Vacuum and reverse water intake are carried out directly in the pump housing. There is no need to install additional filters to protect the ejector from clogging with sludge particles or sand.
However, it should be remembered that this model demonstrates maximum efficiency at shallow depths, up to 10 meters. Pumps with a built-in ejector are designed for such relatively shallow sources; their advantage is that they provide excellent incoming water pressure.
As a result, these characteristics are sufficient to use water not only for domestic needs, but also for irrigation or other economic operations. Another problem is the increased noise level, since the vibration of the operating pump is added to the sound effect of water passing through the ejector.
If you decide to install a pump with a built-in ejector, you will have to take special care of sound insulation. It is recommended to install pumps or pumping stations with a built-in ejector outside the house, for example, in a separate building or in a well caisson.
The electric motor for a pump with an ejector must be more powerful than for a similar model without an ejector.
An external or external ejector is installed at a certain distance from the pump, and this distance can be quite significant: 20-40 meters, some experts even consider 50 meters acceptable. Thus, a remote ejector can be placed directly in a water source, for example, in a well.
Of course, the noise from the operation of an ejector installed deep underground will no longer disturb the residents of the house. However, this type of device must be connected to the system using a recirculation pipe through which the water will return to the ejector.
The greater the installation depth of the device, the longer the pipe will have to be lowered into the well or well.
It is better to provide for the presence of another pipe in the well at the design stage of the device. Connecting a remote ejector also involves installing a separate storage tank from which water will be drawn for recirculation.
Such a tank allows you to reduce the load on the surface pump, saving some energy. It is worth noting that the operating efficiency of the external ejector is somewhat lower than that of models built into the pump, however, the ability to significantly increase the intake depth makes one come to terms with this drawback.
When using an external ejector, there is no need to place the pumping station directly near the water source. It can be installed in the basement of a residential building. The distance to the source can vary within 20-40 meters; this will not affect the performance of the pumping equipment.
How to extend the service life of the ejector?
To extend their service life, pumping stations with an ejector must be operated in compliance with the following rules:
- When installing a station, it is important to correctly calculate the ratio of the power of the device and the depth of the source from which water is extracted.
- Constantly monitor the pressure in the pipeline. To measure the pressure in the system, you can use a pressure gauge used for car tires or purchase a station with a special built-in sensor;
- for sources with great depth, it is necessary to purchase a powerful pump, which must be installed as close as possible to the water intake;
- the use of a built-in ejector is justified only at high-power stations;
- when the source depth is from 15 to 40 meters, it is necessary to use a remote ejector installed inside the well and located in the water.
- When using a surface-type pump, it is important to correctly install the pipes coming from the surface of the ejector - strictly vertically. If the pipes are positioned incorrectly, air will enter the system and air pockets will form, which will negatively affect the operation of the system and reduce its service life.
If all operating rules are followed, ejector pumping stations operate uninterruptedly and provide tap water to the home, irrigation and other equally important household needs.
Features of installation and operation
The operation of the ejector will be effective only on powerful pumps, at least 1 kW with high productivity, and the installation depth of the ejector is no more than 20 m; installation deeper sharply reduces the efficiency of the ejector. To ensure that there are no malfunctions when operating a pump with a remote ejector, the supply pipes to the ejector must be placed strictly vertically. It is imperative that there is a coarse filter in front of the pump, since such pumps are very vulnerable to the effects of abrasive particles that can damage the pump. In front of the pump, on the recirculation pipeline, it is necessary to install a tap so that you can regulate the amount of return water, thereby regulating the suction efficiency of the ejector.
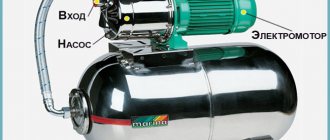
Structure and principle of operation
According to the method of operation, a self-priming pump can be vortex and centrifugal. In both, the key link is the impeller, only it has a different structure and is installed in a housing of different dimensions. This changes the principle of operation.
Centrifugal
Centrifugal self-priming pumps have an interesting working chamber structure - in the form of a snail. The impellers are fixed in the center of the housing. There can be one wheel, then the pump is called a single-stage, or there can be several - a multi-stage design. Single-stage ones always operate at the same power, multi-stage ones can change performance depending on conditions, and accordingly are more economical (consuming less electricity).
Self-priming centrifugal pump device
The main working element in this design is a wheel with blades. The blades are bent in the opposite direction relative to the movement of the wheel. When moving, they seem to push the water, squeezing it towards the walls of the body. This phenomenon is called centrifugal force, and the area between the blades and the wall is called a “diffuser”. So, the impeller moves, creating an area of increased pressure at the periphery and pushing water towards the outlet pipe.
Diagram of water movement in a centrifugal pump
At the same time, a zone of reduced pressure is formed in the center of the impeller. Water is sucked into it from the supply pipeline (suction line). In the picture above, the incoming water is indicated by yellow arrows. Then it is pushed towards the walls by the impeller and rises to the top due to centrifugal force. This process is constant and endless, repeating as long as the shaft rotates.
The principle of operation of centrifugal pumps is associated with their disadvantage: the impeller cannot create centrifugal force from air, so the housing is filled with water before operation. Since pumps often operate in intermittent mode, so that water does not flow out of the housing when stopped, a check valve is installed on the suction pipe. These are the features of the operation of centrifugal self-priming pumps. If the check valve (it must be present) on the supply pipeline is at the bottom, the entire pipeline has to be filled, and this will require more than one liter.
| Name | Power | Pressure | Maximum suction depth | Performance | Housing material | Connection dimensions | Price |
| Caliber NBC-380 | 380 W | 25 m | 9 m | 28 l/min | cast iron | 1 inch | 32$ |
| Metabo P 3300 G | 900 W | 45 m | 8 m | 55 l/min | cast iron (stainless steel drive shaft) | 1 inch | 87$ |
| BISON ZNS-600 | 600 W | 35 m | 8 m | 50 l/min | plastic | 1 inch | 71$ |
| Elitech NS 400V | 400W | 35 m | 8 m | 40 l/min | cast iron | 25 mm | 42$ |
| PATRIOT QB70 | 750 W | 65 m | 8 m | 60 l/min | plastic | 1 inch | 58$ |
| Gilex Jumbo 70/50 Ch 3700 | 1100 W | 50 m | 9 m (built-in ejector) | 70 l/min | cast iron | 1 inch | 122$ |
| BELAMOS XI 13 | 1200 W | 50 m | 8 m | 65 l/min | stainless steel | 1 inch | 125$ |
| BELAMOS XA 06 | 600 W | 33 m | 8 m | 47 l/min | cast iron | 1 inch | 75$ |
Vortex
The vortex self-priming pump is distinguished by the structure of its casing and impeller. The impeller is a disk with short radial baffles located at the edges. It's called an impeller.
Structure of a vortex pump
The housing is made in such a way that it quite tightly covers the “flat” part of the impeller, and there is a significant lateral gap in the area of the partitions. When the impeller rotates, water is carried along by the bridges. Due to the action of the centrifugal force, it is pressed against the walls, but after some distance it again falls into the zone of action of the partitions, receiving an additional portion of energy. Thus, in the gaps it also twists into vortices. This results in a double vortex flow, which is what gave the equipment its name.
Due to the peculiarities of their operation, vortex pumps can create a pressure 3-7 times higher than centrifugal pumps (with the same wheel sizes and rotation speed). They are ideal when low flow and high pressure are required. Another plus is that they can pump a mixture of water and air, sometimes even creating a vacuum if they are filled only with air. This makes it easier to put it into operation - there is no need to fill the chamber with water or a small amount is enough. The disadvantage of vortex pumps is their low efficiency. It cannot be higher than 45-50%.
| Name | Power | Pressure (lifting height) | Performance | Suction depth | Housing material | Price |
| LEO XKSm 60-1 | 370 W | 40 m | 40 l/min | 9 m | cast iron | 24$ |
| LEO XKSm 80-1 | 750 W | 70 m | 60 l/min | 9 m | cast iron | 89$ |
| AKO QB 60 | 370 W | 30 m | 28 l/min | 8 m | cast iron | 47$ |
| AKO QB 70 | 550 W | 45 m | 40 l/min | 8 m | cast iron | 68 $ |
| Pedrollo PKm 60 | 370 W | 40 m | 40 l/min | 8 m | cast iron | 77$ |
| Pedrollo RK 65 | 500 W | 55 m | 50 l/min | 8 m | cast iron | 124$ |
Conclusions and useful video on the topic
This video discusses in detail the issue of the suction depth of a surface pump and options for solving the problem using an ejector:
The principle of operation of the ejector is clearly demonstrated here:
An ejector is a simple but very useful device. This is a convenient and practical way to improve the performance of pumping equipment in a private home. But the installation of the ejector, especially the remote model, must be done correctly; this is the only way to ensure a noticeable increase in water pressure.
We invite everyone interested in the issue of choosing and connecting an ejector to join the discussions and leave comments on the article. The comment form is below.
General information
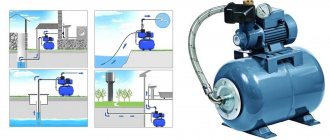
This equipment is used for constructing various sources and pumping water from them:
1. underground sources, located at great depths.
2. in wells.
3.in open water.
4.for storage type containers.
Attention! The pumping equipment consists of two fittings to connect an external ejector, the other to supply liquid to the consumption units.
Ejector pumps are common in everyday life, but many people prefer injection equipment to them. This pump has greater productivity and consumes a minimum of electricity during operation.
The advantages of the device include such qualities as:
1.You can install the pump by yourself.
2.The equipment is safe to use.
3.pumps can pump water from very deep wells, they are superior to submersible pumps.
4. This type of water pumping station is universal and can be used for different purposes.
5. At a high level of productivity, little energy is consumed.
Attention! The injection pump can service wells with a depth of up to twenty-five meters. This equipment is used for constructing underground wells. More powerful equipment is used for wells with greater depth.
Connection
In the case of an internal ejector, if it is included in the design of the pump itself, installation of the system is not much different from the installation of a non-ejector pump. It is enough to simply connect the pipeline from the well to the suction inlet of the pump and arrange a pressure line with associated equipment in the form of a hydraulic accumulator and automation that will control the operation of the system.
For pumps with an internal ejector, in which it is fixed separately, as well as for systems with an external ejector, two additional stages are added:
- An additional pipe is laid for recirculation from the pressure line of the pumping station to the ejector inlet. The main pipe from it is connected to the pump suction.
- A pipe with a check valve and a coarse filter is connected to the ejector suction for drawing water from the well.
If necessary, a valve is installed in the recirculation line for adjustment. This is especially beneficial if the water level in the well is much higher than the pumping station is designed for. You can reduce the pressure into the ejector and thereby increase the pressure in the water supply system. Some models have a built-in valve for such a setting. Its placement and adjustment method are indicated in the equipment instructions.
DIY making
It is quite possible to make ejectors with your own hands. Of course, such work requires a certain responsibility and care, but it is still quite doable.
The vacuum pump is especially popular. The drawings and diagram of such a device are extremely clear.
The ejector, of course, can be easily purchased ready-made. However, if you want to save a lot, it is better to do it yourself.
Making an ejector with your own hands:
- It is necessary to take the tee and attach the fitting to it so that the fitting pipe fits inside the tee and does not protrude from it. If the pipe is too long or short, this can be corrected. In the first case, it can be ground off, and in the second, a polymer tube can be extended.
- Now you need to work with the part that will be connected to the pump. To do this, an adapter is screwed at the top of the tee.
- At the bottom of the tee, in the part where the fitting is located, a bend in the shape of an angle is screwed on. It will connect to the recirculation part of the ejector.
- An angle-type adapter is also screwed into the side of the tee. It is attached to the pipe using a collet clamp.
All connections must be sealed with special tape.
Device Features
The ejector device is very simple; it can even be assembled manually from ordinary materials. The design of the device consists of the following parts:
- Diffuser;
- Offset node;
- Water suction chamber;
- Nozzle narrowed downwards.
The operation of the device is based on Bernoulli's law. When the speed of a certain flow increases, a field with a low level of pressure is created around it. In this regard, a
discharge effect is created. The liquid, passing through the nozzle, narrowed downward according to its design, gradually increases speed. After which the liquid, entering the mixer, creates low pressure in it. Thus, the pressure of the liquid that enters the mixer through the water suction chamber increases significantly.
It is also worth noting that for the ejector to work properly, it must be installed on the pump so that some of the liquid that rises with the help of the pump remains inside the device, or more precisely, the nozzle, creating the necessary pressure constantly
. It is thanks to this operating principle that it is possible to maintain a constant accelerated flow. Using such a device can significantly save energy.
Names and symbols: buyer terminology
Having visited my wife’s parents in the Ulyanovsk region, I was surprised to find that salespeople in plumbing stores do not always understand what I am asking them for, although I did not experience such problems in St. Petersburg. Therefore, I would really like you and I to speak the same language and understand each other, especially in terms of names and designations related to plumbing.
Legend
In plumbing, it is customary to designate parts and threads on them with symbols, which, however, are understandable to anyone who speaks and writes in Russian.
The size or diameter of the thread is most often indicated in inches: ½, ¾, 1½. This also indicates that the threads on the parts are not metric, but conical - pipe.
The letters next to the thread designation indicate which thread it is: internal (B) or external (H).
For example, the short designation: ¾ H x ½ H angle means an adapter angle (or corner adapter), one end of which has a ¾ inch or 20 mm diameter male pipe thread and the other end has a ½ inch or 15 mm diameter internal pipe thread. Let me clarify once again, the letter “B” in this designation does not mean external thread (there is no external thread, there is external thread), but only and only internal thread.
In some previous articles I have already mentioned symbols, abbreviations, and plastic pipes. Let me remind you: MP - metal-plastic, PP - polypropylene, PVC - polyvinyl chloride, HDPE - low-density polyethylene.
So, if in the part designation there is a certain number with the abbreviation of the pipe material in place of the thread size, this means that this “tail” of the part is intended for connection with the specified type of pipe of the same diameter.
For example, an angle ½ N x 16MP is an angle at one end of which there is an external pipe thread with a diameter of ½ inch or 15 mm, while the other has a fitting and thread (in the case of threaded crimping) intended for connection to the angle of a metal-plastic pipe with a diameter of 16 mm.
If there are no markings, this means that this side of the part is intended for a non-threaded connection with, say, a garden hose of the specified diameter and this is most likely an ordinary fitting. For example, adapter ¾ N x 12.
Within the framework of this article, I would not like to go further into the jungle of conventions, because what I have told is already quite enough for our understanding, and we, I hope, will not be distracted by further explanations. However, I will try to express my thoughts clearly, while still explaining the bottlenecks in detail.
DIY making
It is quite possible to make ejectors with your own hands. Of course, such work requires a certain responsibility and care, but it is still quite doable.
The vacuum pump is especially popular. The drawings and diagram of such a device are extremely clear.
The ejector, of course, can be easily purchased ready-made. However, if you want to save a lot, it is better to do it yourself.
Making an ejector with your own hands:
- It is necessary to take the tee and attach the fitting to it so that the fitting pipe fits inside the tee and does not protrude from it. If the pipe is too long or short, this can be corrected. In the first case, it can be ground off, and in the second, a polymer tube can be extended.
- Now you need to work with the part that will be connected to the pump. To do this, an adapter is screwed at the top of the tee.
- At the bottom of the tee, in the part where the fitting is located, a bend in the shape of an angle is screwed on. It will connect to the recirculation part of the ejector.
- An angle-type adapter is also screwed into the side of the tee. It is attached to the pipe using a collet clamp.
All connections must be sealed with special tape.