- What is a siphon and why is it needed?
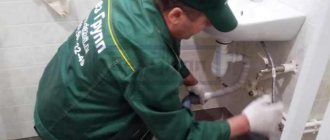
- Dismantling the old system
- Siphon installation
- Leak test
- Siphon selection
- Conclusion
The siphon is a very important element of all plumbing devices. It is used in sinks, showers, toilets, bidets, bathtubs, etc. In some cases, the siphon requires replacement. The cause may be either a breakdown or repair. You can replace an old siphon with a new one without resorting to the services of a plumber, since the design of this device is simple and does not require extensive experience and knowledge.
But it's not that simple. This becomes especially obvious when replacing the siphon in the bathroom. Due to the inaccessibility of the place and the presence of an additional drain, minor difficulties may arise if you do not follow the rules. We offer you step-by-step instructions for replacing a siphon in the bathroom, starting with dismantling and ending with checking the new, newly installed system.
Bath siphon
What is a siphon and why is it needed?
Before considering the process of replacing a siphon, let's understand the device itself and its purpose. A siphon is a transitional link between a plumbing drain and a sewer pipe. This device performs two functions - shutter and filter. Thanks to the presence of a special elbow, the water does not leave the system completely, but partially remains in the pipe. This creates a water plug that prevents foul-smelling odors from passing from the drain into the bathroom. The filtering function is that heavy objects are not able to overcome the elbow and pass further into the pipes, which prevents them from entering the system and clogging it. It also makes it possible to reclaim a precious ring or earring that might fall down the drain. To remove them, you just need to remove the plug from the bottom of the siphon and pick up the loss.
When considering the question of how to replace a siphon in a bathroom, you must also take into account the features of the bath itself. It can be made of different materials and have the most bizarre shapes. In some cases, individual siphon production is even required. But we will not touch on this option, and will consider replacing the simplest siphon on a standard bathtub.
Pollution prevention
To avoid the formation of blockages in the sewer, which can occur as a result of wool, food debris, hair or paper getting into it, the siphon should be cleaned regularly. First of all, you should periodically pour a small amount of a chemical suitable for this type of sinks and pipes into the drain.
Today you can find a variety of products on the household chemicals market. They help prevent the formation of fatty deposits on the walls of the siphon, which over time can fill the entire opening of the pipe. It is also recommended to regularly use a plunger, thanks to which you can cosmetically clean the siphon within a few minutes.
Dismantling the old system
Old siphon
When deciding to install a new siphon, it is necessary to dismantle the old one. Before carrying out this procedure, you need to prepare a small bucket or other container. We need it to collect water, which performs a mixing function in the system. We will also remove the cover from the siphon, and the dirt that has accumulated there may fall on the floor. It is for this reason that you need to place dishes under the structure to be removed.
Dismantling sequence:
- dismantling the old siphon. This is a fairly simple procedure and does not require additional effort. In some cases, the nuts may be over-tightened. So here you can’t do without additional tools;
- Next you need to completely remove the old siphon along with the pipes. Probably, if the system is quite old, they will be “grown in”. This stage must be carried out very carefully so as not to damage the sewer pipes;
- clearing out old places. After completely getting rid of the old system, you need to clean out their locations. There may be pieces of rubber gaskets, rust or any irregularities.
By following these three steps, you'll quickly get rid of your old system and prepare the space for the new one. It is recommended to do everything quickly, since the sewer hole will be open and the toxic stench will pass into the room unhindered.
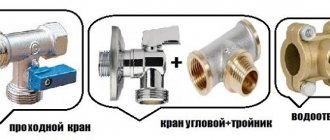
Drain installation
Before fastening, you need to turn off the water and find out the density of the pipelines. If the sewer pipe is made of PVC, a threaded connection with a gasket is used. In the case of a metal pipe or a mismatch in diameter, it will be necessary to buy a rubber adapter. The siphon pipe must extend into it at least 5 cm, and sealant is also used. After assembling and tightening all connections, check the tightness. To do this, fill the bath until water passes through the outlet hole.
Installing a simple overflow system
Before changing the siphon, you need to install the bathtub and secure it firmly. In normal factory-made equipment, the height of the product allows you to insert a drain without difficulty. In a simple overflow system, the siphon can be solid or rotary with a nut fixing the position. There is a hole at the bottom of the bathtub to which the bathtub overflow is connected. There is an internal thread in the lower part, and a grille in the upper part that protects the siphon.
Installation and replacement of a bathroom drain is carried out as follows:
- Start installation from the bottom.
- The set contains 2 rubber gaskets. One needs to be placed on top and, together with the siphon, brought to the bottom of the bathtub into the drain hole.
- Then you should screw the upper part with the gasket to the lower one and secure it with pliers.
- It is necessary to connect the drain pipe to the sewer.
Installation of a semi-automatic siphon
The semi-automatic version is a bathroom drain device, complemented by a cable connecting the holes. When you turn the lid located on the overflow, the lower hole will open or close. In this way, the leading outlet from the bath can be kept under control.
The assembly of the semi-automatic drain must be performed in the following order:
- find out the compliance of outlet and sewer pipes;
- attach the equipment to the drain and overflow holes;
- connect the drainage part to the sewerage system;
- tighten the threaded connections;
- check for tightness and absence of leaks.
Installation of an automatic siphon
The process of installing such a drain in a bathroom and the order of work are somewhat different from installing a conventional system. Execution order:
- The first step is to assemble the main part of the siphon.
- Next comes the connection of the automatic system of this drain. The procedure is almost the same as for a conventional device.
- After installing the siphon on the bath, check the water seal.
Siphon installation
New bath siphon
After the preparation has been completed, you can proceed to the second stage - installing a new drain system. It is also performed in several stages. But first, let's look at what should be included in the package:
- exhaust pipe;
- plastic nuts in the amount of 2 pieces;
- rubber gasket for the inlet pipe;
- stainless steel clamping screw;
- conical rubber cuff;
- drain cover;
- drain gasket;
- flask or curved pipe;
- rubber plug.
Once you are sure that the system is complete, you can begin assembly.
From the very beginning, the siphon itself is assembled. If this is a bottle system, then a rubber gasket is put on the flask and the bottom is screwed on. The tubular system does not require preparation. Next, we take the overflow and connect it to the bathtub. At the same time, we tighten all elements tightly. It is important not to forget about padding. After installing the overflow, you need to install the main drain with a pipe. There shouldn't be any problems here either. Don’t forget to put the gaskets here too, having previously coated them with sealant.
After the overflow pipes and the main drain hole are securely secured, you can install the siphon. When fastening it, it is recommended to use only your hands, since wrenches and other devices can tighten the nuts and create excess tension, which will subsequently lead to cracks and leaks.
By connecting the siphon to the pipes, you can connect it to a pipe from the sewer system. If everything is done correctly and there are no problems, then replacing the siphon yourself should not take more than an hour and a half.
Using a plunger
Any blockage in the sink and siphon should begin to be cleared using the simplest and most accessible methods. It is necessary to move on to more complex methods if the first ones are useless. So, first of all, when a blockage occurs, you should use a plunger. Cleaning the siphon with a plunger is the easiest way. Quite often, it is the plunger that helps solve the jam problem. A plunger is a device consisting of two elements - a rubber nozzle and a wooden handle.
Cleaning with a plunger
The cleaning procedure consists of several steps:
- firstly, it is necessary to close the drain in the sink, which is necessary to prevent water from overflowing;
- secondly, it is recommended to run hot water;
- thirdly, you should firmly press the rubber nozzle of the plunger to the drain hole;
- fourthly, it is necessary to turn off the hot water as soon as its quantity reaches the wooden handle;
- then you need to make several pumping movements up and down, and they should be done sharply and energetically. These actions are designed to create pressure differences with the help of which the jam is destroyed;
- upon completion of the pumping action, the plunger must be torn away from the drain with a sharp movement;
- With the correct algorithm of actions and weak congestion, the water will drain away.
Leak test
After installing the siphon, you must wait a day for everything to “sit” in place and for the sealant to completely harden. Leak tests are carried out as follows: a large amount of water is poured into the bath. The plug should cover the drain. Be sure to check for leaks at the very first stages. If everything is in order, continue drawing water. When the bath is half full, open the plug and watch the siphon. If leaks appear, mark the places so that you can cover everything with sealant in the future. To test the overflow, take a few scoops of water and pour it into the hole. Observe the presence or absence of leaks. This can also be done using a shower, directing it towards the overflow.
The absence of leaks is a sign that the replacement of the siphon in the bathroom was completed successfully. As a rule, if you follow the instructions, everything goes without any problems.
How to assemble a bath drain device
All models that come in boxes come with detailed assembly instructions.
Assemble the siphon in the bathroom in this order:
- The part attached to the plug is secured to the overflow cover.
- A rubber gasket is inserted into the pipe, after which it is brought from below to the outlet hole.
- The seals should be directed toward the nut with the wide part and the neck with the narrow part.
- A protective element equipped with a seal is inserted into the drain hole from the inside of the bath.
- Both gaskets must be secured with a screw. In some models it is possible to find a threaded plug, then it is screwed directly into the pipe.
Siphon selection
Convenient bath siphon
Having considered the installation process, you can begin to give advice on choosing this device. At the same time, you need to understand that you can replace the siphon in the bathroom with your own hands in accordance with the instructions, but no one writes anything about purchasing it. So, when purchasing, pay attention to the material from which the siphon is made. If you purchase a device made of plastic, then its surface should be uniform, smooth, and without flaws. Do not purchase a siphon made of nickel-plated metal or steel. It will quickly rust, and after a few years it will completely fail. If you take a metal one, then only one made of stainless steel or brass.
Also, when purchasing, try to choose the simplest design possible. It will cost less and is much easier to install. But do not purchase siphons at greatly reduced prices. As a rule, they are made of PVC, and it tends to disintegrate when exposed to high temperatures (hot water with various chemicals significantly speeds up this process). It is better to give preference to siphons that are in the middle and high price range. This device will definitely serve you for several decades.
In almost all configurations there is a lack of pipes, and they have to be purchased separately. Experts recommend choosing corrugated pipes, as they are flexible, reliable and inexpensive. Also, when using them, you don’t have to think too much about the exact distances between centers. More problems may arise when using a rigid pipe. Here everything needs to be measured exactly down to the millimeter, which can cause a lot of trouble.
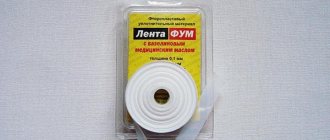
Another recommendation from experts is the correct selection of sealant. It is worth paying attention to the basis. If it is acidic, then it will not suit us. It is better to take a more expensive one, but one that does not contain acid.
Clean with mole or other chemical agent.
If you are not a fan of brute force, buy a drain cleaner from your local hardware store and use it according to the instructions. In general, it is believed that cleaning the sewer with chemicals is ineffective, since this destroys the microorganisms involved in the self-cleaning of the sewer, and therefore, after using chemicals, the sewer will become clogged more often. But for manufacturers of chemical drain cleaners, this has its own benefits.
ease of operation - very easy
time - 60-90 minutes
costs - 1-2$
pollution level is minimal
effectiveness - helps for 1-2 months.
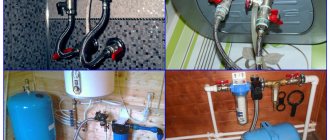
What does the harness consist of?
The piping system includes holes for drainage and overflow. Water is discharged through the drain hole, and the overflow hole allows you to control the water level in the bathroom. The harness is not difficult to install, so it is very often used.
Having understood what a harness is, it’s time to clarify the issue of the types of equipment used. There are different types of harnesses, they differ in material, installation method and design. The material is predominantly metal or plastic. Even though plastic is inexpensive, it can last quite a long time.
It is immune to the action of chemical reagents, therefore it is widespread. But despite its positive qualities, plastic is afraid of mechanical damage, which is a problem during installation.
This is due to the fact that during work it becomes necessary to trim or extend elements of the plastic structure, as well as the appearance of various nicks that need to be cleaned.
Metal straps are no less functional, but they also have their drawbacks. They are quite difficult to install and tend to get dirty. Yes, and they are quite expensive.